background image

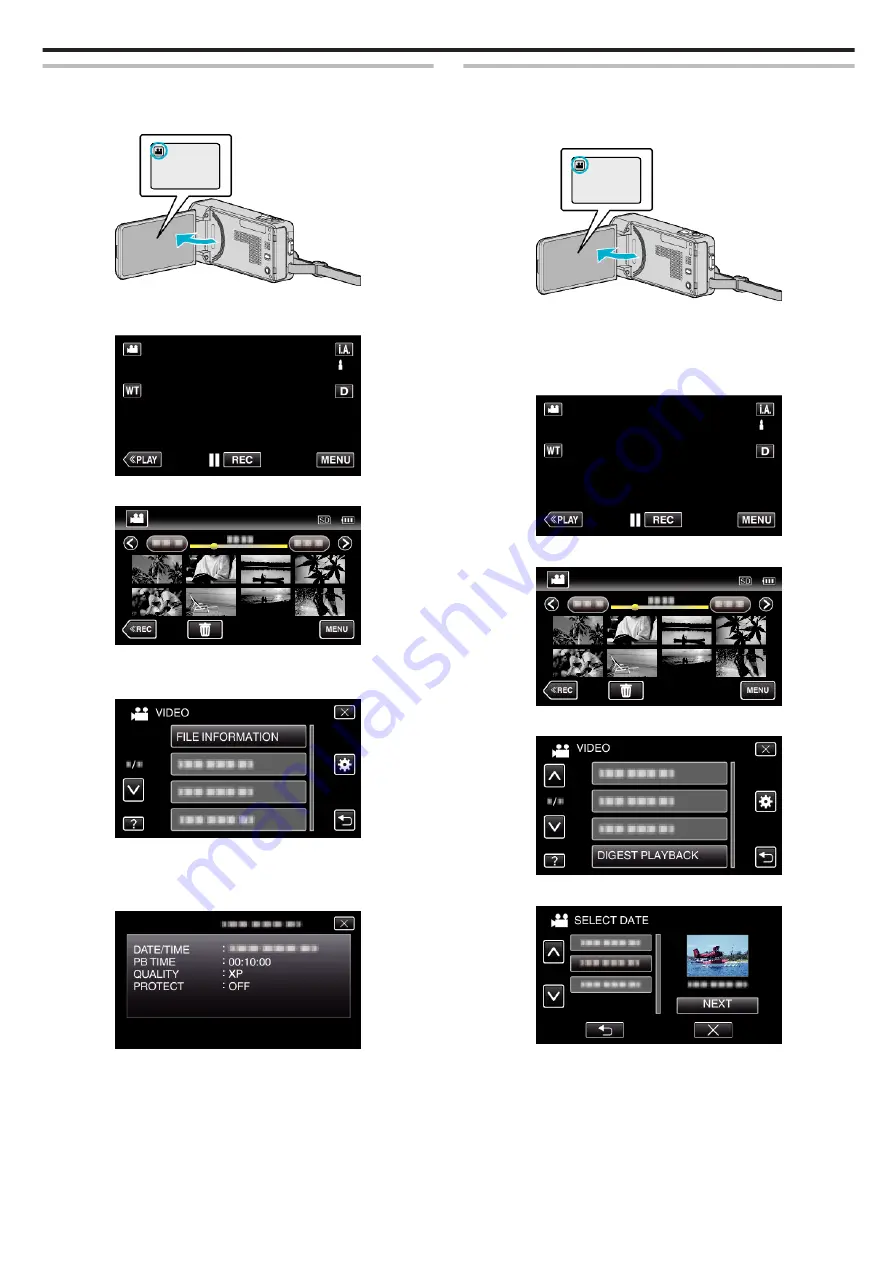
Checking the Recording Date and Other Information

You can see the recording information of the recorded videos.

1

Open the LCD monitor.

.

0

Tap 

A

 or 

B

 to select the video or still image mode.

2

Tap “<<PLAY” to select the playback mode.

.

3

Tap on the file to start playback.

.

4

Tap “MENU”.

5

Tap “FILE INFORMATION”.

.

0

Tap 

3

 or 

2

 to move upward or downward for more selection.

0

Tap 

L

 to exit the menu.

0

Tap 

J

 to return to the previous screen.

You can display the recording date and duration of the selected file.

.

Checking the Content of Videos Quickly (Digest Playback)

You can play back a digest of the recorded videos (Digest Playback).

This is useful for checking the content of the videos quickly.

1

Open the LCD monitor.

.

0

Check if the recording mode is 

A

.

0

If the mode is 

B

 still image, tap 

B

 on the recording screen to display

the mode switching screen.

Tap 

A

 to switch the mode to video.

2

Tap “<<PLAY” to select the playback mode.

.

3

Tap “MENU”.

.

4

Tap “DIGEST PLAYBACK”.

.

5

Tap to select a date for Digest Playback.

.

0

After selecting a date, tap “NEXT”.

0

When “ALL” is tapped, Digest Playback will be performed for all the

dates.

0

Tap 

3

 or 

2

 to move upward or downward for more selection.

0

Tap 

L

 to exit the menu.

0

Tap 

J

 to return to the previous screen.

6

Select the Digest Playback time

Playback

117

Summary of Contents for GZ-VX715

Page 1: ...CAMCORDER LYT2463 034A Detailed User Guide GZ VX715 ...

Page 2: ...lock Setting 69 Resetting the Clock 70 Changing the Display Language 71 Holding this Unit 71 Tripod Mounting 71 Using this Unit Overseas 72 Charging the Battery Pack Overseas 72 Setting the Clock to Local Time when Traveling 72 Setting Daylight Saving Time 73 Optional Accessories 73 Recording Taking Videos in Auto Mode 74 Zooming 76 Capturing Still Images During Video Recording 76 Taking Still Ima...

Page 3: ...ting the Shortcut Menu 163 Operating the Main Menu 164 Operating the Common Menu 164 Recording Menu Video 165 INFO 167 SCENE SELECT 168 FOCUS 168 BRIGHTNESS ADJUST 168 SHUTTER SPEED 168 APERTURE PRIORITY 168 WHITE BALANCE 168 BACKLIGHT COMP 168 TELE MACRO 168 TOUCH PRIORITY AE AF 168 LIGHT 168 GAIN UP 169 WIND CUT 169 ANIMATION EFFECT 169 DECORATE FACE EFFECT 169 STAMP 169 HANDWRITING EFFECT 170 H...

Page 4: ... Image Recording 199 Video Playback 199 Still Image Playback 200 Troubleshooting When the unit is not working properly 200 Battery Pack 201 Recording 201 Card 202 Playback 202 Editing Copying 203 Computer 203 Screen Image 204 Other Problems 204 Error Message 205 Maintenance Specifications 4 ...

Page 5: ...o achieve stable images 0 Set to the wide angle as much as possible as the image will be prone to camera shake 0 Be considerate Do not inconvenience the people around you Squatting and Shooting at Eye Level Staying low is a common position to take when shooting small children By recording from the eye level of the child you can capture all his cute expressions clearly o Getting Ready A Kneel down ...

Page 6: ...s as everyone helps to prepare the feast of the night You can film the mother who is cooking the children who are helping and of course the process of making a cake Recording the Christmas Party After all preparations it is finally the Christmas party itself Not only should you record the candle blowing scene but also the smiles of the family while being surrounded by good food or even the father ...

Page 7: ... as to capture the scene well when the bride and groom enter again You can also make use the time while the bride and groom are changing to record comments of well wishes from the guests Finding the Right Angle to Capture Both Bride and Groom o Composing the picture with the guests in front and the bride and groom at the back The main characters of a wedding are of course the bride and groom Recor...

Page 8: ...lar you have to think about what to bring in accordance to the local conditions Here are some suggestions for your consideration o Camcorder Think about how many hours of shooting you will usually perform in a day Be sure to prepare enough recording medium especially for long overseas trips If you are recording in SD cards get ready the sufficient number of cards including some for backup o Batter...

Page 9: ... are taking may be useful for future reference Using Pan at the Places of Interest Tourists spots with beautiful scenery or historical sites are places that you would certainly want to record To capture the magnificence of a scene which cannot be fitted into a single frame try the panning technique Refer to Shooting Tips found in the Beginner s Guide on this website on how to use panning effective...

Page 10: ...aving of hands nor laughter are not only dull when you view them later but also put the capability of the audio recording function of the camcorder to a waste When recording induce more reactions by enthusiastically waving your hands or shouting out Is it fun and the like Capturing the Best Moment in a Video as a Still Image Shots with the eyes closed are often taken by accident To reduce such mis...

Page 11: ...rmed while monitoring Image Monitoring via an Access Point at Home OUTSIDE MONITORING A p 17 0 You can check the image on the camera via internet connection with a smartphone or computer while you are outside Recording of videos and still images may be performed while monitoring Image Monitoring via the Internet OUTSIDE MONITORING A p 19 Notification Mail 0 A still image is automatically captured ...

Page 12: ...ission or illegal access may arise if security settings are not configured Before you connect to the network in a wireless LAN environment read through the instruction manual for the wireless LAN device in use and configure the security settings accordingly Failure to do so may increase the risk of personal information being intercepted such as user names passwords and the content of your mails or...

Page 13: ...sage 0 When not monitoring from a smartphone or computer the focus of the camera is fixed 0 Recording stops when the smartphone or computer is disconnected 0 Even when monitoring from a smartphone or computer the focus of the camera will be fixed if not operated for more than 3 hours Focus works again when the camera is operated 0 You may have difficulty establishing a connection via direct monito...

Page 14: ...n on this camera 0 The shortcut menu appears 2 Tap DIRECT MONITORING S in the shortcut menu Operation on this camera 3 Check the SSID and PASS shown on the camera s screen then add the smartphone or computer to connect Operation on the smartphone or computer 0 For details on connecting your smartphone or computer to a Wi Fi network please refer to the instruction manual of the phone terminal in us...

Page 15: ... operating from the camera tap J on the camera to enable operations from the smartphone application 0 Using smartphone applications Using Smartphone Applications A p 43 0 To end operations tap STOP o Computer Windows 7 1 Tap CAMERA NETWORK INFO after setting direct monitoring Operation on this camera 0 The URL for the computer to connect to appears 2 Check the URL Adds network information screen 0...

Page 16: ...d Connect Select the appropriate method of connection according to the device o Wi Fi Protected Setup WPS 1 Tap MENU Operation on this camera 0 The shortcut menu appears 2 Tap DIRECT MONITORING S in the shortcut menu Operation on this camera 3 Tap WPS Operation on this camera 4 Activate WPS on the smartphone within 2 minutes Operation on the smartphone 0 To activate WPS refer to the instruction ma...

Page 17: ...orgetting to turn off the power this unit will turn off automatically after 10 days of continuous usage 0 When not monitoring from a smartphone or computer the focus of the camera is fixed 0 Recording stops when the smartphone or computer is disconnected 0 Even when monitoring from a smartphone or computer the focus of the camera will be fixed if not operated for more than 3 hours Focus works agai...

Page 18: ...martphone 5 The smartphone starts to search for the camera automatically 0 If the camera cannot be found enter the URL LAN displayed in CAMERA NETWORK INFO directly To display CAMERA NETWORK INFO refer to Computer Windows 7 6 Log in with your username and password if authentication cannot be achieved 0 The username is everio and the default password is 0000 Changing the Settings A p 27 0 Using sma...

Page 19: ...itoring from a smartphone or computer the focus of the camera is fixed 0 Recording stops when the smartphone or computer is disconnected 0 Even when monitoring from a smartphone or computer the focus of the camera will be fixed if not operated for more than 3 hours Focus works again when the camera is operated 0 To monitor images while you are out make sure in advance that you can establish a conn...

Page 20: ...mic DNS DDNS Account A p 29 0 Setting the account on this camera Setting Dynamic DNS DDNS on this Camera OUT MONITORING SET A p 29 Caution 0 Even if registration is done correctly to the camera access may be temporarily unavailable such as when the dynamic DNS server is down To check whether the dynamic DNS server is working properly access and check the DDNS server with a computer etc Operation M...

Page 21: ... username and password if authentication cannot be achieved 0 The username is everio and the default password is 0000 Changing the Settings A p 27 0 Using smartphone applications Using Smartphone Applications A p 43 0 To end operations tap STOP Using Wi Fi 21 ...

Page 22: ... appears Does not appear if DDNS is not set or set incorrectly 5 Check the URL WAN 0 After checking the URL tap QUIT to return to the previous screen 6 Start Internet Explorer web browser on the computer and enter the URL 7 Log in with your username and password 0 The username is everio and the default password is 0000 Changing the Settings A p 27 0 Using the Wi Fi function from the web browser Us...

Page 23: ...e internet provider in advance to find out if there are any restrictions on the number or size of e mails that can be sent 0 When setting another person as the recipient be sure to obtain his her consent in advance 0 If you reply to the received e mail by using this unit the receiver can not check your replied e mail by using this unit Check the e mails sent by this unit from computer etc 0 JVC wi...

Page 24: ...nding on the internet provider that provides the e mail service the e mails may be marked as spam or the usage limited may be exceeded Be sure to check the terms of the internet provider in advance to find out if there are any restrictions on the number or size of e mails that can be sent 0 When setting another person as the recipient be sure to obtain his her consent in advance 0 Depending on the...

Page 25: ...e shortcut menu Operation on this camera 3 Tap VIDEO MAIL ATTN Operation on this camera 4 Tap the e mail address to be set as recipient Operation on this camera 0 An icon a appears beside the recipient s e mail address 0 After setting tap SET 0 Settings will not be saved until SET is tapped Operation Method 1 Tap MENU Operation on this camera 0 The shortcut menu appears 2 Tap VIDEO MAIL R in the s...

Page 26: ...ccess Points to Connect ACCESS POINTS A p 35 0 Obtaining a dynamic DNS account Obtaining a Dynamic DNS DDNS Account A p 29 0 Setting the account on this camera Setting Dynamic DNS DDNS on this Camera OUT MONITORING SET A p 29 0 Setting the sender s e mail address Setting the Sender s E mail Address A p 30 0 Registering the recipient s e mail address Registering the Recipient s E mail Address A p 3...

Page 27: ...a ON Records videos on this camera Setting Self Recording on this Camera DETECT MAIL SETTING A p 35 NETWORK SETTINGS Configures various settings related to the network 0 ACCESS POINTS Adds deletes or perform LAN settings of access points wireless LAN router Registering the Access Points to Connect ACCESS POINTS A p 35 0 Wi Fi DIRECT SETTING Configures various settings related to direct monitoring ...

Page 28: ...with every tap 0 Tap DELETE to delete a character 0 Tap CANCEL to exit 0 Tap A a 1 to select character input type from upper case letter lower case letter and number 0 Tap E or F to move one space to the left or right 0 After setting tap SET Setting the UPnP of this Camera OUT MONITORING SET Sets the UPnP of the camera 1 Tap MENU Operation on this camera 0 The shortcut menu appears 2 Tap Wi Fi Q i...

Page 29: ...ITORING is executed while dynamic DNS settings are enabled the camera will access the dynamic DNS server 5 Tap CAMERA NETWORK INFO to check that the URL WAN is displayed Registration complete Image Monitoring via the Internet OUTSIDE MONITORING A p 19 Caution 0 Registration will be canceled if you do not access the dynamic DNS server from the camera within 3 days Perform the registration again in ...

Page 30: ...ing tap SET Memo 0 Only the JVC dynamic DNS service can be set on this camera Setting the Sender s E mail Address Sets the address to be used for sending e mails on the camera Memo 0 By using Gmail as the sender s mail address some of the settings can be omitted Use of Gmail is recommended for users who have a Gmail account 1 Tap MENU Operation on this camera 0 The shortcut menu appears 2 Tap Wi F...

Page 31: ...ot necessary in the case of Gmail 0 Change the SMTP port number if necessary and tap SET 0 This is automatically configured if the sender s mail address is Gmail 0 Tap on the on screen keyboard to enter characters The character changes with every tap 0 Tap DELETE to delete a character 0 Tap CANCEL to exit 0 Tap E or F to move one space to the left or right 0 After setting tap SET 8 Tap AUTHENTICAT...

Page 32: ...l address SMTP SERVER Enter the SMTP server address SMTP PORT Set this when the SMTP port number needs to be changed AUTHENTICATE METHOD Set this when the authentication method needs to be changed USERNAME Enter the username PASSWORD Enter the password Caution 0 It is necessary to obtain an e mail account in advance 0 Some web based mail addresses do not support this feature 0 These are Gmail sett...

Page 33: ...e from upper case letter lower case letter and number 0 Tap E or F to move one space to the left or right 0 After setting tap SET Memo 0 Up to 8 e mail addresses can be registered as recipients Caution 0 When setting another person as the recipient be sure to obtain his her consent in advance 0 Check whether notifications indicating errors have been sent to the sender s e mail address Make use of ...

Page 34: ...DETECTION to start recording upon detection of subject s movements 0 Select FACE DETECTION to start recording upon detection of human faces Setting the Detection Interval of this Camera DETECT MAIL SETTING Sets the time period to enable detection again after the previous one 1 Tap MENU Operation on this camera 0 The shortcut menu appears 2 Tap Wi Fi Q in the shortcut menu Operation on this camera ...

Page 35: ... of registration Authentication method and wireless LAN setup are performed automatically in WPS allowing easy registration of connection settings between devices Search and Register A search is conducted to locate access points Select and register an access point from the list of search results Manual Registration Enter the name and authentication method manually to register an access point WPS P...

Page 36: ...er to the instruction manual of the device in use 8 After registration is complete tap OK on the camera s screen Operation on this camera o Search and Register 1 Tap MENU Operation on this camera 0 The shortcut menu appears 2 Tap Wi Fi Q in the shortcut menu Operation on this camera 3 Tap NETWORK SETTINGS Operation on this camera 4 Tap ACCESS POINTS Operation on this camera 5 Tap ADD Operation on ...

Page 37: ...er input type from upper case letter lower case letter and number 0 Tap E or F to move one space to the left or right 0 The password is not required if the wireless LAN router is not security protected 9 After registration is complete tap OK on the camera s screen Operation on this camera o Manual Registration 1 Tap MENU Operation on this camera 0 The shortcut menu appears 2 Tap Wi Fi Q in the sho...

Page 38: ...d is not set to NONE enter a password and tap SET Operation on this camera 0 Tap on the on screen keyboard to enter characters The character changes with every tap 0 Tap DELETE to delete a character 0 Tap CANCEL to exit 0 Tap A a 1 to select character input type from upper case letter lower case letter and number 0 Tap E or F to move one space to the left or right 10 After registration is complete...

Page 39: ... camera 0 The shortcut menu appears 2 Tap Wi Fi Q in the shortcut menu Operation on this camera 3 Tap NETWORK SETTINGS Operation on this camera 4 Tap ACCESS POINTS Operation on this camera 5 Tap UPDATE Operation on this camera 0 Tap 3 or 2 to select an item to edit or delete 0 To change connection to another access point tap on the desired access point 6 Perform the LAN settings when DHCP is set t...

Page 40: ...a 4 Tap Wi Fi DIRECT SETTING Operation on this camera 5 Tap PASSWORD Operation on this camera 6 Enter the password Operation on this camera 0 Tap on the on screen keyboard to enter characters The character changes with every tap 0 Tap DELETE to delete a character 0 Tap CANCEL to exit 0 Tap A a 1 to select character input type from upper case letter lower case letter and number 0 Tap E or F to move...

Page 41: ...ces that support Wi Fi Direct fails set to OFF 0 After setting tap SET Memo 0 When set to OFF connection to devices that do not support Wi Fi Direct will be disabled Checking the MAC Address of this Camera Displays the MAC address of the camera 1 Tap MENU Operation on this camera 0 The shortcut menu appears 2 Tap Wi Fi Q in the shortcut menu Operation on this camera 3 Tap NETWORK SETTINGS Operatio...

Page 42: ...rs The character changes with every tap 0 Tap DELETE to delete a character 0 Tap CANCEL to exit 0 Tap E or F to move one space to the left or right 0 After setting tap SET Initializing the Network Settings Returns the network settings to their default values 1 Tap MENU Operation on this camera 0 The shortcut menu appears 2 Tap Wi Fi Q in the shortcut menu Operation on this camera 3 Tap NETWORK SET...

Page 43: ...p file of Android Market o iPhone iPad iPod touch 1 Tap App Store on the home screen 2 Search for the Everio Sync application 3 Tap on the Everio Sync application 0 The detailed information of the application is displayed 4 Tap FREE F INSTALL 0 Enter your password on the password entry screen 0 Downloading starts 0 The downloaded application will be added to the home screen automatically Deleting ...

Page 44: ...ton Transferring Videos You can transfer recorded videos to your smartphone 0 The video to be forwarded is converted to the following format System MP4 Video H 264 MPEG 4 AVC baseline profile codec 640 x 360 resolution 30p frame rate 1 Mbps bit rate Audio Advanced Audio Coding AAC system 48 kHz sampling rate 16 bit 2 channels 1 Start Everio Sync on the smartphone 2 Tap U 3 Tap on the thumbnail to ...

Page 45: ...nly when MANUAL is tapped in step 4 0 A progress status is displayed on the smartphone during preparation for the transfer and while transferring 0 To cancel the transfer tap CANCEL 6 After transferring is complete tap OK 0 To play back the video tap CHECK Android only 0 To upload share the video tap SHARE Android only Tap the desired service to start the uploading process To make use of a service...

Page 46: ...hile transferring 0 To cancel the transfer tap CANCEL 5 After transferring is complete tap OK 0 To play back the still image tap CHECK Android only 0 To upload share the still image tap SHARE Android only Tap the desired service to start the uploading process To make use of a service it is necessary to perform registration beforehand Using Wi Fi 46 ...

Page 47: ...deo to transfer URL Enter the URL when using outside monitoring HTTP AUTHORIZATION Enter the required username and password when using outside monitoring Theusernameis everio fixed andthedefault password is 0000 can be changed from camera CHANGE BACKGROUND COLOR Changes the background HELP Display how to use the Everio sync LICENSE AGREEMENT Displays the license agreement of the smartphone applica...

Page 48: ...ngth of video to transfer URL Enter the URL when using outside monitoring USERNAME Enter the required username when using outside monitoring The username is everio fixed PASSWORD Enter the required password when using outside monitoring By default the password is 0000 can be changed from camera HELP Display how to use the Everio sync Memo 0 When connecting to outside monitoring you will be prompte...

Page 49: ...PEG Sound of the camera cannot be played back from the browser Recording and zoom operations can be performed from the browser 0 The monitor s image stops automatically after monitoring is performed continuously for 12 hours in Full HD or SD To resume press the reload button 0 To use Full HD or SD it is necessary to install Media Player 12 in advance 0 When the video recording quality is set to SS...

Page 50: ...bnail o Still Image Index Screen 0 To download a still image click on the thumbnail o DETECT MAIL SETTING Screen Notification mail settings such as detection method and recipient s e mail address can be changed even when the camera is out of reach Using Wi Fi 50 ...

Page 51: ... SSID and PASS shown on the camera s screen then register them on the computer to connect Operation on this camera 0 When the computer is connected to the camera a URL appears on the camera 6 Check the URL shown on the camera s screen then enter it on the Internet Explorer web browser Operation on this camera 0 To exit tap QUIT You can change the Wi Fi function of the camera from a web browser Add...

Page 52: ...ck REG 0 Password entry is not required if the access point is security protected 5 Click OK To add ACCESS POINTS manually 1 Click Access Point 2 Click ADD 3 Enter SSID TYPE OF SECURITY and PASSWORD and click REG 0 To configure the LAN settings manually set DHCP to OFF and enter the necessary information manually 4 Click OK To change or delete an ACCESS POINTS registration 1 Click Access Point 2 C...

Page 53: ...hanges are made click REG 0 Click DELETE on this screen to delete the registered access point 3 Click OK Wi Fi DIRECT SETTING To change Wi Fi DIRECT SETTING 1 Click Wi Fi Direct Setting 2 After changes are made click REG 0 Click DELETE on this screen to delete the registered access point 3 Click OK Mail Setting To change SENDER S EMAIL settings 1 Click Mail Setting 2 Click SENDER S EMAIL Using Wi ...

Page 54: ... and click REG 0 Select the checkbox for VIDEO MAIL and DETECT MAIL to set the address as the recipient 5 Click OK To change or delete a RECIPIENT S EMAIL 1 Click Mail Setting 2 Click RECIPIENT S EMAIL 3 Click on the mail address you want to change 4 After changes are made click REG 0 Click DELETE on this screen to delete the registered address 5 Click OK Using Wi Fi 54 ...

Page 55: ...ngs 1 Click Mail Setting 2 Click VIDEO MAIL ATTN 3 After changes are made click REG 4 Click OK To change DETECT MAIL SETTING 1 Click Mail Setting 2 Click DETECT MAIL SETTING 3 After changes are made click REG 4 Click OK Using Wi Fi 55 ...

Page 56: ...rength The unit turns off automatically 0 To prevent the situation of forgetting to turn off the power this unit will turn off automatically after 10 days of continuous usage Unable to set focus 0 When not monitoring from a smartphone or computer the focus of the camera is fixed 0 Even when monitoring from a smartphone or computer the focus of the camera will be fixed if not operated for more than...

Page 57: ...work when outside monitoring is in use 0 Operations cannot be performed from this unit when outside monitoring is in use Operate from the Android iPhone application or web browser Recording stops when the Android iPhone application or web browser is closed 0 When the Android iPhone application or web browser is closed during recording the camera gets disconnected and recording stops Video or audio...

Page 58: ...ll HD change to SD or Motion JPEG and try again Wi Fi Specifications A p 59 0 For web browser If lagging is severe reload the screen regularly 0 For smartphone Try to change the place and time to locate an environment with good signal strength The unit turns off automatically 0 To prevent the situation of forgetting to turn off the power this unit will turn off automatically after 10 days of conti...

Page 59: ... continuous usage Unable to set focus For DETECT MAIL SETTING 0 While on standby for notification mails the focus is fixed Perform the camera settings first then enable notification mails Focus may not be set correctly if the notification mails start before camera settings are made In this case disable notification mails temporarily then enable it again Vide Still Image Transmission Trouble Action...

Page 60: ...higher SD approx 3 Mbps or higher If the network speed is too low video images may appear jumpy or audio sound may be interrupted or delayed Monitor Screen 0 MotionJPEG Video JPEG 640x360 max 5 fps Audio nil 0 Full HD Video MPEG 2 TS compliant H 264 High Profile 1920x1080 60i Audio AAC 48kHz 16 bits 2ch 0 SD Video MPEG 2 TS compliant H 264 Main Profile 720x480 60i Audio AAC 48kHz 16 bits 2ch Video...

Page 61: ... to play back recorded images on the TV in a better quality AV Cable 0 Connects this unit to a TV to play back recorded images on the TV USB Cable Type A Mini Type B 0 Connects this unit to a computer Core Filter for USB Cable Core Filter for AC Adapter 0 The core filter reduces interference when this unit is connected to other devices Stylus Pen 0 Use this for operations on the touch screen Basic...

Page 62: ... Usable SD Card A p 66 0 When using the AC adapter overseas please prepare a commercially available converter plug for the country or region of visit Charging the Battery Pack Overseas A p 72 Getting Started 62 ...

Page 63: ...lter Attach a core filter to the power cord of the AC adapter and the end of the USB cable that is connected to this unit The core filter reduces interference when this unit is connected to other devices Getting Started 63 ...

Page 64: ...pplied one open the SD card cover before attaching Warning 0 Make sure not to insert the battery pack in the wrong direction It may cause damage to the unit and battery pack Caution Be sure to use JVC battery packs 0 If you use any other battery packs besides JVC battery packs safety and performance cannot be guaranteed 0 Charging time Approx 3 h 30 m using supplied battery pack The charging time ...

Page 65: ...the battery pack perform the above steps in reverse order 0 If it is difficult to detach the battery pack open the SD card cover on the base Approximate Battery Charging Time Using AC Adapter Battery Pack Charging Time BN VG212U Supplied 3 h 30 m BN VG226U 5 h 30 m 0 When the battery life is reached the recording time becomes shorter even if the battery pack is fully charged Replace the battery pa...

Page 66: ...ards from the following manufacturers 0 Panasonic 0 TOSHIBA 0 SanDisk SD Card 0 This unit supports 256 MB to 2 GB SD cards 0 Use a Class 4 or higher compatible SD card 2 GB for video recording SDHC Card 0 Use a Class 4 or higher compatible SDHC card 4 GB to 32 GB for video recording SDXC Card 0 Use a Class 4 or higher compatible SDXC card Max 64 GB for video recording Memo 0 Using SD cards includi...

Page 67: ...o 10 6 5 or later Using the Touch Screen Icon operation buttons thumbnails and menu items are displayed on the touch screen according to the mode in use 0 There are two ways to operate the touch screen namely tap and drag The following are some examples A Tap the displayed button icon or thumbnail file on the touch screen to make selection B Drag the thumbnails on the touch screen to search for th...

Page 68: ...igent Auto and H Manual Playback Screen Video 1 Video Still Image Mode Button 0 Switches between video and still image modes 2 Recording Mode Button 0 Switches to the recording mode 3 Index Screen Button Operation Buttons for Video Playback A p 115 4 Delete Button Deleting the Currently Displayed File A p 125 5 Menu Button Operating the Menu A p 163 6 Operation Buttons Operation Buttons for Video ...

Page 69: ...s not set yet Set the clock before recording 1 Open the LCD monitor 0 The unit turns on 0 When the LCD monitor is closed the unit turns off 2 Tap YES when SET DATE TIME is displayed 3 Set the date and time 0 When the year month day hour or minute item is tapped 3 and 2 will be displayed 0 Tap 3 or 2 to adjust the year month day hour and minute 4 After setting the date and time tap SET 5 Select the...

Page 70: ...ard or downward for more selection 4 Tap CLOCK SETTING 5 Set the date and time 0 When the year month day hour or minute item is tapped 3 and 2 will be displayed 0 Tap 3 or 2 to adjust the year month day hour and minute 6 After setting the date and time tap SET 7 Select the region where you live and tap SAVE 0 The city name and time difference are displayed 0 Tap 0 or 1 to select the city name Gett...

Page 71: ...excessive use the image stabilizer Reducing Camera Shake A p 105 Tripod Mounting This unit can be mounted on a tripod or monopod This is useful for preventing camera shake and recording from the same position 0 To prevent this unit from falling off check the tripod mounting screw holes and positioning holes on the unit carefully before mounting and turn the screws until they are fastened firmly Ca...

Page 72: ...ck you need a converter plug that matches the shape of the outlet Setting the Clock to Local Time when Traveling Change the date and time display to the local time by selecting your travel destination in AREA SETTING of CLOCK ADJUST Restore the region settings after you returned from the trip 1 Tap MENU 0 When entering from the recording mode tap MENU again as the shortcut menu appears 2 Tap Q 3 T...

Page 73: ...DMI Mini Cable 0 VX HD310 0 VX HD315 0 Allows viewing in high picture quality when connected to a TV 0 Transmits video audio and control signals between devices Memo 0 The optional accessories above may not be supported in some regions 0 For more information refer to the catalog 0 For details on the provided accessories refer to Verifying the Accessories Verifying the Accessories A p 61 Approximat...

Page 74: ...ntelligent Auto mode Caution 0 While this unit may be used with the LCD monitor reversed and closed the temperature rises more easily Do not use this unit with the LCD monitor reversed and closed for long periods of time 0 The power may turn off to protect the circuit if the temperature of this unit rises too much Indications During Video Recording Display Icon Description A Video Quality Displays...

Page 75: ... the shooting conditions and automatically adjusted in Intelligent Auto mode 0 Some functions may not work properly depending on the shooting conditions Operation Buttons for Video Recording Operation Button Description A Video Still Image Mode Switches between video and still image modes B T W Zoom Allows the same functions as the zoom lever to be performed Camera shake that often occurs when usi...

Page 76: ... data to a DVD or other recording media for storage JVC will not be responsible for any lost data Memo 0 Checktheremainingrecordingtimeinthemediabeforeyoustartshooting If there is not enough space move copy the data to a computer or disc 0 When there are many files in the media it may take time for them to be displayed on the playback screen Wait for a while as the access lamp appears blinking whi...

Page 77: ...lligent Auto mode 0 Image stabilization only starts when the button is pressed halfway Indications During Still Image Recording Display Icon Description A Image Size Displays the icon of the image size 0 The size of still images can be changed IMAGE SIZE A p 179 B TOUCH PRIORITY AE AF Displays the setting of TOUCH PRIORITY AE AF By default it is set to FACE TRACKING Capturing Subjects Clearly TOUC...

Page 78: ...e overall image J Prevents colors from fading even when recording in a bright environment G Records while focusing on a near object H Reproduces the green color of trees vividly F Reproduces the colors of sunset naturally C Adjusts settings so that the subject does not appear too dark due to backlight K Allowspeopletobecapturednaturallywithminimal noise in the overall image L Records while focusin...

Page 79: ...cally to conserve power when it is not operated for 5 minutes only when using the battery pack AUTO POWER OFF A p 189 0 When TOUCH PRIORITY AE AF is set to FACE TRACKING this unit detects faces and automatically adjusts its brightness and focus to record the faces more clearly Capturing Subjects Clearly TOUCH PRIORITY AE AF A p 96 Caution 0 Do not expose the lens to direct sunlight 0 Do not use th...

Page 80: ...s brightness and shutter speed by using the manual mode Manual recording can be set for both video and still image modes 1 Open the LCD monitor 0 To switch the mode between video and still image tap A or B on the recording screen to display the mode switching screen Tap A or B to switch the mode to video or still image respectively 2 Select the Manual recording mode 0 If the mode is P Intelligent ...

Page 81: ...s while blurring the surroundings Setting Aperture A p 86 WHITE BALANCE 0 Overall color on the screen can be adjusted 0 Use this when the color on the screen appears differently from the actual color Setting White Balance A p 87 BACKLIGHT COMP 0 Corrects the image when the subject appears dark due to backlight 0 Use this when shooting against the light Setting Backlight Compensation A p 88 TELE MA...

Page 82: ...rk To prevent camera shake use a tripod t NIGHT Captures night scenes naturally w PORTRAIT Blurs the background to bring out the people in the picture u SPORTS Captures fast moving subjects clearly in every single frame v SNOW Prevents the subject from appearing too dark when recording snow scenes on a sunny day g SPOTLIGHT Prevents the human subject from appearing too bright under light Memo 0 Al...

Page 83: ... FOCUS 0 Tap 3 or 2 to move upward or downward for more selection 0 Tap L to exit the menu 0 Tap J to return to the previous screen 5 Tap MANUAL 6 Adjust the focus 0 Tap E to focus on a distant subject If E appears blinking focus cannot be set any further 0 Tap p to focus on a near subject If p appears blinking focus cannot be set any nearer 7 Tap SET to confirm 0 When focus is confirmed the focus...

Page 84: ...NU in the shortcut menu 4 Tap BRIGHTNESS ADJUST 0 Tap 3 or 2 to move upward or downward for more selection 0 Tap L to exit the menu 0 Tap J to return to the previous screen 5 Tap MANUAL 6 Adjust the brightness value 0 Compensation range during video recording 2 0 to 2 0 0 Compensation range during still image recording 2 0 to 2 0 0 Tap 3 to increase the brightness 0 Tap 2 to decrease the brightnes...

Page 85: ...wnward for more selection 0 Tap L to exit the menu 0 Tap J to return to the previous screen 5 Tap MANUAL 6 Adjust the shutter speed 0 Shutter speed can be set from 1 2 to 1 4000 0 Tap 3 to increase the shutter speed 0 Tap 2 to decrease the shutter speed 7 Tap SET to confirm Memo 0 Settings can be adjusted separately for videos and still images 0 While fast moving subjects can be captured clearly b...

Page 86: ... menu 0 Tap J to return to the previous screen 5 Tap MANUAL 6 Adjust the aperture 0 Aperture can be set from F1 2 to F5 6 0 If you want the background to be in focus as well larger aperture value tap 3 0 If you want the background to appear blurry smaller aperture value tap 2 7 Tap SET to confirm Memo 0 Settings can be adjusted separately for videos and still images 0 When zoomed to the telephoto ...

Page 87: ...s MWB Use this when the problem of unnatural colors is not resolved FINE Set this when shooting outdoors on a sunny day CLOUD Set this when shooting on a cloudy day or inside a shade HALOGEN Set this when shooting under illumination such as a video light MARINE BLUE Set this when shooting the sea at deep water area water appears blue using an optional marine case MARINE GREEN Set this when shootin...

Page 88: ...n the recording screen to display the mode switching screen Tap H to switch the recording mode to Manual 2 Tap MENU 0 The shortcut menu appears 3 Tap MENU in the shortcut menu 4 Tap BACKLIGHT COMP 0 Tap 3 or 2 to move upward or downward for more selection 0 Tap L to exit the menu 0 Tap J to return to the previous screen 5 Tap ON 0 After setting the backlight icon l appears Recording 88 ...

Page 89: ...ut menu 4 Tap TELE MACRO 0 Tap 3 or 2 to move upward or downward for more selection 0 Tap L to exit the menu 0 Tap J to return to the previous screen 5 Tap ON 0 After setting the tele macro icon o appears Setting Details OFF Enables close up shots up to 1 m at the telephoto T end Enables close up shots up to 5 cm at the wide angle W end ON Enables close up shots up to 50 cm at the telephoto T end ...

Page 90: ...nal Handwriting A p 95 Recording with Animation Effects You can add animation effects to video recordings The animation effects appear when smiles are detected or when the screen is touched 1 Open the LCD monitor 0 Check if the recording mode is A 0 If the mode is B still image tap B on the recording screen to display the mode switching screen Tap A to switch the recording mode 2 Tap MENU 0 The sh...

Page 91: ...Press again to stop 0 To perform operations other than recording tap L to cancel the ANIMATION EFFECT first Recording 91 ...

Page 92: ...etected Animation effect appears when smiles are detected Animation effect appears when smiles are detected Animation effect appears when the screen is touched Animation effect appears when the screen is touched Animation effect appears when the screen is touched Animation effect appears when the screen is touched Recording 92 ...

Page 93: ... menu appears 3 Tap MENU Go to step 4 Alternatively tap DECORATE FACE EFFECT 5 in the shortcut menu Go to step 5 4 Tap DECORATE FACE EFFECT 0 Tap 3 or 2 to move upward or downward for more selection 0 Tap L to exit the menu 0 Tap J to return to the previous screen 5 Select a desired effect and tap SET 0 Tap 0 or 1 to select an item 0 Press the START STOP button the camera to start recording Press ...

Page 94: ...enu 0 Tap J to return to the previous screen 5 Select a stamp 0 Tap K to start selecting a stamp Tap on the desired stamp to use The number indicates the size of the stamp 0 Tap I to scroll through the list of stamps 0 Tap M to change the size of stamps 0 Tap J to return to the previous screen 6 Tap on the screen to add a stamp 0 Tap Jto delete the stamp 0 Tap ON OFF to display hide the stamps 0 P...

Page 95: ...ckness The number indicates the thickness of the line 0 You can select a color from white gray black etc 0 Select P to tap and erase part of the line 0 Tap H to select the line color Tap I to scroll through the list of colors 0 Tap L to select the line thickness 0 Tap J to return to the previous screen 6 Start writing and drawing with the provided stylus 0 Tap J to delete all the lines 0 Tap ON OF...

Page 96: ...main subject and the blue frame appears even without specific selection PET TRACKING N appears on the screen Recording is performed while tracking and automatically adjusting the tapped pet subject with appropriate focus and brightness In addition a blue frame appears around the tapped pet subject COLOR TRACKING f appears on the screen Recording is performed while tracking and automatically adjust...

Page 97: ...gistered faces they cannot be tracked back again To track back the subject tap on it again For registered faces focus and brightness will be adjusted automatically even without specific selection In addition registered faces may be tracked back again even if they are lost Therefore it is recommended to register the faces that are often being recorded by this camera beforehand Registering Human Fac...

Page 98: ...hen DECORATE FACE EFFECT is set when STAMP is set when HANDWRITING EFFECT is set when AUTO REC is set when DATE TIME RECORDING is set Recording while Displaying a Magnified View of a Selected Face FACE SUB WINDOW A p 99 Recording with Animation Effects A p 90 Caution 0 If TOUCH PRIORITY AE AF is not set to FACE TRACKING SMILE SHOT will not work 0 If appropriate results cannot be obtained record wi...

Page 99: ... of a Selected Face FACE SUB WINDOW A p 99 Recording with Effects A p 90 Caution 0 When PET SHOT is set to ON TOUCH PRIORITY AE AF will be set to PET TRACKING automatically Even when PET SHOT is set to ON if TOUCH PRIORITY AE AF is not set to PET TRACKING PET SHOT will be set to OFF automatically 0 If appropriate results cannot be obtained record with PET SHOT set to OFF Recording while Displaying...

Page 100: ...splayed in the sub window ANIMATION EFFECT is not available 0 The sub window display will also be recorded Memo 0 When a face is magnified and displayed in the sub window only the name of the person will be displayed When a face is not registered the name of the person will not be displayed 0 The face sub window mode is canceled when the power is turned off 0 Frames do not appear around the faces ...

Page 101: ...ion is complete 0 To cancel the registration tap STOP When CANCEL FACE RECOGNITION appears tap YES to return to the normal recording mode 7 Tap RECORD and record the face from the front 0 A face is captured to be used on the face registration index screen 0 Other than tapping RECORD you can also record by pressing the SNAPSHOT button fully 0 A sound can be heard when recording is complete 0 To can...

Page 102: ...1 The priority level of the registered subject becomes number 1 while the priority levels of the original number 1 and the ones below drop by one place In this example the original number 1 becomes number 2 and the orignal number 2 becomes number 3 0 When REG is tapped the registration complete screen appears 0 Tap OK to complete the registration 0 You can edit registered face information in EDIT ...

Page 103: ...PLAY 5 Tap the desired setting Setting Details OFF Displays only the frames when faces are detected ON Displays the frames names and smile levels when faces are detected 0 Frame Appears around detected faces Name Appears for faces that are registered Smile level Appears in value 0 100 for detected smiles Memo 0 The camera is able to detect up to 16 faces Smile levels will be displayed for up to 3 ...

Page 104: ... Information A p 101 0 If you select CHANGE NAME proceed to step 12 in Registering Human Face Personal Authentication Information A p 102 0 If you select CHANGE ORDER OF PRIORITY proceed to step 13 in Registering Human Face Personal Authentication Information A p 102 Registering Human Face Personal Authentication Information A p 101 Canceling Deleting Registered Face Information You can cancel del...

Page 105: ... image stabilizer changes with every press Setting Details b OFF Deactivates image stabilizer a ON Reduces camera shake under normal shooting conditions r ON AIS Reduces camera shake more effectively when shooting bright scenes on the wide angle end Only on the wide angle end approx 5x Memo 0 It is recommended to set the image stabilizer to OFF when shooting a subject of little movement with the u...

Page 106: ...de to video 2 Tap MENU 0 The shortcut menu appears 3 Tap MENU in the shortcut menu 4 Tap HIGH SPEED RECORDING 5 Tap ON 0 When ON is tapped 250 frames can be recorded in 1 second 0 To cancel high speed recording tap OFF 6 Start recording 0 Press the START STOP button again to stop recording 0 Settings of high speed recording are not saved when the power is turned off Memo 0 Images may appear graini...

Page 107: ...ding interval 0 Tap 3 or 2 to move upward or downward for more selection 0 Tap L to exit the menu 0 Tap J to return to the previous screen 6 Start recording 0 A frame is taken at intervals of the selected period 0 When the recording interval is set to 20SEC INTERVAL or higher this unit switches to the power saving mode between recordings At the next point to record the power saving mode will be tu...

Page 108: ...will not be saved Memo 0 Settings of time lapse recording are reset when the power is turned off To start time lapse recording again it is necessary to make the selection once more 0 Recording stops automatically 99 hours after it is started 0 Make use of a tripod and AC adapter for time lapse recordings with long intervals It is also recommended to fix the focus and white balance manually Tripod ...

Page 109: ...REC set it to OFF Caution 0 Digital zoom image stabilizer self timer and continuous shooting are not available after AUTO REC is set 0 AUTO REC cannot be used together with TIME LAPSE RECORDING When both are set priority is given to TIME LAPSE RECORDING 0 IMAGE SIZE cannot be changed after AUTO REC is selected Set it before selecting AUTO REC 0 The auto power off and power saving modes are not ava...

Page 110: ... the recording mode is B 0 If the mode is A video tap A on the recording screen to display the mode switching screen Tap B to switch the mode to still image 2 Tap MENU 0 The shortcut menu appears 3 Tap MENU in the shortcut menu 4 Tap SELF TIMER 0 Tap 3 or 2 to move upward or downward for more selection 0 Tap L to exit the menu 0 Tap J to return to the previous screen 5 Tap 2SEC or 10SEC 6 Set the ...

Page 111: ...ER 0 Tap 3 or 2 to move upward or downward for more selection 0 Tap L to exit the menu 0 Tap J to return to the previous screen 5 Tap FACE DETECTION 6 After making sure that everyone is facing the camera press the SNAPSHOT button 0 Frames appear around the faces of the subjects 0 Pressing the SNAPSHOT button again starts the 10 second self timer 7 The photographer enters the frame 0 The shutter is...

Page 112: ...itching screen Tap A to switch the mode to video 2 Tap MENU 0 The shortcut menu appears 3 Tap MENU in the shortcut menu 4 Tap DATE TIME RECORDING 0 Tap 3 or 2 to move upward or downward for more selection 0 Tap L to exit the menu 0 Tap J to return to the previous screen 0 When the item is tapped the precaution for date time recording appears 5 Press the START STOP button to start recording 0 Press...

Page 113: ...ing screen Tap A to switch the mode to video 2 Tap MENU 0 The shortcut menu appears 3 Tap MENU in the shortcut menu 4 Tap INFO 0 Tap 3 or 2 to move upward or downward for more selection 0 Tap L to exit the menu 0 Tap J to return to the previous screen 5 Display the remaining recording time 0 Tap J to return to the recording mode 0 To exit the display tap L Memo 0 You can change to the desired vide...

Page 114: ...440 1080 4 3 4200 8500 9999 9999 640 480 4 3 9999 9999 9999 9999 0 Still images that are captured during video recording or video playback are saved at a size of 1920 x 1080 Approximate Recording Time Using Battery Battery Pack Actual Recording Time Continuous Recording Time BN VG212U Supplied 45 m 1 h 20 m BN VG226U 1 h 40 m 3 h 0 The above are values when LIGHT is set to OFF and MONITOR BRIGHTNE...

Page 115: ... Description A Video Still Image Mode Switches between video and still image modes B Date Moves to the previous next date C Displays the previous index screen thumbnail display 0 You can perform the same operation with the zoom lever D Displays the next index screen thumbnail display 0 You can perform the same operation with the zoom lever E Thumbnail File Tap on thumbnail Starts playback Drag to ...

Page 116: ...s the menu screen Memo 0 Tap or drag on the operation area of the touch screen 0 Operations buttons on the touch screen disappear if the unit is not operated for about 5 seconds Tap on the screen to display the operation buttons again 0 You can search for a specific file by the recording date Searching for a Specific Video Still Image by Date A p 121 0 The recording date and time can be displayed ...

Page 117: ...y Digest Playback You can play back a digest of the recorded videos Digest Playback This is useful for checking the content of the videos quickly 1 Open the LCD monitor 0 Check if the recording mode is A 0 If the mode is B still image tap B on the recording screen to display the mode switching screen Tap A to switch the mode to video 2 Tap PLAY to select the playback mode 3 Tap MENU 4 Tap DIGEST P...

Page 118: ...fective Management Information The management information of a video may be damaged if recording is not performed correctly such as turning off the power in the middle of recording You can perform the following operations to play back the videos with defective management information 1 Open the LCD monitor 0 Check if the recording mode is A 0 If the mode is B still image tap B on the recording scre...

Page 119: ... Description A Video Still Image Mode Switches between video and still image modes B Date Moves to the previous next date C Displays the previous index screen thumbnail display 0 You can perform the same operation with the zoom lever D Displays the next index screen thumbnail display 0 You can perform the same operation with the zoom lever E File Still Image Tap on thumbnail Starts playback Drag t...

Page 120: ...rations buttons on the touch screen disappear if the unit is not operated for about 5 seconds Tap on the screen to display the operation buttons again 0 You can rotate a still image 90 to the right or left during playback Rotation applies to the on screen display only 0 You can search for a specific file by the recording date This is useful when searching from a large number of files Searching for...

Page 121: ... DISPLAY DATE TIME and DISPLAY ON TV to ON DISPLAY DATE TIME A p 181 DISPLAY ON TV A p 191 Unnatural Displays on TV Trouble Action Images do not appear on the TV properly 0 Disconnect the cable and connect again 0 Turn off and on this unit again 0 Images may not appear properly when the remaining battery power is low Use an AC adapter Images are projected vertically on the TV 0 Set VIDEO OUTPUT in...

Page 122: ...nit will not work when connected to these devices 0 This unit is not guaranteed to operate with all HDMI CEC enabled devices 0 Depending on the specifications of each HDMI CEC enabled device some functions may not work with this unit For details refer to the instruction manual of your TV 0 Unintended operations may occur with some connected devices In these cases set HDMI CONTROL to OFF HDMI CONTR...

Page 123: ...act your TV s manufacturer Playing Back Playlists Plays back the playlists that you have created 1 Open the LCD monitor 0 Check if the recording mode is A 0 If the mode is B still image tap B on the recording screen to display the mode switching screen Tap A to switch the mode to video 2 Tap PLAY to select the playback mode 3 Tap MENU 4 Tap PLAYBACK PLAYLIST 5 Tap to select a playlist 0 Playback o...

Page 124: ...layer DVD recorder P Blu ray player Blu ray recorder P P DVD writer with playback function CU VD50 P Only for AVCHD compatible devices Caution 0 DVDs that are created in AVCHD format cannot be played back on DVD players with standard quality You may not be able to remove the disc from the player Digest Playback on a Blu ray or DVD Player You can play back a few seconds from each scene of the recor...

Page 125: ...rrently displayed file Caution 0 Deleted files cannot be restored 1 Tap A 0 While the video mode is shown in the image the same operations apply for the still image mode 2 Tap YES 0 Tap h g to select the previous or next file 0 When no file remains the screen returns to the index screen Deleting Selected Files Deletes the selected files Caution 0 Deleted files cannot be restored 1 Open the LCD mon...

Page 126: ...K 0 To cancel the deletion tap QUIT Protecting Files Prevent important videos still images from being deleted accidently by protecting them Protecting Releasing Protection of the Currently Displayed File A p 126 Protecting Releasing Protection of Selected Files A p 127 Caution 0 When the recording media is formatted even the protected files will be deleted Protecting Releasing Protection of the Cu...

Page 127: ...cted To release protection of a file tap on the file such that P is removed 0 Tap SEL ALL to select all files 0 Tap REL ALL to release all selections 0 Grouped Files Still images that are recorded continuously within 2 seconds or with the continuous shooting mode will be grouped together Only the first recorded file is shown and the group is displayed with a green frame When this is tapped an inde...

Page 128: ...oint to capture by tapping forward slow motion k and reverse slow motion l 5 Press the SNAPSHOT button Memo 0 Still images are captured with a size of 1920 1080 Capturing a Required Part in the Video TRIMMING Select the required part of a video and save it as a new video file 0 The original video remains in its existing location 1 Open the LCD monitor 0 Check if the recording mode is A 0 If the mo...

Page 129: ...ivision point may deviate slightly from the selected scene Capturing Videos for Uploading to YouTube Capture and copy a part of a recorded video maximum 15 minutes for uploading to YouTube and save it as a YouTube video When capturing videos for YouTube the duration cannot be longer than 15 minutes 1 Open the LCD monitor 0 Check if the recording mode is A 0 If the mode is B still image tap B on th...

Page 130: ...p STOP on the upload settings screen Memo 0 The division point may deviate slightly from the selected scene Uploading Videos to YouTube You can upload your videos to YouTube using the provided software Everio MediaBrowser 4 Install the software on your PC and connect this unit to the PC 0 For details on how to use the software refer to the help file Installing the Provided Software A p 155 Trouble...

Page 131: ...recording screen to display the mode switching screen Tap A to switch the mode to video 2 Tap PLAY to select the playback mode 3 Tap MENU 4 Tap EDIT PLAYLIST 5 Tap NEW LIST 6 Tap CREATE FROM SCENE 7 Tap on the video to add to playlist 0 d appears on the selected video Tap J to deselect 0 Tap on the selected video again to check the video After checking tap J 0 Tap 0 1 or move the zoom lever to dis...

Page 132: ...ng to recording date 1 Open the LCD monitor 0 Check if the recording mode is A 0 If the mode is B still image tap B on the recording screen to display the mode switching screen Tap A to switch the mode to video 2 Tap PLAY to select the playback mode 3 Tap MENU 4 Tap EDIT PLAYLIST 5 Tap NEW LIST 6 Tap CREATE BY DATE Editing 132 ...

Page 133: ...rs when the inserted video is selected Tap J to deselect 0 Tap on the selected video again to check all the videos of the same date After checking tap J 0 To delete of a video in the playlist lower row tap the video then tap CANCEL 9 After arranging tap SAVE 10 Tap YES Memo 0 Tap L on each screen to exit the menu Editing Playlists You can change the content of a created playlist However the playli...

Page 134: ...ed Tap J to deselect 0 Tap on the selected video again to check the video After checking tap J 0 To delete of a video in the playlist lower row tap the video then tap CANCEL 0 X indicates the size of the video 9 After arranging tap SAVE 10 Tap YES Memo 0 Tap L on each screen to exit the menu Deleting Playlists Delete the playlists that you have created 1 Open the LCD monitor 0 Check if the recordi...

Page 135: ... to a TV Creating Discs with a DVD Writer o Preparing a DVD Writer Preparing a DVD Writer CU VD3 A p 136 Preparing a DVD Writer CU VD50 A p 136 o Copying to Discs Copying All Files A p 137 Copying Files by Date A p 138 Copying Selected Playlists A p 139 Copying Selected Files A p 140 o Other Operations Playing Back with a DVD Writer A p 141 Memo 0 Discs created on this unit are saved in the AVCHD ...

Page 136: ...ocks or malfunctions may occur Preparing a DVD Writer CU VD50 1 Remove the AC adapter and battery pack from this unit 2 Connect the USB cable and the AC adapter A Connect the USB cable provided with the DVD writer B Connect the AC adapter of the DVD writer 0 Turn on the DVD writer C Connect the AC adapter to this unit 0 Refer also to the instruction manual of the DVD writer 3 Open the LCD monitor ...

Page 137: ...lect video or still image mode 2 Tap CREATE FROM ALL video or SAVE ALL still image 0 While the video mode is shown in the image the same operations apply for the still image mode 0 Tap A to switch between the video and still image modes 3 Tap the desired method 0 While the video mode is shown in the image the same operations apply for the still image mode 0 ALL SCENES video ALL IMAGES still image ...

Page 138: ...D Writer A p 141 Playing Back with a DVD Writer A p 141 Copying Files by Date Videos or still images are sorted and copied according to the date on which they were recorded 1 Select video or still image mode 2 Tap SELECT AND CREATE video or SELECT AND SAVE still image 0 While the video mode is shown in the image the same operations apply for the still image mode 0 Tap A to switch between the video...

Page 139: ... check the created disc refer to Playing Back with a DVD Writer A p 141 Playing Back with a DVD Writer A p 141 Copying Selected Playlists Arrange and copy the created playlists in the order you like 1 Select video mode 2 Tap SELECT AND CREATE 3 Tap CREATE BY PLAYLIST 4 Tap on the playlist to copy to disc 0 d appears on the selected playlist upper row Tap J to deselect 0 Tap on the selected playlis...

Page 140: ...ying Back with a DVD Writer A p 141 0 To create a playlist Creating Playlists from the Recorded Videos A p 131 Copying Selected Files Select and copy the desired videos or still images individually 1 Select video or still image mode 2 Tap SELECT AND CREATE video or SELECT AND SAVE still image 0 While the video mode is shown in the image the same operations apply for the still image mode 0 Tap A to...

Page 141: ...tically Files cannot be added to the DVD R DVD RW later Memo 0 To check the created disc refer to Playing Back with a DVD Writer A p 141 Playing Back with a DVD Writer A p 141 Playing Back with a DVD Writer You can play back the DVDs created on this unit 1 Prepare a DVD writer 0 Insert the DVD to play back into the DVD writer Preparing a DVD Writer CU VD3 A p 136 Preparing a DVD Writer CU VD50 A p...

Page 142: ...to the BD writer external Blu ray drive use a USB cable with Mini A Male B Male connectors The USB cable provided with this unit cannot be used 0 To use the USB cable provided with the BD writer external Blu ray drive purchase the following USB conversion cable Part number QAM0852 001 Mini A Male A Female Consult your nearest service center 1 Remove the AC adapter and battery pack from this unit 2...

Page 143: ...ES still image All videos or still images in this unit are copied 0 UNSAVED SCENES video UNSAVED IMAGES still image Videos or still images that have never been copied are automatically selected and copied 5 Tap EXECUTE 0 The number of discs required to copy the files is displayed Prepare the discs accordingly 6 Tap AUTO or BY DATE A mode only 0 When AUTO is selected videos with similar recording d...

Page 144: ...eating Playlists from the Recorded Videos A p 131 Copying Selected Playlists A p 145 6 Tap EXECUTE 0 The number of discs required to copy the files is displayed Prepare the discs accordingly 7 Tap AUTO or BY DATE A mode only 0 When AUTO is selected videos with similar recording dates are displayed in groups 0 When BY DATE is selected videos are displayed according to recording dates 8 Tap EXECUTE ...

Page 145: ...eat steps 5 6 and arrange the playlists 0 To change the position of a playlist lower row select the insertion point with E F after step 5 and tap ADD 0 d appears when the inserted playlist is selected Tap J to deselect 0 Tap on the selected playlist again to check the content of the playlist After checking tap J 0 To delete of a video in the playlist lower row tap the video then tap CANCEL 7 After...

Page 146: ...eo or still image mode 2 Tap SELECT AND CREATE video or SELECT AND SAVE still image 0 While the video mode is shown in the image the same operations apply for the still image mode 0 Tap A to switch between the video and still image modes 3 Tap Blu ray DISC or DVD AVCHD 0 The media changes to the tapped item Select the appropriate setting according to the disc 0 Selecting Blu ray DISC enables you t...

Page 147: ... 2 seconds or more to turn off this unit and disconnect the USB cable Caution 0 Do not turn off the power or remove the USB cable until copying is complete 0 Files that are not on the index screen during playback cannot be copied Special files cannot be copied either 0 All DVDs will be finalized automatically While files cannot be added to the DVD R DVD RW later files can still be added to the BD ...

Page 148: ...played on the screen 0 To play back the recorded image on TV connect this unit via the HDMI mini cable or the AV cord while this unit is connected to the BD writer external Blu ray drives Connecting via the HDMI Mini Connector A p 122 Connecting via the AV Connector A p 123 Creating a Disc Using a Connected Blu ray Recorder You can create discs using a Blu ray recorder by connecting it to this uni...

Page 149: ...and time during dubbing set DISPLAY DATE TIME in the video playback menu to ON Set DISPLAY ON TV in the common menu to ON Dubbing Files to a VHS Tape by Connecting to a VCR You can dub videos in standard quality by connecting to a VCR 0 Refer also to the instruction manuals of the TV and VCR 1 Remove the AC adapter and battery pack from this unit 2 Connect to a VCR DVD recorder A Connect using the...

Page 150: ...f the unit or the USB external hard disk drive Disconnecting the USB cable 0 Do not format the USB external hard disk drive using the PC If you did format again using this unit All the data in the USB external hard disk drive will be erased 0 Avoid the following operations using the PC Deleting files or folders in the USB external hard disk drive Moving files or folders in the USB external hard di...

Page 151: ...ave never been copied are automatically selected and copied 4 Check that there is sufficient remaining space on the hard disk drive and tap YES 0 Backup starts when YES is tapped 5 Tap OK when COMPLETED is displayed 6 Press and hold the M button for 2 seconds or more to turn off this unit and disconnect the USB cable Caution 0 Do not turn off the power or remove the USB cable until copying is comp...

Page 152: ...deo Playback A p 115 Operation Buttons for Video Playback A p 115 0 To exit stop playback and turn off the camcorder by pressing the M button for about 2 seconds Then disconnect the USB cable Memo 0 Sound or video may be interrupted during playback Deleting Folders in the USB External Hard Disk Drive Files that are copied to the external hard disk drive can be deleted Caution 0 Deleted files canno...

Page 153: ...rive can be deleted Caution 0 All data on the external hard disk drive will be deleted when it is formatted Copy all files on the external hard disk drive to a computer before formatting 1 Select video or still image mode 2 Tap FORMAT 3 Tap YES 0 After formatting tap OK Copying 153 ...

Page 154: ...oftware refer to MediaBrowser Help in the Help menu of Everio MediaBrowser 4 Verifying System Requirements Guideline Right click on Computer or My Computer in the Start menu and select Properties to check the following items Windows Vista Windows 7 0 Refer to the operating instructions found in the animation on the Detailed User Guide Windows XP 0 Refer to the operating instructions found in the a...

Page 155: ...ormat and perform simple editing using the provided software Windows Vista Windows 7 0 Refer to the operating instructions found in the animation on the Detailed User Guide Windows XP 0 Refer to the operating instructions found in the animation on the Detailed User Guide Copying 155 ...

Page 156: ...rations are to be performed on the computer 6 Select the source of the image file 7 Start backup 0 Backup starts 8 After backup is complete click OK Memo 0 Before making backup load the SD card in which the videos and still images are stored on this unit 0 If you encounter any problems with the provided software Everio MediaBrowser 4 please consult the Pixela User Support Center Telephone USA and ...

Page 157: ...monitor Organizing Files After backing up your files organize them by adding labels such as Family Trip or Athletic Meet This is useful not only for creating discs but for viewing the files too 1 Double click on the Everio MediaBrowser 4 icon 0 The provided software starts up 2 Display the month of the files to organize 3 Create a user list 0 A new user list is added to the user list library Copyi...

Page 158: ... Spanish 800 1532 4865 toll free Other Countries in Europe English German French Spanish 44 1489 564 764 Asia Philippines English 63 2 438 0090 China Chinese 10800 163 0014 toll free Homepage http www pixela co jp oem jvc mediabrowser e Recording Videos to Discs Copy the files that are arranged using the user list to discs 1 Insert a new disc into the PC s recordable DVD drive 2 Select the desired...

Page 159: ...pain English German French Spanish 800 1532 4865 toll free Other Countries in Europe English German French Spanish 44 1489 564 764 Asia Philippines English 63 2 438 0090 China Chinese 10800 163 0014 toll free Homepage http www pixela co jp oem jvc mediabrowser e Backing Up Files Without Using Provided Software Copy the files to a computer using the following method 1 Remove the AC adapter and batt...

Page 160: ...ng this Unit from Computer 1 Click Safely Remove Hardware and Eject Media 2 Click Safely Remove USB Mass Storage Device 3 For Windows Vista Click OK 4 Disconnect the USB cable and close the LCD monitor Copying 160 ...

Page 161: ...ders and files are created in the SD card as shown below They are created only when necessary Caution 0 When the folders or files are deleted moved renamed in the computer they cannot be played back on this unit anymore Copying 161 ...

Page 162: ...d back on this unit anymore 0 MTS files that are copied to a Mac computer cannot be imported to iMovie To use MTS files with iMovie import the files using iMovie Memo 0 To edit view the files use a software that supports AVCHD video JPEG still image files 0 When removing this unit from the computer drag and drop the JVCCAM_SD icon on the desktop to the trash bin iMovie and iPhoto You can import fi...

Page 163: ...the recommended functions in the video still image recording mode using the shortcut menu 1 Tap MENU 0 The shortcut menu appears 2 Tap the desired menu and setting Shortcut Menu During Video Recording Mode 0 SMILE Allows settings of SMILE SHOT and SMILE NAME DISPLAY 0 EFFECT RECORDING Allows settings of ANIMATION EFFECT DECORATE FACE EFFECT HANDWRITING EFFECT and STAMP 0 SILENT Allows settings of ...

Page 164: ...urn 0 To display the help file Tap K help and tap the item Help file may not be available for some items Operating the Common Menu You can configure common setting items regardless of the mode using the common menu 1 Tap MENU 0 The menu differs according to the mode in use 0 When entering from the recording mode tap MENU again as the shortcut menu appears 2 Tap Q 3 Tap the desired setting Memo 0 T...

Page 165: ... FOCUS Focus can be adjusted manually Adjusting Focus Manually A p 83 Displayed only in the manual recording mode BRIGHTNESS ADJUST Adjusts the overall brightness of the screen Adjusting Brightness A p 84 Displayed only in the manual recording mode SHUTTER SPEED Shutter speed can be adjusted Setting Shutter Speed A p 85 Displayed only in the manual recording mode APERTURE PRIORITY Adjusts the aper...

Page 166: ...Intervals TIME LAPSE RECORDING A p 107 AUTO REC This function enables the unit to record automatically by sensing the changes in subject s movement brightness within the red frame displayed on the LCD monitor Recording Automatically by Sensing Movements AUTO REC A p 108 Wi Fi Sets or uses the Wi Fi function Wi Fi Capabilities A p 11 DATE TIME RECORDING You can record videos together with the date ...

Page 167: ...ZOOM MIC Sets the zoom microphone ZOOM MIC A p 173 INFO You can check the remaining recording time on the SD card Operating Details Checking the Remaining Recording Time A p 113 Menu Settings 167 ...

Page 168: ...White Balance A p 87 BACKLIGHT COMP Corrects the image when the subject appears dark due to backlight Operating Details Setting Backlight Compensation A p 88 TELE MACRO Enables close up shots when using the telephoto T end of the zoom Operating Details Taking Close up Shots A p 89 TOUCH PRIORITY AE AF Automatically adjusts focus and brightness based on the subjects faces or selected area Operating...

Page 169: ... shortcut menu appears 3 Tap MENU in the shortcut menu 4 Tap GAIN UP WIND CUT Reduces the noise caused by wind Setting Details OFF Deactivates the function ON Activates the function Displaying the Item 1 Open the LCD monitor 0 Check if the recording mode is A 2 Tap MENU 0 The shortcut menu appears 3 Tap MENU in the shortcut menu 4 Tap WIND CUT ANIMATION EFFECT Records videos with animation effects...

Page 170: ...ng Details Recording Automatically by Sensing Movements AUTO REC A p 108 Wi Fi Sets or uses the Wi Fi function Operating Details Wi Fi Capabilities A p 11 DATE TIME RECORDING You can record videos together with the date and time Set this when you want to save the file with date and time display The date and time cannot be deleted after recording Operating Details Recording Videos with Date and Tim...

Page 171: ...UXP Enables recording in the best picture quality 0 Applies to Blu ray discs only Videos taken in high definition quality cannot be saved to DVDs XP Enables recording in high picture quality SP Enables recording in standard quality EP Enables long recordings SSW Enables recording in the best picture quality SEW Enables recording in the best picture quality Memo 0 Set to UXP or XP mode when recordi...

Page 172: ...o 17x when the image stabilizer is set to the AIS mode 72x DIGITAL Enables recording with 1 10x optical zoom and 11 72x digital zoom 200x DIGITAL Enables recording with 1 10x optical zoom and 11 200x digital zoom Memo 0 When digital zoom is used the image becomes grainy as it is digitally enlarged Displaying the Item 1 Open the LCD monitor 0 Check if the recording mode is A 2 Tap MENU 0 The shortc...

Page 173: ...r 0 Check if the recording mode is A 2 Tap MENU 0 The shortcut menu appears 3 Tap MENU in the shortcut menu 4 Tap x v Color ZOOM MIC Sets the zoom microphone Setting Details OFF Deactivates the zoom microphone ON Records audio sounds in the same direction as the zoom operation Displaying the Item 1 Open the LCD monitor 0 Check if the recording mode is A 2 Tap MENU 0 The shortcut menu appears 3 Tap...

Page 174: ...s Manually A p 83 Displayed only in the manual recording mode BRIGHTNESS ADJUST Adjusts the overall brightness of the screen Adjusting Brightness A p 84 Displayed only in the manual recording mode SHUTTER SPEED Shutter speed can be adjusted Setting Shutter Speed A p 85 Displayed only in the manual recording mode APERTURE PRIORITY Adjusts the aperture value Setting Aperture A p 86 Displayed only in...

Page 175: ...le who are often shot with this unit Registering Human Face Personal Authentication Information A p 101 PET SHOT Automatically captures a still image upon detection of the face of a pet such as dogs or cats Capturing Pets Automatically PET SHOT A p 98 IMAGE SIZE Sets the image size number of pixels for still images IMAGE SIZE A p 179 SCENE SELECT Settings to suit the shooting condition can be sele...

Page 176: ...se this when taking a group photo Operating Details Taking Group Shots Self timer A p 110 GAIN UP Makes the subject appear bright automatically when recording in dark places Setting Details OFF Deactivates the function ON Electrically brightens the scene when it is dark Memo 0 Setting can be adjusted separately for videos GAIN UP Video A p 169 Displaying the Item 1 Open the LCD monitor 0 Check if ...

Page 177: ... SHOOTING Records still images continuously while the SNAPSHOT button is pressed Memo 0 The continuous shooting speed can be changed CONT SHOOTING SPEED A p 178 0 Continuous shooting is not available when image size is set to 3808x2856 0 Some SD cards may not support continuous shooting 0 The continuous shooting speed will drop if this function is used repeatedly Displaying the Item 1 Open the LCD...

Page 178: ... Open the LCD monitor 0 Check if the recording mode is B 2 Tap MENU 0 The shortcut menu appears 3 Tap MENU in the shortcut menu 4 Tap CONT SHOOTING SPEED SMILE SHOT Automatically captures a still image upon detection of a smile Operating Details Capturing Smiles Automatically SMILE SHOT A p 97 SMILE NAME DISPLAY Sets the items to display when faces are detected Operating Details Setting SMILE NAME...

Page 179: ...des of still images recorded in 16 9 aspect ratio may be cut off when printed 3808x2856 10 9M 1440X1080 1 5M 640X480 0 3M Takes still images with aspect ratio 4 3 Displaying the Item 1 Open the LCD monitor 0 Check if the recording mode is B 2 Tap MENU 0 The shortcut menu appears 3 Tap MENU in the shortcut menu 4 Tap IMAGE SIZE Menu Settings 179 ...

Page 180: ...ecking the Content of Videos Quickly Digest Playback A p 117 PLAYBACK PLAYLIST Plays back the playlists that you have created Playing Back Playlists A p 123 EDIT PLAYLIST Creates or edits a playlist Creating Playlists with Selected Files A p 131 Creating Playlists by Date A p 132 Editing Playlists A p 133 PROTECT CANCEL Protects files from being deleted accidently Protecting Releasing Protection o...

Page 181: ...17 SEARCH DATE Narrows down the video index screen according to recording dates Operating Details Searching for a Specific Video Still Image by Date A p 121 DISPLAY DATE TIME Sets whether to display the recording date and time during video playback Setting Details OFF Does not display the date and time during playback ON Displays the date and time during playback Displaying the Item 1 Open the LCD...

Page 182: ...ntly Displayed File A p 126 Protecting Releasing Protection of Selected Files A p 127 TRIMMING Select the required part of a video and save it as a new video file Operating Details Capturing a Required Part in the Video TRIMMING A p 128 UPLOAD SETTINGS Capture and copy a part of a recorded video maximum 15 minutes for uploading to YouTube Operating Details Capturing Videos for Uploading to YouTube...

Page 183: ...tection of the Currently Displayed File A p 126 Protecting Releasing Protection of Selected Files A p 127 FILE INFORMATION You can display the recording date and duration of the selected file Operating Details Checking the Recording Date and Other Information A p 117 SEARCH DATE Narrows down the still image index screen according to recording dates Operating Details Searching for a Specific Video ...

Page 184: ... to select the playback mode 3 Tap MENU 4 Tap SLIDE SHOW EFFECTS PROTECT CANCEL Protects files from being deleted accidently Operating Details Protecting Releasing Protection of the Currently Displayed File A p 126 Protecting Releasing Protection of Selected Files A p 127 Menu Settings 184 ...

Page 185: ...nging the Display Language A p 71 MONITOR BRIGHTNESS Sets the brightness of the LCD monitor MONITOR BRIGHTNESS A p 187 OPERATION SOUND Turns on or off the operation sound OPERATION SOUND A p 188 SILENT MODE Sets to the Silent mode in which operation sounds are turned off and the brightness of the screen is reduced SILENT MODE A p 188 AUTO POWER OFF Prevents the situation of forgetting to turn off ...

Page 186: ...A p 192 HDMI OUTPUT Sets the definition of the video output from the HDMI mini connector HDMI OUTPUT A p 192 HDMI CONTROL Sets the linked operations ON OFF when the TV and this unit are connected using the HDMI mini connector HDMI CONTROL A p 193 FACTORY PRESET Returns all the settings to their default values FACTORY PRESET A p 193 UPDATE Updates the functions of this unit to the latest version UP...

Page 187: ... display style 0 After setting tap SET LANGUAGE The language on the display can be changed Operating Details Changing the Display Language A p 71 MONITOR BRIGHTNESS Sets the brightness of the LCD monitor Setting Details AUTO Sets the brightness automatically to 4 when using outdoors and to 3 when using indoors 4 Brightens the backlight of the monitor regardless of the surrounding conditions 3 Sets...

Page 188: ...e Setting Details OFF Turns off the Silent mode ON Turns on the Silent mode Displaying the Item 1 Tap MENU 0 When entering from the recording mode tap MENU again as the shortcut menu appears 2 Tap Q 3 Tap SILENT MODE Memo 0 T appears when SILENT MODE is set to ON 0 It may be difficult to see the screen in Silent mode as the LCD monitor darkens Set SILENT MODE to OFF for normal recordings 0 Brightn...

Page 189: ... from the recording mode tap MENU again as the shortcut menu appears 2 Tap Q 3 Tap AUTO POWER OFF QUICK RESTART Enables the power to turn on quickly when the LCD monitor is opened again within 5 minutes Setting Details OFF Deactivates the function ON Enables the power to turn on quickly when the LCD monitor is opened again within 5 minutes Memo 0 The power consumption within 5 minutes after the LC...

Page 190: ...103 Displaying the Item 1 Tap MENU 0 When entering from the recording mode tap MENU again as the shortcut menu appears 2 Tap Q 3 Tap DEMO MODE TOUCH SCREEN ADJUST Adjusts the response position of the buttons on the touch screen 1 Tap MENU 0 When entering from the recording mode tap MENU again as the shortcut menu appears 2 Tap Q 3 Tap TOUCH SCREEN ADJUST 0 The touch screen adjustment screen appear...

Page 191: ...apping with the stylus pen 0 Do not press with an object with a sharp tip or do not press hard DISPLAY ON TV Displays icons and date time on a TV screen Setting Details OFF Does not display icons and date time on TV ON Displays icons and date time on TV Displaying the Item 1 Tap MENU 0 When entering from the recording mode tap MENU again as the shortcut menu appears 2 Tap Q 3 Tap DISPLAY ON TV Men...

Page 192: ... recording mode tap MENU again as the shortcut menu appears 2 Tap Q 3 Tap VIDEO OUTPUT HDMI OUTPUT Sets the output from the HDMI connector of this unit when it is connected to a TV Setting Details AUTO It is recommended to select AUTO usually 480p Select this when the video is not output in AUTO correctly Displaying the Item 1 Tap MENU 0 When entering from the recording mode tap MENU again as the ...

Page 193: ...ET Returns all the settings to their default values 1 Tap MENU 0 When entering from the recording mode tap MENU again as the shortcut menu appears 2 Tap Q 3 Tap FACTORY PRESET 4 Tap YES 0 All settings return to their default values UPDATE Updates the functions of this unit to the latest version For details refer to the JVC homepage When no program to update the software of this unit is available n...

Page 194: ... no SD card is inserted 0 All data on the SD card will be deleted when it is formatted Copy all files on the SD card to a computer before formatting 0 Make sure that the battery pack is fully charged or connect the AC adapter as the formatting process may take some time Displaying the Item 1 Tap MENU 0 When entering from the recording mode tap MENU again as the shortcut menu appears 2 Tap Q 3 Tap ...

Page 195: ...ens cover The lens cover does not close automatically Rear 1 DC Connector 0 Connects to an AC adapter to charge the battery 2 AV Connector 0 Connects to the AV connector of a TV etc 3 HDMI Mini Connector 0 Connects to TV using an HDMI mini cable 4 USB Connector 0 Connects to computer using a USB cable 5 ACCESS Access Lamp 0 Lights up blinks during recording or playback Do not remove the battery pa...

Page 196: ...rting an SD Card A p 66 Interior 1 Speaker 0 Outputs audio sound during video playback 2 a Image Stabilizer Button 0 The setting of image stabilizer changes with every press during video recording Reducing Camera Shake A p 105 3 M Power Button 0 Press and hold to turn the power on off while the LCD monitor is opened Names of Parts 196 ...

Page 197: ...s self portraits to be taken by rotating the monitor Using the Touch Screen A p 67 Names of Buttons and Functions on the LCD Monitor A p 68 Caution 0 Do not press against the surface with force or subject it to strong impact Doing so may damage or break the screen Names of Parts 197 ...

Page 198: ...g Mode Taking Videos in Auto Mode A p 74 Manual Recording A p 80 13 SILENT MODE SILENT MODE A p 188 14 Zoom ZOOM A p 172 15 Focus Adjusting Focus Manually A p 83 16 APERTURE PRIORITY Setting Aperture A p 86 17 Brightness Adjusting Brightness A p 84 18 Shutter Speed Setting Shutter Speed A p 85 Video Recording 1 Video Mode Operation Buttons for Video Recording A p 75 2 Video Quality VIDEO QUALITY A...

Page 199: ... p 171 3 Operation Indicator Operation Buttons for Video Playback A p 115 4 Date Time 0 Displays the recording date and time 5 Media 6 Battery Indicator Checking the Remaining Recording Time A p 113 7 Playback Time Playing Back Videos A p 115 8 Time Lapse Playback Time Lapse Setting A p 108 9 External Storage Playback Playing Back with a DVD Writer A p 141 Playing Back with a BD Writer External Bl...

Page 200: ...l Storage Playback Playing Back with a DVD Writer A p 141 Playing Back with a BD Writer External Blu ray Drive A p 148 Playing Back Files in the USB External Hard Disk Drive A p 152 9 1080p Output HDMI OUTPUT A p 192 When the unit is not working properly Turning Off the Power 1 Close the LCD monitor 2 Remove the AC adapter and battery pack from this unit reattach them open the LCD monitor and this...

Page 201: ...settings manually Adjusting Focus Manually A p 83 Recording stops automatically Recording stops automatically as it cannot be performed for 12 or more consecutive hours according to specifications It may take some time to resume recording Turn off this unit wait for a while and turn it on again This unit stops automatically to protect the circuit when the temperature rises The continuous shooting ...

Page 202: ...mething similar Execute FORMAT SD CARD in the COMMON menu All data will be deleted FORMAT SD CARD A p 194 Verify the system requirements of your PC when using Everio MediaBrowser 4 to play back Verifying System Requirements Guideline A p 154 Cannot find a recorded file Cancel the date search function Searching for a Specific Video Still Image by Date A p 121 Select PLAYBACK OTHER FILE in the menu ...

Page 203: ...puter Unable to copy files to the computer s HDD If the provided software Everio MediaBrowser 4 is not installed some functions may not work properly Installing the Provided Software A p 155 Before making backup make sure that enough free space is left in the computer s hard disk HDD Unable to copy files to DVD or Blu ray disc with a PC To record to discs a recordable DVD or Blu ray drive is requi...

Page 204: ...ts This is not a malfunction The spots will not be recorded Other Problems The buttons on the touch screen do not work Tap the buttons on the touch screen with your fingers or the stylus pen The buttons may not respond if you touch them with your fingernails or with gloves on The image is grainy When digital zoom is used the image becomes grainy as it is digitally enlarged This unit heats up This ...

Page 205: ...VAILABLE SPACE Delete files or move files to a computer or other devices Replace the SD card with a new one RECORDABLE MANAGEMENT CAPACITY LEVEL HAS BEEN REACHED A Move the files or folders to a computer or other device Back up your files B Select FILE MANAGEMENT NO in FORMAT SD CARD of the media settings menu All data on the SD card will be deleted SCENE QUANTITY EXCEEDED LIMIT A Move the files o...

Page 206: ...ohol Doing so may cause damage to the unit 0 When using a chemical cloth or cleaner be sure to observe the warning labels and instructions of the product 0 Do not leave the device in contact with rubber or plastic products for a long time Lens LCD Monitor 0 Use a lens blower commercially available to remove any dust and a cleaning cloth commercially available to wipe off any dirt Mold may form if ...

Page 207: ...mm Video 35mmconversion 32 8mmto594 5mm dynamic zoom ON 35 mm conversion 32 8 mm to 396 mm dynamic zoom OFF Still Image 35 mm conversion 40 4 mm to 404 mm 4 3 35 mm conversion 33 mm to 330 mm 16 9 Calculated when DIS is set to OFF on the wide W end and ON AIS on the tele T end Item Details Lowest illumination 1 lux 1 lux SCENE SELECT NIGHTALIVE Zoom during video recording Optical zoom Up to 10x Dy...

Page 208: ... x 480 pixels Interlaced Average Approximate 6 2 Mbps SEW 16 9 720 x 480 pixels Interlaced Average Approximate 3 Mbps Sound quality Audio 48 kHz 256 kbps Still Image Item Details Recording format JPEG standard Extension JPG Image size Approximate Number of Still Images Unit Number of Shots A p 114 AC Adapter AP V30M Item Details Power supply AC 110 V to 240 V 50 Hz 60 Hz Output DC 5 2 V 1 8 A Allo...

Page 209: ......

Reviews: