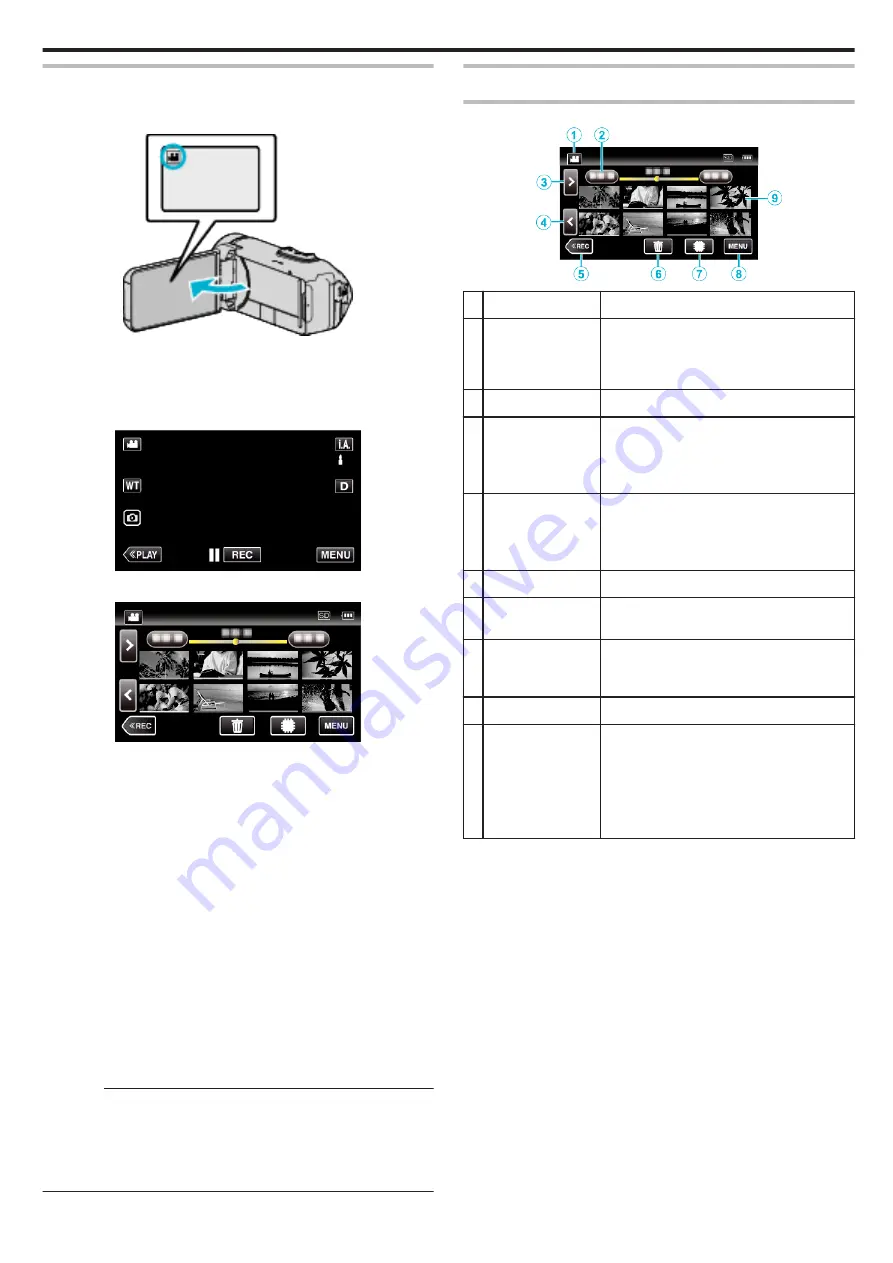
Normal Playback
Plays back the recorded videos.
1
Open the LCD monitor.
.
0
Check if the recording mode is
A
.
0
If the mode is
B
still image, tap
B
on the recording screen to display
the mode switching screen.
Tap
A
to switch the mode to video.
2
Tap
M
to select the playback mode.
.
3
Tap the file (image).
.
0
Tap
I
/
J
to select the media for playback and change the index
screen (thumbnail display).
0
L
appears on the last image played back.
0
Lines in different colors are displayed under the thumbnail display to
distinguish the recording date.
0
Images recorded in 50p mode and 50i mode are displayed on the
index screen separately.
0
To view the images recorded in 50p mode, set “SYSTEM SELECT”
in the video recording menu to “50p” before selecting the playback
mode. In cases such as during Digest Playback or when playing back/
editing a playlist, set “SYSTEM SELECT” in the same way before
operating.
0
To view the images recorded in 50i mode, set “SYSTEM SELECT” in
the video recording menu to “50i” before selecting the playback
mode. In cases such as during Digest Playback or when playing back/
editing a playlist, set “SYSTEM SELECT” in the same way before
operating.
4
Playback starts.
0
Tap
e
to pause.
0
Tap
u
to return to the index screen.
Caution :
0
While this unit may be used with the LCD monitor reversed and closed,
the temperature rises more easily. Do not use this unit with the LCD
monitor reversed and closed for long periods of time, or in places exposed
to direct sunlight or high temperatures.
0
The power may turn off to protect the circuit if the temperature of this unit
rises too much.
Operation Buttons for Video Playback
During Index Screen Display
.
Display
Description
A
Video/Still Image
Mode
A
/
B
Switches between video and still image
modes.
Switches between video mode (50i/50p) and
still image mode.
B
Date
Moves to the previous/next date
C
>
Displays the next index screen (thumbnail
display)
0
You can perform the same operation with the
zoom lever.
D
<
Displays the previous index screen (thumbnail
display)
0
You can perform the same operation with the
zoom lever.
E
3
Switches to the recording mode.
F
R
Displays the index screen (thumbnail display)
to perform deletion
G
I
/
J
Switches between the memories in which
images are recorded (
I
built-in memory/
J
SD card)
H
MENU
Displays the menu screen
I
Thumbnail (File)
Tap on thumbnail - Starts playback
Drag to right - Scrolls to the right to show the
previous index screen (thumbnail display)
Drag to left - Scrolls to the left to show the next
index screen (thumbnail display)
Images with the same underlined color
indicates the same recording date.
Playback
49
Summary of Contents for GZ-RX110
Page 1: ...CAMCORDER LYT2730 005A Detailed User Guide GZ RX110 GZ RX115 ...
Page 164: ......


