background image

52


EN

Master Page: Left-Heading0

DUBBING

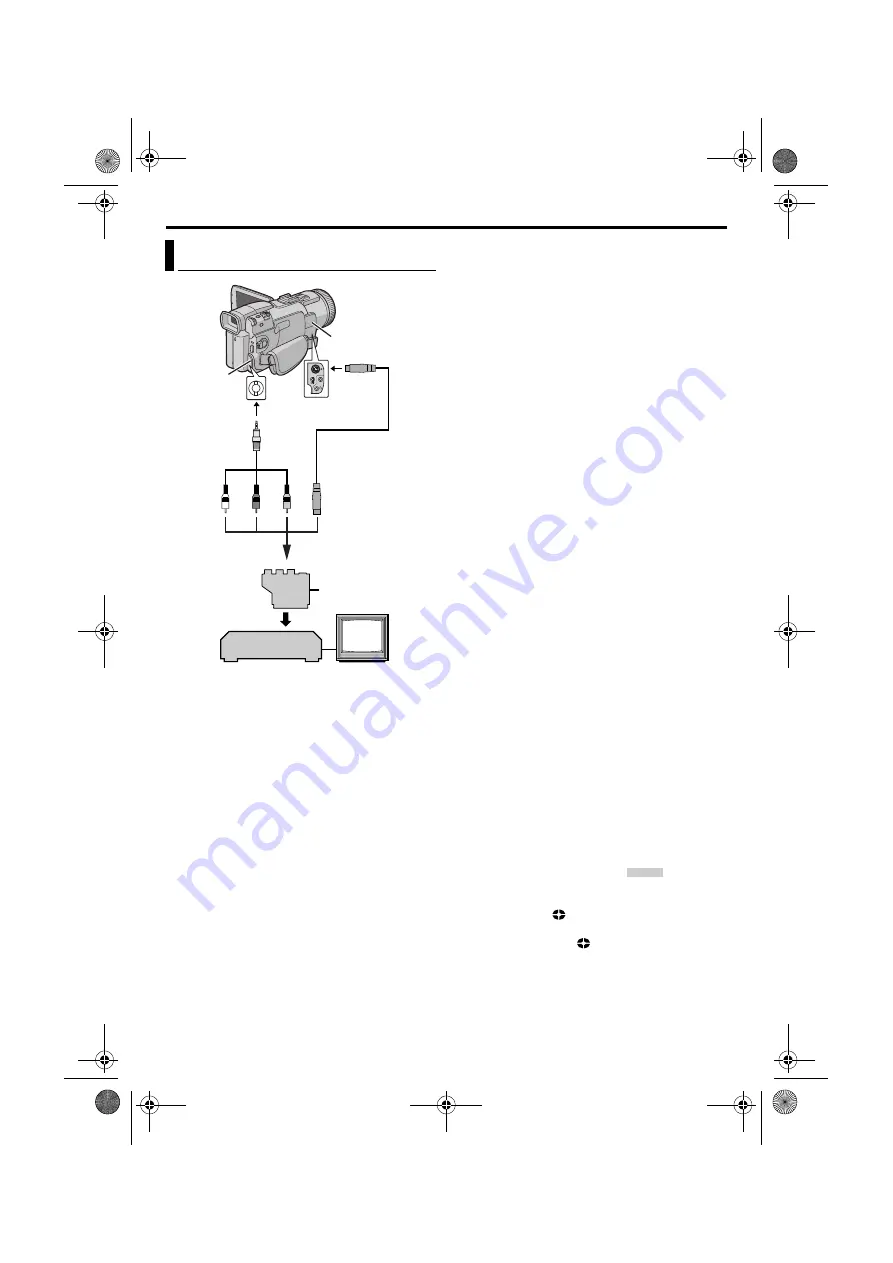
*

If your VCR has a SCART connector, use the 
provided cable adapter.

** Connect when your TV/VCR has an S-VIDEO 

IN/OUT connector. In this case, it is not 
necessary to connect the yellow video cable.

*** When connecting the cable, open the cover.

NOTE:

Set the video out select switch of the cable adapter 
as required:
Y/C: 

When connecting to a TV or VCR which accepts 

Y/C signals and uses an S-Video cable.

CVBS: 

When connecting to a TV or VCR which does 

not accept Y/C signals and uses an audio/video cable.

To use this camcorder as a player...

1

Following the illustrations, connect the 
camcorder and the VCR. Also refer to page 22.

2

Set the camcorder’s 

VIDEO/MEMORY

 Switch to 

“VIDEO”.

3

Set the camcorder’s Power Switch to “PLAY” 
while pressing down the Lock Button located on 
the switch.

4

Turn on the VCR’s power.

5

Insert the source cassette in the camcorder.

6

Insert the recording cassette in the VCR.

7

Engage the VCR’s AUX and Record-Pause modes.

Refer to the instruction manual for the VCR.

8

Press 

4

/

9

 on the camcorder to start playback of 

the source tape.

9

At the point you want to start dubbing, engage 
the VCR’s Record mode.

10

To pause dubbing, engage the VCR’s Record-

Pause mode and press 

4

/

9

 on the camcorder.

11

Repeat steps

8

10

 for additional editing. Stop 

the VCR and camcorder.

NOTES:

It is recommended to use the AC Power Adapter/
Charger as the power supply instead of the 
battery pack. (

pg. 11)

As the camcorder starts to play your footage, it will 
appear on your TV. This will confirm the 
connections and the AUX channel for dubbing 
purposes.

Before you start dubbing, make sure that the 
indications do not appear on the connected TV. If 
they do, they are being recorded onto the new 
tape.

To choose whether or not the following displays 
appear on the connected TV...

• Date/time

Set “DATE/TIME” to “AUTO”, “ON” or “OFF”. 
(

pg. 31, 41) Or, press 

DISPLAY

 on the remote 

control to turn on/off the date indication.

• Time code

Set “TIME CODE” to “OFF” or “ON”. 
(

pg. 31, 41)

• Indications other than date/time and time code

Set “ON SCREEN” to “OFF”, “LCD” or “LCD/
TV”. (

pg. 31, 41)

To use this camcorder as a recorder...

1)

Perform steps

to 

3

 in the left column.

2)

Set “S/AV INPUT” to “ON”. (

pg. 31, 40)

3)

Set “REC MODE” to “SP” or “LP”. (

pg. 31, 34)

4)

Insert the recording cassette in this camcorder.

5)

Press the Recording Start/Stop Button to engage 
the Record-Pause mode. The “

” indication 

appears on the screen.

6)

Press the Recording Start/Stop Button to start 
recording. The 

 indication rotates.

7)

Press the Recording Start/Stop Button again to 
stop recording. The 

 indication stops rotating.

NOTES:

After dubbing, set “S/AV INPUT” back to “OFF”.

Analogue signals can be converted to digital 
signals with this procedure.

It is also possible to dub from another camcorder. 

Dubbing To Or From A VCR

1

2

3

4

Connector 

Cover***

Connector

Cover***

Audio/Video

cable

(provided)

To AV

To S

S-Video cable

(optional)

TV

VCR

A

White to AUDIO L IN or OUT

B

Red to AUDIO R IN or OUT

C

Yellow to VIDEO IN or OUT

D

To S-VIDEO IN or OUT**

“Y/C”/“CVBS” Video 

Out Select Switch

Cable Adapter*

A/V . IN

GR-DV4000PAL.book  Page 52  Friday, February 14, 2003  10:30 PM

Summary of Contents for GR GR-DV4000

Page 1: ...AMERA D S C RECORDING PLAYBACK 23 ADVANCED FEATURES 31 REFERENCES 67 TERMS 86 Please visit our Homepage on the World Wide Web for Digital Video Camera For Accessories http www jvc victor co jp english cyber http www jvc victor co jp english accessory INSTRUCTIONS DIGITAL VIDEO CAMERA GR DV4000PAL book Page 1 Friday February 14 2003 10 30 PM ...

Page 2: ...y with an identical approved type as originally fitted and to replace the fuse cover If nonetheless the mains plug is cut off be sure to remove the fuse and dispose of the plug immediately to avoid possible shock hazard by inadvertent connection to the mains supply If this product is not supplied fitted with a mains plug then follow the instructions given below DO NOT make any connection to the La...

Page 3: ...ands and NEVER fix legs with wood screws to ensure complete safety always fit the manufacturer s approved stand or legs with the fixings provided according to the instructions DON T allow electrical equipment to be exposed to rain or moisture ABOVE ALL NEVER let anyone especially children push anything into holes slots or any other opening in the case this could result in a fatal electrical shock ...

Page 4: ...o S Video etc to the camcorder and leaving it on top of the TV is not recommended as tripping on the cables will cause the camcorder to fall resulting in damage Attach only the optional JVC VL V3U Video Light VL F3U Flash MZ V3U Stereo Zoom Microphone or MZ V5U Stereo Microphone to the camcorder s Info Shoe 䡲 This camcorder is designed exclusively for the digital video cassette SD Memory Card and ...

Page 5: ...40EG or AA V40EK Battery Pack BN V408U B Remote Control Unit RM V717U Audio Video Cable ø3 5 mini plug to RCA plug USB Cable DC Cord Editing Cable CD ROM Lens Hood Already attached to the camcorder 墌 pg 6 Lens Cap 墌 pg 7 for attachment AAA R03 Battery x 2 for remote control unit Memory Card 8 MB Already inserted in the camcorder Shoulder Strap 墌 pg 7 for attachment Audio Cable x 2 for connection o...

Page 6: ...e twice around the outside of the core filter as shown in the illustration Wind the cable so that it is not slack 3 Close the core filter until it clicks shut NOTES If the core filter cannot be attached to the S Video cable you have use the optional YTU94146B S Video cable Consult your nearest JVC dealer for details on its availability Take care not to damage the cable When connecting a cable atta...

Page 7: ...ap is on correctly make sure the cap is flush to the camcorder How To Attach The Strap 1 Following the illustration thread the strap through the eyelet a 2 Fold it back and thread it through the buckle b 3 Repeat the procedure to attach the other end of the strap to the other eyelet c located under the Grip Strap 4 Confirm the strap is not twisted During shooting GR DV4000PAL book Page 7 Friday Fe...

Page 8: ...29 Setting Print Information DPOF Setting 29 Initialising A Memory Card 30 ADVANCED FEATURES 31 MENUS FOR DETAILED ADJUSTMENT 31 Changing The Menu Settings 31 RECORDING MENUS 32 Wipe Or Fader Effects 32 Program AE With Special Effects 33 White Balance Adjustment 34 PLAYBACK MENUS 40 FEATURES FOR RECORDING 42 Night Scope 42 Snapshot For Video Recording 42 Snapshot Flash 43 Flash Brightness Adjustme...

Page 9: ...1 Set the Power Switch to M while pressing down the Lock Button located on the switch 2 Open the LCD monitor fully or pull out the viewfinder fully 3 Press the MENU Wheel in The Menu Screen appears 4 Rotate the MENU Wheel to select s and press it The SYSTEM Menu appears 5 Rotate the MENU Wheel to select DEMO MODE and press it The Sub Menu appears 6 Rotate the MENU Wheel to select OFF and press it ...

Page 10: ...Charger then try charging again If the battery operation time remains extremely short even after having been fully charged the battery is worn out and needs to be replaced Please purchase a new one For other notes 墌 pg 67 Using The Battery Pack 1 With the arrow on the battery pack pointing upward push the battery pack slightly against the battery pack mount a 2 Slide up the battery pack until it l...

Page 11: ...67 About Batteries Lithium ion is vulnerable in colder temperatures DANGER Do not attempt to take the batteries apart or expose them to flame or excessive heat as it may cause a fire or explosion WARNING Do not allow the battery or its terminals to come in contact with metals as this can result in a short circuit and possibly start a fire The Benefits Of Lithium Ion Batteries Lithium ion battery p...

Page 12: ...e viewfinder is pushed back in Press PUSH OPEN and open the LCD monitor fully It can rotate 270º 90º downward 180º upward While using the viewfinder Make sure the LCD monitor is closed and locked Pull out the viewfinder fully Be sure to pull out the viewfinder until you hear a click otherwise it may be pushed back in during use NOTES The image will not appear simultaneously on the LCD monitor and ...

Page 13: ...splay Operation Mode BR I GHT MENU Wheel Power Lamp VIDEO MEMORY Switch Power Switch Lock Button Power Switch Position A Full Auto Recording Allows you to record using NO special effects or manual adjustments Suitable for standard recording The A indicator appears on the display M Manual Recording Allows you to set various recording functions using the Menus 墌 pg 31 If you want more creative capab...

Page 14: ...However if the camcorder is not used for approx 3 months the clock s lithium battery will become discharged and the date time stored in memory will be lost When this occurs first connect the camcorder to an AC outlet using the AC Power Adapter Charger for over 24 hours to charge the clock s rechargeable lithium battery Then perform the date time setting before using the camcorder Note that the cam...

Page 15: ... a few seconds for the cassette holder to open Do not apply force If you wait a few seconds and the cassette holder does not open close the cassette holder cover and try again If the cassette holder still does not open turn the camcorder off then on again If the tape does not load properly open the cassette holder cover fully and remove the cassette A few minutes later insert it again When the cam...

Page 16: ... from being recorded over To record on this memory card slide the tab back to the position opposite to LOCK before loading it NOTES Be sure to use only SD Memory Cards marked or MultiMediaCards marked Some brands of memory cards are not compatible with this camcorder Before purchasing a memory card consult its manufacturer or dealer Before using a new memory card it is necessary to FORMAT the card...

Page 17: ...s power shuts off automatically To turn the camcorder on again push back and pull out the viewfinder again or close and re open the LCD monitor LCD monitor viewfinder indications When power is supplied from a battery the battery indicator is displayed 墌 pg 84 When power is supplied from an AC outlet the battery indicator does not appear When a blank portion is left between recorded scenes on the t...

Page 18: ...r Zoom Lever is set all the way to W Also see TELE MACRO in MANUAL Menu on page 36 For other notes 墌 pg 67 Journalistic Shooting In some situations different shooting angles may provide more dramatic results Hold the camcorder in the desired position and tilt the LCD monitor in the most convenient direction It can rotate 270º 90º downward 180º upward Interface Shooting The person you shoot can vie...

Page 19: ...ape When shooting on a blank portion located partway through the tape When shooting again after shooting a scene then opening closing the cassette holder cover Recording From The Middle Of A Tape 1 Play back a tape or use Blank Search 墌 pg 21 to find the spot at which you want to start recording then engage the Still Playback mode 墌 pg 20 2 Set the Power Switch to A or M while pressing down the Lo...

Page 20: ... with it flipped over and pushed against the camcorder body LCD monitor viewfinder indications When power is supplied from a battery the battery indicator is displayed 墌 pg 84 When power is supplied from an AC outlet the battery indicator does not appear When a cable is connected to the AV connector the sound is not heard from the speaker To control the speaker volume Rotate the MENU Wheel towards...

Page 21: ...d the camcorder automatically starts reverse or forward search then stops at the spot which is about 3 seconds of tape before the beginning of the detected blank portion To cancel Blank Search midway press 8 NOTES Before starting Blank Search if the current position is at a blank portion the camcorder searches in the reverse direction If the current position is at a recorded portion the camcorder ...

Page 22: ... DISPLAY on the remote control to turn on off the date indication Time Code Set TIME CODE to ON or OFF 墌 pg 31 41 Indications other than date time and time code Set ON SCREEN to OFF LCD or LCD TV 墌 pg 31 41 NOTES It is recommended to use the AC Power Adapter Charger as the power supply instead of the battery pack 墌 pg 11 To monitor the picture and sound from the camcorder without inserting a tape ...

Page 23: ... 39 82 F Remaining Number Of Shots 墌 pg 82 INFO LCD Indications a Memory card indicator Appears when a memory card is loaded and blinks when no memory card is loaded b Number of shots c Battery indicator To turn off the indications 墌 pg 31 38 NOTES Even if DIS is set to ON 墌 pg 35 the Stabiliser will be disabled If Snapshot recording is not possible O blinks when SNAPSHOT is pressed If Program AE ...

Page 24: ... back a low numbered one this will not overwrite an existing image because new images are automatically stored after the last recorded one Images shot in a file size other than 640 x 480 1024 x 768 1280 x 960 and 1600 x 1200 with another devices will be displayed thumbnail images These thumbnail images cannot be transferred to a PC Images shot with devices such as JVC GR DVX7 that are not compatib...

Page 25: ...also superimposed during recording 墌 pg 51 1 Load the provided memory card 墌 pg 16 2 Set the VIDEO MEMORY Switch to MEMORY 3 Set the Power Switch to PLAY while pressing down the Lock Button located on the switch 4 Open the LCD monitor fully or pull out the viewfinder fully The type of file IMAGE E MAIL CLIP or TITLE which has been played back at the last time is displayed 5 If the image playback I...

Page 26: ...ices or processed on a PC QUALITY will be displayed 1 Perform steps 1 6 in Normal Playback Of Images 墌 pg 24 or Playback Of Title Images 墌 pg 25 2 Press the MENU Wheel in The Menu Screen appears 3 Rotate the MENU Wheel to select DISPLAY and press it The Sub Menu appears 4 Rotate the MENU Wheel to select OFF and press it The operation mode indicator folder file number and battery indicator disappea...

Page 27: ...s stored in the memory card 9 Rotate the MENU Wheel to select PROT ALL and press it The PROTECT screen appears 10 Rotate the MENU Wheel to select EXECUTE and press it To cancel protection select RETURN NOTES If the mark appears the currently displayed file is protected When the memory card is initialised or corrupted even protected files are deleted If you do not want to lose important files trans...

Page 28: ... press it The DELETE screen appears 10 Press 3 or 5 to select the desired file 11 Rotate the MENU Wheel to select EXECUTE and press it To cancel deletion select RETURN Repeat steps 10 and 11 for all files you want to delete NOTE If the mark appears the selected file is protected and cannot be deleted To delete all files stored in the memory card 9 Rotate the MENU Wheel to select ALL and press it T...

Page 29: ...start again from DVC00001 This camcorder is compatible with the DPOF Digital Print Order Format standard in order to support future systems such as automatic printing You can select one of the 2 print information settings for images stored in the memory card To Print All Still Images One Print For Each or To Print By Selecting Still Images And Number Of Prints NOTES If you load a memory card alrea...

Page 30: ...umber of prints is reset to 0 for all still images You can initialise a memory card any time After initialising all files and data stored in the memory card including those which have been protected are cleared 1 Set the VIDEO MEMORY Switch to MEMORY 2 Set the Power Switch to PLAY while pressing down the Lock Button located on the switch 3 Open the LCD monitor fully or pull out the viewfinder full...

Page 31: ...DEO DISPLAY 1 Rotate the MENU Wheel to select the desired function and press it The Sub Menu appears Example m CAMERA Menu 2 Rotate the MENU Wheel to select the desired parameter 3 Press the MENU Wheel in Selection is complete Repeat the procedure if you wish to set other function menus Changing The Menu Settings Power Switch Lock Button VIDEO MEMORY Switch MENU Wheel H I DE FA R E T LA DE FA R K ...

Page 32: ...blinks in blue or goes out These effects let you make pro style scene transitions Use them to spice up the transition from one scene to the next Wipe or Fader works when video recording is started or stopped 1 Set the VIDEO MEMORY Switch to VIDEO 2 Set the Power Switch to M while pressing down the Lock Button located on the switch 3 Open the LCD monitor fully or pull out the viewfinder fully 4 Set...

Page 33: ... 120th of a second The flickering that occurs when shooting under a fluorescent light or mercury vapour lamp is reduced SPORTS Variable Shutter Speed 1 250 1 4000 This setting allows fast moving images to be captured one frame at a time for vivid stable slow motion playback The faster the shutter speed the darker the picture becomes Use the shutter function under good lighting conditions SNOW Comp...

Page 34: ... bit Enables video recording of stereo sound on four separate channels and is recommended for use when performing Audio Dubbing Equivalent to the 32 kHz mode of previous models 16 bit Enables video recording of stereo sound on two separate channels Equivalent to the 48 kHz mode of previous models Zooming ZOOM Factory preset 40X 10X When set to 10X while using digital zoom the zoom magnification wi...

Page 35: ...red thumbnail images may take up a lot of memory In this case using the memory card with large capacity is recommended MANUAL Enables thumbnail images to be made manually 墌 pg 48 MANUAL Digital Image Stabilisation To compensate for unstable images caused by camera shake particularly at high magnification DIS Factory preset ON OFF ON NOTES Accurate stabilisation may not be possible if hand shake is...

Page 36: ...set to ON you can shoot a subject as large as possible at a distance of approx 60 cm NOTE Depending on the zoom position the lens may go out of focus Wide mode WIDE MODE Factory preset OFF OFF Records with no change in the screen ratio For playback on a TV with a normal screen ratio CINEMA Inserts black bands at the top and bottom of the screen The indicator appears During playback on wide screen ...

Page 37: ...T 墌 pg 56 REMOTE Factory preset ON OFF Disables the remote control operations ON Enables the remote control operations Automatic demonstration mode Demonstrates certain functions such as Program AE with special effects etc and can be used to confirm how these functions operate 墌 pg 9 DEMO MODE Factory preset ON OFF Automatic demonstration will not take place ON Demonstrates certain functions such ...

Page 38: ...not reset all settings to the factory preset CAMERA DISPLAY Brightness adjustment of the display BRIGHT For details refer to Brightness Adjustment Of The Display 墌 pg 13 Display setting ON SCREEN Factory preset LCD TV LCD Keeps the camcorder s display except the date time and time code from appearing on the connected TV screen LCD TV Makes the camcorder s display appear on screen when the camcorde...

Page 39: ...to VIDEO still images are recorded only onto the tape When Snapshot recording is performed with the VIDEO MEMORY Switch set to VIDEO still images are recorded not only onto the tape but also in the memory card 640 x 480 pixels In this mode the SNAP MODE selection in CAMERA Menu is also applicable to memory card recording DSC Menu Image Size Picture Quality SD Memory Card 8 MB 8 MB 16 MB 32 MB 64 M...

Page 40: ...amcorder cannot detect the sound mode in which the recording was made during fast forward or rewind During playback the sound mode is displayed in the upper left corner Synchro adjustment For details refer to For More Accurate Editing 墌 pg 64 SYNCHRO Factory preset 0 0 Recording mode Allows you to set the video recording mode SP or LP depending on your preference It is recommended you use REC MODE...

Page 41: ... to Brightness Adjustment Of The Display 墌 pg 13 ON SCREEN Factory preset LCD OFF LCD LCD TV When set to OFF the camcorder s display disappears DATE TIME Factory preset OFF OFF AUTO ON When set to AUTO the date time are displayed in the following cases When playback starts The camcorder displays the date time when scenes are recorded When the date is changed during playback TIME CODE Factory prese...

Page 42: ...s SNAPSHOT The O indication appears and a still image will be recorded for approx 6 seconds then the camcorder re enters the Record Standby mode You can perform Snapshot also during recording A still image will be recorded for approx 6 seconds then the normal recording resumes Regardless of the Power Switch position A or M Snapshot recording takes place using the selected Snapshot mode NOTES To re...

Page 43: ...ed The colour tone changes depending on the background lighting conditions such as under fluorescent or halogen lamps While charging the flash blinks and the flash will not fire Although noise may appear this is not a malfunction and is not recorded It can take up to 10 seconds to charge the flash Do not open the flash unit manually or apply an unreasonable amount of pressure to it Doing so may ca...

Page 44: ...Stop Button again The camcorder re enters Record Standby mode OR 5 Press SNAPSHOT After 15 seconds the beep sounds and snapshot recording starts After that the camcorder re enters Record Standby mode 6 To end Self Timer recording select OFF in step 3 NOTE If BEEP and TALLY are set to OFF 墌 pg 37 the beep does not sound and the tally lamp does not light Self Timer Power Switch SNAPSHOT Button Lock ...

Page 45: ...n the auto focus mode the camcorder may automatically zoom out depending on the distance between the camcorder and the subject This will not occur when TELE MACRO is set to ON 墌 pg 36 NOTE If you are using the viewfinder you should already have performed Viewfinder Adjustment 墌 pg 12 1 Set the Power Switch to M while pressing down the Lock Button located on the switch 2 Press FOCUS The manual focu...

Page 46: ...nvironments to allow in more light Use this function in the following situations When shooting a moving subject When the distance to the subject changes so its size in the LCD monitor or the viewfinder changes such as when the subject is backing away When shooting on a reflective natural background such as at the beach or when skiing When shooting objects under a spotlight When zooming When the su...

Page 47: ... Switch to A NOTE White balance cannot be used when r is set to SEPIA or MONOTONE 墌 pg 33 Adjust the white balance manually when shooting under various types of lighting 1 Set the Power Switch to M while pressing down the Lock Button located on the switch 2 Open the LCD monitor fully or pull out the viewfinder fully 3 Set u to MWB 墌 pg 31 34 The indication blinks slowly 4 Hold a sheet of plain whi...

Page 48: ...ured image is stored in the memory card as a thumbnail image NOTES The remaining number of storable thumbnail images also appears on the screen when it reaches 10 or less If REC SELECT is set to in DSC Menu the number shows how many 640 x 480 pixel images can be stored If 5S is set to 5S or Anim in MANUAL Menu the NAVIGATION function will not work properly To find scenes on tape using thumbnail im...

Page 49: ...ing deletion Also be sure to use the provided AC Power Adapter Charger as the memory card may be corrupted if the battery becomes exhausted during deletion If the memory card becomes corrupted initialise it NOTE Once images are deleted they cannot be restored Check images before deleting IMPORTANT Be sure to always use the same tape and memory card together as they were during recording otherwise ...

Page 50: ...te recording time Optional Provided 9 title images pre stored NOTE It is not possible to adjust the speaker and headphone volume during E Mail Clip Recording mode To make video clips from recorded video footage 1 Load a cassette 墌 pg 15 2 Load a memory card 墌 pg 16 3 Set the VIDEO MEMORY Switch to VIDEO 4 Set the Power Switch to PLAY while pressing down the Lock Button located on the switch 5 Set ...

Page 51: ...e index screen 墌 pg 25 26 cannot be used during E Mail Clip Recording Video noise may appear while viewing video clips in the LCD monitor or viewfinder however this noise is not present in the actual video clips stored in the memory card You can also view video clips on your PC by using Windows Media Player version 6 4 or later Refer to the instructions of PC and software A selection of titles fra...

Page 52: ...rder starts to play your footage it will appear on your TV This will confirm the connections and the AUX channel for dubbing purposes Before you start dubbing make sure that the indications do not appear on the connected TV If they do they are being recorded onto the new tape To choose whether or not the following displays appear on the connected TV Date time Set DATE TIME to AUTO ON or OFF 墌 pg 3...

Page 53: ...deo unit and camcorder NOTES It is recommended to use the AC Power Adapter Charger as the power supply instead of the battery pack 墌 pg 11 If the remote control is used when both the player and recorder are JVC video units both units will perform the same operation To prevent this from happening press the buttons on both units If a blank portion or disturbed image is played back on the player duri...

Page 54: ... 12 Repeat steps 10 11 for additional editing Stop the video unit and camcorder NOTES It is recommended to use the AC Power Adapter Charger as the power supply instead of the battery pack 墌 pg 11 If no image is displayed on the LCD monitor set S AV INPUT to OFF 墌 pg 31 40 If the remote control is used when both the player and recorder are JVC video units both units will perform the same operation ...

Page 55: ...mage is stored in the memory card NOTES If SNAPSHOT is pressed in step 8 when a memory card is not loaded the message COPYING FAILED is displayed If an image recorded on the tape using WIDE MODE 墌 pg 36 is dubbed to a memory card the WIDE mode identifying signal is not dubbed with it To use Playback Special effects with a video image you wish to dub perform up to step 8 using the remote control pr...

Page 56: ...order s Power Switch set to PLAY B DISPLAY Button 墌 pg 22 52 61 C SHIFT Button 墌 pg 57 60 D SLOW Rewind Forward Buttons 墌 pg 57 Left Right Buttons 墌 pg 57 E REW Button Rewind Reverse Shuttle Search on a tape 墌 pg 21 Displays previous file in a memory card 墌 pg 24 F FADE WIPE Button 墌 pg 62 G EFFECT ON OFF Button 墌 pg 58 H EFFECT Button 墌 pg 58 I PAUSE IN Connector 墌 pg 61 J MBR SET Button 墌 pg 60 ...

Page 57: ...ure may seem unstable especially with steady images This is not a malfunction Frame By Frame Playback Allows frame by frame search during video playback During normal or still playback press SLOW IU repeatedly for forward or SLOW YI repeatedly for reverse Each time SLOW YI or IU is pressed the frame is played back Playback Zoom Magnifies the recorded image up to 30X at any time during video playba...

Page 58: ...rack can be customised only when recorded in the 12 bit and SP modes 墌 pg 34 1 Play back the tape to locate the point where editing will start then press PAUSE 9 2 While holding A DUB D on the remote control press PAUSE 9 The 9D and MIC indicators appear 3 Press PLAY U then begin narrating Speak into the microphone To pause dubbing press PAUSE 9 4 To end Audio Dubbing press PAUSE 9 then STOP 8 To ...

Page 59: ...g 22 1 Play back the tape locate the Edit Out point and press PAUSE 9 Confirm the time code at this point 墌 pg 41 2 Press REW 3 until the Edit In point is located then press PAUSE 9 3 Press and hold INSERT I on the remote control then press PAUSE 9 The 9I indicator and the Time Code min sec appear and the camcorder enters Insert Pause mode 4 Press START STOP to begin editing Confirm the insert at ...

Page 60: ...dom Assemble Editing IMPORTANT Although the MBR is compatible with JVC VCRs and those of many other makers it may not work with yours or may offer limited functions NOTES If the VCR s power does not come on in step 1 try another code from the VCR CODE LIST Some brands of VCR do not come on automatically In this case turn the power on manually and try step 2 If the remote control is not able to con...

Page 61: ...while pressing down the Lock Button located on the switch 5 Turn the VCR power on insert a recordable tape and engage the AUX mode Refer to the VCR s instructions NOTES Before Random Assemble Editing make sure the indications do not appear on the TV monitor If they do they will be recorded onto the new tape To choose whether or not the following displays appear on the connected TV Date time Set DA...

Page 62: ...n the remote control The registered points disappear one at a time from the most recently registered point If you are not using Wipe Fader or Program AE with special effects repeat steps 8 and 9 only NOTES When choosing a scene set Edit In and Edit Out points so that there is a relatively large difference between them If the search time for an in point exceeds 5 minutes the recording deck s Record...

Page 63: ... press PAUSE 9 14 Press VCR REC STBY 79 or manually engage the VCR s Record Pause mode 15 Press the Recording Start Stop Button on the camcorder Editing proceeds as programmed right through to the end of the last registered scene When dubbing is complete the camcorder enters the Pause mode and the VCR enters its Record Pause mode If you do not register an Edit Out point the tape will be dubbed all...

Page 64: ...corder Timing 4 Press R A EDIT ON OFF to make the Random Assemble Editing menu disappear then press the MENU Wheel in The Menu Screen appears 5 Rotate the MENU Wheel to select t and press it The VIDEO Menu appears 6 Rotate the MENU Wheel to select SYNCHRO and press it The value for SYNCHRO is highlighted 7 Based on the diagnostics performed you can now advance the VCR s record timing by rotating t...

Page 65: ...rder When using a DV cable be sure to use the optional JVC VC VDV206U or VC VDV204U DV cable depending on the type of DV connector 4 or 6 pins on the PC If the PC connected to the camcorder via the USB cable is not powered the camcorder does not enter the USB mode The date time information cannot be captured into the PC Refer to the instruction manuals of the PC and Software The still images can a...

Page 66: ... Disconnect the USB cable from the camcorder and PC NOTES It is recommended to use the AC Power Adapter Charger as the power supply instead of the battery pack 墌 pg 11 Use the provided software PIXELA ImageMixer to capture video in real time You can also use the camcorder for web conference by using Microsoft Windows NetMeeting and signing up for MSN Hotmail In the Web Camera mode the following bu...

Page 67: ...til it recedes completely before closing the cassette holder cover When the Recording Start Stop button is pressed it may take a few seconds before actual recording starts The T indicator starts rotating when the camcorder actually starts recording The time required to calculate and display the remaining tape length and the accuracy of the calculation may vary according to the type of tape used TA...

Page 68: ...d 2 The Power Switch is set to PLAY or OFF For Video Recording The tape s erase protection tab is set to SAVE The VIDEO MEMORY Switch is set to MEMORY TAPE END appears The cassette holder cover is open For D S C Recording The VIDEO MEMORY Switch is set to VIDEO 2 Set the Power Switch to A or M 墌 pg 17 23 For Video Recording Set the tape s erase protection tab to REC 墌 pg 15 Set the VIDEO MEMORY Sw...

Page 69: ...ower Switch is set to A or M VIDEO MEMORY Switch is set to MEMORY 9 Set the Power Switch to PLAY 墌 pg 20 Set the VIDEO MEMORY Switch to VIDEO 10 The tape is moving but there is no picture 10 Your TV has AV input terminals but is not set to its VIDEO mode The cassette holder cover is open 10 Set the TV to the mode or channel appropriate for video playback 墌 pg 22 Close the cassette holder cover 墌 p...

Page 70: ...e Sepia SEPIA and Monotone MONOTONE 墌 pg 31 33 17 The image taken using Snapshot is too dark 17 Shooting was performed under backlit conditions 17 Press BACK LIGHT 墌 pg 47 18 The image taken using Snapshot is too bright 18 The subject is too bright 18 Set r to SPOTLIGHT 墌 pg 33 19 White Balance cannot be activated 19 The Sepia SEPIA or Monotone MONOTONE mode is activated 19 Disengage the Sepia SEP...

Page 71: ... The CHARGE indicator on the AC Power Adapter Charger does not light 26 The temperature of the battery is extremely high low Charging is difficult in places subject to extremely high low temperatures 26 To protect the battery it is recommended to charge it in places with a temperature of 10 C to 35 C 墌 pg 74 27 SET DATE TIME appears 27 The built in clock s rechargeable lithium battery is discharge...

Page 72: ...or and the viewfinder are made with high precision technology However black spots or bright spots of light red green or blue may appear constantly on the LCD monitor or the viewfinder These spots are not recorded on the tape This is not due to any defect of the unit Effective dots more than 99 99 35 36 The indicators and the image colour on the LCD monitor are not clear 36 This may occur when the ...

Page 73: ...malfunction of some kind has occurred In this case the camcorder s functions become unusable 43 墌 pg 85 44 An error indication E03 or E04 appears 44 A malfunction of some kind has occurred In this case the camcorder s functions become unusable 44 墌 pg 85 45 The remote control does not work 45 REMOTE is set to OFF The remote control does not point at the remote sensor The remote control batteries a...

Page 74: ...temperatures are within the tolerances shown in the chart below This is a chemical reaction type battery cooler temperatures impede chemical reaction while warmer temperatures can prevent complete charging store in a cool dry place Extended exposure to high temperatures will increase natural discharge and shorten service life fully charge and then fully discharge the battery every 6 months when st...

Page 75: ... unit short circuit the terminals of the battery pack Keep it away from metallic objects when not in use allow inflammables water or metallic objects to enter the unit remove the battery pack or disconnect the power supply while the power is on leave the battery pack attached when the camcorder is not in use 2 Avoid using the unit in places subject to excessive humidity or dust in places subject t...

Page 76: ...ets dirty gently wipe it with a soft cloth outward from the centre hole using a circular motion Do not use conventional disc cleaners or cleaning spray Do not bend the CD ROM or touch its mirror surface Do not store your CD ROM in a dusty hot or humid environment Keep it away from direct sunlight Serious malfunctioning About moisture condensation You have observed that pouring a cold liquid into a...

Page 77: ...n wipe again with a dry cloth 2 Press PUSH OPEN and open the LCD monitor Wipe gently with a soft cloth Be careful not to damage the monitor Close the LCD monitor 3 To clean the lens blow it with a blower brush then wipe gently with lens cleaning paper NOTES Avoid using strong cleaning agents such as benzine or alcohol Cleaning should be done only after the battery pack has been removed or other po...

Page 78: ... LCD panel TFT active matrix system Viewfinder Electronic viewfinder with 0 24 colour LCD Speaker Monaural For Digital Video Camera Format DV format SD mode Signal format PAL standard Recording Playback format Video Digital component recording Audio PCM digital recording 32 kHz 4 channel 12 bit 48 kHz 2 channel 16 bit Cassette Mini DV cassette Tape speed SP 18 8 mm s LP 12 5 mm s Maximum recording...

Page 79: ... analogue AV Video input Y 0 8 V to 1 2 V p p 75 Ω analogue Video output Y 1 0 V p p 75 Ω analogue Audio input 300 mV rms 50 kΩ analogue stereo Audio output 300 mV rms 1 kΩ analogue stereo EDIT ø3 5 mm 2 pole Headphone output Stereo DV Input output 4 pin IEEE 1394 compliant USB 5 pin AC Power Adapter Charger For General Power requirement AC 110 V to 240 Vd 50 Hz 60 Hz Power consumption 23W Output ...

Page 80: ...Master Page Left start 80 EN INDEX INDEX Controls Connectors And Indicators Y Z GR DV4000PAL book Page 80 Friday February 14 2003 10 30 PM ...

Page 81: ...ut Output Connector S VIDEO 墌 pg 22 52 61 Z Edit Connector EDIT 墌 pg 61 a Microphone connector MIC Attach the optional microphone b Headphone Connector 墌 pg 58 No sound is output from the speaker when headphones are connected to this connector c Digital Video Connector DV IN OUT i Link 墌 pg 53 54 65 i Link refers to the IEEE1394 1995 industry specification and extensions thereof The logo is used f...

Page 82: ...tops blinking when the focus is locked c Shooting Icon 墌 pg 23 Appears and blinks during shooting d Card Icon 墌 pg 23 Appears during shooting Blinks in white when a memory card is not loaded Blinks in yellow while the camcorder is reading the data in the memory card such as titles frames NAVIGATION thumbnail images video clips still images etc e Picture Quality FINE and STANDARD in order of qualit...

Page 83: ...or Viewfinder Indications During Video Playback a Sound Mode Indicator 墌 pg 40 b Blank Search Indicator 墌 pg 21 c Thumbnail Storing Indicator 墌 pg 49 Appears while the captured image is being stored as a thumbnail image in the memory card d Tape Speed 墌 pg 34 e U Playback 5 Fast Forward Shuttle Search 3 Rewind Shuttle Search 9 Pause 9 U Forward Frame By Frame Playback Slow Motion Y 9 Reverse Frame...

Page 84: ...en the tape ends during recording or playback 墌 pg 67 SET DATE TIME Appears when the date time is not set 墌 pg 14 Appears when the built in clock lithium battery is discharged and the previously set date time is erased 墌 pg 14 LENS CAP Appears for 5 seconds after power is turned on if the lens cap is attached A DUB ERROR Appears if Audio Dubbing is attempted on a blank portion of a tape 墌 pg 58 A ...

Page 85: ... does not recognise the loaded memory card Remove the memory card once and insert it again Repeat these procedures until no indication appears If the indication still appears the memory card is corrupted UNSUPPORTED FILE Appears when playing back a file that is not compatible with DCF or a file with a size that is not compatible with this camcorder CHECK CARD S WRITE PROTECTION SWITCH Appears when...

Page 86: ...35 DPOF Setting Digital Print Order Format 29 30 Dubbing 52 55 Dubbing from tape to memory card COPY 40 55 E E Mail Clip Recording E CLIP REC 38 50 Erase Protection 15 16 Exposure Control EXPOSURE 46 F Fade In Out 32 Fast Forward The Tape 20 Flash B IN FLASH 37 43 Flash Brightness Adjustment FLASH ADJ 43 Frame By Frame Playback 57 G Gain Up GAIN UP 35 Grip Adjustment 12 I Image Size IMAGE SIZE 39 ...

Page 87: ...setting REMOTE 37 Resetting Menu Settings CAM RESET 38 Resetting The File Name 29 Rewind The Tape 20 S SD Memory Card 16 75 Self Timer SELF TIMER 35 44 Set Remote VCR Code 60 Shuttle Search 21 Slow Motion Playback 57 Snapshot 23 42 Snapshot Mode SNAP MODE 34 Sound Mode SOUND MODE 34 40 Speaker Volume 20 Specifications 78 79 Still Playback 20 S Video AV input S AV INPUT 40 52 Synchro adjustment SYN...

Page 88: ...COPYRIGHT 2003 VICTOR COMPANY OF JAPAN LTD EN GR DV4000 Master Page Cover4 EK Printed in Japan 0203 FO ID VP GR DV4000PAL book Page 88 Friday February 14 2003 10 30 PM ...

Reviews: