


Recording at a Fixed Interval and Playing
Back Repeatedly
After recording for a specified duration, this unit automatically plays back the
scene and then repeats the recording process and the playback process
over and over again. This can be used to check a sports form or dance form.
The recorded scene can also be deleted automatically depending on the
setting.
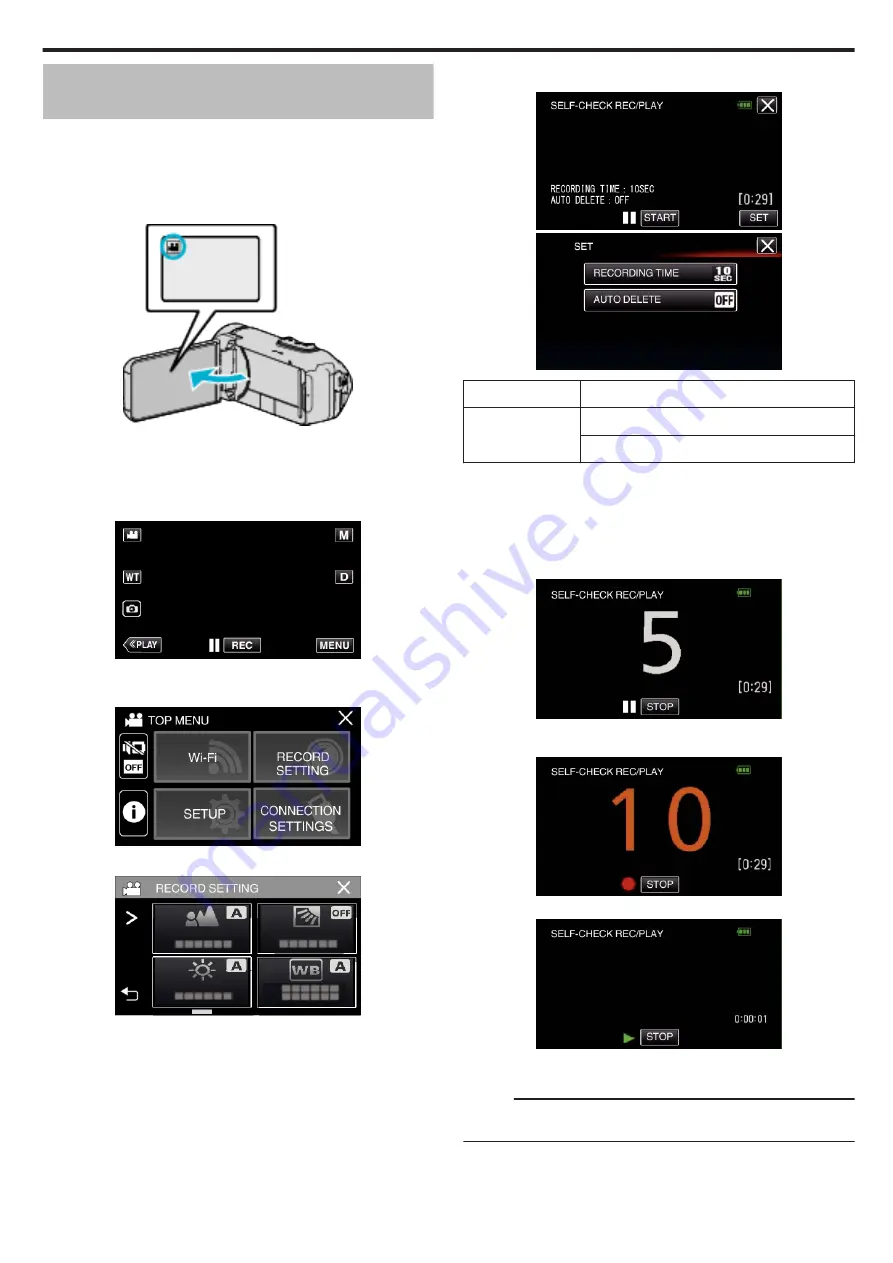
1
Open the LCD monitor.
.
0
Check if the recording mode is
A
.
0
If the mode is
B
still image, tap
B
on the recording screen to display
the mode switching screen.
Tap
A
to switch the mode to video.
2
Tap “MENU”.
.
0
The top menu appears.
3
Tap “RECORD SETTING”.
.
4
Tap “SELF-CHECK REC/PLAY”.
.
0
If the icon is not displayed on the screen, tap
1
to scroll the screen.
0
Tap
L
to exit the menu.
0
Tap
J
to return to the previous screen.
5
Tap “SET”.
.
.
RECORDING TIME 10 to 40 seconds (Can be set in 5-second interval.)
AUTO DELETE
Off: The recorded video is retained.
On: The recorded video is deleted.
0
Tap
L
to return to the previous screen.
0
This operation is not necessary if you do not intend to change the
current setting displayed.
6
Tap “START”.
0
There is a 5 second countdown before recording starts at the
beginning of the operation only.
.
0
When the recording starts, the color of the number changes and the
remaining number of seconds for recording is displayed.
.
0
When recording is complete, playback starts automatically.
.
0
When playback ends, the next recording starts automatically.
0
Tap “STOP” to exit “SELF-CHECK REC/PLAY”.
Memo :
0
The START/STOP button cannot be used during the “SELF-CHECK REC/
PLAY” operation.
Recording
49