background image

EN

Playlists

It is a list that enables you to organize 

recorded videos in order of preference.
Preparation:

 Select 

!

 mode.

 Select the playback mode.

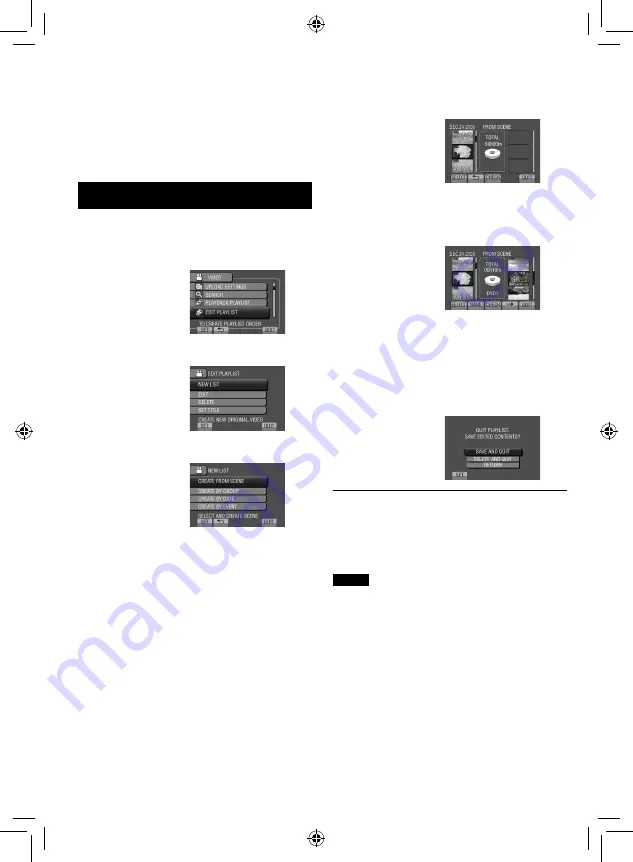
Creating Playlists

1

  Touch MENU.

2

  Select [EDIT PLAYLIST].

3

  Select [NEW LIST].

4

  Select an item and display files.

 [CREATE FROM SCENE]:

  Display all files individually.

 [CREATE BY GROUP]:

  Display all files listed by group.

 [CREATE BY DATE]:

  Display all the files listed by recording 

date.

 [CREATE BY EVENT]:

  Search for an event and display the 

corresponding files listed by recording 

date.

5

  Select the file to add to playlist.

To preview scenes, select the file and 

select [CHECK].

6

  Select the insertion point.

 To add other files, repeat steps 

5

 and 

6

.

 To delete a registered scene, select the 

registered file, then select [CANCEL].

7

  Select [SAVE].

8

  Select [SAVE AND QUIT].

To quit the screen

Select [QUIT].
To add a picture title after creating a 

playlist 

See page 68.

NOTE

 A maximum of 99 playlists can be created.

 If you delete the original files, the 

corresponding files are also deleted from the 

playlist.

Summary of Contents for Everio GZ-HM1

Page 1: ...6 INSTRUCTIONS Advanced INSTRUCTIONS GUIDEBOOK U GZ HM1 ENGLISH To view the INSTRUCTIONS click below To view the Advanced INSTRUCTIONS click below C0S6_HM1 US_GB_EN_LYT2196 003A_C1 1 C0S6_HM1 US_GB_EN_LYT2196 003A_C1 1 2010 01 27 19 50 55 2010 01 27 19 50 55 ...

Page 2: ...ct For Future Reference Enter the Model No located on the bottom of the camcorder and Serial No located on the battery pack mount of the camcorder below Model No Serial No Read these INSTRUCTIONS to enjoy your CAMCORDER For more details on the operations refer to the Advanced INSTRUCTIONS in the supplied CD ROM GZ HM1 U ENGLISH C0S6_HM1 US_IB_EN_01 indd 1 C0S6_HM1 US_IB_EN_01 indd 1 2010 01 27 19 ...

Page 3: ...make sure that it has sufficient space on all sides to allow for ventilation 10 cm 3 15 16 or more on both sides on top and at the rear Do not block the ventilation holes If the ventilation holes are blocked by a newspaper or cloth etc the heat may not be able to get out No naked flame sources such as lighted candles should be placed on the apparatus When discarding batteries environmental problem...

Page 4: ...pparatus has been exposed to rain or moisture does not operate normally or has been dropped Remember that this camcorder is intended for private consumer use only Any commercial use without proper permission is prohibited Even if you record an event such as a show performance or exhibition for personal enjoyment it is strongly recommended that you obtain permission beforehand Trademarks AVCHD and ...

Page 5: ...cording Turn off the camcorder and attach the battery pack Power charge lamp blinks Charging goes out Charging finished Battery Pack AC Adapter To AC Outlet 110V to 240V The battery pack is not charged at the time of purchase Access lamp blinks Accessing files Do not remove the AC adapter the battery pack or the SD card when the access lamp is blinking GETTING STARTED ...

Page 6: ...e sensors with your finger The sensors do not function if you touch them with your finger nail or with gloves on S Select CLOCK SETTING T Select the city closest to the area where you use the camcorder U Select ON if daylight saving time is observed V Set the date and time Slide your finger up and down on the sensor Then touch OK Touch sensor Sets the date and time Moves the cursor to the right OK...

Page 7: ...ding Press the START STOP button to start recording and press it again to stop Remaining space on the recording media Video Quality Record standby Recording Q Slide the mode switch to select video mode R Select recording mode REC The mode changes when you press the button The auto recording indicator appears GETTING STARTED ...

Page 8: ...ON Do not forget to make copies after recording To copy files onto discs Z p 26 To dub files to a VCR DVD recorder Z p 28 To edit files on your computer Z p 29 Q Select playback mode PLAY The mode changes when you press the button R Select the desired file Index screen S Select F Touch OK Playback screen GETTING STARTED ...

Page 9: ...t 17 Other Settings 18 Using an SD Card 18 RECORDING PLAYBACK Recording Files 19 Video Recording 19 Still Image Recording 20 Image Stabilizer 20 Zooming 21 Flash 21 Checking the Remaining Space on the Recording Media 21 Checking the Remaining Battery Power 21 Playing Back Files 22 Video Playback 22 Still Image Playback 23 USING WITH TV Viewing Files on TV 24 Connection with TV 24 Playback Operatio...

Page 10: ... JVC cannot guarantee safety or performance of this product when it is operated by other batteries If the camcorder is subjected to electrostatic discharge turn off the power before using it again If a malfunction occurs stop using the camcorder immediately and contact www jvc com or by phone at 1 800 252 5722 Recorded data may be erased while the camcorder is being repaired or inspected Back up a...

Page 11: ...tional microphone or light can be attached to the shoe adapter Slide the shoe cover in the direction of the arrow to reveal the shoe adapter mounting socket Mount the accessory shoe adapter Fasten the shoe adapter to the shoe adapter mounting socket by turning the screw in the direction of the arrow Insert a microphone etc from behind the shoe adapter NOTE Do not try to attach a microphone etc to ...

Page 12: ... S N A P S H O T S T A R T S T O P IN D E X NOTE The transmitted beam may not be effective or may cause incorrect operation when the remote sensor is directly exposed to sunlight or powerful lighting To Reinsert the Battery Pull out the battery holder by pressing the lock tab Effective distance Max 4 m 13 16 ft Remote Sensor Lock Tab Lithium Battery CR2025 GETTING STARTED ...

Page 13: ...12 EN Index NOTE Be careful not to cover 2 3 5 and C during shooting The LCD monitor can rotate 270 INFO SNAP SHOT START STOP INDEX GETTING STARTED ...

Page 14: ...mcorder Power Button SD Card Slot OPEN knob Z p 18 Speaker PLAY REC Button Z p 19 20 22 23 SNAPSHOT Button Z p 20 Touch Sensor OK Button MENU Button Z p 36 USB Connector Z p 26 30 Mode Switch EXPORT Button Z p 34 DIRECT DISC Button Z p 27 INFO Button Z p 21 0 DISPLAY Button Z p 15 1 UPLOAD Button Z p 35 TITLE Button 2 Lens 3 Flash Z p 21 4 Shoe Adapter Mounting Socket Z p 10 5 Remote Sensor 6 Zoom...

Page 15: ...cator 3 Shutter Speed During Video Recording Only Mode Indicator High Speed Recording Indicator Time Lapse Recording Indicator Upload Mode Indicator Z p 35 Counter Export Mode Indicator Z p 34 Video Quality Remaining Time MREC Appears during recording M Q Appears during record standby mode Shooting Indicator Z p 19 Continuous Shooting Indicator Wind Cut Indicator Microphone Input Level Indicator E...

Page 16: ...dicator Battery Indicator Date Time Z p 16 Volume Level Indicator Wipe Fader Effect Indicator x v Color 0 Output with 1080p During Still Image Playback 4 55 PM DEC 24 2010 Mode Indicator Quick Review Indicator Z p 20 Folder File Number Slide Show Playback Indicator Recording Medium Indicator Battery Indicator Date Time Z p 16 Face Detection Zoom Indicator Output with 1080p Switching indication mod...

Page 17: ...detach the battery pack NOTE You can also use the camcorder with just the AC adapter The actual recording time may shorten depending on the recording environment such as when recording scenes with fast moving subject Please do not pull or bend the AC adapter plug and cable This may damage the AC adapter Date Time Setting 1 Open the LCD monitor to turn on the camcorder 2 Touch MENU 3 Select DISPLAY...

Page 18: ...osest to the area you are traveling To return to the previous screen Select To quit the screen Select QUIT Language Setting The language on the display can be changed 1 Open the LCD monitor to turn on the camcorder 2 Touch MENU 3 Select DISPLAY SETTINGS 4 Select LANGUAGE 5 Select the desired language To return to the previous screen Select To quit the screen Select QUIT Grip Adjustment NOTE Fasten...

Page 19: ... have already been recorded using the devices from other manufacturers It is recommended to use Class 6 when recording video in UXP mode NOTE No SD card is supplied with your camcorder Insert an SD card Preparation Press the Power button for more than 2 seconds to turn off the camcorder 1 Slide the OPEN knob to open the SD card cover 2 Firmly insert the card with its clipped edge first 3 Close the...

Page 20: ...ecting during playback deletes that scene To record a still image during video recording Press SNAPSHOT To change the video quality Change the settings in VIDEO QUALITY To change the manual recording mode Select A M twice Slide the mode switch to select video mode NOTE The video recording mode is automatically selected when you turn off the camcorder and then turn on again If the camcorder is not ...

Page 21: ...ZE To record still images continuously Set to CONTINUOUS SHOOTING in SHUTTER MODE To change the manual recording mode Select A M twice NOTE If the camcorder is not operated for 5 minutes while the power is on it turns itself off automatically to conserve power The sides of still images recorded in 16 9 size may be cut off when printed Check whether 16 9 size prints can be printed at your local pri...

Page 22: ...of the subject s eyes ON The flash fires regardless of the shooting condition SLOW SYNCHRO The flash fires The shutter speed becomes slower so that background can also be brightened NOTE The flash does not work during CONTINUOUS SHOOTING and BRACKETING The flash does not work with the following SCENE SELECT settings LANDSCAPE TWILIGHT NIGHT SNOW BEACH FIREWORKS SUNSET It is recommended shoot dista...

Page 23: ... Select when playback is stopped To change the number of thumbnails 6 thumbnails 12 thumbnails Move the zoom lever to W Operations during Video Playback On screen buttons N Return to the first scene of the file O Go to the first scene of the next file L Return to the index screen J Reverse search during playback E Frame by frame playback in reverse direction during pause F Playback Q Pause K Forwa...

Page 24: ...e desired file Slide the mode switch to select still image mode Still Image Playback Operations during Still Image Playback On screen buttons P Play the slide show in reverse direction F Play the slide show in forward direction L Return to the index screen N Display the previous file F Start the slide show Q End the slide show O Display the next file Rotate 90 degrees counterclockwise during playb...

Page 25: ... cable the image or sound may not appear on the TV properly depending on the TV connected In such cases perform the following operations 1 Disconnect the HDMI cable and connect it again 2 Turn off and on the camcorder again To connect using the COMPONENT connector NOTE Change the settings in COMPONENT OUTPUT according to the connection Viewing Files on TV USING WITH TV HDMI Mini Connector AC Adapt...

Page 26: ...ting the camcorder to the VCR DVD recorder Turn on the VCR DVD recorder and set the VCR DVD recorder to its AUX input mode 4 Start playback on the camcorder Z p 22 23 To display camcorder s on screen display on TV Set DISPLAY ON TV to ON NOTE When the video was recorded with x v Color set to ON change the x v Color setting on TV For details refer to the TV s instruction manual AV Cable DC Connecto...

Page 27: ...t Desk series LaCie Design by Neil Poulton series USB external hard disk drive with the capacity over 2 TB cannot be used Using a BD DVD Burner The files in the camcorder can be backed up to a disc using a BD DVD burner Use one of the following methods to view the disc If you try to play back the disc with incompatible player the disc may not be ejected Playing back the disc in the BD DVD burner u...

Page 28: ... automatically selected and copied 3 Select EXECUTE 4 Select YES or NO YES Displays the thumbnails by group NO Displays the thumbnails by date or by playlist 5 Select EXECUTE The files are copied on the disc When COMPLETED appears touch OK When INSERT NEXT DISC PRESS STOP TO EXIT CREATE appears change the disc Remaining files are copied on the second disc To cancel copying select STOP Copying Vide...

Page 29: ... 3 Select the desired playlist 4 Select YES A black screen is displayed for 5 seconds at the beginning and the end of the footage 4 At the point you want to start dubbing start recording on the VCR DVD recorder Refer to the VCR DVD recorder s instruction manual To stop dubbing Stop recording on the VCR DVD recorder To hide the date or icons on the screen Change the settings in DISPLAY ON TV before...

Page 30: ...mation on iMovie or iPhoto refer to the Apple web site For details on how to use iMovie or iPhoto refer to the help file of the respective software There is no guarantee that the operations will work in all environments NOTE Make sure your PC has a recordable BD DVD drive If your system does not meet the requirements it is recommended to copy files using a BD DVD burner Z p 26 Macintosh users may ...

Page 31: ...ts on the PC 3 Click All volume in camcorder and click Next 4 Click Start Backup starts To disconnect the camcorder from the PC 1 Right click the icon Safely Remove Hardware on the task bar and select Safely remove USB Mass Storage Device 2 Follow the on screen instructions and make sure that the device can be safely removed 3 Disconnect the USB cable and close the LCD monitor NOTE It takes time t...

Page 32: ... PC 1 Double click the icon to open the calendar 2 Select Movies only 3 Click 4 Input the name of the new user list and click OK 5 Click the recording date The files recorded on the day are displayed 6 Drag and drop the file into the user list To add other files into the user list repeat steps 5 and 6 PC OPERATION C0S6_HM1 US_IB_EN_04 indd 31 C0S6_HM1 US_IB_EN_04 indd 31 2010 01 27 11 48 49 2010 0...

Page 33: ...5 Input the disc name select the top menu style and click Next 6 Click Start NOTE When copying video recorded in UXP recording mode to create an AVCHD disc the video needs to be converted to XP recording mode before copying Therefore it may take longer time than copying video recorded in other modes Use Everio MediaBrowser Player to play back the disc Refer to the help of the provided Everio Media...

Page 34: ...k EVERIO_MEM EVERIO_SD displayed on the computer screen 4 Click Search the files you want referring the folder structure above 5 Copy files to any folder on the PC such as the desktop To edit files Use the software compatible with AVCHD JPEG NOTE Do not move or delete the folders and the files in the camcorder X number Contains the still image folders Video file in AVCHD format Video files with de...

Page 35: ...yback mode 1 Press EXPORT 2 Select the file and select To check the content of the file select CHECK 3 Select DONE To cancel the export setting Select the file and select again To quit the screen 1 Select DONE 2 Select YES To confirm the export setting Press EXPORT on the index screen Transferring the Files to PC Preparation Install iTunes on a PC http www apple com itunes 1 Connect the camcorder ...

Page 36: ...s authorized according to the terms of the software license JVC When contacting the nearest JVC office or agency in your country refer to the JVC Worldwide Service Network at http www jvc victor co jp english worldmap index e html about this software please have the following information ready Product Name Model Problem Error Message PC Manufacturer Model Desktop Laptop CPU OS Memory MB Available ...

Page 37: ...y may not be displayed correctly The LCD monitor is difficult to see The LCD monitor may be difficult to see if used in bright areas such as under direct sunlight Before requesting service consult the following chart If the solutions indicated in the chart do not solve the problem consult your nearest JVC dealer or JVC service center for instructions Refer also to the FAQ of new products on JVC s ...

Page 38: ...eck the remaining battery pack charge When the battery pack is fully charged the lamp does not flash When recharging in either a hot or cold environment ensure that battery is being charged within the permitted temperature range If the battery pack is being recharged outside the permitted temperature range recharging may stop to protect the battery pack The remote control does not work Replace the...

Page 39: ... it on again MEMORY CARD ERROR Perform formatting All data is deleted Remove and re insert the SD card MultiMediaCard cannot be used Remove any dirt from the SD card terminals Insert the SD card before switching the power on Turn off the camcorder and turn it on again Do not change the folder name on a computer RECORDING CANCELLED Turn off the camcorder and turn it on again Prevent the camcorder f...

Page 40: ... V p p 75 W Pb Pr 700 mV p p 75 W USB Mini USB type A and type B USB 2 0 compliant Headphones ø3 5 mm mini jack stereo analog output Microphone ø3 5 mm mini jack stereo analog input AC Adapter Power requirement AC 110 V to 240 V 50 Hz 60 Hz Output DC 11 V 1 A Remote Control Power supply DC 3 V Battery life Approx 1 year depending on the frequency of use Operating distance Within 4 m 13 16 ft Opera...

Page 41: ...INE 9999 510 1030 2100 4140 8330 9999 9999 1920 x 1080 STANDARD 9999 810 1620 3210 6310 9999 9999 9999 1280 x 720 FINE 9999 1150 2310 4690 9230 9999 9999 9999 1280 x 720 STANDARD 9999 1760 3530 6780 9999 9999 9999 9999 4 3 3648 x 2736 FINE 9999 110 220 440 880 1770 3550 7180 3648 x 2736 STANDARD 9999 170 340 700 1380 2770 5550 9999 3200 x 2400 FINE 9999 140 280 580 1140 2300 4600 9300 3200 x 2400 ...

Page 42: ...arging recording time approx Battery pack Charging time Recording time BN VF808U 1 h 50 m 1 h 10 m BN VF815U Provided 2 h 40 m 2 h 25 m BN VF823U 3 h 40 m 3 h 40 m When the monitor backlight is set to STANDARD mode FURTHER INFORMATION ...

Page 43: ...n fully discharge the battery every 6 months when storing the battery pack over a long period of time remove from charger or powered unit when not in use as some machines use current even when switched off ATTENTION The product you have purchased is powered by a rechargeable battery that is recyclable Please call 1 800 8 BATTERY for information on how to recycle this battery Recording Medium Be su...

Page 44: ...th a tripod attach the camcorder to the tripod securely If the camcorder drops you may be injured and the camcorder may be damaged When a child uses the unit there must be parental guidance Declaration of Conformity Model Number GZ HM1SU Trade Name JVC Responsible party JVC AMERICAS CORP Address 1700 Valley Road Wayne N J 07470 Telephone Number 973 317 5000 This device complies with Part 15 of FCC...

Page 45: ...rt to Library Mode 34 F Flash 21 H HDMI 24 I Image Stabilizer 20 iTunes 34 L Language Setting 17 LCD Monitor 14 42 M Menu Settings 36 N Number of Images 40 O On screen Recording Control 19 On screen Zoom Control 21 P Portable Media Player 34 Q Quick Review 19 20 R Recordable Time 40 Recording Medium 42 Remaining Battery Power 21 Remaining Recording Time 21 Remote Control 11 13 S SD Card 18 Speaker...

Page 46: ...HD MEMORY CAMERA GZ HM1 Advanced INSTRUCTIONS EN ...

Page 47: ... a Still Image from a Video 58 Deleting Files 58 Protecting Files 59 Viewing File Information 61 Changing the Event Registration 62 Dividing Files 63 Trimming Files 64 Face Detection Zoom 65 Playlists 66 Creating Playlists 66 Playing Back Playlists 67 Other Operations of Playlists 68 Print Setting 69 DPOF Print Setting 69 Direct Printing with PictBridge Printer 70 COPYING Copying Files 71 Copying ...

Page 48: ...ngle W side Brightness You can adjust the brightness manually 1 Slide the FOCUS BRIGHT switch up to BRIGHT 2 Turn the adjustment dial to adjust the brightness of the subject The brightness is corrected in the following range mode 6 to 6 by 1 mode 2 0 to 2 0 EV by 1 3 EV 3 Press SET Shutter Speed A fast shutter speed can freeze the motion of the fast moving subject and a slow shutter speed can blur...

Page 49: ...equently use to the U USER button you can access the function quickly To assign a function to the USER button 1 Touch MENU 2 Select USER BUTTON SETTING 3 Select the desired function You can select one of the following functions For details on each function see the pages given default setting BACKLIGHT COMP Z p 50 SCENE SELECT Z p 49 PHOTOMETRY AREA Z p 50 WB Z p 50 FOCUS ASSIST Z p 49 HIGH SPEED R...

Page 50: ...ning scenes look more natural 5 NIGHT Records with more sensitivity in dim locations by adjusting the shutter speed automatically SNOW Compensates for subjects that may appear too dark when shooting in extremely bright surroundings such as in snow BEACH Captures vividly the blue sky and sea on a sunny beach without making the people appear dark SPORTS Records fast moving subjects clearly SPOTLIGHT...

Page 51: ...he function PHOTOMETRY AREA Enables you to adjust the brightness in the desired spot when backlight compensation does not work well 6 WHOLE SCREEN Brightness is adjusted automatically for whole screen 7 SPOT Brightness for the specified spot is adjusted automatically w EFFECT Enables you to record videos or still images with special effects 1 OFF No effect is used J SEPIA The image has a brownish ...

Page 52: ... Sections that are close to be over exposed are displayed in striped pattern 100 Sections that are over exposed are displayed in striped pattern NOTE Correct the brightness by using the shutter speed or aperture priority setting function SHARPNESS Enhances the outline of the subject In mode only Adjust the sharpness using the touch sensor then touch OK NOTE Enhancing the sharpness causes the recor...

Page 53: ...he recording time limit is expired even if you do not stop recording NOTE Video quality is fixed to XP mode Sound cannot be recorded FACE PRIORITY AE AF cannot be activated Only optical zoom is available When using the U USER button pressing the U USER button repeatedly changes the setting Setting Image size Recording time sec Playback time sec Aspect ratio 1 OFF Deactivates the function 120fps 48...

Page 54: ... do not stop recording NOTE Audio cannot be recorded during time lapse recording Zooming simultaneous still image recording and DIS are not available in time lapse recording When recording is stopped with the recorded time less than 0 00 00 17 the video will not be saved Recording stops automatically 99 hours after it is started Make use of a tripod and AC adapter for time lapse recordings with lo...

Page 55: ...ettings have been changed 54 EN Photographer Registering Files to Events If you select an event to register the file to before starting recording you can find the file easily at playback Preparation Select mode Select the recording mode 1 Touch MENU 2 Select REGISTER EVENT VIDEO REGISTER EVENT VIDEO QUALITY HIGH SPEED RECORDING FOR EASY SEARCHING ARRANGE SET QUIT FACE PRIORITY AE AF 3 Select the e...

Page 56: ...ht to left or wipes out in the opposite way U WIPE DOOR Wipes in as the two halves of a black screen which open to the left and right revealing the scene or wipes out in the opposite way V WIPE SCROLL Wipes in from the bottom to the top of a black screen or wipes out in the opposite way W WIPE SHUTTER Wipes in from the center of a black screen toward the top and bottom or wipes out in the opposite...

Page 57: ...the group is displayed in the thumbnails To return to the index screen Select To quit the screen Select QUIT NOTE The contents of the group may be changed depending on the interval of the recording time To change the contents register the event Z p 54 The created groups may not be listed by recording date such as when copying the files to an SD card Date Index Screen You can search the desired fil...

Page 58: ...ack To return to the index screen Select To quit the screen Select QUIT To change the event registration of a file See page 62 Playing Back MTS Files MTS files demonstration files etc are stored in the EXTMOV folder Follow the procedure below to play back the MTS files in the EXTMOV folder Preparation Select mode Select the playback mode 1 Touch MENU 2 Select PLAYBACK OTHER FILE 3 Select the file ...

Page 59: ...ack mode Press SNAPSHOT when playback is paused NOTE Captured still images are stored at a resolution of 1920 x 1080 The image can be elongated in the horizontal or vertical directions depending on the quality of the source video file The continuous shooting function cannot be used to capture images You cannot capture video during playback Deleting Files Protected files cannot be deleted To delete...

Page 60: ...er files repeat this step To check the content of the file select CHECK 5 Select EXEC 6 Select YES To quit the screen Select QUIT Deleting All Files After performing steps 1 2 Z p 58 3 Select DELETE ALL 4 Select YES To quit the screen Select QUIT Protecting Files Preparation Select or mode Select the playback mode 1 Touch MENU 2 Select EDIT 3 Select PROTECT CANCEL ...

Page 61: ...ECT 5 Select the desired file and select x The x protection mark appears on the file To select other files repeat this step To check the content of the file select CHECK 6 Select QUIT 7 Select YES To release protection Select the protected file in step 5 Protecting All Files After performing steps 1 3 Z p 59 4 Select PROTECT ALL 5 Select YES To quit the screen Select QUIT To release protection of ...

Page 62: ... Press INFO again Histogram A histogram is a graph indicating the image s brightness By checking the image and its histogram you can see the exposure level pattern and the overall tone reproduction Preparation Play back the still image Press INFO twice D B The shutter speed F number and ISO sensitivity GAIN when recorded are also displayed A larger number of pixels in the center position indicates...

Page 63: ...lect the previous or next file by selecting or 6 Select a new event To cancel the event registration select CANCEL Changing the Event of the Selected Files After performing steps 1 3 4 Select SET RANGE AND CHANGE 5 Select the first file of the range To preview scenes select the file and select CHECK 6 Select the last file of the range 7 Select a new event To cancel the event registration select CA...

Page 64: ... recommended to select SET after the pause button is pressed Use these controls to locate the division point The actual division point may differ slightly from the point that is set 6 Select DIVIDE HERE To set the division point again select CANCEL To quit the screen Select QUIT NOTE When playing back the divided file the recording date of the division point is displayed You cannot divide the file...

Page 65: ...o select SET after the pause button is pressed Use these controls to locate the starting point 6 Select SET at the end point It is recommended to select SET after the pause button is pressed To cancel the start point setting select CANCEL 7 Select CAPTURE TRIMMED FILE To set the start end point again select REDEFINE AREA 8 Select YES When copying is finished the copied file is added to the index s...

Page 66: ...he playback mode 1 Select the desired still image 2 Select 3 Touch the touch sensor to select the face to zoom 4 Select 5 Adjust the zoom area Touch the touch sensor to move the area upwards or downwards Select to change the zoom ratio 6 Select SAVE Zoom images are saved in 16 9 aspect regardless of the original aspect 7 Select YES 8 Touch OK ...

Page 67: ...rding date CREATE BY EVENT Search for an event and display the corresponding files listed by recording date 5 Select the file to add to playlist To preview scenes select the file and select CHECK 6 Select the insertion point To add other files repeat steps 5 and 6 To delete a registered scene select the registered file then select CANCEL 7 Select SAVE 8 Select SAVE AND QUIT To quit the screen Sele...

Page 68: ...revious screen Select To quit the screen Select QUIT Playing Back Playlists 1 Touch MENU 2 Select PLAYBACK PLAYLIST 3 Select the playlist To stop playback Select L To quit the screen Select QUIT To play back from the desired scene 1 In step 3 select CHECK The index screen for playlist appears 2 Select the desired scene NOTE When playing back a playlist with a picture title playback starts after th...

Page 69: ...w the steps 5 to 8 Z p 66 Deleting Playlist Original files are not deleted even if you delete the playlist After performing steps 1 2 Z p 66 3 Select DELETE 4 Select a playlist you want to delete To delete all playlists at once select DELETE ALL 5 When DELETE PLAYLIST appears select YES Adding a Picture Title to Playlist After performing steps 1 2 Z p 66 3 Select SET TITLE 4 Select the desired pla...

Page 70: ...the file select CHECK 5 Select the number of prints max 15 prints Slide your finger up and down on the sensor You can set the value by using the touch sensor To set print information for other images repeat steps 4 and 5 You can set up to 999 files To cancel the selection set the number of prints to 00 in step 5 Setting All Files Together One Print for Each File After performing steps 1 2 3 Select...

Page 71: ...ime 5 Select PRINT To stop printing after printing starts 1 Select STOP 2 When QUIT PRINTING appears select YES Direct Printing with PictBridge Printer If your printer is compatible with PictBridge still images can be printed easily by connecting the camcorder directly to the printer with the USB cable Preparation Press the Power button for more than 2 seconds to turn off the camcorder USB Connect...

Page 72: ...n the source medium 4 Select the direction mode BUILT IN MEM CARD mode BUILT IN MEM CARD or CARD BUILT IN MEM 5 Select the desired menu COPY ALL MOVE ALL Select this to transfer all files in the recording medium When the size of all files in the built in memory is larger than the free space of the SD card only the files that can be contained in the free space will be transferred SELECT AND COPY SE...

Page 73: ...Preparation Turn on the camcorder first then turn on the BD DVD burner NOTE Refer also to the BD DVD burner s instruction manual When connecting to a DVD burner use the USB cable that came with the DVD burner When connecting to a BD burner use a USB cable with Mini A Male to B Male connectors JVC s QAM0852 001 optional is recommended Refer to page 35 for information on contacting JVC Backup All Fi...

Page 74: ...ing files are copied on the second disc To cancel the disc creation select CANCEL To quit the screen 1 Select QUIT 2 When QUIT appears select YES NOTE This method can be used to copy video files to discs in a computer connected to the camcorder Selecting Files for Backup Preparation Select or mode Select built in memory or SD card to copy from Connect the camcorder to the BD DVD burner When using ...

Page 75: ...camcorder 3 Select FINALIZE 4 Select EXECUTE 5 When COMPLETED appears select OK To check whether the disc was created properly On the screen as in step 1 select PLAYBACK To play back the created disc in the BD DVD burner using the camcorder 1 Connect the camcorder to the BD DVD burner 2 Turn on the camcorder first then turn on the BD DVD burner 3 Insert the disc 4 Select PLAYBACK 5 Select the desi...

Page 76: ...ntacting JVC When connecting to a Design by Neil Poulton series product use a USB cable with Mini A Male to B Male connectors JVC s QAM0852 001 optional is recommended Refer to page 35 for information on contacting JVC Backup All Files Preparation Select or mode Select built in memory or SD card to copy from Connect the camcorder to the USB external hard disk drive 1 Select the desired setting mod...

Page 77: ...he USB cable Files in the USB external hard disk drive cannot be copied back to the camcorder Files deleted from the camcorder cannot be written to a disc using a BD DVD burner even if they have been copied in the USB external hard disk drive Sound or video may be interrupted during playback When connecting a USB external hard disk drive to a PC Do not format the USB external hard disk drive using...

Page 78: ...e start point Use these controls to locate the starting point 5 Select SET at the end point The duration between the start point and the end point cannot be longer than 10 minutes To cancel the start point setting select CANCEL Uploading Files to Websites 6 Select CAPTURE TRIMMED FILE To set the start end point again select REDEFINE AREA 7 Select YES When copying is finished the copied file is add...

Page 79: ...cable between the camcorder and the TV Z p 24 Turn on the TV and set the HDMI CEC related setting to on For details refer to the instruction manual of the TV Turn on the camcorder and set HDMI CONTROL to ON Z p 86 Operation method 1 Turn on the camcorder Select the playback mode Connect the HDMI cable TV turns on automatically and switches to HDMI input mode when the camcorder is turned on Operati...

Page 80: ...me elapses after SNAPSHOT is pressed OFF 2SEC 10SEC FACE DETECTION FACE DETECTION The camcorder checks the number of faces in the monitor and starts countdown when another face is detected NOTE 2SEC is for reducing camera shake as a still image is taken 2 seconds after SNAPSHOT is pressed You can confirm the countdown on the camcorder screen It is recommended to attach the camcorder to a tripod an...

Page 81: ...d by a DVD burner Use a BD burner to save them HIGH SPEED RECORDING See page 52 TIME LAPSE RECORDING See page 53 8 SHUTTER MODE Records still images continuously while SNAPSHOT is pressed RECORD ONE SHOT Records one still image at a time CONTINUOUS SHOOTING Records still images continuously while SNAPSHOT is pressed BRACKETING Activates the bracket shooting function In addition to an image with th...

Page 82: ...Image stabilizer B is activated maximum zooming becomes 15x NOTE Optical zoom is used up to 10X OPTICAL Digital zoom is used from more than 10X OPTICAL up to the selected zoom ratio 8 GAIN Makes the sensitivity of the image sensor equivalent to the ISO of film AUTO ISO100 ISO200 ISO400 ISO800 ISO1600 ISO3200 ISO6400 NOTE With the AUTO setting the sensitivity of the image sensor is increased automa...

Page 83: ...ject accurately OFF Deactivates the function ON Activates the function USER BUTTON SETTING See page 48 Y MIC LEVEL Displays the microphone input level OFF Deactivates the function ON Activates the function Do not turn up the volume more than the red part on the level indicator d MIC LEVEL SETTING Adjusts the microphone sensitivity 2 1 0 1 2 The larger the number the higher the sensitivity e HEADPH...

Page 84: ...D monitor Adjusts the brightness of the display by using the touch sensor C MONITOR BACKLIGHT Enables you to adjust the brightness of backlight on the monitor BRIGHTER Brightens the backlight on the monitor regardless of the surrounding conditions STANDARD Select this when saving the battery life AUTO The brightness will automatically be set to BRIGHTER when using outdoors and to STANDARD when usi...

Page 85: ...is set to ON AUTO POWER OFF If the camcorder is not operated for 5 minutes while the power is on it turns itself off automatically to conserve power OFF Disables the function ON Activates the function To turn the camcorder on again close the LCD monitor and open it again when using the battery pack When using the AC adapter perform any operation such as zooming OPERATION SOUND Turns on off the ope...

Page 86: ...D burner NOTE When you play back a DVD created when OFF is set on a DVD burner select FINALIZE on the DVD creation screen Z p 74 When you create two or more DVDs at the same time DVDs other than the last DVD are finalized automatically even if the setting is OFF UPDATE Updates and improves the camera software YES Performs this function NO Cancels this function NOTE Information about obtaining syst...

Page 87: ...80i Outputs at 1080i T HDMI OUTPUT Sets the definition of the video output from the HDMI mini connector AUTO 1 It is recommended to select AUTO 1 usually AUTO 2 Select when the video is not projected in AUTO 1 correctly 480p Select when the video is not projected in AUTO 2 correctly NOTE When connecting to a 1080p compatible TV set HDMI OUTPUT to AUTO 1 When this is set 1080P appears at the top of...

Page 88: ...aware that all files and data including protected files will be erased by the formatting process FORMAT SD CARD You have to format newly purchased SD cards with this camcorder before using them This will also ensure stable speeds and operation when accessing the SD card FILE Initializes all files in the SD card FILE MANAGEMENT NO Initializes all files and management numbers in the SD card NOTE Be ...

Page 89: ...echarge it again If the camcorder is used for long periods of time in high or low temperatures or if the battery pack is repeatedly charged the amount of remaining battery may not be displayed correctly The LCD monitor is difficult to see The LCD monitor may be difficult to see if used in bright areas such as under direct sunlight Before requesting service consult the following chart If the soluti...

Page 90: ...m does not work Change ZOOM to 64X DIGITAL or 200X DIGITAL Digital zoom is not available in the still image recording mode The focus is not adjusted automatically Wipe the lens with lens cleaning cloth If you are recording in a dark place or a subject that has no contrast between dark and light adjust the focus manually The color looks strange Too bluish too reddish etc Set WB in MANUAL SETTING ap...

Page 91: ...the camcorder it takes time for the camcorder to respond It is recommended that you copy all files from the camcorder onto your computer and erase the files from the camcorder The lamp does not flash during battery pack charging Check the remaining battery pack charge When the battery pack is fully charged the lamp does not flash When recharging in either a hot or cold environment ensure that batt...

Page 92: ...roblem contact the JVC customer service for repairs To reset the camcorder when it does not operate normally Close the LCD monitor and remove the power supply battery pack or AC adapter from the camcorder then reattach it Execute FACTORY PRESET Z p 85 Cleaning Before cleaning turn off the camcorder and remove the battery pack and AC adapter To clean the camcorder Wipe the camcorder gently with a s...

Page 93: ...LT IN MEMORY Perform formatting All data is deleted Turn off the camcorder and turn it on again MEMORY CARD ERROR Perform formatting All data is deleted Remove and re insert the SD card MultiMediaCard cannot be used Remove any dirt from the SD card terminals Insert the SD card before switching the power on Turn off the camcorder and turn it on again RECORDING CANCELLED Turn off the camcorder and t...

Page 94: ...he camcorder or the SD card Select FILE MANAGEMENT NO in FORMAT BUILT IN MEM or FORMAT SD CARD UPPER LIMIT OF RECORDABLE MANAGEMENT NUMBERS HAS BEEN REACHED SCENE QUANTITY LIMIT EXCEEDED PLAYLIST QUANTITY LIMIT EXCEEDED When creating a disc reduce the number of playlists to be saved Reduce the number of the playlist to 99 files or less POWER IS OFF OR USB DEVICE IS UNSUPPORTED Turn on the power of...

Page 95: ...ified in this Agreement 3 You have no right to grant a license to use the Program and may not distribute rent lease or transfer the Program to any third party or otherwise let them use the Program 4 LIMITED WARRANTY JVC warrants that any media in which the Program is embodied are free from any defects in materials and workmanship for a period of thirty 30 days from the date of Your purchasing any ...

Page 96: ...zed representative of JVC 2 If any part of this Agreement is held invalid by or in conflict with any law having jurisdiction over this Agreement the remaining provisions will remain in full force and effect 3 This Agreement shall be governed by and interpreted under the laws of Japan The Tokyo District Court has jurisdiction over all disputes which may arise with respect to the execution interpret...

Page 97: ...t in Memory 87 Format SD Card 87 G Gain 81 Gain Up 81 Grid 82 H HDMI 78 86 Headphone Volume 82 High Speed Recording 52 Histogram 61 I Image Quality 81 Image Size 81 K K2 Technology 55 M Manual Recording 47 Menu Settings 79 Microphone 82 Monitor Backlight 83 Monitor Bright 83 Moving Files 71 O Operation Sound 84 P Photometry Area 50 Picture Title 67 Playlists 66 Protecting Files 59 Q Quick Restart ...

Reviews: