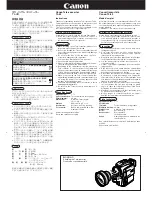
background image

22

Recording

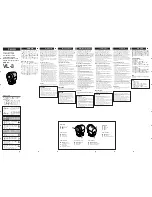
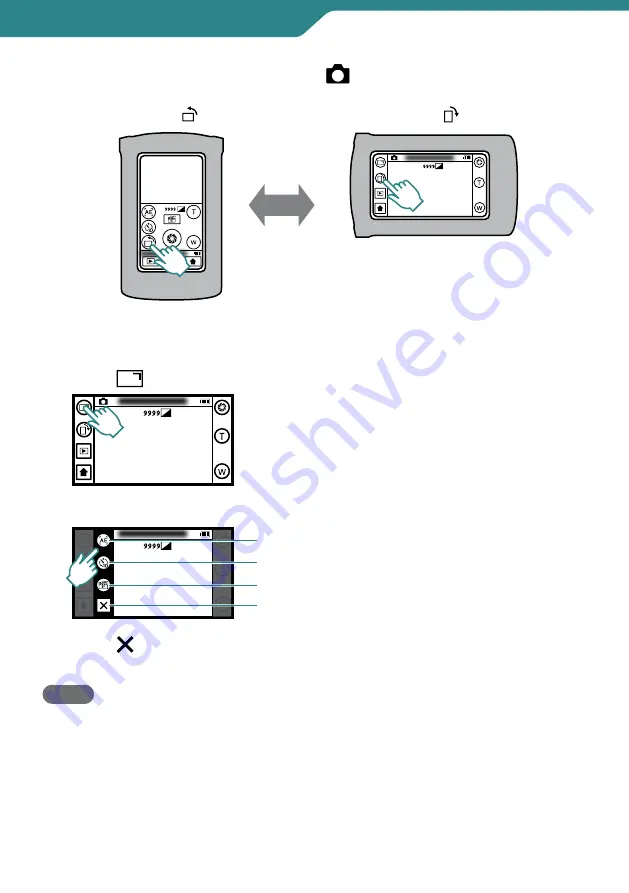
Switching the Image Orientation (  Still Image Recording only)

 

To use functions in landscape mode

1

  Touch 

.

2

  Select the function to use.

3

  Touch  .

Quit.

NOTE

 The size of still images differs between the portrait and the landscape modes. 

Portrait mode: 2592 × 1944 (5M) 

Landscape mode: 1440 × 1920 (2.7M)

 The image orientation do not switch automatically. Switch it according to the actual 

orientation of the camcorder.

 Video is not output through the AV cable when the Image Orientation is set to Portrait.

 Video is not output at 480i or 480p through the HDMI cable when the Image 

Orientation is set to Portrait.

Touch AE, Face Priority AE Switching (P.23)
SELF-TIMER
Menu Settings (P.45)
QUIT

Touch  .

Touch  .

Portrait

Landscape

Image orientation can be changed to correspond to 

the camera’s orientation. 

Summary of Contents for 0810YMH-AL-OT

Page 1: ...e EN U ENGLISH U Read this first Before use be sure to read Safety Precautions P 2 and Cautions P 3 to use the product correctly GC WP10 is waterproof Before use in water be sure to read Using the Camcorder in Water P 25 Waterproof with Audio Recording ...

Page 2: ...es will cause the camcorder to fall resulting in damage CAUTION The mains plug shall remain readily operable Remove the mains plug immediately if the camcorder functions abnormally WARNING The camcorder should not be exposed to excessive heat such as direct sunshine fire or the like If this symbol is shown it is only valid in the European Union IMPORTANT SAFETY INSTRUCTIONS 1 Read these instructio...

Page 3: ... s chassis disassemble or modify the unit allow inflammables water or metallic objects to enter the unit place naked flame sources such as lighted candles on the apparatus expose the apparatus to dripping or splashing GC FM2 only insert any objects in the camcorder Avoid using the unit in places subject to excessive humidity or dust in places subject to soot or steam such as near a cooking stove i...

Page 4: ...t connector 8 Waterproof design within 3 m 10 ft 30 minutes GC WP10 only 9 MP3 voice recorder GC WP10 only Battery When using the unit in a low temperature environment 10 C 50 F or below the operating time may be shortened or it may not function properly Keep the unit warm by keeping it in a pocket when using the unit out of doors in winter Do not expose the unit to heat directly such as a pocket ...

Page 5: ...oth or other products be sure to observe the instructions of the product Do not leave the device in contact with rubber or plastic products for a long time Lens LCD Monitor Use a lens blower commercially available to remove any dust and a cleaning cloth commercially available to wipe off any dirt Mold may form if the lens is left dirty Perform TOUCH SCREEN ADJUST P 45 if the reactive area of the s...

Page 6: ...g 23 Using the Camcorder in Water GC WP10 only 25 Playback Playing Back on the Camcorder 28 Deleting Files 30 Copying a Part in the Video Trimming 31 Viewing Files on TV 32 Audio Recording Recording Audio GC WP10 only 33 Audio Playback Playing Back Audio on the Camcorder GC WP10 only 34 Delete Audio Files GC WP10 only 37 Copying a Part in the Audio GC WP10 only 38 Connecting with a Computer Make a...

Page 7: ...rding Button P 20 GC WP10 only Tripod Mounting Socket Lens Microphone GC WP10 Stereo GC FM2 Monaural AV Connector P 32 GC WP10 also serves as Headphones Connector SD Card Slot P 12 USB Connector P 14 39 0HDMI Mini Connector P 32 1USB Connector Lever GC FM2 only 1 Push the connector out 2 Retract the connector Press and hold the lever and slide 2Cover 0 2 GC WP10 GC FM2 0 2 ...

Page 8: ...Button P 44 Battery Indicator P 15 AC Adapter When connected When inoperative When both of the Battery indicator and AC adapter icons are displayed the power is supplied through the both Video Recording Mode Select Button P 21 Top Menu Video Playback Button Still image Playback Button Audio Playback Button GC WP10 only Recording Select Button Recording Mode Playback Mode ...

Page 9: ...ton P 44 AE Select Button P 23 GC WP10 only Self Timer 10 Seconds OFF Select Button Recording Button Recording Direction Select Button P 22 Play Select Button Top Menu Button Zoom Buttons EFFECT P 45 Remaining Number of Shots During Recording Videos Still images Audio GC WP10 only Audio GC WP10 only Counter Audio Recording Start Stop Button P 33 Play Select Button Top Menu Button Microphone Input ...

Page 10: ... Volume Button P 28 Top Menu Button Next Page Button Battery Indicator P 15 Recording Media SD card Next Date Button 0Recorded Year 1Previous Date Button Playback Index Screen Audio GC WP10 only Videos Still Images Audio GC WP10 only Playback Operation External File Button P 36 Delete Button P 37 Recording Select Button Top Menu Button Next Page Button Previous Page Button Volume Button P 34 File ...

Page 11: ... filter to the USB extension cable The core filter reduces noise generated when connecting the camcorder to an external component Connect the end of the cable with the core filter to the camcorder NOTE Be sure to use the USB cable or the USB extension cable with the core filter attached when connecting the camcorder to the AC adapter or a computer USB Extension Cable GC FM2 only Dedicated AV Cable...

Page 12: ... Turn off the power of this unit before inserting or removing a card 4 Close the terminal cover firmly To remove an SD card Push the card inward once then pull it out straight Be sure to insert the SD card with the power turned off NOTE To protect data do not touch the terminals of the SD card Operations are confirmed on the following SD cards P 13 GC WP10 GC FM2 ...

Page 13: ...ey may lose data that had already been recorded The Eye Fi card is a SD type memory card with built in wireless LAN You can transfer videos and still images to a computer or the Web via the Eye Fi card An Internet accessible environment and a wireless LAN router are separately required See page 42 to use an Eye Fi card When your computer cannot recognize the SDXC card Confirm and upgrade the OS of...

Page 14: ...t 1 second during charging You cannot confirm the level when the battery is extremely low When the charging is finished disconnect the camcorder from the computer NOTE The charging time is when the camcorder is charged at 25 C 77 F If the battery is charged outside the room temperature range of 10 C 50 F to 35 C 95 F charging may take a longer time or it may not start The recordable and playable t...

Page 15: ... or play back video still image audio while the camcorder is connected to a computer You can record or play back video still image audio while the AC adapter is connected to the camcorder Indication when using the battery Fully charged Medium Very low Recharge the battery at an early opportunity Indication when using the AC Adapter When connected When both of the Battery indicator and AC adapter i...

Page 16: ...p Menu Audio is for GC WP10 only Touch to return to the Top Menu and select the mode Recording Touch to start stop recording Playback Touch the thumbnail of the desired scene to play back MEMO The touchscreen of this unit is pressure sensitive When the touchscreen does not respond smoothly apply slightly more force to your fingertip ...

Page 17: ...tip Do not press or rub with excessive force If you apply a protect sheet or a sticker the touchscreen may not respond smoothly Do not operate the touchscreen using an object with a sharp or hard tip Touching two or more places at a time may cause a malfunction Perform TOUCH SCREEN ADJUST P 45 if the reactive area of the screen is misaligned with the touched area Adjust by lightly tapping with a c...

Page 18: ... and minute to select it Touch to make adjustments After setting the date and time touch SET 4 Set the region where you live and touch SAVE The city name and time difference are displayed Touch to make adjustments To reset the clock Set the clock with CLOCK ADJUST from the Basic Settings P 45 1 Press the button to turn on the camcorder 2 Touch on the top menu 3 Touch CLOCK ADJUST 4 Touch CLOCK SET...

Page 19: ...e already set The SET DATE TIME screen appears when the camcorder has not been used for a long time Charge the battery before setting the clock P 14 When using this unit abroad change the date and time display to the local time by simply selecting your travel destination in AREA SETTING P 45 ...

Page 20: ... To return to the Top Menu touch during video or still image recording 3 Start recording For Videos Touch the Recording START STOP button Touch it again to stop recording GC WP10 You can make recording also with a press of the Recording button For Still Images Touch the SNAPSHOT button To shoot continuously keep touching the button GC WP10 You can shoot still image also with a press of the Recordi...

Page 21: ... monitor increases brightness when the AC adapter is connected to the camcorder However it returns to normal brightness when you do not operate the camcorer during video recording for 5 minutes is displayed for about 3 seconds at the moment of switching Change the Recording Quality video only Preparation Video recording 1 Touch 2 Touch 3 Select the recording quality HD 1080 When you place priority...

Page 22: ... 2 7M The image orientation do not switch automatically Switch it according to the actual orientation of the camcorder Video is not output through the AV cable when the Image Orientation is set to Portrait Video is not output at 480i or 480p through the HDMI cable when the Image Orientation is set to Portrait Touch AE Face Priority AE Switching P 23 SELF TIMER Menu Settings P 45 QUIT Touch Touch P...

Page 23: ...isappears if you touch the frame or if you use zoom function Shooting Human Subjects Face Priority AE GC WP10 only Preparation Video Still image recording 1 Touch With every touch Touch AE and Face Priority AE alternate Frames appear on human faces in which exposure is automatically adjusted NOTE Up to 16 frames on faces can be displayed in total You cannot choose the frame to adjust exposure arbi...

Page 24: ...econds 300 times 40 seconds 2400 times 3 Touch the Recording START STOP button Recorded Time Actual Elapsed Time NOTE Audio cannot be recorded during time lapse recording Zooming is not available in time lapse recording When recording is stopped with the recorded time less than 0 00 00 17 the video will not be saved Recording stops automatically 99 hours after it is started Make use of a tripod an...

Page 25: ...make recordings in marine water and fresh water not deeper than 3 m 10 ft or for not more than 30 minutes The waterproof capability is tested in accordance with JVC test standard and it does not assure damage free or trouble free operation Waterproof function not evaluated by UL Do not soak the camera in hot springs or water of 40 C 104 F or higher Do not subject the camcorder to high water pressu...

Page 26: ... the touchscreen so that it will not malfunction with the water pressure is displayed on the screen Press the Recording button to record Press the SCREEN LOCK button again for more than 1 second to turn off and activate the touchscreen To select video recording still image recording in water Pressing the button will toggle the operation between Video Recording and Still Image Recording Audio recor...

Page 27: ...wipe off strange materials and water drops inside the cover CAUTION Do not dry with heat such as by using a hairdryer The waterproof capability will deteriorate Do not leave the camcorder for long time in low temperature environment in cold climates or in heat of 40 C 104 F or higher such as under sun light in a sun heated car or near the heater The waterproof capability will deteriorate After use...

Page 28: ...t and right or touch to move to another page If a shooting duration of still images is within 2 seconds they are displayed as one thumbnail group 3 Play back a file Touch the screen to display screen messages and operation buttons They will disappear if touched again Operation modes Playback Reverse playback Pause Forward search Reverse search Forward slow motion Reverse slow motion Touch to stop ...

Page 29: ... slideshow Advances to the next still image Returns to the previous still image Play back a group continuously Repeated Playback of a Part A B Repeat Preparation Video playback 1 Play back the video then touch at the starting end points With every touch the setting toggles as shown below Set starting point Set end point No setting normal playback NOTE A B repeat is possible only within one scene T...

Page 30: ...e selected video still image If you touch the video still image with a check mark the selection is cancelled Touch SEL ALL to select all the video still image files Touch REL ALL to cancel all the selection 3 Touch SET 4 Touch DELETE when the confirmation message appears NOTE You can delete the files by touching during video still image playback ...

Page 31: ... TRIMMING QUIT Copy starting point 3 Resume playback pause at the end point and touch TRIMMING SET QUIT Copy end point 4 Touch SET 5 Touch YES when the confirmation message appears When copying finishes the copied file is added to the index screen NOTE When you copy a part of the video the division point may not be accurate within a 1 second margin of error ...

Page 32: ...layback will be paused When an AV cable and an HDMI cable are connected output to the HDMI cable is prioritized Also refer to instruction manual of the TV We recommend using the Category 2 HDMI cable High Speed cable Insert the connector in the right direction Forcing the connector into the terminal may cause damage If you connect the camcorder using the AV cable image is output only when playing ...

Page 33: ...n on the camcorder 2 Touch Audio mode on the Top Menu To return to the Top Menu touch in the audio recording screen 3 Touch the Recording START STOP button Audio recording starts Touch again to stop audio recording NOTE If you record audio 12 hours continuously it will stop recording automatically ...

Page 34: ...to move to another page To the recorded audio files serial numbers 0001 9999 will be given 3 Play back the audio Operation modes Playback Pause Forward search Reverse search Adjust the volume Touch to make adjustments and touch to quit Operation buttons Playback Pause Advances to the next audio Returns to the beginning of the Audio currently playing Forward search Reverse search Changes the playba...

Page 35: ...k the audio then touch at the starting end points With every touch the setting toggles as shown below Set starting point Set end point No setting normal playback NOTE A B repeat is possible only within one scene The setting is canceled if Stop or Random Playback is selected after the end point is set ...

Page 36: ...older You can create up to 999 files per folder Display of tags and the Album Art are not supported Folders and files with double byte characters such as Japanese cannot be played Folders and files with more than 8 single byte characters cannot be played You cannot edit file name with the camcorder Use a computer and other devices to edit file names You cannot delete external audio files with the ...

Page 37: ...h the audio with a check mark the selection is cancelled You can select all the audio files by touching SEL ALL You can cancel all the selection by touching REL ALL You can confirm the audio to play back by touching Confirm Playback 3 Touch SET 4 Touch DELETE when the confirmation message appears NOTE You can delete the files by touching during audio playback You cannot delete external audio files...

Page 38: ... point and touch TRIMMING QUIT Copy starting point 3 Resume playback pause at the end point and touch TRIMMING QUIT SET Copy end point 4 Touch SET 5 Touch YES when the confirmation message appears When copying finishes the copied file is added to the index screen NOTE The starting and end points of the copied audio may not exactly match the selected points ...

Page 39: ...ouble click PICSIO_SD on the desktop 3 Copy video still image audio files from the DCIM folder PICSIO_SD DCIM 100JVCSO 101JVCSO 102JVCSO PIC_XXXX MP4 PIC_XXXX MP4 PIC_XXXX JPG PIC_XXXX JPG PIC_XXXX MP3 PIC_XXXX MP3 Videos Still Image Audio To disconnect the camcorder from a computer Windows 1 Click the icon in the task tray on the computer screen The Safely Remove Hardware window appears 2 Select ...

Page 40: ...r higher Intel Core 2 Duo CPU 3 GHz or higher recommended Intel Core 2 Quad CPU 2 GHz or higher recommended Memory 2 GB or more System type 32 bit 64 bit For Windows XP Windows XP Home Edition or Professional Pre installed edition only for both Service Pack 3 Processor Intel Core 2 Duo CPU 2 GHz or higher Intel Core 2 Duo CPU 3 GHz or higher recommended Intel Core 2 Quad CPU 2 GHz or higher recomm...

Page 41: ...2 Select LoiLoScope EX and click OK If LoiLoScope EX does not appear in the Auto Play window select Open folder to view files click OK and double click the LoiLoScope EX LoiLoScopeEX exe icon in the window NOTE For details about operations in LoiLoScope EX see its Help For Mac Computer Users You can import files from this unit to a computer using Apple s iMovie 09 video or iPhoto still image To ve...

Page 42: ...Eye Fi card with Eye Fi Center For how to install and operate the Eye Fi Center refer to its instruction manual 2 Set the Eye Fi SETTING to ON in the Basic Settings P 45 When the Eye Fi SETTING is set to ON recorded videos and still images are automatically transferred The files already transferred earlier are not transferred again To abort Eye Fi transfer turn off the camcorder or set the Eye Fi ...

Page 43: ... transfer selected videos still images Preparation Video Still image playback 1 Touch Eye Fi Setting OFF Eye Fi Setting ON Ready for Transfer from the Eye Fi card Transferring from the Eye Fi card animated 2 Touch the video still image to transfer TRANSFER SELECTION SEL ALL REL ALL SET A check mark appears on the selected video still image If you touch the video still image with a check mark the s...

Page 44: ...DMI OUTPUT Eye Fi SETTING Touch to move to another page 4 Touch the item to set AUTO 480p Touch to return to the previous screen Touch to quit the setting Menu Settings during Video Still Image recording 1 Video recording Touch the Menu Settings button Still image recording Touch the Effect button P 9 The Menu Settings screen appears 2 Touch the item to set WIND CUT EFFECT With every touch the set...

Page 45: ... will be available only after the UPDATE and PC SOFTWARE UPDATE are ready HDMI OUTPUT AUTO It is recommended to select AUTO normally 480p Select this when the video is not output in AUTO correctly Eye Fi SETTING OFF Does not transfer the files ON Transfers video still image files automatically TOUCH SCREEN ADJUST Adjust if the reactive area of the screen is misaligned with the touched area Menu Se...

Page 46: ...han 10 seconds If you reset the camcorder reset the clock P 18 Troubles Trouble Action Page Battery Unable to turn on the power Recharge the battery When the battery level is extremely low the camcorder does not turn on until it is charged even if it is connected to the computer or AC adapter 14 15 Unable to charge the battery Check the remaining battery power When the battery is fully charged the...

Page 47: ...o is interrupted Sometimes playback is interrupted at the connecting section between two scenes This is not a malfunction The same image is displayed for a long time during video playback or motion is choppy Replace the SD card with a new one Perform FORMAT SD CARD in Basic Settings All data will be deleted Image is stretched up and down on the TV On the TV with aspect ratio of 4 3 images are proj...

Page 48: ...fore setting the clock 18 FORMAT ERROR Check the operating procedure and perform once again Turn off this unit and turn it on again 45 MEMORY CARD ERROR Turn off this unit and turn it on again Re insert the SD card Remove any dirt from the SD card terminals If the above does not solve the problem back up your files and execute FORMAT SD CARD in the Basic Settings All data will be deleted 12 45 NOT...

Page 49: ...tor 3 0 diagonally measured LCD panel TFT active matrix system Zoom Digital zoom Up to 4x Video recording format Video Mpeg 4 AVC H 264 Audio AAC 48 kHz 16 bit 256 kbps 2ch GC WP10 stereo sound GC FM2 monaural sound Still image recording format JPEG standard Continuous shooting speed approx 1 5 shots second Audio recording format GC WP10 only Mpeg 1 Audio Layer 3 standard Playable software Windows...

Page 50: ...m 5 h 50 m QHD 960 540 30 frames second Average 5 Mbps VBR 1 h 40 m 6 h 40 m 27 h 30 m The above recording time is approximate The actual recording time may shorten depending on the shooting environment Approximate Number of Still Images Unit Number of Shots Recording mode Image size SD Card SDHC Card SDXC Card 1 GB 2 GB 4 GB 8 GB 32 GB 64 GB Portrait 2592 1944 300 600 1300 2700 9999 9999 Landscap...

Page 51: ...te Approximate Recording Time Using Battery Battery Approximate Charging Time Actual Recording Time Continuous Recording Time Built in Battery When using the computer 3 h 00 m When using the AC adapter 2 h 00 m 40 m 1 h 20 m The actual recording time may be shorter if zooming is used or if recording is stopped repeatedly When the battery life is reached the recording time becomes shorter even if t...

Page 52: ...html about this software please have the following information ready Product Name Model Problem Error Message PC Manufacturer Model Desktop Laptop CPU OS Memory MB GB Available Hard Disk Space GB Please note that it may take some time to respond to your questions depending on their subject matter JVC cannot answer questions regarding basic operation of your PC or questions regarding specifications...

Page 53: ...rd 42 F Face priority AE 23 Folder number 36 I Index screen thumbnail display 10 M Menu settings 45 O Operation mode 28 34 R Recording in water 25 Recording mode 20 Recording time number of recordable still images 50 S SCREEN LOCK button 26 SD card 12 Self timer 22 Size of still image 22 Still image mode 20 T Time lapse recording 24 Touch AE 23 Trimming 31 V Video image quality 21 Video mode 20 Vi...

Page 54: ... 2010 Victor Company of Japan Limited US 0810YMH AL OT ...

Reviews: