background image

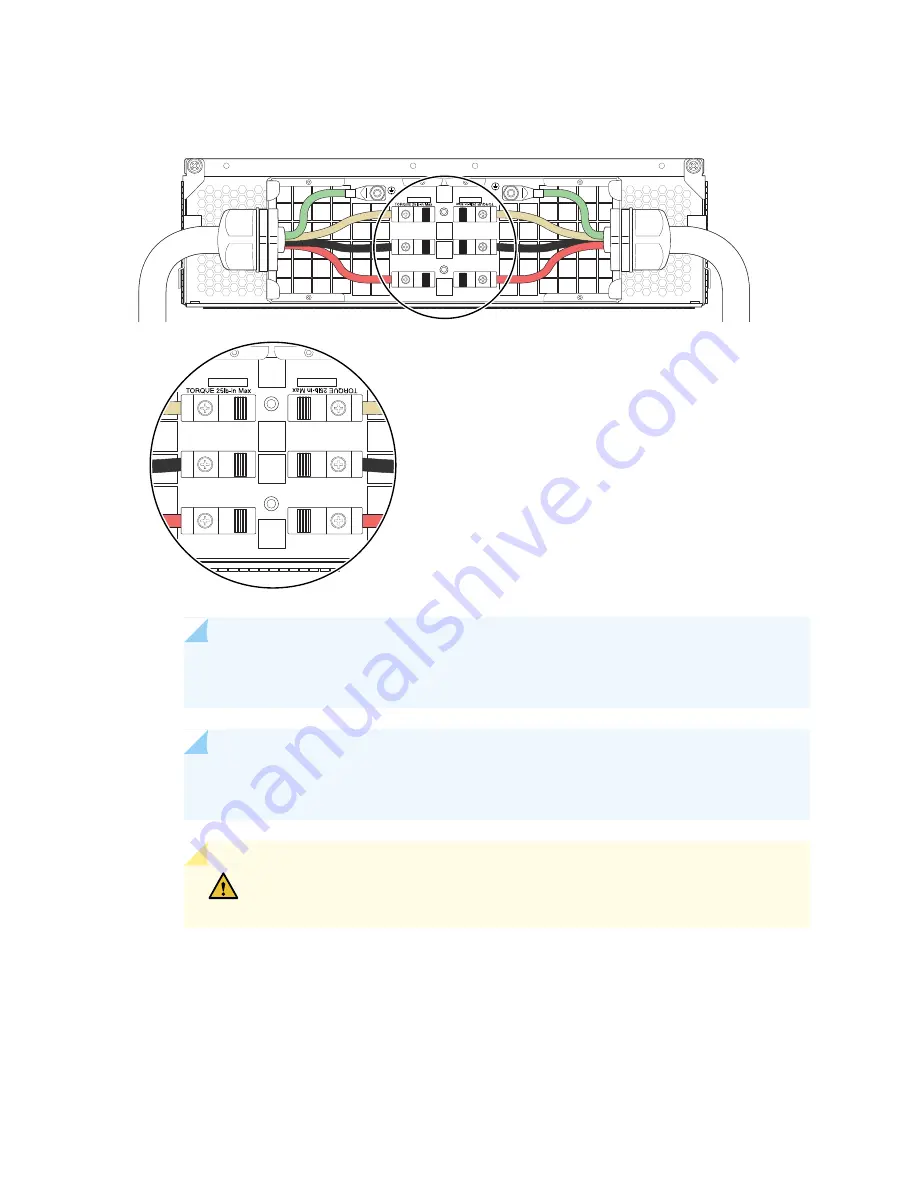
Figure 197: Connecting Power to a Three-Phase Delta AC Power Distribution Module

g007066g007066

C1

B1

A1

C2

B2

A2

C1

B1

A1

C2

B2

A2

NOTE:

The three-phase delta AC PDM terminal blocks will be flipped depending on which

slot the PDM gets plugged into.

NOTE:

The color of each AC power wire might vary. The MX2000 chassis is not sensitive

to phase rotation sequence—either clockwise or counterclockwise will operate correctly.

CAUTION:

Wire label configuration is for Juniper Networks supplied cable only.

If you are using your own cable, make sure you use the proper connections.

To insert wires into the terminal block that serves three PSMs:

a. Insert the grounding wire into the grounding point labeled GND.

b. Insert the wire labeled L1 into the input terminal labeled A2.

414

Summary of Contents for MX2010

Page 1: ...MX2010 Universal Routing Platform Hardware Guide Published 2019 12 03...

Page 2: ...ardware Guide Copyright 2019 Juniper Networks Inc All rights reserved The information in this document is current as of the date on the title page YEAR 2000 NOTICE Juniper Networks hardware and softwa...

Page 3: ...2010 Router Overview 3 MX2010 Router Overview 3 Chassis Components and Descriptions 5 MX Series Router Architecture 6 MX2010 Chassis Description 7 MX2010 Backplane Description 13 MX2010 Component Redu...

Page 4: ...tacts on the Craft Interface 34 MX2010 Alarm LEDs and Alarm Cutoff Lamp Test Button 35 Cable and Rack Management 37 MX2010 Cable Manager Description 37 Standard Cable Manager 37 Extended Cable Manager...

Page 5: ...MX2010 Port and Interface Numbering 90 Power System 95 MX2010 Power System Description 95 MX2010 Power Midplane Description 100 MX2000 Three Phase Delta AC Power Distribution Module Description 100 MX...

Page 6: ...Physical Specifications 130 MX2010 Rack Requirements 135 Rack Size and Strength 135 Spacing of Mounting Bracket and Flange Holes 137 Connection to the Building Structure 138 MX2010 Router Transport Ki...

Page 7: ...fications 157 RJ 45 Connector Pinouts for MX Series CB RE or RCB Auxillary and Console Ports 157 RJ 45 Connector Pinouts for an MX Series CB RE or RCB Management Port 158 AC Power Requirements Specifi...

Page 8: ...215 Installing an MX2010 Router Overview 215 Tools and Parts Required to Unpack the MX2010 Router 217 Tools Required to Install the MX2010 Router Using a Pallet Jack 217 Tools Required to Install the...

Page 9: ...Using a Router Transport Kit Overview 258 Installing the Router Transport Kit on the MX2010 Router 258 Securing the MX2010 Router to the Router Transport Platform 261 Using the Router Transport Kit t...

Page 10: ...and Management 337 Connecting an MX2000 Router to a Console or Auxiliary Device 338 Connecting an MX2010 Router to an External Alarm Reporting Device 340 Connecting the MX2010 Router to a Network for...

Page 11: ...lta AC Power Distribution Module 410 Installing an MX2000 Router Three Phase Wye AC Power Distribution Module 416 Installing an MX2000 Single Phase AC Power Distribution Module 422 Installing an SFP o...

Page 12: ...Manager 465 Installing the MX2010 Extended Cable Manager 466 Installing the MX2010 Extended DC Cable Manager 467 Replacing the MX2010 Craft Interface 468 Disconnecting the Alarm Relay Wires from the...

Page 13: ...10 Extended EMI Cover 505 Removing the MX2010 Extended EMI Cover 505 Installing the MX2010 Extended EMI Cover 506 Replacing an MX2010 Fan Tray 508 Removing an MX2010 Fan Tray 509 Installing an MX2010...

Page 14: ...lta AC Power Distribution Module 571 Removing an MX2000 Three Phase Delta AC Power Distribution Module 571 Installing an MX2000 Router Three Phase Delta AC Power Distribution Module 576 Replacing an M...

Page 15: ...Control Boards 649 Maintaining MX2010 MICs 651 Maintaining MX2010 MPCs 653 Maintaining MX2010 Packet Forwarding Engine Components 656 Maintaining MX2010 MPCs 656 Maintaining MX2010 MICs 660 Maintaini...

Page 16: ...nterface Alarm Messages 704 Alarm Relay Contacts 704 Craft Interface LEDs 704 Component LEDs 705 Troubleshooting the MX2010 Cooling System 706 Troubleshooting the MX2010 Host Subsystems 709 Troublesho...

Page 17: ...8 General Safety Guidelines and Warnings 761 General Safety Guidelines and Warnings 761 Definitions of Safety Warning Levels 762 Qualified Personnel Warning 765 Fire Safety Requirements 766 Fire Suppr...

Page 18: ...uidelines 796 AC Power Disconnection Warning 797 DC Power Copper Conductors Warning 798 DC Power Disconnection Warning 799 DC Power Grounding Requirements and Warning 801 DC Power Wiring Sequence Warn...

Page 19: ...nvironmental Requirements 814 Compliance Statements for EMC Requirements 815 Canada 815 European Community 815 Israel 815 Japan 815 United States 816 Compliance Statements for Environmental Requiremen...

Page 20: ...n see the product documentation page on the Juniper Networks website at https www juniper net documentation If the information in the latest release notes differs from the information in the documenta...

Page 21: ...From the HTML or PDF version of the manual copy a configuration example into a text file save the file with a name and copy the file to a directory on your routing platform For example copy the follo...

Page 22: ...platform commit file ex script snippet xsl 2 Move to the hierarchy level that is relevant for this snippet by issuing the following configuration mode command edit user host edit system scripts edit s...

Page 23: ...text and syntax conventions used in this guide Table 2 Text and Syntax Conventions Examples Description Convention To enter configuration mode type the configure command user host configure Represent...

Page 24: ...default metric metric Encloses optional keywords or variables angle brackets broadcast multicast string1 string2 string3 Indicates a choice between the mutually exclusive keywords or variables on eit...

Page 25: ...em Click TechLibrary Feedback on the lower right of any page on the Juniper Networks TechLibrary site and do one of the following Click the thumbs up icon if the information on the page was helpful to...

Page 26: ...iper net Find product documentation https www juniper net documentation Find solutions and answer questions using our Knowledge Base https kb juniper net Download the latest versions of software and r...

Page 27: ...0 Router Overview 3 Chassis Components and Descriptions 5 Alarm and Display Components 29 Cable and Rack Management 37 Cooling System 45 Host Subsystem Components 51 Interface Modules ADCs MPCs and MI...

Page 28: ......

Page 29: ...ling system the Control Board and the switch fabrics are fully redundant The MX2010 router is 34 rack units U tall One router can be installed in an open frame rack four post rack or cabinet The MX201...

Page 30: ...MX2010 Power System Description 95 MX2010 Cooling System Description 45 4...

Page 31: ...ption 13 MX2010 Component Redundancy 14 MX2010 Field Replaceable Units 17 MX Series Router Packet Forwarding Engine PFE Architecture 19 Line Cards Supported on MX Series Routers 20 Ethernet Frame Coun...

Page 32: ...both ingress and egress packet forwarding The MX Series router has been optimized for Ethernet services Examples of the wide range of Ethernet services provided by the MX Series include Virtual privat...

Page 33: ...Supported on MX Series Routers 20 MX2010 Chassis Description The router chassis is a rigid sheet metal structure that houses all the other router components see Figure 1 on page 8 Figure 2 on page 10...

Page 34: ...cable managers and EMI cover measures 59 50 in 151 13 cm high 19 in 48 26 cm wide and 36 20 in 91 95 cm deep from the front mounting flanges to the rear of the chassis An extended cable manager extend...

Page 35: ...tion Component No 1 Craft interface 1 1 Card cage air filter 2 2 0 and 1 Control Board and Routing Engine CB RE 3 8 0 through 7 Switch Fabric Boards SFBs 4 10 0 through 9 MPCs with ADCs and MICs 5 NOT...

Page 36: ...s Component Description Component No 2 Fan tray 2 and fan tray 3 behind cage door Upper fan trays two 1 1 PDM1 Input1 AC PDM Three phase delta or wye or a single phase AC PDM 2 9 0 through 8 AC PSM 3...

Page 37: ...router See Table 5 on page 11 for information about router components on the back of a DC powered MX2010 router Table 5 Rear Components in a Fully Configured DC Powered MX2010 Router Number of FRUs S...

Page 38: ...tray 0 and fan tray 1 behind access door Lower fan trays two 8 The MX2010 router has two electrostatic discharge ESD points These are located on either side of the MPCs on the front of the chassis see...

Page 39: ...system components also connect to the top and bottom backplane The backplane performs the following major functions Data path Data packets are transferred across the backplane between the MPCs through...

Page 40: ...two CB REs and eight SFBs located in the top portion of the chassis DC power feed redundancy The MX2010 router power system is feed redundant Each PSM can be connected to two separate feeds from diffe...

Page 41: ...g007085 AC PS_0 2800W input AC PS_3 2800W input AC PS_1 2800W input AC PS_4 2800W input AC PS_2 2800W input AC PS_5 2800W input A1 B1 AC PS_8 2800W input A2 B2 C2 AC PS_6 2800W input AC PS_7 2800W inp...

Page 42: ...d from other feed each phase goes to only one PSM Power distribution modules PDMs In the DC configuration each system provides N 1 PSM redundancy along with N N feed redundancy The power feeds from di...

Page 43: ...with the ten line cards The top fan trays are used to cool the top half of the CB REs and SFBs If a fan fails or the temperature rises above the temperature threshold the speed of the remaining fans i...

Page 44: ...onredundant Switch Fabric Board SFB nonredundant PSM air filter Air filter lower Lower cable manager Craft interface Switch Fabric Board SFB if redundant Backup CB RE if redundant Master CB RE if nons...

Page 45: ...ution Module Taking an MX2000 Host Subsystem Offline 685 Tools and Parts Required for Replacing MX2010 Hardware Components 430 MX2010 Router Hardware Components and CLI Terminology 25 Replacing the MX...

Page 46: ...MIC Flexible PIC Concentrator FPC with Physical Interface Card PIC Dense Port Concentrator DPC House the routing engine Control power to MPCs Monitor and control system functions such as fan speed an...

Page 47: ...d horizontally in the MX480 and MX240 router chassis The maximum number of supported FPCs varies per router Physical Interface Cards PICs provide physical interfaces for MX240 MX480 MX960 routers They...

Page 48: ...ll directly into the router chassis There are also fixed configuration MPCs with built in network ports and services functionality The maximum number of supported MPCs varies per MX router and hardwar...

Page 49: ...the DPC line cards MX960 router 3 SCBs for 2 1 redundancy when used with the DPC line cards MX2010 and MX2020 routers 8 SCBs MX2000 ADC The MX2000 ADC is a special line card adapter ADC that enables...

Page 50: ...frame size includes the Layer 2 header without the trailer CRC and after any VLAN rewrite or other rules are applied RELATED DOCUMENTATION Layer 2 and Layer 3 Features on MX Series Routers Understandi...

Page 51: ...ED DOCUMENTATION Protocols and Applications Supported on MPCs for MX Series Routers MX2010 Router Hardware Components and CLI Terminology The MX2010 router supports the components listed in Table 9 on...

Page 52: ...Power System Components MX2010 DC Power Distribution Module 48 V Description on page 111 N A MX2000 PDM BLANK PDM blank cover DC 52V Power Dist Module MX2000 PDM DC Power distribution module PDM MX20...

Page 53: ...IC MX2010 Modular Port Concentrator Description on page 70 N A MX2000 LC BLANK MPC blank cover See MX Series Interface Module Reference MPC MX2000 Adapter Card ADC Description on page 69 Adapter Card...

Page 54: ...MX2010 Router Overview 3 MX Series Router Interface Names MX2010 Port and Interface Numbering 90 28...

Page 55: ...e enables the user to view status and troubleshooting information at a glance and to perform many system control functions It is hot insertable and hot removable The craft interface is located on the...

Page 56: ...deactivates the device attached to the corresponding alarm relay contact on the craft interface ACO LT 6 Chassis ID Dial and Standalone Dial One dial is used to indicate the chassis number for multi c...

Page 57: ...t Interface 468 MX2010 Craft Interface Serial Number Label 741 MX2010 Component LEDs on the Craft Interface IN THIS SECTION MX2010 Host Subsystem LEDs and Buttons on the Craft Interface 31 MX2010 Powe...

Page 58: ...odule LEDs on the Craft Interface Each Power Supply Module PSM has one bicolor LED on the craft interface that indicates its status The LEDs labeled 0 through 8 are located on the upper left of the cr...

Page 59: ...he MX2010 router the online offline buttons can turn both cards on or off NOTE When installing an adapter card without the line card the online offline buttons have no affect MX2010 SFB LED and Button...

Page 60: ...normally On steadily Green FAN TRAY Fan in a fan tray has failed Fan tray has failed On steadily Red RELATED DOCUMENTATION MX2010 Craft Interface Description 29 MX2010 Alarm Relay Contacts on the Cra...

Page 61: ...per right of the craft interface When lit the circular red LED indicates a critical condition that can result in a system shutdown A lit triangular yellow LED indicates a less severe condition that re...

Page 62: ...steadily Red Indicates a serious but nonfatal error condition such as a maintenance alert or a significant increase in component temperature Warning alarm On steadily Yellow Deactivates red and yellow...

Page 63: ...0 CBL MID Lower cable manager MX2000 CBL BTM S DC power cable manager MX2010 DC CBL MGR S The lower cable manager see Figure 11 on page 38 is located just below the bottom line card cage has a removab...

Page 64: ...e strips or other ties to gently secure the cables in the DC cable manager To secure the cables in place loop the tie through the cable anchor and secure the tie You can pull the DC cable manager up a...

Page 65: ...r filter located in the upper card cage which has rows for routing and securing the cables away from the front of the CB REs and SFBs You can use cable strips or other ties to gently secure the cables...

Page 66: ...OK FAIL OK FAIL OK FAIL OK FAIL g007444 Figure 14 Card Cage Air Filter g007041 Extended Cable Manager The extended cable manager consists of the following components Extended lower cable manager MX200...

Page 67: ...Cable Manager g000010 Front upper Front lower Rear DC PDM The extended cable manager provides additional support to route and secure a large number of cables away from the front of the MPCs and MICs s...

Page 68: ...m the rear of the PDMs You can use cable strips or other ties to gently secure the cables in the upper and lower extended cable managers To secure the cables in place loop the tie through the cable an...

Page 69: ...n frame mounting shelf for mounting in an open frame rack optional Two center mounting brackets for mounting the router in an open frame rack optional Mounting screws Cage nuts NOTE There must be a mi...

Page 70: ...le temperature range The router has four fan trays two trays located at the top and two trays located at the bottom of the router that install horizontally Each fan tray contains six fans and are 172...

Page 71: ...omponents When the router is operating normally the fans function at lower than full speed If a fan fails or the ambient temperature rises above a threshold the speed of the remaining fans is automati...

Page 72: ...between the backplanes in the center of the chassis This cools the bottom MPCs and half of each SFB and CB RE Air is pulled through the SFBs and all the CB REs in the center of the chassis and is exh...

Page 73: ...the upper fan tray access door the air baffle dissipates exhausted air away from the router RELATED DOCUMENTATION Troubleshooting the MX2010 Cooling System 706 Maintaining the MX2010 Air Filters 609...

Page 74: ...w Fan temperature may indicate warm threshold Fan tray is nonoperational On Red One or more fans are bad or not operating Fan temperature may indicate high threshold RELATED DOCUMENTATION MX2010 Cooli...

Page 75: ...ents Provides the interface for system management and user access to the route The CB RE is hot pluggable and installs into the front of the MX2000 chassis in vertical slots labeled 0 and 1 A USB port...

Page 76: ...MX Series CB RE or RCB Auxillary and Console Ports 157 RJ 45 Connector Pinouts for an MX Series CB RE or RCB Management Port 158 RE MX2000 1800x4 CB RE Description IN THIS SECTION RE MX2000 1800x4 CB...

Page 77: ...unit AUX 1 This port is used to configure the MX2000 router CONSOLE 2 This port is a dedicated management channel for device maintenance It is also used for system administrators to monitor and manage...

Page 78: ...PS 1000Base T Ethernet controller Circuits for chassis management and control Power circuits for the CB RE Control FPGA Provides the Peripheral Component Interconnect PCI interface to the routing engi...

Page 79: ...les manage the routing protocols used on the router control the router interfaces control some chassis components and provide the interface for system management and user access to the router RE MX200...

Page 80: ...IL CONSOLE g009125 RE MX2K X8 64G 2 OFFLINE 1 3 2 4 5 6 7 8 5 1 USB ports AUX port 6 2 RESET button CONSOLE port 7 3 XGE 0 and XGE 1 ports MGMT port 8 4 EXTCLK0 and EXTCLK1 ports ONLINE OFFLINE button...

Page 81: ...ersions 3 0 2 0 and 1 1 Solid state drives nonremovable Provides secondary storage for log files memory dumps and system reboot Interface ports The AUX CONSOLE and MGMT ports provide access to managem...

Page 82: ...nnot be removed The Routing Engine interface boots from the storage media in this order the USB device SSD1 SSD2 and then the LAN RELATED DOCUMENTATION Supported Routing Engines by Router Routing Engi...

Page 83: ...ed to the embedded CPU complex on all components CPU Runs Junos OS as a guest OS to maintain the router s routing tables and routing protocols I2C bus logic used for low level communication with each...

Page 84: ...ide status of the Routing Engine on the CB RE REMX2K X8 128G CB RE LEDs Figure 25 REMX2K X8 128G CB RE LEDs AUX MGMT DISK1 DISK2 RESET ONLINE ONLINE OK FAIL MASTER 1 XGE 0 XGE 1 LINK EXTCLK 0 EXTCLK 1...

Page 85: ...ine is not powering up which indicates failure On steadily Yellow This Routing Engine is the Master Routing Engine On steadily Blue MASTER REMX2K X8 128G CB RE Boot Sequence The router is shipped with...

Page 86: ...atus The LEDs labeled LINK GPS BITS and UTI are located directly on the faceplate of the CB RE Table 21 on page 62 describes the functions of the Control Board interface of the CB RE There are two LED...

Page 87: ...nterface is active On steadily Green GPS GPS external clocking interface has failed On steadily Yellow GPS external clocking interface is offline Off Figure 26 REMX2K X8 64G CB RE LEDs Table 22 REMX2K...

Page 88: ...ISK2 2 There is no disk activity Off SFP ports XGE0 and XGE1 links are active On steadily Green LINK 3 Activity on the SFP ports XGE0 and XGE1 Blinking steadily No link On Yellow BITS external clockin...

Page 89: ...nterface is active On steadily Green UTI 5 UTI external clocking interface has failed On steadily Yellow UTI external clocking interface is offline Off CB has failed On steadily Red OK FAIL 6 RELATED...

Page 90: ...e same except that the SFB model has three XF fabric chips per card whereas the SFB2 model has two PF fabric chips per card RELATED DOCUMENTATION MX2000 Switch Fabric Board LED MX2000 Switch Fabric Bo...

Page 91: ...of the craft interface For more information about the SFB LED on the craft interface see MX2010 Component LEDs on the Craft Interface on page 31 RELATED DOCUMENTATION MX2000 Switch Fabric Board SFB O...

Page 92: ...ADC Description The MX2000 routers are compatible with all Trio based MPC line cards However because the MX2000 routers use a newer generation Switch Fabric Board SFB with faster bandwidth smaller for...

Page 93: ...ers 73 Replacing an MX2008 MPC MX2010 Modular Port Concentrator Description The Modular Port Concentrators MPCs provides packet forwarding services The MPCs install into an adapter card which in turn...

Page 94: ...red 0 though 9 left to right An MPC can be installed in any line card slot The user can install any combination of MPC types in the router When an MPC slot is not occupied by an MX2000 MPC or an adapt...

Page 95: ...Up to four Junos Trio chipsets which perform control functions tailored to the MPC s media type Backplane connectors and power circuitry Online button located on the craft interface which takes the MP...

Page 96: ...ion 70 Maintaining MX2010 MPCs 653 Troubleshooting the MX2010 MPCs 726 Replacing an MX2010 MPC and Adapter Card 525 MICs Supported by MX Series Routers 79 MPCs Supported by MX Series Routers Table 24...

Page 97: ...P 16x10GE MPC 15 1 15 1 15 1F7 13 2R4 MS MPC Multiservices MPC 12 3R2 12 3R2 15 1F7 12 3R2 MPC4E 3D 32XGE SFPP 32x10GE MPC4E 12 3R2 12 3R2 15 1F7 12 3R2 MPC4E 3D 2CGE 8XGE 2x100GE 8x10GE MPC4E 13 3R2...

Page 98: ...6 1R1 and later 15 1F5 with Junos Continuity 16 1R1 and later 15 1F7 15 1F5 with Junos Continuity 16 1R1 and later MPC7E 10G MPC7E 10G MPCs 12 3 12 3 15 1F7 10 2 MX MPC1 3D MPC1 12 3 12 3 15 1F7 11 2R...

Page 99: ...and Junos Continuity 15 1 15 1F7 14 1R4 14 2R3 and Junos Continuity 15 1 MX MPC2E 3D NG MPC2E NG 14 1R4 14 2R3 and Junos Continuity 15 1 14 1R4 14 2R3 and Junos Continuity 15 1 15 1F7 14 1R4 14 2R3 an...

Page 100: ...OS Release on MX240 MX480 and MX960 Routers MPC Model Number MPC Name 15 1F5 with Junos Continuity 16 1R1 and later 15 1F5 with Junos Continuity 16 1R1 and later 15 1F7 MX2K MPC8E MPC8E 15 1F5 with Ju...

Page 101: ...an MPC vertically or horizontally this information uses the same terms for all four edges of the MPC see Figure 30 on page 78 Faceplate Edge of the MPC that has connectors into which you insert the SF...

Page 102: ...MICs receive incoming packets from the network and transmit outgoing packets to the network During this process each MIC performs framing and high speed signaling for its media type MICs are hot remov...

Page 103: ...12 1 8 MIC 3D 8OC3 2OC12 ATM ATM MIC with SFP DS3 E3 15 1F7 11 4 8 MIC 3D 8DS3 E3 MIC 3D 8CHDS3 E3 B DS3 E3 MIC Circuit Emulation 15 1F7 12 3 16 MIC 3D 16CHE1 T1 CE Channelized E1 T1 Circuit Emulation...

Page 104: ...QSFP 100 Gigabit Ethernet 15 1F7 12 1 1 MIC3 3D 1X100GE CFP 100 Gigabit Ethernet MIC with CFP 15 1F7 12 2 1 MIC3 3D 1X100GE CXP 100 Gigabit Ethernet MIC with CXP 15 1F7 4 MIC6 100G CXP 100 Gigabit Eth...

Page 105: ...E Channelized OC3 STM1 Multi Rate Circuit Emulation MIC with SFP 15 1F7 12 MIC MRATE MIC MRATE 12 Port Multi Rate MIC with QSFP 17 4 12 MIC MACSEC MRATE Multi Rate Ethernet MIC 12 Port Multi Rate MACs...

Page 106: ...SFP 13 3 13 3 20 MIC 3D 20GE SFP E Gigabit Ethernet MIC with SFP E 10 Gigabit Ethernet 12 3 12 3 2 MIC 3D 2XGE XFP 10 Gigabit Ethernet MICs with XFP 12 3 12 3 4 MIC 3D 4XGE XFP 10 Gigabit Ethernet MI...

Page 107: ...MIC with CFP2 100 Gigabit DWDM OTN 15 1F5 15 1F6 17 1R1 15 1F5 15 1F6 17 1R1 1 MIC3 100G DWDM 100 Gigabit DWDM OTN MIC with CFP2 ACO Multi Rate 12 3 12 3 4 MIC 3D 4OC3OC12 1OC48 SONET SDH OC3 STM1 Mul...

Page 108: ...lti Rate MACsec MIC with QSFP Tri Rate 12 3 12 3 40 MIC 3D 40GE TX Tri Rate MIC Services 13 2 13 2 0 MS MIC 16G Multiservices MIC SONET SDH 12 3 12 3 1 MIC 3D 1OC192 XFP SONET SDH OC192 STM64 MIC with...

Page 109: ...2R4 2 MIC 3D 2XGE XFP 10 Gigabit Ethernet MICs with XFP Multi Rate 11 2R4 11 2R4 11 2R4 4 MIC 3D 4OC3OC12 1OC48 SONET SDH OC3 STM1 Multi Rate MICs with SFP 11 2R4 11 2R4 11 2R4 8 MIC 3D 8OC3OC12 4OC4...

Page 110: ...P Table 28 MICs Supported by MX80 and MX104 Routers MX104 MX80 Ports MIC Model Number MIC Name ATM 13 3 12 1 8 MIC 3D 8OC3 2OC12 ATM ATM MIC with SFP DS3 E3 13 3 11 4 8 MIC 3D 8DS3 E3 MIC 3D 8CHDS3 E3...

Page 111: ...DH OC3 STM1 Multi Rate MICs with SFP 13 3 11 2 8 MIC 3D 8OC3OC12 4OC48 SONET SDH OC3 STM1 Multi Rate MICs with SFP 13 3 11 4 4 MIC 3D 4CHOC3 2CHOC12 Channelized SONET SDH OC3 STM1 Multi Rate MICs with...

Page 112: ...modular MX80 and fixed MX80 48T 0 MS MIC 16G Multiservices MIC SONET SDH 13 3 12 2 1 MIC 3D 1OC192 XFP SONET SDH OC192 STM64 MIC with XFP Table 29 MICs Supported by MX10003 Router MX10003 Ports MIC Mo...

Page 113: ...bers type fpc pic port type Media type which identifies the network device For example ge Gigabit Ethernet interface so SONET SDH interface xe 10 Gigabit Ethernet interface For a complete list of medi...

Page 114: ...40 014289 AD0932M0092 XFP 10G SR PIC 3 BUILTIN BUILTIN 1x 10GE XFP Xcvr 0 REV 01 740 014289 AD0932M000J XFP 10G SR There is one 10 Gigabit Ethernet MIC MIC 3D 2XGE XFP installed into the MPC MIC 0 top...

Page 115: ...nd displays the two 10 Gigabit Ethernet interfaces xe 9 0 0 and xe 9 1 0 that correspond to the two ports on the MIC card that is installed in slot 0 of the MPC and four 10 Gigabit Ethernet interfaces...

Page 116: ...e 9 2 1 up up xe 9 2 0 0 up up inet 223 1 3 1 30 iso inet6 3ffe df01 301 30 fe80 6687 88ff fe04 8928 64 mpls multiservice xe 9 3 0 up up xe 9 3 1 up up RELATED DOCUMENTATION MX2010 Router Hardware Com...

Page 117: ...stribution Module 48 V LEDs 114 MX2000 DC Power Distribution Module 240 V China LEDs 115 MX2010 DC Power Supply Module 48 V Description 116 MX2000 DC Power Supply Module 240 V China Description 118 MX...

Page 118: ...or PSM redundancy This pool provides power to 10 line card slots four fan trays two CB REs and eight SFBs DC power system In the DC 48 V power configuration the router contains up to two DC PDMs locat...

Page 119: ...Power Supply Module 48 V Description on page 116 There are two PDMs per power system capable of carrying seven feeds or nine feeds each The 240 V China PDM has nine feeds Each DC PSM is capable of de...

Page 120: ...PSM Up to nine PSMs can be connected through the AC PDM AC Power Distribution Modules PDMs The MX2010 AC PSMs are hot removable and hot insertable The AC PSMs have a dual redundant feed INP0 and INP1...

Page 121: ...t used but still plugged into the MX2010 router make sure that you Do not connect external power feeds to the PSM through the PDM Move the DIP switch on the PSMs to the off position Turn off the PSM b...

Page 122: ...Card Description 79 MX2010 Power System Description 95 MX2010 Backplane Description 13 MX2000 Three Phase Delta AC Power Distribution Module Description Each three phase delta AC power distribution mo...

Page 123: ...the chassis before connecting the power input cables If the PDM must be removed both input power cables must be uninstalled and removed from the PDM before the PDM can be removed from the chassis The...

Page 124: ...170 MX2000 Three Phase Wye AC Power Distribution Module Description Each three phase wye AC PDM weighs approximately 12 lb 5 44 kg A metal wiring compartment contains two AC terminal blocks and groun...

Page 125: ...on page 104 shows the three phase wye AC PDM connections CAUTION The three phase wye AC PDM must be installed and secured in the chassis before connecting the power input cables If the PDM must be rem...

Page 126: ...e 36 Three Phase Wye AC Power Distribution Module Connections g007082 Figure 37 on page 104 shows the three phase wye AC power cord Figure 37 Three Phase Wye AC Power Cord g007083 RELATED DOCUMENTATIO...

Page 127: ...power cord connections for connecting to single phase AC power Figure 38 on page 105 shows the seven feed single phase AC PDM Figure 38 Seven Feed Single Phase AC Power Distribution Module CAUTION The...

Page 128: ...single phase AC power Figure 39 on page 106 shows the nine feed single phase AC PDM Figure 39 Nine Feed Single Phase AC Power Distribution Module CAUTION The single phase AC PDM must be installed and...

Page 129: ...hree Phase Delta AC PDM LEDs g007063 200 240V 3W PE 50A 20 0 2 40 V 3W P E 50 A Table 33 Three Phase Delta AC PDM LEDs Description State Color Label The left AC terminal block is receiving voltage On...

Page 130: ...of phases Each PSM works on a single phase This means the power system works independent of the kind of AC feed connected You can connect one or two feeds depending on the power system configuration n...

Page 131: ...ived from a three phase delta or wye AC input system These feeds are set by the input mode DIP switch located on the AC PSM Move the input mode DIP switch to the on or off position to determine the po...

Page 132: ...ns on page 173 RELATED DOCUMENTATION MX2020 AC Power Supply Module LEDs MX2010 AC Power Supply Module LEDs Each AC PSM faceplate contains four LEDs These LEDs are described in Table 35 on page 111 The...

Page 133: ...voltage range On Yellow AC input to the PSM is not present Off AC input is within the required voltage range and the DIP switch is set to on On Green INP1 AC input is out of the required voltage range...

Page 134: ...IP switch on the PDM to the rated amperage of the DC power input feeds NOTE The selected input capacity applies to all inputs of this PDM Selecting 60 A reduces the available power output capacity of...

Page 135: ...s up to two DC power distribution modules PDMs located at the rear of the chassis in slots PDM0 Input0 and PDM1 Input1 bottom to top A minimum of one PDM is required per system two PDMs per chassis fo...

Page 136: ...0 Routers 204 DC Power 48 V Circuit Breaker Requirements for the MX2010 Router 208 DC Power Cable Specifications for the MX2010 Router 209 Site Electrical Wiring Guidelines for MX Series Routers MX201...

Page 137: ...ON MX2010 Component LEDs on the Craft Interface 31 MX2010 Power System Description 95 MX2010 DC Power Distribution Module 48 V Description 111 MX2010 DC Power 48 V System Electrical Specifications 201...

Page 138: ...or 80 A current limited A total of nine feeds are required to fully power the MX2010 Another nine feeds are required to provide feed redundancy a total of 18 60 A or 80 A feeds In the DC power config...

Page 139: ...redundant feed INP0 and INP1 Both feeds are active during operation but both feeds might or might not be providing current Move the input mode DIP switch to the on or off position to determine the po...

Page 140: ...1 Removing the MX2010 Air Filter 449 MX2000 DC Power Supply Module 240 V China Description The MX2010 supports a DC power system The 240 V China DC power system operates with nine feeds A total of nin...

Page 141: ...DMs per power subsystem capable of carrying nine feeds each Connect feeds from one source to one PDM and feeds from the other source to the second PDM of the power subsystem The primary input of the P...

Page 142: ...OCUMENTATION MX2020 DC and Power Supply Module LEDs MX2000 DC Power Distribution Module 240 V China LEDs MX2000 Router Grounding Specifications 142 MX2010 Router DC 240 V China System Electrical Speci...

Page 143: ...controller is functioning normally On Yellow PSM is not functioning normally or the PSM controller is off Off PSM is not functioning normally or the DC input voltage of one or more feeds is out of ran...

Page 144: ...MX2010 DC Power 48 V System Electrical Specifications 201 122...

Page 145: ...and Specifications Planning and Preparing the Site 125 Transceiver and Cable Specifications 151 Pinout Specifications 157 AC Power Requirements Specifications and Guidelines 161 DC Power Requirements...

Page 146: ......

Page 147: ...Requirements for Airflow and Hardware Maintenance for the MX2010 Router 147 Overview of Preparing the Site for the MX2010 Router To prepare a site for router installation 1 Verify that environmental f...

Page 148: ...ifications for the MX2010 Router on page 209 MX2010 DC Power Distribution Description 48 V on page 197 MX2000 DC Power Distribution Module 240 V China Description on page 113 5 Plan rack location incl...

Page 149: ...cabinet is sufficient to prevent overheating Consider the following requirements to when planning for chassis cooling Ensure that the cool air supply you provide through the cabinet can adequately di...

Page 150: ...X2010 Rack Mounting Hardware 43 MX2010 Cabinet Size and Clearance Requirements The minimum size cabinet that can accommodate the router is 23 62 in 60 cm wide and 39 37 in 100 cm deep A cabinet larger...

Page 151: ...s removed Observe the following guidelines for moving the router Before moving the router read the Overview of Preparing the Site for the MX2010 Router on page 125 to verify that the intended site mee...

Page 152: ...ummarize the physical specifications for the router chassis and the components Table 41 MX2010 Shipping Weight Specifications Shipping Weight Item 358 lb 162 4 kg Shipping crate and pallet 324 lb 146...

Page 153: ...ing brackets Chassis with components removed 324 lb 146 96 kg Chassis dimensions 59 50in 151 13cm With standard cable manager 36 20 in 91 95 cm With extended cable manager 40 15 in 102 cm 19 in 48 26...

Page 154: ...25 in 15 9 cm 1 25 in 3 17 cm 1 2 lb 0 54 kg MIC 15 10 in 38 35 cm 7 224 in 18 34 cm 1 65 in 4 19 cm 7 0 lb 3 17 kg Fully populated with 9 total 63 lb 28 57 kg AC PSM 7 361 in 18 69 cm 4 76 in 12 09...

Page 155: ...21 cm 23 6 in 59 94 cm With ejector handle 26 14 in 66 39 cm 1 7 in 4 31 cm 12 lb 5 44 kg Fully populated with 8 total 96 lb 43 55 kg SFB 16 225 in 41 21 cm 23 6 in 59 94 cm With ejector handle 26 14...

Page 156: ...e cable manager with air filter 2 73 in 6 93 cm 2 93 in 7 44 cm 16 85 in 42 79 cm 1 2 lb 0 54 kg Fully populated with 2 total 2 4 lb 1 08 kg Standard DC cable manager rear 8 23 in 20 90 cm 4 75 in 12...

Page 157: ...ils in a rack that complies with this standard is usually wider than the mounting brackets which measure 19 2 in 48 8 cm from the outer edge to outer edge Use approved wing devices to narrow the openi...

Page 158: ...n 151 1 cm You can install one chassis in a rack A typical four post rack measures 84 in 213 4 cm high 24 in 61 cm through 30 in 76 2 cm deep and 19 in 48 3 cm wide see Figure 52 on page 137 A typical...

Page 159: ...when installing the MX2010 router Spacing of Mounting Bracket and Flange Holes The holes in the mounting brackets and front mount flanges used to attach the chassis to a rack are spaced at 1 U 1 75 i...

Page 160: ...y also secure the rack to ceiling brackets RELATED DOCUMENTATION Clearance Requirements for Airflow and Hardware Maintenance for the MX2010 Router 147 MX2010 Rack Mounting Hardware 43 MX2010 Cabinet S...

Page 161: ...f Router Transport Kit 42 in 106 7 cm g000041 The weight of the router transport kit is 138 5 lb 63 kg The maximum recommended height the MX2010 should be lifted from the floor by using the router tra...

Page 162: ...1 cm 23 40 in 59 4 cm Viewed from the front the MX2010 router with the router transport kit installed measures 30 78 in 78 2 cm wide with the router measuring 19 in 48 3 cm wide see Figure 56 on page...

Page 163: ...e Description Normal operation ensured in relative humidity range of 5 through 90 noncondensing Relative humidity Normal operation ensured in temperature range of 32 F 0 C through 104 F 40 C Nonoperat...

Page 164: ...es Router Grounding Cable Specifications 144 MX2000 Series Chassis Grounding Points Specifications To meet safety and electromagnetic interference EMI requirements and to ensure proper operation the r...

Page 165: ...grounding point on the chassis with two screws The router is shipped with two Standard UNC 1 4 20 screws for connecting to the top left pair of grounding points WARNING The router is a pluggable type...

Page 166: ...de Power MX2000 Series Router Grounding Cable Specifications The 48 VDC facility must be equipped with a circuit breaker rated 60 A 48 VDC or 80 A 48 VDC for each PDM input and the grounding cable mus...

Page 167: ...r Environmental Specifications on page 141 Verify that environmental factors such as temperature and humidity do not exceed router tolerances Power MX2010 DC Power Supply Module 48 V Description on pa...

Page 168: ...into a network cabinet make sure that no hardware device rack or cabinet component obstructs the 34 U rack space from access during installation MX2010 Rack Requirements on page 135 If a rack is used...

Page 169: ...unction properly the airflow around the chassis must be unrestricted Airflow must always be from front to back with respect to the rack This ensures that fresh air from the front of the rack is suppli...

Page 170: ...ce Requirements for a DC powered MX2010 with a Standard Cable Manager g008200 36 4 in 92 5 cm 19 0 in 48 3 cm 17 5 in 44 45 cm Front Rear 33 5 in 85 1 cm 36 0 in 91 44 cm Clearance required Top view S...

Page 171: ...s extra clearance to accommodate the added depth Figure 62 on page 149 and Figure 63 on page 150 show the dimensions and clearance requirements for AC and DC powered MX2010 routers with extended cable...

Page 172: ...85 1 cm 36 0 in 91 44 cm Clearance required Top view Extended cable manager Front mounting flange 36 0 in 91 44 cm Clearance recommended Center mounting flange 12 0 in 30 5 cm Extended DC power cable...

Page 173: ...to find information about the pluggable transceivers supported on your Juniper Networks device To calculate the power budget and power margin perform the following tasks 1 Calculating Power Budget for...

Page 174: ...connectors splices and fiber attenuation Table 46 on page 152 lists an estimated amount of loss for the factors used in the following sample calculations For information about the actual amount of si...

Page 175: ...um of fiber attenuation 8 km 0 5 dB km or 4 dB and loss for seven connectors 0 5 dB per connector or 3 5 dB The power margin P M is calculated as follows P M P B LL P M 13 dB 8 km 0 5 dB km 7 0 5 dB P...

Page 176: ...ight reaching the receiver with enough power to be demodulated correctly Attenuation is the reduction in power of the light signal as it is transmitted Attenuation is caused by passive media component...

Page 177: ...ne RE and Control Board CB are integrated into a single board a CB RE is known as Routing and Control Board RCB The RCB is a single FRU that provides RE and CB functionality Table 47 Cable and Wire Sp...

Page 178: ...Routing Engine and RCB Management and Alarm Interfaces Router Receptacle Maximum Length Cable Wire Supplied Cable Specification Port RJ 45 female 1 83 m 1 83 m length with RJ 45 DB 9 connectors RS 232...

Page 179: ...us serial interfaces that accept an RJ 45 connector The ports connect the Routing Engine to an auxiliary or console management device Table 49 on page 157 describes the RJ 45 connector pinout NOTE In...

Page 180: ...ment LAN or other device that supports out of band management NOTE In routers where the Routing Engine and Control Board CB are integrated into a single board a CB RE is known as Routing and Control B...

Page 181: ...Table 50 RJ 45 Management Port Connector Pinouts for the CB RE or RCB MGMT Port continued Description Signal Pin Transmit receive data pair 4 TRP4 7 Transmit receive data pair 4 TRP4 8 159...

Page 182: ...X2000 Routers 185 MX2010 AC Power Requirements To allow for future growth so that you can operate the router in any hardware configuration without upgrading the power infrastructure we recommend that...

Page 183: ...AY Fan trays upper 100 W 2 200 W MX2000 FANTRAY Fan trays lower 440 W 10 4400 W MPC 3D 16XGE SFPP MPC 150 W 10 1500 W ADC ADC 150 W RE MX2000 1800X4 CB RE 200 W 8 1600 W MX2000 SFB SFB slots 0 through...

Page 184: ...at 25 C MX2000 SFB SFB 220 W Typical 265 W at 55 C 250 W at 40 C 240 W at 25 C MX2000 SFB2 S SFB2 Fan Trays 100 W Typical 500 W at 55 C 330 W at 40 C 300 W at 25 C MX2000 FANTRAY Fan trays Upper 100...

Page 185: ...E MPCs 440 W at 55 C ambient MPC 3D 16XGE SFPP 16x10GE MPC see16x10GE MPC 165 W With MICs and optics 239 W at 55 C 227 W at 40 C 219 W at 25 C MX MPC1 3D MX MPC1E 3D MPC1 see MPC1 175 W With MICs and...

Page 186: ...W With MICs and optics 368 W at 55 C 347 W at 40 C 333 W at 25 C MX MPC2E 3D P MPC2E P see MPC2E P 440 W With MICs and optics 500 W at 55 C two 40 W MICs 485 W at 40 C two CFP MICs with LR4 optics 473...

Page 187: ...10GE MPC4E 645 W With optics 604 W at 55 C with SFPP ZR and CFP LR4 optics 541 W at 40 C with SFPP ZR and CFP LR4 optics 511 W at 25 C with SFPP ZR and CFP LR4 optics MPC5E 40G10G MPC5EQ 40G10G 6x40GE...

Page 188: ...MPC9E without MICs MICs 35 W MIC 3D 8OC3 2OC12 ATM ATM MIC with SFP 37 W MIC 3D 20 GE SFP Gigabit Ethernet MIC with SFP 2 Port 29 W 4 Port 37 W 2 Port MIC 3D 2XGE XFP 4 Port MIC 3D 4XGE XFP 10 Gigabit...

Page 189: ...P 40 Gigabit Ethernet MIC with QSFPP 40 W MIC3 3D 1X100GE CFP 100 Gigabit Ethernet MIC with CFP 20 W MIC3 3D 1X100GE CXP 100 Gigabit Ethernet MIC with CXP 104 W With optics 94 W at 55 C with 100G BASE...

Page 190: ...W at 25 C 4 Port MIC 3D 4OC3OC12 1OC48 8 Port MIC 3D 8OC3OC12 4OC48 SONET SDH OC3 STM1 Multi Rate MIC 41 W at 55 C 38 5 W at 40 C 36 W at 25 C MIC 3D 1OC192 XFP OC192 STM64 MIC with XFP 4 Port 41 W at...

Page 191: ...000 Router with Three Phase Wye AC Power Distribution Modules 295 Connecting Power to an MX2000 Single Phase AC Power Distribution Module 300 MX2000 AC Power Cord Specifications 170 MX2000 AC Power Co...

Page 192: ...n the chassis in addition to the grounding pin on the power cord This separate protective earthing terminal must be permanently connected to earth CAUTION Power cords and cables must not block access...

Page 193: ...er Cord g007083 Table 55 Single Phase AC Power Cord Specifications Graphic Plug Type Electrical Specification Model Number Region AS NZS 3112 15 A 250 VAC CBL PWR C21S AU Australia GB 1002 GB 2099 16...

Page 194: ...CBL PWR C21S US US Canada RELATED DOCUMENTATION Connecting AC Power to an MX2000 Router with Three Phase Delta AC Power Distribution Modules 291 Connecting AC Power to an MX2000 Router with Three Phas...

Page 195: ...and 15 A 200 VAC input 2 for each PDM Single phase 30 A 200 VAC AC system current rating Delta 16800 W input 1 8400 W input 2 Wye 16800 W input 1 8400 W input 2 AC system input power 90 5 at 50 load...

Page 196: ...se Wye AC Power Distribution Module Description 102 MX2000 Seven Feed Single Phase AC Power Distribution Module Description 105 MX2000 Nine Feed Single Phase AC Power Distribution Module Description 1...

Page 197: ...ctly attached lug can damage the router The chassis has two grounding points The upper pair is sized for UNC 1 4 20 nuts and the lower pair is sized for M6 nuts You only need to connect to one of the...

Page 198: ...es Table 44 on page 144 summarizes the specifications for the power cables which you must supply Table 58 DC Power Cable Specifications Quantity and Specification Cable Type Eighteen pairs of 4 AWG 21...

Page 199: ...2000 Router 289 Tools and Parts Required for Connecting an MX2000 Router to Power 219 MX2000 Three Phase Delta AC Power Distribution Module Electrical Specifications Table 59 on page 178 lists the thr...

Page 200: ...specifications Table 60 Three Phase Wye AC Power Distribution Module Electrical Specifications Specification Item Operating range 200 240 VAC line to neutral or 345 415 VAC line to line nominal AC inp...

Page 201: ...ng AC Power Requirements for MX2010 Routers The information in this topic helps you determine which of the two input ratings for the PSM is suitable for various configurations You determine suitabilit...

Page 202: ...e power usage using the values see MX2010 AC Power Requirements on page 161 2 Evaluate the power budget including the budget for each configuration if applicable and check the required power against t...

Page 203: ...2800 W 2142 W Three phase wye AC PDM 2 per system 30 A feed input 1 and 15 A feed input 2 3 To calculate necessary input power for three phase delta AC PDM follow the procedure below see Figure 69 on...

Page 204: ...power for three phase wye AC PDM follow the procedure below see Figure 70 on page 183 Figure 70 AC PDM Three Phase Wye Input Power g007086 AC PS_0 2800W input AC PS_3 2800W input AC PS_2 2800W input...

Page 205: ...n Module Maximum power divided by 0 91 3 41 BTU hr Input power Maximum power divided by 0 91 Refer to MX2010 AC Power Requirements on page 161 to calculate maximum power which is dependent on configur...

Page 206: ...e PSMs Figure 71 on page 185 shows the mapping for the MX2010 and Figure 72 on page 186 shows the mapping for the MX2020 The arrangement matches the internal components of the PDM Table 64 on page 186...

Page 207: ...EFT IN P1 1_RIGHT IN P0 0_LEFT IN P0 0_RIGHT PSM 10 PSM 11 PSM 12 PSM 13 PSM 14 PSM 15 PSM 16 PSM 17 PSM 0 PSM 1 PSM 2 PSM 3 PSM 4 PSM 5 PSM 6 PSM 7 PSM 8 PDM3 PDM2 PDM1 PDM0 Table 64 Input AC Power M...

Page 208: ...11 PSM14 PSM11 PSM12 PSM15 PSM13 PSM16 PSM14 PSM17 BEST PRACTICE To achieve complete redundancy when you have two power sources such as Source A and Source B we recommend that you connect them as foll...

Page 209: ...ns for the MX2010 Router 209 MX2010 DC Power Requirements Table 66 on page 190 lists the FRU power requirements for SFBs CB REs MPCs and MICs In addition Table 66 on page 190 lists the MPC power requi...

Page 210: ...Component Switch Fabric Boards SFBs 200 W Typical 220 W at 55 C 220 W at 40 C 220 W at 25 C MX2000 SFB S SFB 220 W Typical 265 W at 55 C 250 W at 40 C 240 W at 25 C MX2000 SFB2 S SFB2 Fan Trays 100 W...

Page 211: ...CB RE MPCs 440 W at 55 C ambient MPC 3D 16XGE SFPP 16x10GE MPC see16x10GE MPC 165 W With MICs and optics 239 W at 55 C 227 W at 40 C 219 W at 25 C MX MPC1 3D MX MPC1E 3D MPC1 see MPC1 175 W With MICs...

Page 212: ...ith MICs and optics 368 W at 55 C 347 W at 40 C 333 W at 25 C MX MPC2E 3D P MCP2E P see MPC2E P 440 W With MICs and optics 520 W at 55 C two 40 W MICs 420 W at 40 C two CFP MICs with LR4 optics 408 W...

Page 213: ...E 8x10GE MPC4E With optics 607 W at 55 C 541 W at 40 C 511 W at 25 C MPC5E 40G10G MPC5EQ 40G10G 6x40GE 24x10GE MPC5E 6x40GE 24x10GE MPC5EQ With optics 607 W at 55 C 541 W at 40 C 511 W at 25 C MPC5E 1...

Page 214: ...37 W 2 Port MIC 3D 2XGE XFP 4 Port MIC 3D 4XGE XFP 10 Gigabit Ethernet MIC with XFP 74 W With optics 53 W at 55 C 40 C and 25 C with 10G BASE SR and 10G BASE LR optics 66 W at 55 C 40 C and 25 C with...

Page 215: ...t MIC with CXP 104 W With optics 94 W at 55 C with 100G BASE LR4 OTN optics 86 W at 40 C with 100G BASE LR4 OTN optics 74 W at 25 C with 100G BASE LR4 OTN optics MIC6 100G CFP2 100 Gigabit Ethernet MI...

Page 216: ...C48 SONET SDH OC3 STM1 Multi Rate MIC 41 W at 55 C 38 5 W at 40 C 36 W at 25 C MIC 3D 1OC192 XFP OC192 STM64 MIC with XFP 4 Port 41 W at 55 C 40 W at 40 C 39 W at 25 C 8 Port 52 W at 55 C 50 5 W at 40...

Page 217: ...power distribution panels one of which might be located at a location near the rack that houses the router A pair of cables one input and one return connects each set of PDM input terminal studs to th...

Page 218: ...ils in a redundant configuration the remaining PSMs provide power to FRUs Up to nine PSMs might be required to supply power to a fully configured router A portion of power from each zone is reserved t...

Page 219: ...power distribution panel and safety ground connection The PSMs can be connected to two separate feeds from different sources that are used for feed redundancy There are two PDMs located in slots PDM0...

Page 220: ...ate even if power to a complete zone fails CAUTION You must ensure that power connections maintain the proper polarity The power source cables might be labeled and to indicate their polarity There is...

Page 221: ...2010 Router 209 MX2010 DC Power 48 V System Electrical Specifications Table 67 on page 201 lists the DC power system electrical specifications Table 67 DC PSM Electrical Specifications per Input Confi...

Page 222: ...48 V Description 116 MX2010 DC Power Electrical Safety Guidelines MX2010 Router DC 240 V China System Electrical Specifications Table 67 on page 201 lists the DC power system electrical specification...

Page 223: ...ses The DC PSM has a power supply input fuse in the negative terminals of both INP0 and INP1 Table 69 on page 203 lists the electrical specification for this fuse Table 69 Electrical Specifications fo...

Page 224: ...ou determine suitability by subtracting the total power draw from the maximum output of the PSMs Afterward you calculate the required input current Finally you calculate the thermal output A sample co...

Page 225: ...s Chassis Power Configuration The power consumed by CB REs and SFBs is 250 W each The power consumed by 2 CB REs and 8 SFBs is 2 5 KW The power consumed by fan trays 0 and 1 is 2 KW and fan trays 2 an...

Page 226: ...lower 440 W 10 4400 W MPC 3D 16XGE SFPP MPC 150 W 10 1500 W ADC ADC 250 W 2 500 W RE MX2000 1800X4 S CB RE 220 W 8 1760 W MX2000 SFB S SFB slots 0 through 7 2100 W 8 PSMs 16 800 W 1 PSM 2100 W redund...

Page 227: ...le 73 Calculating DC Input Power Input Power Requirement Watt per PSM Output Power Requirement Watt per PSM Power Supply Module Efficiency Power Supply Module 2307 2100 91 MX2010 DC PSM 60 A 2747 2500...

Page 228: ...Code and customer site internal standards to maintain proper level of protection for the current specified above For PDMs If you plan to operate a minimally configured DC powered router we recommend t...

Page 229: ...aintain proper level of protection for the current specified above If you plan to operate a DC powered router at less than the maximum configuration we recommend that you provision a 2 pole circuit br...

Page 230: ...rth terminal must be permanently connected to earth Table 75 on page 210 summarizes the specifications for the DC power cables which you must supply Table 75 DC Power Cable Specifications Quantity and...

Page 231: ...Module 48 V Description 116 MX2010 DC Power Distribution Module 48 V Description 111 MX2010 DC Power Electrical Safety Guidelines MX2010 DC Power Distribution Description 48 V 197 Connecting an MX201...

Page 232: ...iguration Installation Overview 215 Unpacking the Router 221 Installing the Mounting Hardware 233 Installing the Router 239 Connecting the Router to Power 289 Connecting the Router to the Network 337...

Page 233: ......

Page 234: ...10 Router Overview To install the MX2010 router 1 Prepare your installation site See Overview of Preparing the Site for the MX2010 Router on page 125 2 Review the safety guidelines See General Safety...

Page 235: ...ower Distribution Modules on page 291 Connecting AC Power to an MX2000 Router with Three Phase Wye AC Power Distribution Modules on page 295 Installing MX2010 DC Power Supply Modules Installing MX2000...

Page 236: ...view 3 Tools Required to Install the MX2010 Router Using a Pallet Jack To install the router you need the following tools and equipment Standard pallet jack not provided Pallet jack attachment MX2000...

Page 237: ...t 1 1 8 in 28 57 mm torque controlled driver or socket wrench to tighten the router transport kit winch mechanism 9 16 in or 14 mm open end or socket wrench with extension to remove bracket bolts from...

Page 238: ...block connections on the AC delta and wye PDM use a 1 4 in slotted screwdriver for the slotted screws Use a 5 32 in 4 mm Allen wrench for the 5 16 in hex screws Wire cutters Electrostatic discharge ES...

Page 239: ...umbers 1 and 2 2 5 mm flat blade screwdriver 2 5 mm Phillips screwdriver Wire cutters Electrostatic discharge ESD grounding wrist strap RELATED DOCUMENTATION Connecting the MX2010 Router to a Network...

Page 240: ...s required to unpack the router See Tools and Parts Required to Unpack the MX2010 Router on page 217 2 Remove the router accessory box and all parts from the shipping crate See Unpacking the MX2010 Ro...

Page 241: ...configuration the MX2010 might be shipped with additional components already installed NOTE The MX2010 can be ordered with extended EMI covers and extended cable managers There are two styles of ship...

Page 242: ...ler g007407 3 ft 91 44 cm 3 ft 91 44 cm 4 ft 121 92 cm 13 ft 396 24 cm 23 ft 701 cm 6 ft 182 88 cm 3 5 ft 106 7 cm 9 5 ft 289 56 cm Crate door ramp 3 5 ft 106 7 cm 5 5 ft 168 3 cm 4 ft 121 9 cm Figure...

Page 243: ...crate with the arrows pointing up 3 Open all the latches on the shipping crate 4 Remove the front door of the shipping crate and set it aside see Figure 79 on page 225 NOTE If you ordered a router tra...

Page 244: ...ench and use a number 2 Phillips screwdriver to remove the bolts and screws from the brackets 11 Set the shipping brackets aside for later use to secure the router to the pallet jack attachment NOTE I...

Page 245: ...part is missing contact a customer service representative A fully configured router contains the router chassis with installed components listed in Table 76 on page 226 and an accessory box which con...

Page 246: ...llation instructions One blank panel for each slot not occupied by a component Blank panels for slots without components installed Table 77 Accessory Box Parts List Quantity Part 14 Screws to mount ch...

Page 247: ...nd Parts Required to Unpack the MX2010 Router 217 Unpacking the MX2010 Router 222 MX2010 Router Overview 3 Unpacking the MX2010 Router Transport Kit The router transport kit is shipped in a wooden cra...

Page 248: ...e the shipping crate Do not unpack it until you are ready to begin installation To unpack the router transport kit 1 Move the router transport kit shipping crate to an ESD approved staging area where...

Page 249: ...ipping crate and set them aside 5 Remove the two wing nuts that secure the wooden brace to the shipping crate platform and set them aside 6 Align the crate door with the shipping crate platform and se...

Page 250: ...CI packs attached to the pallet being careful not to break the VCI packs open 9 Save the shipping crate cover pallet and packing materials in case you need to move or ship the router transport kit at...

Page 251: ...ive to the standard U division on the rack that is aligned with the bottom of the mounting shelf To install cage nuts in a four post rack 1 On the rear side of both rack rails insert cage nuts in the...

Page 252: ...nce Above U Division Hole 36 50 U 63 88 in 162 2 cm 110 33 50 U 58 63 in 148 9 cm 101 30 50 U 53 38 in 135 6 cm 92 27 50 U 48 13 in 122 2 cm 83 24 50 U 42 88 in 108 9 cm 74 21 50 U 37 63 in 95 6 cm 65...

Page 253: ...ttom of the shelf on the rack rail supports The shelf installs on the front of the rear rails extending toward the front of the rack 2 Partially insert screws into the open holes in the rear flanges o...

Page 254: ...table from 24 in 60 96 cm through 30 in 76 2 cm to accommodate different types of racks rails NOTE There must be a minimum of 34 U unobstructed front to back usable rack space when installing the MX20...

Page 255: ...ssis To remove the center mounting brackets from the chassis 1 Loosen the screws from each bracket see Figure 84 on page 237 2 Remove each bracket Figure 84 Center Mounting Bracket Removal g007463 SEE...

Page 256: ...k 270 Reinstalling Components in the MX2010 Router After Initially Installing the Router in a Rack 275 Removing Components from the MX2010 Router Chassis Before Installing It in a Rack Before installi...

Page 257: ...off O position On a DC powered router move the DC circuit breaker from the power source to the off O position We recommend this precaution even though the PDMs are not connected to power sources 3 Loo...

Page 258: ...Figure 85 Removing an AC Power Distribution Module Before Installing the MX2010 Router D g007439 241...

Page 259: ...Figure 86 Removing a DC Power Distribution Module 48 V Before Installing the MX2010 Router D g007431 242...

Page 260: ...point See the instructions for your site 2 On an AC powered router move the AC power switch on each PSM to the off O position On a DC powered router move the DC power switch on each PSM to the off O...

Page 261: ...lace each component on an antistatic mat resting on a stable flat surface Figure 88 Removing an AC Power Supply Module Before Installing the MX2010 Router g007437 D Figure 89 Removing a DC Power Suppl...

Page 262: ...ble 1 Attach an electrostatic discharge ESD grounding strap to your bare wrist and connect the strap to an approved site ESD grounding point See the instructions for your site 2 Loosen the two captive...

Page 263: ...while removing the fan trays 5 Place each component on an antistatic mat resting on a stable flat surface CAUTION Do not stack fan trays on one another after you remove them 6 Repeat the procedure for...

Page 264: ...aneously to unseat the SFB 4 Grasp the ejector handles and slide the SFB about halfway out of the chassis 5 Place one hand underneath the SFB to support it and slide it completely out of the chassis P...

Page 265: ...ESD grounding strap to your bare wrist and connect the strap to an approved site ESD grounding point See the instructions for your site 3 Open both the ejector handles simultaneously to unseat the bo...

Page 266: ...at have optical interfaces 2 Attach an electrostatic discharge ESD grounding strap to your bare wrist and connect the strap to an approved site ESD grounding point See the instructions for your site 3...

Page 267: ...See the instructions for your site 3 Open both ejector handles simultaneously to unseat the CB RE 4 Grasp the handles and slide the CB RE straight out of the card cage halfway 5 Place one hand around...

Page 268: ...atic Discharge Damage to an MX Series Router Overview of Preparing the Site for the MX2010 Router 125 Reinstalling Components in the MX2010 Router After Initially Installing the Router in a Rack 275 I...

Page 269: ...ttachment across both pallet jack legs 3 Using a 9 16 in 14 mm socket wrench loosen and remove the eight shipping bracket support torque fasteners that are located on the top of the pallet jack attach...

Page 270: ...ng It in a Rack on page 239 To install the router by using a pallet jack with attachment 1 Ensure that the rack is in its permanent location and is secured to the building Ensure that the installation...

Page 271: ...et jack 4 Using a four person team to load the router onto the pallet jack make sure it rests securely on the pallet jack attachment platform Figure 97 Loading the MX2010 Router onto the Pallet Jack g...

Page 272: ...during installation 9 Using the pallet jack lift the chassis approximately 0 75 in 1 9 cm above the surface of the mounting shelf four post rack or bottom opening of the rack open frame rack and posi...

Page 273: ...Figure 98 Loading the MX2010 Router into the Rack g007436 256...

Page 274: ...ront mounting flanges of the chassis align with the holes in the rack rails 13 Move the pallet jack away from the rack 14 Insert twelve mounting screws six on each side into the mounting holes to secu...

Page 275: ...stall the router using the router transport kit See either Using the Router Transport Kit to Install the MX2010 Router in a Four Post Rack on page 263 or Using the Router Transport Kit to Install the...

Page 276: ...sen the captive screws that secure the winch mount to the router transport kit and set the mount aside 4 Using a number 3 Phillips screwdriver loosen the captive screws that secure the router transpor...

Page 277: ...router transport mounting plate and wheel assembly indicated by right arrow with the holes on the right side of the chassis see Figure 101 on page 260 9 Using a number 3 Phillips screwdriver tighten...

Page 278: ...and maintenance 2 Using the shipping crate door as a ramp secure the door to the crate platform by using the two metal latches see Figure 102 on page 261 Figure 102 Securing the Crate Door to the Shi...

Page 279: ...ssis down the crate ramp to the rack location WARNING Do not push or pull the router fast during transporting Using excessive speed can cause the wheels to turn abruptly and tilt the router over CAUTI...

Page 280: ...85 lb 446 79 kg depending on the configuration we recommend that you use a router transport kit to install the router NOTE Four people are needed to install the router into a rack CAUTION Before front...

Page 281: ...inch Strap Plate Four Post Rack g000060 2 Using a four person team transport the router to the rack installation location and center it in front of the mounting shelf NOTE A minimum of 38 in 96 5 cm o...

Page 282: ...the handles clockwise until the router transport platform is aligned with the surface of the mounting shelf and slightly higher than the mounting shelf see Figure 106 on page 266 NOTE Make sure the b...

Page 283: ...t mounting plate and wheel assembly 7 Lift the wheels up by turning the handles counterclockwise so that the weight of the router is on the router transport platform 8 Using a number 3 Phillips screwd...

Page 284: ...Figure 107 Remove Router Transport Mounting Plate and Wheel Assembly g000065 9 Attach the winch strap to the winch strap plate at the rear of the router see Figure 108 on page 268 267...

Page 285: ...Attaching Winch Strap to Winch Strap Plate g000067 10 Attach a 1 1 8 in 28 57 mm socket wrench to the winch mechanism and turn clockwise to start pulling the chassis into the rack see Figure 109 on pa...

Page 286: ...ack by the winch mechanism grasp the handles on the shipping covers and carefully slide the router onto the mounting shelf until the front mounting flanges contact the rack rails You must remove the w...

Page 287: ...ring the Site for the MX2010 Router 125 Tools Required to Install the MX2010 Router Using a Router Transport Kit 218 MX2010 Router Transport Kit Moving Requirements and Guidelines 138 Removing Compone...

Page 288: ...sis NOTE The router transport kit handles can be removed to accommodate aisle width 3 Adjust the height of the router by turning the handles clockwise until the router transport platform is approximat...

Page 289: ...nting plate and wheel assembly 6 Lift the wheels up by turning the handles counterclockwise so that the weight of the router is on the router transport platform 7 Using a number 3 Phillips screwdriver...

Page 290: ...ransport Mounting Plate and Wheel Assembly g000066 8 Grasping the handles on the shipping covers carefully slide the router into the rack until the center mounting brackets contact the rack rails see...

Page 291: ...er transport platform and set the platform aside 10 Insert twelve mounting screws six on each side into the mounting holes to secure the router to the rack 11 Visually inspect the alignment of the rou...

Page 292: ...outer in a Rack After the router is installed in the rack remove the shipping covers and reinstall the removed components before booting and configuring the router You reinstall components first in th...

Page 293: ...e recommend this precaution even though the PDMs are not connected to power sources 3 Take each PDM to be installed out of its electrostatic bag and identify the slot on the PDM where it will be conne...

Page 294: ...Figure 113 Reinstalling an AC Power Distribution Module g007440 D 277...

Page 295: ...Figure 114 Reinstalling a DC Power Distribution Module 48 V D g007432 278...

Page 296: ...To reinstall the AC or DC PSMs follow this procedure for each PSM see Figure 116 on page 280 and Figure 117 on page 280 1 Remove the PSM to be installed out of the ESD bag and identify the slot where...

Page 297: ...e PSM straight in until the PSM is fully seated into the chassis slot 4 The PSM faceplate should be flush with adjacent PSMs Figure 116 Reinstalling an AC Power Supply Module D g007438 Figure 117 Rein...

Page 298: ...n tray access panel and open the panel 2 Take each fan tray to be installed out of its electrostatic bag and identify the slot on the fan tray where it will be connected 3 While grasping the handle pl...

Page 299: ...ompletely into the router 6 Tighten the two captive screws on the fan tray faceplate 7 Close the fan tray access panel and tighten the captive screws to secure it in place Figure 119 Reinstalling Uppe...

Page 300: ...its electrostatic bag and identify the slot on the SFB where it will be connected 3 Carefully align the sides of the SFB with the guides inside the chassis 4 Slide the SFB into the chassis until you f...

Page 301: ...ctrostatic bag and identify the slot where it will be installed 3 Locate the slot in the card cage in which you plan to install the adapter card 4 Ensure that the adapter card is right side up with th...

Page 302: ...ic MPC has a rubber safety cap covering the transceiver If it does not cover the transceiver with a safety cap 4 Locate the slot in the adapter card in which you plan to install the MPC 5 Ensure that...

Page 303: ...c CB RE has a rubber safety cap covering the transceiver If it does not cover the transceiver with a safety cap 4 Locate the slot in the CB RE card cage in which you plan to install the CB RE 5 Ensure...

Page 304: ...ELATED DOCUMENTATION Overview of Preparing the Site for the MX2010 Router 125 Tools Required to Install the MX2010 Router Using a Pallet Jack 217 Removing Components from the MX2010 Router Chassis Bef...

Page 305: ...8 V 304 Connecting Power to a DC Powered MX2000 Router with DC Power Distribution Modules 240 V China 309 Connecting an MX2000 DC Router Power Distribution Module 48 V Cable 310 Connecting an MX2000 D...

Page 306: ...has attached the cable lug provided with the router to the grounding cable 5 Attach an electrostatic discharge ESD grounding strap to your bare wrist and connect the strap to one of the ESD points on...

Page 307: ...site 2 Switch off the dedicated customer site circuit breakers Ensure that the voltage across the AC power source cable leads is 0 V and that there is no chance that the cable leads might become activ...

Page 308: ...input terminal or grounding point screw insert each wire into the grounding point input terminal and tighten the screw see Table 80 on page 294 for approved AC wire gauge NOTE The terminal connections...

Page 309: ...C power wire might vary The MX2000 chassis is not sensitive to phase rotation sequence either CW or CCW will operate correctly CAUTION Wire label configuration is for Juniper Networks supplied cable o...

Page 310: ...de energizing the PDM and install the metal cover and engage all AC PSMs NOTE The terminal connections have either slotted screws or hex screws Use a 1 4 in slotted screwdriver for the slotted screws...

Page 311: ...PDMs RELATED DOCUMENTATION MX2000 Three Phase Delta AC Power Distribution Module Description 100 MX2000 Three Phase Delta and Wye AC Power Distribution Module LEDs 107 Mapping Input Power from AC Powe...

Page 312: ...and secured in the chassis before connecting power cables NOTE The power cables must be uninstalled and removed from the three phase wye PDM before removal of the PDM from the chassis 6 Using a numbe...

Page 313: ...ounding point labeled GND b Insert the wire labeled L1 into the input terminal labeled A1 c Insert the wire labeled L2 into the input terminal labeled B1 d Insert the wire labeled L3 into the input te...

Page 314: ...e Insert the wire labeled N into the input terminal labeled N2 WARNING To protect power supplies from input voltage that might be caused by mis wired PDMs before reinstalling the metal cover to the wi...

Page 315: ...to 12 lb in 1 35 Nm of torque to each screw Do not overtighten the screws 15 Use the provided plastic cable tie to fasten the AC power cord to the PDM 16 Verify that the AC power cord does not touch...

Page 316: ...is no chance that the cable leads might become active during installation 3 Detach the ESD grounding strap from the approved site ESD grounding point and connect the strap to one of the ESD points on...

Page 317: ...strap to an approved site ESD grounding point See the instructions for your site WARNING Do not touch the power connectors on the PDM They can contain dangerous voltages RELATED DOCUMENTATION Installi...

Page 318: ...the mapping for the MX2020 The arrangement matches the internal components of the PDM Table 64 on page 186 shows the AC PDM input mapping to AC PDM0 Input0 and PDM1 Input1 MX2010 and MX2020 Table 65 o...

Page 319: ...EFT IN P1 1_RIGHT IN P0 0_LEFT IN P0 0_RIGHT PSM 10 PSM 11 PSM 12 PSM 13 PSM 14 PSM 15 PSM 16 PSM 17 PSM 0 PSM 1 PSM 2 PSM 3 PSM 4 PSM 5 PSM 6 PSM 7 PSM 8 PDM3 PDM2 PDM1 PDM0 Table 82 Input AC Power M...

Page 320: ...ws Connect Source A to PDM0 left and PDM0 right Connect Source B to PDM1 left and PDM1 right RELATED DOCUMENTATION Powering On a Three Phase AC Powered MX2000 Router 319 Connecting Power to a DC Power...

Page 321: ...80 A for each feed NOTE The switch position applies to all inputs of this PDM Selecting the 60 A position might reduce power output capacity available from each PSM NOTE The type of feed that you use...

Page 322: ...Remove the cover protecting the terminal studs on the faceplate 7 Remove the nut and washers from each of the terminal studs Use a 7 16 in 11 mm nut driver or socket wrench 8 Secure each power cable l...

Page 323: ...Close the plastic cable restraint cover over the terminal studs on the faceplate 10 Route the positive and negative DC power cables through the left and right sides of the cable restraint 11 Tighten t...

Page 324: ...2010 router has more than one connection to power after it is fully connected Disconnect all power sources before servicing the PSMs or PDMs to avoid electrical shock RELATED DOCUMENTATION DC Power Ca...

Page 325: ...he DC 240 V China source power cables CBL PWR 240V CH to the router 1 Switch off the dedicated customer site circuit breakers Ensure that the voltage across the DC power source cable leads is 0 V and...

Page 326: ...the OFF position To connect a power cable for a DC PDM 1 Locate a replacement power cable that meets the specifications defined in MX2000 Router DC Power Subsystem Electrical Specifications 2 Verify...

Page 327: ...the terminal block as you are tightening the nuts Ensure that each nut is properly threaded onto the terminal stud The nut should be able to spin freely with your fingers when it is first placed onto...

Page 328: ...o DC power sources see MX2000 Router DC Power Subsystem Electrical Specifications NOTE Make sure the amperage switch is set to 60 A or 80 A to match the DC circuit input feed 5 Route the positive and...

Page 329: ...e OFF position To connect the DC 240 V China source power cables CBL PWR 240V CH to the router 1 Switch off the dedicated customer site circuit breakers Ensure that the voltage across the DC power sou...

Page 330: ...e 314 Figure 136 240 V China Power Cable g100414 2 1 3 3 1 Positive Negative 2 Ground 6 Switch on the dedicated customer site circuit breaker 7 On each of the DC power input sources switch the DC circ...

Page 331: ...he appropriate terminal on the PDMs the positive source cable to the return terminal labeled RTN and the negative source cable to the input terminal labeled 48V 5 Switch on the dedicated customer site...

Page 332: ...feed installation 12 On the external management device connected to the CB RE monitor the startup process to verify that the system has booted properly NOTE If the system is completely powered off wh...

Page 333: ...he PDMs are installed and functioning normally NOTE Nine input LEDs indicate proper voltage level and polarity of input feeds 7 Attach an electrostatic discharge ESD grounding strap to your bare wrist...

Page 334: ...NOTE If the system is completely powered off when you power on the PSM the Routing Engine boots as the PSM completes its startup sequence Normally the router boots from the Junos OS on the CompactFla...

Page 335: ...ting Engine ports on the CB RE AUX CONSOLE or MGMT NOTE The management Ethernet port is not functional until you have completed the initial configuration 5 Turn on power to the external management dev...

Page 336: ...nitially Configuring the MX2010 Router 351 Maintaining and Verifying the Status of the MX2010 Router Components 609 Initially Configuring the MX2020 Router Maintaining and Verifying the Status of the...

Page 337: ...polarity of DC input voltage is connected on the DC PDM Solution To troubleshoot the MX2000 router power system 1 Check the LEDs on all AC or DC PSM faceplates PWR OK PSM LED is blinking Check the fa...

Page 338: ...steadily indicating the input feed is receiving voltage 4 Verify that the source circuit breaker has the proper current rating Each PDM must be connected to a separate source circuit breaker Check tha...

Page 339: ...Power W Load 52 00 4 25 221 00 10 52 Hours Used 6862 PSM 2 status State Online Temperature OK AC Input Feed Voltage V Current A Power W INP0 225 00 1 30 292 50 INP1 3 75 0 00 0 00 DC Output Voltage V...

Page 340: ...00 DC Output Voltage V Current A Power W Load 52 00 5 00 260 00 12 38 Hours Used 7462 PSM 7 status State Online Temperature OK AC Input Feed Voltage V Current A Power W INP0 225 00 1 20 270 00 INP1 3...

Page 341: ...2 50 INP1 0 00 0 00 0 00 DC Output Voltage V Current A Power W Load 52 00 8 25 429 00 20 43 Hours Used 7438 PSM 12 status State Online Temperature OK AC Input Feed Voltage V Current A Power W INP0 223...

Page 342: ...r W INP0 226 25 2 20 497 75 INP1 5 00 0 00 0 00 DC Output Voltage V Current A Power W Load 52 00 8 25 429 00 20 43 Hours Used 7462 PSM 17 status State Online Temperature OK AC Input Feed Voltage V Cur...

Page 343: ...Power W Load 51 25 10 00 512 50 24 40 Hours Used 2969 PSM 7 status State Online Temperature OK DC Input Feed Voltage V Current A Power W INP0 0 00 0 00 0 00 INP1 51 60 11 20 577 92 DC Output Voltage...

Page 344: ...DC Output Voltage V Current A Power W Load 51 25 9 50 486 88 23 18 Hours Used 2970 PSM 16 status State Online Temperature OK DC Input Feed Voltage V Current A Power W INP0 0 00 0 00 0 00 INP1 51 60 1...

Page 345: ...4 PSM 2 status State Online Temperature OK DC Input Feed Voltage V Current A Power W INP0 0 00 0 00 0 00 INP1 240 00 1 00 240 00 DC Output Voltage V Current A Power W Load 52 75 4 00 211 00 8 44 Hours...

Page 346: ...8 88 Hours Used 2616 PSM 7 status State Online Temperature OK DC Input Feed Voltage V Current A Power W INP0 0 00 0 00 0 00 INP1 240 00 1 10 264 00 DC Output Voltage V Current A Power W Load 52 50 4 2...

Page 347: ...A Power W Load 52 75 1 50 79 12 3 17 Hours Used 2712 PSM 12 status State Online Temperature OK DC Input Feed Voltage V Current A Power W INP0 240 00 0 60 144 00 INP1 0 00 0 00 0 00 DC Output Voltage V...

Page 348: ...DC Output Voltage V Current A Power W Load 52 25 1 50 78 38 3 13 Hours Used 2664 PSM 17 status State Online Temperature OK DC Input Feed Voltage V Current A Power W INP0 240 00 0 60 144 00 INP1 0 00 0...

Page 349: ...can shut down one of the power supplies for other reasons In this case the remaining power supplies provide power to the router and you can still view the system status through the CLI or display To r...

Page 350: ...e switched off when restarting the chassis If output power is not load balancing correctly in the same zone on an MX2000 router with a high capacity AC or DC power supply module connect two feeds and...

Page 351: ...pacity 1700 W maximum 4100 W DC output 969 W zone 1 17 A at 57 V 57 of capacity 2 Issue the show chassis alarms command to see if there are any active alarms on the DIP switch show chassis alarms 4 al...

Page 352: ...ermine the cause of the problem or need additional assistance see Contacting Customer Support on page 731 RELATED DOCUMENTATION MX2000 Three Phase Delta and Wye AC Power Distribution Module LEDs 107 M...

Page 353: ...PC or MIC Cables to the MX2010 Router 348 Connecting the MX2010 Router to Management and Alarm Devices IN THIS SECTION Connecting the MX2010 Router to a Network for Out of Band Management 337 Connecti...

Page 354: ...e It is also used by system administrators to monitor and manage the MX2010 remotely MGMT 3 SEE ALSO Connecting the MX2010 Router to Management and Alarm Devices 337 Connecting an MX2000 Router to a C...

Page 355: ...r auxiliary device 2 Plug the RJ 45 end of the serial cable see Figure 141 on page 340 into the AUX port or CONSOLE port on the RCB interface Figure 140 on page 340 shows the ports Table 85 on page 34...

Page 356: ...a laptop or console terminal to configure the MX2000 router CONSOLE 2 Connecting an MX2010 Router to an External Alarm Reporting Device To connect the router to external alarm reporting devices attach...

Page 357: ...small screws facing left insert wires into the slots in the front of the block based on the wiring for the external device Tighten the screws to secure the wire 3 Plug the terminal block into the rela...

Page 358: ...ded with the router To connect to the MGMT port on the CB RE interface 1 Turn off power to the management device 2 Plug one end of the Ethernet cable Figure 139 on page 338 shows the connector into th...

Page 359: ...another device to the AUX port you must supply an additional cable WARNING The MX2000 router must be adequately grounded before powering on the console or auxiliary devices see MX2000 Router Grounding...

Page 360: ...a laptop or console terminal to configure the MX2000 router CONSOLE 2 Connecting an MX2010 Router to an External Alarm Reporting Device To connect the router to external alarm reporting devices attach...

Page 361: ...crews facing left insert wires into the slots in the front of the block based on the wiring for the external device Tighten the screws to secure the wire 3 Plug the terminal block into the relay conta...

Page 362: ...repare the required length of replacement wire with gauge between 28 AWG 0 08 mm 2 and 14 AWG 2 08 mm 2 2 Insert the replacement wires into the slots in the front of the block see Table 90 on page 347...

Page 363: ...arm reporting device see Figure 149 on page 347 1 Disconnect the existing wire at the external device 2 Attach an electrostatic discharge ESD grounding strap to your bare wrist and connect the strap t...

Page 364: ...he ends of fiber optic cables Fiber optic transceivers and fiber optic cable connected to a transceiver emit laser light that can damage your eyes CAUTION Do not leave a fiber optic transceiver uncove...

Page 365: ...c cable hang free from the connector Do not allow fastened loops of cable to dangle which stresses the cable at the fastening point Figure 150 Attaching a Cable to an MPC g007411 Figure 151 Attaching...

Page 366: ...RELATED DOCUMENTATION Connecting the MX2010 Router to Management and Alarm Devices 337 Tools and Parts Required for MX2010 Router Connections 220 Grounding an MX2000 Router 289 350...

Page 367: ...sh drive that can be inserted into the slot in the CB RE faceplate see Figure 152 on page 352 NOTE The SSD is internal in the CB RE and cannot be removed When the router boots it first attempts to sta...

Page 368: ...n for the Ethernet interface IP address of a default router IP address of a DNS server Password for the root user This procedure connects the router to the network but does not enable it to forward tr...

Page 369: ...rd Retype new password password 7 Set the user account class to super user edit root set system login user user name class super user 8 Configure the router s domain name edit root set system domain n...

Page 370: ...a public key or edit root set system root authentication ssh rsa public key 13 Optional Configure the static routes to remote subnets with access to the management port Access to the management port i...

Page 371: ...er address interfaces fxp0 unit 0 family inet address address prefix length 16 Commit the configuration to activate it on the router edit root commit 17 Optional Configure additional properties by add...

Page 372: ...ile rescue conf the rescue configuration file and juniper conf 1 the first rollback configuration file When the search finds the first configuration file that can be loaded properly the file loads and...

Page 373: ...4 PART Installing and Replacing Components Installing Components 359 Replacing Components 429...

Page 374: ......

Page 375: ...r 382 Installing the MX2010 Extended EMI Cover 383 Installing an MX2010 Fan Tray 385 Installing the MX2010 Air Baffle 387 Installing the MX2010 Standard Cable Manager 388 Installing the MX2010 Extende...

Page 376: ...cally 5 Lift the adapter card into place and carefully align the sides of the adapter card with the guides inside the card cage 6 Slide the adapter card all the way into the card cage until you feel r...

Page 377: ...ESD grounding strap to your bare wrist and connect the strap to one of the ESD points on the chassis 2 Ensure that the air filter is right side up 3 Open the fan tray and air filter access door locat...

Page 378: ...to one of the ESD points on the chassis 2 Move the cables from the card cage cable manager if necessary 3 Loosen the two captive screws located on the front of the card cage cable manager door and ope...

Page 379: ...le manager if necessary To install the PSM air filter MX2000 FLTR PWR 1 Attach an electrostatic discharge ESD grounding strap to your bare wrist and connect the strap to one of the ESD points on the c...

Page 380: ...your bare wrist and connect the strap to one of the ESD points on the chassis 2 Remove the screws from the mechanical interlock bracket to remove it See Figure 157 on page 364 Figure 157 Removing the...

Page 381: ...air filter straight out from the chassis 5 Slide the air filter out of the chassis as shown in Figure 157 on page 364 Figure 158 Removing the PSM Air Filter from the Chassis g100412 6 Make sure to re...

Page 382: ...wrist and connect the strap to one of the ESD points on the chassis 2 Grasp the craft interface with one hand and hold the bottom edge of the craft interface with the other hand to support its weight...

Page 383: ...e faceplate by positioning it in place and then tightening the two screws on the left and right sides using the Torx T10 screwdriver 6 Reattach the sheet metal cover and EMI door by positioning them i...

Page 384: ...ion 29 Maintaining and Verifying the Status of the MX2010 Craft Interface 684 Installing the MX2010 Standard DC Cable Manager To install the standard DC cable manager see Figure 162 on page 369 1 Atta...

Page 385: ...ing the two flanges into the slots on both sides of the DC PDM 4 Push down to secure the DC cable manager in place Figure 162 Installing the Standard DC Cable Manager D g007080 RELATED DOCUMENTATION R...

Page 386: ...discharge ESD grounding strap to your bare wrist and connect the strap to one of the ESD points on the chassis 3 Move the DC circuit breaker on the power input source to the off position 4 Optional I...

Page 387: ...Figure 163 Installing an MX2020 Router DC Power Distribution Module g007052 Figure 164 Installing an MX2010 Router DC Power Distribution Module D g007432 371...

Page 388: ...rming DC power procedures disconnect all power sources To ensure that all power is off locate the circuit breaker on the panel board that services the DC circuit switch the circuit breaker to the off...

Page 389: ...the PDM until the locking levers are inserted into the chassis With both hands push the locking levers simultaneously until the PDM is fully seated into the chassis see Figure 166 on page 373 Figure 1...

Page 390: ...the power socket until you feel it engage As you plug in each power cord the power LED for the socket lights up green See Figure 167 on page 374 Figure 167 Plugging the 240 V China Power Cord an MX200...

Page 391: ...you remove a PSM you must install a replacement PSM or a blank panel shortly after the removal NOTE After powering on a PSM wait at least 60 seconds before turning it back off To install a DC PSM see...

Page 392: ...t the power switches on all PSMs are in the off O position 2 On the PSM slide the plastic cover away from the input mode switch to expose the dual DIP switches Move the input mode DIP switch 0 left sw...

Page 393: ...ils Figure 169 Selecting DC Power 240 V China Subsystem Feed Redundancy g100410 3 Using both hands grasp the handle and slide the PSM straight into the chassis until the PSM is fully seated in the cha...

Page 394: ...on the PSM are lit green steadily see Figure 171 on page 379 NOTE If you are connecting two feeds INP0 and INP1 both LEDs on the PSM will be lit green steadily 5 Attach an electrostatic discharge ESD...

Page 395: ...n PSM LED behavior 8 Repeat Steps 1 through 7 for installing PSMs in slots 0 1 and 2 where required Figure 171 MX2000 DC Power Supply Module Front View 240 V China g000407 NOTE Each PSM slot not occup...

Page 396: ...led S on the top of the MPC d Slide the septum toward you and out of the MPC e Store the septum and screws for later use f Install the MPC as described in Installing an MX2010 MPC into an Adapter Card...

Page 397: ...and prevents accidental exposure to laser light 9 Insert the appropriate cables into the cable connectors on the MIC 10 Arrange each cable to prevent the cable from dislodging or developing stress po...

Page 398: ...e that affects an electrical circuit because of electromagnetic interference emitted from an external source The EMI cover is designed to reduce the electromagnetic interference EMI to comply with the...

Page 399: ...router over the card cage 1 Attach an electrostatic discharge ESD grounding strap to your bare wrist and connect the strap to one of the ESD points on the chassis 2 On each side of the card cage orie...

Page 400: ...of the card cage 5 Angle the extended EMI cover so that the points at each side fit into the grooves on the EMI cover s mounting brackets 6 Tilt the extended EMI cover into place and press firmly unt...

Page 401: ...DC cable manager and remove the cables from the tray Arrange the cables so that they do not block the front of the cable manager and tray and secure them with temporary fasteners so that they are not...

Page 402: ...the DC cable manager back into position if necessary Figure 176 Installing Upper Fan Trays g007426 Figure 177 Installing Lower Fan Trays g007040 RELATED DOCUMENTATION Preventing Electrostatic Dischar...

Page 403: ...holes located on either side of the upper fan tray access door see Figure 178 on page 387 5 Tighten the four captive screws to secure the air baffle to the upper fan tray access door 6 Open the air b...

Page 404: ...the strap to one of the ESD points on the chassis 2 Position the lower cable manager on the studs on the lower front of the chassis just below the MPCs 3 Insert the screws into the corners in the lowe...

Page 405: ...anager using eight screws as shown in Figure 180 on page 389 4 Replace the cable manager cover and secure it with the two captive screws Figure 180 Installing the Extended Lower Cable Manager g000431...

Page 406: ...discharge ESD grounding strap to your bare wrist and connect the strap to one of the ESD points on the chassis 2 If you have used a dual wide MIC and are now replacing it with two single wide MICs in...

Page 407: ...the MIC you are installing away from the MPC faceplate 5 Align the rear of the MIC with the guides located at the corners of the MIC slot 6 Slide the MIC into the MPC until it is firmly seated in the...

Page 408: ...e which stresses the cable at the fastening point CAUTION Avoid bending fiber optic cable beyond its minimum bend radius An arc smaller than a few inches in diameter can damage the cable and cause pro...

Page 409: ...Figure 183 Installing a MIC g007413 RELATED DOCUMENTATION Maintaining MX2010 MICs 651 Removing an MX2010 MIC 515 Installing an MX2010 Dual Wide MIC 380 393...

Page 410: ...h an electrostatic discharge ESD grounding strap to your bare wrist and connect the strap to one of the ESD points on the chassis 2 Take each SFB to be installed out of its electrostatic bag and ident...

Page 411: ...7 Check the status of the SFB by using the show chassis environment sfb command user host show chassis environment sfb SFB 0 status State Online Intake Zone0 Temperature 32 degrees C 89 degrees F Exha...

Page 412: ...degrees F IntakeA Zone0 Temperature 27 degrees C 80 degrees F IntakeB Zone1 Temperature 29 degrees C 84 degrees F Exhaust Zone0 Temperature 31 degrees C 87 degrees F SFB XF2 Zone1 Temperature 56 degre...

Page 413: ...mV LTC3880 XF2 1 5v CH1 1500 mV LTC3880 XF2 1 0v RAIL 1029 mV LTC3880 XF2 1 0v CH0 1029 mV LTC3880 XF2 1 0v CH1 1032 mV LTC3880 XF1 1 5v RAIL 1499 mV LTC3880 XF1 1 5v CH0 1499 mV LTC3880 XF1 1 5v CH1...

Page 414: ...29 mV LTC3880 XF0 1 0v CH0 1029 mV LTC3880 XF0 1 0v CH1 1032 mV LTC3880 3 3v RAIL 3300 mV LTC3880 3 3v CH0 3300 mV LTC3880 3 3v CH1 3300 mV SFB 4 status State Online Intake Zone0 Temperature 32 degree...

Page 415: ...Exhaust Zone0 Temperature 32 degrees C 89 degrees F SFB XF2 Zone1 Temperature 54 degrees C 129 degrees F SFB XF1 Zone0 Temperature 50 degrees C 122 degrees F SFB XF0 Zone0 Temperature 50 degrees C 122...

Page 416: ...v RAIL 1499 mV LTC3880 XF1 1 5v CH0 1499 mV LTC3880 XF1 1 5v CH1 1500 mV LTC3880 XF1 1 0v RAIL 1029 mV LTC3880 XF1 1 0v CH0 1029 mV LTC3880 XF1 1 0v CH1 1033 mV LTC3880 XF0 1 5v RAIL 1500 mV LTC3880 X...

Page 417: ...3 3v CH0 3300 mV LTC3880 3 3v CH1 3300 mV Installing an MX2010 CB RE To install a CB RE seeFigure 185 on page 403 1 Attach an electrostatic discharge ESD grounding strap to your bare wrist and connec...

Page 418: ...grees F ExhaustB Zone1 Temperature 28 degrees C 82 degrees F TCBC Zone0 Temperature 32 degrees C 89 degrees F Power 1 1 0 V 1008 mV 1 2 V 1208 mV 1 8 V 1801 mV 2 5 V 2526 mV 3 3 V 3312 mV 5 0 V 5020 m...

Page 419: ...u install a PSM be aware of the following NOTE The AC PSM is hot swappable when a minimum number of PSMs installed and operational WARNING The AC PSMs have no circuit breakers that can physically disc...

Page 420: ...d operational install an additional PSM with the power supply switch in the off O or in the on position WARNING If there is only one PSM installed and operational the power supply switch must be place...

Page 421: ...Figure 186 Installing an MX2020 Router AC Power Supply Module g007062 Figure 187 Installing an MX2010 Router AC Power Supply Module D g007438 405...

Page 422: ...to the ON position for the bottom feed INP0 expected to be connected and DIP switch 1 right switch to the ON position for the top feed INP1 expected to be connected If both DIP switches 0 and 1 are tu...

Page 423: ...d slide the PSM straight into the chassis until the PSM is fully seated in the chassis slot Tighten the two captive screws see Figure 190 on page 408 MX2020 and Figure 191 on page 408 MX2010 or Figure...

Page 424: ...Figure 190 Installing an MX2020 Router DC Power Supply Module Installed g007049 Figure 191 Installing an MX2010 Router DC Power Supply Module g007430 D 408...

Page 425: ...ch an electrostatic discharge ESD grounding strap to your bare wrist and connect the strap to one of the ESD points on the chassis 6 Move the switch to the on position 7 Verify that the PWR OK LED is...

Page 426: ...ng an MX2008 DC Power Supply Module 48 V Installing an MX2000 Router Three Phase Delta AC Power Distribution Module Before you install a three phase delta AC power distribution module PDM be aware of...

Page 427: ...ome active during the installation process 2 Attach an electrostatic discharge ESD grounding strap to your bare wrist and connect the strap to one of the ESD points on the chassis 3 Optional If you ar...

Page 428: ...s on the cover of the metal wiring compartment that protects the AC terminal block Figure 194 Installing a Three Phase Delta AC Power Distribution Module MX2020 g007065 Figure 195 Installing a Three P...

Page 429: ...ment 14 Connect the wires to the AC terminal block on the three phase delta AC PDM see Figure 197 on page 414 Loosen each of the input terminals or grounding point screws and insert the wire into the...

Page 430: ...re might vary The MX2000 chassis is not sensitive to phase rotation sequence either clockwise or counterclockwise will operate correctly CAUTION Wire label configuration is for Juniper Networks suppli...

Page 431: ...ltage between AC terminal blocks A1 B1 B1 C1 C1 A1 A2 B2 B2 C2 and C2 A2 for three phase delta PDM is not more than 264 VAC when measured with a digital voltage meter DVM Then turn off the AC breaker...

Page 432: ...ide voltage on the AC power cord 22 Remove the ESD grounding strap from the approved site ESD grounding point See the instructions for your site Reconnect the strap to one of the ESD points on the cha...

Page 433: ...e AC power source cord is 0 V and that there is no chance that the cord might become active during the installation process 2 Attach an electrostatic discharge ESD grounding strap to your bare wrist a...

Page 434: ...Figure 198 Installing a Three Phase Wye AC PDM MX2020 g007065 Figure 199 Installing a Three Phase Wye AC PDM MX2010 g007440 D 418...

Page 435: ...C wiring compartment 10 Unscrew the retaining nut from the AC power cord 11 Place the retaining nut inside the metal wiring compartment 12 Insert the wires of the AC power cord through the hole of the...

Page 436: ...ire labeled L3 into the input terminal labeled C1 e Insert the wire labeled N into the input terminal labeled N1 Figure 201 Connecting Power to a Three Phase Wye AC Power Distribution Module g007082 N...

Page 437: ...the metal cover to the wiring compartment apply AC voltage to the PDM with disengaged PSM to make sure that two LEDs on the PDM are lit green and that the AC voltage between AC terminal blocks A1 N1 B...

Page 438: ...s to router components and that it does not drape where people could trip on it 19 Remove the ESD grounding strap from the ESD points on the chassis Connect the strap to an approved site ESD grounding...

Page 439: ...the chassis NOTE After powering off a PDM wait at least 60 seconds before turning the circuit breaker back on The seven feed single phase AC PDM weighs approximately 8 lbs 3 6 kg The nine feed single...

Page 440: ...e that the PDM is securely in place 10 Tighten the two thumbscrews on the ejectors to secure the PDM in the chassis Apply between 7 lb in 0 8 Nm and 9 lb in 1 01 Nm of torque to each screw Do not over...

Page 441: ...e could trip on them Figure 204 on page 425 shows the seven feed and nine feed power cord retainer Figure 204 MX2000 Single Phase AC Power Cord Retainer g005143 Loosen the two screws at each end of th...

Page 442: ...screws at each end of the power cord retainer into the screw holes on the PDM and turning them clockwise to tighten Verify that the PDM looks like the illustration shown in Figure 206 on page 426 Figu...

Page 443: ...Power System 320 Removing an MX2000 Single Phase AC Power Distribution Module Installing an SFP or XFP into an MX2000 MPC or MIC To install an SFP or XFP 1 Attach an electrostatic discharge ESD ground...

Page 444: ...connected to a transceiver emit laser light that can damage your eyes 8 Verify that the status LEDs on the component faceplate indicate that the SFP or XFP is functioning correctly For more informatio...

Page 445: ...le 48 V 475 Replacing an MX2000 DC Power Supply Module 240 V China 480 Replacing an MX2000 DC Power Distribution Module 48 V 484 Replacing an MX2000 DC Power Distribution Module 240 V China 490 Replac...

Page 446: ...ompartment 7 16 in 11 mm hexagonal head external drive socket wrench or nut driver with a torque range between 23 lb in 2 6 Nm and 25 lb in 2 8 Nm to attach the ground wire 1 4 in slotted screwdriver...

Page 447: ...e torque damages the terminal studs and the PDM The absolute maximum that may be applied to this nut is between 23 lb in 2 6 Nm and 25 lb in 2 8 Nm DC power supply cable Phillips screwdrivers numbers...

Page 448: ...CUMENTATION MX2010 Field Replaceable Units 17 Replacing the MX2010 Craft Interface 468 Replacing an MX2010 Fan Tray 508 Replacing the MX2010 Air Filters 449 Tools and Parts Required to Remove Componen...

Page 449: ...o avoid damage to the equipment CAUTION Before you replace a CB RE you must take the host subsystem offline If there is only one host subsystem taking the host subsystem offline shuts down the router...

Page 450: ...f the chassis 7 Place the CB RE on the antistatic mat or into an antistatic bag 8 If you are not replacing the CB RE immediately install a blank panel over the empty slot Figure 207 Removing a CB RE M...

Page 451: ...Control Board Routing Engine REMX2K X8 64G in a Redundant Host Subsystem A redundant host subsystem consists of a master Routing Engine Control Board CB RE RE0 and a backup CB RE RE1 To upgrade the ho...

Page 452: ...ing steps 1 On the external management device connected to the CB RE issue the request system halt other routing engine operational mode command to offline the backup CB RE The command shuts down the...

Page 453: ...an electrostatic bag or antistatic mat on a flat stable surface 2 Attach an electrostatic discharge ESD grounding strap to your bare wrist and connect the strap to one of the ESD points on the chassis...

Page 454: ...ly ensuring that it is correctly aligned 5 Grasp both ejector handles and gently close them inward simultaneously until the CB RE is fully seated 6 Check the LEDs on the CB RE faceplate to verify that...

Page 455: ...g the show vmhost status and show vmhost version commands 2 After you install the REMX2K X8 64G CB RE the CB RE is automatically powered on and comes up in amnesiac mode as it is loaded with factory d...

Page 456: ...CB RE 441 3 Installing the REMX2K X8 64G CB RE 442 4 Verifying and Configuring the Upgraded CB RE 443 Taking the Host Subsystem Offline To take the host subsystem offline perform the following steps...

Page 457: ...lectrostatic bag or antistatic mat on a flat stable surface 2 Attach an electrostatic discharge ESD grounding strap to your bare wrist and connect the strap to one of the ESD points on the chassis 3 O...

Page 458: ...ssis 2 Remove the CB RE from the electrostatic bag 3 Carefully align the sides of the CB RE with the guides inside the chassis 4 Slide the CB RE into the chassis until you feel resistance carefully en...

Page 459: ...the green ONLINE LED on the CB RE lights steadily If the red FAIL LED lights steadily instead remove the CB RE and reinstall it If the red FAIL LED on the CB RE still lights steadily the CB RE is not...

Page 460: ...rubber safety cap for each cable and transceiver 2 If you are removing all cables connected to the component use one of the following methods to take the component offline To take an MPC offline Press...

Page 461: ...ables Fiber optic transceivers and fiber optic cable connected to a transceiver emit laser light that can damage your eyes CAUTION Do not leave a fiber optic transceiver uncovered except when insertin...

Page 462: ...nsceiver emit laser light that can damage your eyes CAUTION Do not leave a fiber optic transceiver uncovered except when inserting or removing cable The safety cap keeps the port clean and prevents ac...

Page 463: ...in diameter can damage the cable and cause problems that are difficult to diagnose CAUTION Do not let fiber optic cable hang free from the connector Do not allow fastened loops of cable to dangle whic...

Page 464: ...tion about the command see the Junos OS System Basics and Services Command Reference The normal functioning indicator LED confirms that the component is online You can also verify correct MPC function...

Page 465: ...through the unfiltered air intake This could damage the router components To remove the lower air filter MX2010 MID FLTR PNL S 1 Attach an electrostatic discharge ESD grounding strap to your bare wris...

Page 466: ...strap to your bare wrist and connect the strap to one of the ESD points on the chassis 2 Move the cables from the card cage cable manager if necessary 3 Loosen the two captive screws located on the f...

Page 467: ...he strap to one of the ESD points on the chassis 2 Loosen the two captive screws located on either side of the air filter and pull slightly out of the chassis CAUTION Do not run the router for more th...

Page 468: ...rap to your bare wrist and connect the strap to one of the ESD points on the chassis 2 Remove the screws from the mechanical interlock bracket to remove it See Figure 217 on page 452 Figure 217 Removi...

Page 469: ...air filter straight out from the chassis 5 Slide the air filter out of the chassis as shown in Figure 218 on page 453 Figure 218 Removing the PSM Air Filter from the Chassis g100412 6 Make sure to re...

Page 470: ...atic discharge ESD grounding strap to your bare wrist and connect the strap to one of the ESD points on the chassis 2 Ensure that the air filter is right side up 3 Open the fan tray and air filter acc...

Page 471: ...to one of the ESD points on the chassis 2 Move the cables from the card cage cable manager if necessary 3 Loosen the two captive screws located on the front of the card cage cable manager door and ope...

Page 472: ...le manager if necessary To install the PSM air filter MX2000 FLTR PWR 1 Attach an electrostatic discharge ESD grounding strap to your bare wrist and connect the strap to one of the ESD points on the c...

Page 473: ...your bare wrist and connect the strap to one of the ESD points on the chassis 2 Remove the screws from the mechanical interlock bracket to remove it See Figure 157 on page 364 Figure 223 Removing the...

Page 474: ...air filter straight out from the chassis 5 Slide the air filter out of the chassis as shown in Figure 157 on page 364 Figure 224 Removing the PSM Air Filter from the Chassis g100412 6 Make sure to re...

Page 475: ...ing the MX2010 Air Filter 449 RELATED DOCUMENTATION Preventing Electrostatic Discharge Damage to an MX Series Router Removing the MX2010 Air Filter 449 Maintaining the MX2010 Air Filters 609 Replacing...

Page 476: ...2010 Standard DC Cable Manager 462 4 Installing the MX2010 Standard DC Cable Manager 463 Removing the MX2010 Standard Cable Manager To remove the standard cable manager see Figure 226 on page 461 1 At...

Page 477: ...be ordered from Juniper Networks 1 Attach an electrostatic discharge ESD grounding strap to your bare wrist and connect the strap to one of the ESD points on the chassis 2 Position the lower cable man...

Page 478: ...le manager see Figure 228 on page 463 1 Attach an electrostatic discharge ESD grounding strap to your bare wrist and connect the strap to an approved site ESD grounding point See the instructions for...

Page 479: ...162 on page 369 1 Attach an electrostatic discharge ESD grounding strap to your bare wrist and connect the strap to one of the ESD points on the chassis 2 Position the DC cable manager over the two s...

Page 480: ...Electrostatic Discharge Damage to an MX Series Router MX2010 Cable Manager Description 37 Replacing the MX2010 Extended Cable Manager IN THIS SECTION Removing the MX2010 Extended Cable Manager 465 Re...

Page 481: ...ght screws that secure the extended cable manager to the chassis as shown in Figure 230 on page 465 4 Pull the extended cable manager away from the chassis Figure 230 Removing the Extended Cable Manag...

Page 482: ...Extended Cable Manager To install the extended cable manager see Figure 180 on page 389 1 Attach an electrostatic discharge ESD grounding strap to your bare wrist and connect the strap to one of the...

Page 483: ...trap to your bare wrist and connect the strap to one of the ESD points on the chassis 2 Position the extended DC cable manager over the two slots located on both sides of the DC PDM 3 Lift the extende...

Page 484: ...the alarm relay wires from the MX2010 and an alarm reporting device see Figure 149 on page 347 1 Disconnect the existing wire at the external device 2 Attach an electrostatic discharge ESD grounding...

Page 485: ...jor alarm when broken MINOR ALARM NC C NO MAJOR ALARM NC C NO 1 Removing the MX2010 Craft Interface Here s how to remove the MX2010 craft interface 1 Attach an electrostatic discharge ESD grounding st...

Page 486: ...screws holding the sheet metal cover in place and remove the sheet metal cover Refer to Figure 236 on page 470 Figure 236 Removing the Sheet Metal Cover g100551 5 Loosen the two captive screws at the...

Page 487: ...des of the latch with your thumb and forefinger 8 Gently slide the left end of the craft interface out of the housing The pin at the right end of the craft interface will auto slide out of the dedicat...

Page 488: ...o one of the ESD points on the chassis 2 Grasp the craft interface with one hand and hold the bottom edge of the craft interface with the other hand to support its weight 3 Orient the ribbon cable so...

Page 489: ...e faceplate by positioning it in place and then tightening the two screws on the left and right sides using the Torx T10 screwdriver 6 Reattach the sheet metal cover and EMI door by positioning them i...

Page 490: ...ace Here s how to connect the alarm relay wires between a router and an alarm reporting device see Figure 148 on page 346 1 Prepare the required length of replacement wire with gauge between 28 AWG 0...

Page 491: ...hree terminal contacts with a normal closed NC a common C and a normal open NO relay that signal a minor or major alarm when broken MINOR ALARM NC C NO MAJOR ALARM NC C NO 1 RELATED DOCUMENTATION MX20...

Page 492: ...ed and operational remove any additional PSM by turning the power switch to the off O position 2 Attach an electrostatic discharge ESD grounding strap to your bare wrist and connect the strap to one o...

Page 493: ...Figure 242 Removing a DC Power Supply Module from the MX2010 Router D g007429 SEE ALSO MX2010 DC Power Supply Module 48 V Description 116 Installing an MX2010 DC Power Supply Module 48 V 375 477...

Page 494: ...you remove a PSM you must install a replacement PSM or a blank panel shortly after the removal NOTE After powering on a PSM wait at least 60 seconds before turning it back off To install a DC PSM see...

Page 495: ...ALSO MX2010 DC Power Supply Module 48 V Description 116 Removing an MX2010 DC Power Supply Module 48 V 475 RELATED DOCUMENTATION Preventing Electrostatic Discharge Damage to an MX Series Router MX2010...

Page 496: ...ng off a PSM wait at least 60 seconds before turning it back on To remove a DC PSM see Figure 244 on page 481 NOTE The minimum number of DC PSMs change based on the configuration 1 With one PSM instal...

Page 497: ...into an antistatic bag NOTE Each PSM slot not occupied by a DC PSM must be covered by a PSM blank panel Figure 244 Removing an MX2000 Router DC Power Supply Module 240 V China 8 6 g100409 SEE ALSO MX...

Page 498: ...l shutdown of the operating PSM each PSM slot must contain either a PSM or a blank panel If you remove a PSM you must install a replacement PSM or a blank panel shortly after the removal NOTE After po...

Page 499: ...vertighten the screws 5 Turn on the power switch to the on position 6 Verify that the PWR OK LED is lit steadily green Figure 245 Installing a DC Power Supply Module 240 V China 8 6 g100408 SEE ALSO M...

Page 500: ...ore you remove a PDM be aware of the following NOTE The minimum number of PDMs must be present in the router at all times WARNING Before performing DC power procedures disconnect all power sources To...

Page 501: ...ve the nut and washers from each of the terminal studs Use a 7 16 in 11 mm nut driver or socket wrench 8 Remove the cable lugs from the terminal studs 9 Carefully move the power cables out of the way...

Page 502: ...Figure 246 Removing a DC PDM from an MX2020 Router g007051 Figure 247 Removing a DC PDM from an MX2010 Router D g007431 486...

Page 503: ...andles and gently pull the PDM straight out of the chassis CAUTION Do not touch the power connectors on the back of the PDM It can get damaged NOTE Each PDM slot not occupied by a DC PDM must be cover...

Page 504: ...discharge ESD grounding strap to your bare wrist and connect the strap to one of the ESD points on the chassis 3 Move the DC circuit breaker on the power input source to the off position 4 Optional I...

Page 505: ...Figure 249 Installing an MX2020 Router DC Power Distribution Module g007052 Figure 250 Installing an MX2010 Router DC Power Distribution Module D g007432 489...

Page 506: ...terminal studs RELATED DOCUMENTATION Powering Off the DC Powered MX2000 Router 698 MX2000 Router DC Power Subsystem Electrical Specifications Troubleshooting the MX2000 Router Power System 320 Connect...

Page 507: ...ll a replacement PDM or a blank panel shortly after the removal NOTE After powering off a PDM wait at least 60 seconds before turning the circuit breaker back on 1 Switch off the dedicated customer si...

Page 508: ...X2020 Router pull down the PDM3 Input1 and PDM1 Input1 locking levers to release the PDM from the chassis and pull up the PDM0 Input0 and PDM2 Input0 locking levers to release the PDM from the chassis...

Page 509: ...e 253 on page 493 9 With both hands grasp the two handles and gently pull the PDM straight out of the chassis CAUTION Do not touch the power connectors on the back of the PDM It can get damaged NOTE E...

Page 510: ...installation 2 Attach an electrostatic discharge ESD grounding strap to your bare wrist and connect the strap to one of the ESD points on the chassis 3 Move the DC circuit breaker on the power input...

Page 511: ...rew Do not overtighten the screws 9 Starting at one end of the PDM plug the power cords into the power sockets on the PDM Press the latch on the side of the power cable before pushing it in Apply slig...

Page 512: ...240 V China Power Subsystem Electrical Specifications Troubleshooting the MX2000 Router Power System 320 Preventing Electrostatic Discharge Damage to an MX Series Router Replacing an MX2010 DC Power...

Page 513: ...cross the DC power source cable leads is 0 V and that there is no chance that the cables might become active during the removal process 3 Verify that the 48V LED on the PDM is not lit 4 Remove the pow...

Page 514: ...flat washer then with the split washer and finally with the nut Apply between 23 lb in 2 6 Nm and 25 lb in 2 8 Nm of torque to each nut see Figure 133 on page 311 Do not overtighten the nut Use a 7 1...

Page 515: ...power cable is connected correctly that it does not touch or block access to router components and that it does not drape where people could trip on it 7 Attach the power cable to the DC power source...

Page 516: ...er in the OFF position To connect the DC 240 V China source power cables CBL PWR 240V CH to the router 1 Switch off the dedicated customer site circuit breakers Ensure that the voltage across the DC p...

Page 517: ...e 314 Figure 259 240 V China Power Cable g100414 2 1 3 3 1 Positive Negative 2 Ground 6 Switch on the dedicated customer site circuit breaker 7 On each of the DC power input sources switch the DC circ...

Page 518: ...EMI Cover 502 2 Installing the MX2010 Standard EMI Cover 503 Removing the MX2010 Standard EMI Cover To remove the electromagnetic interference EMI card cage cover see Figure 260 on page 503 1 Attach...

Page 519: ...tic interference emitted from an external source The EMI cover is designed to reduce the electromagnetic interference EMI to comply with the Federal Communications Commission FCC requirements To insta...

Page 520: ...IL OK FAIL OK FAIL OK FAIL OK FAIL OK FAIL OK FAIL OK FAIL g007442 SEE ALSO Removing the MX2010 Standard EMI Cover 502 Preventing Electrostatic Discharge Damage to an MX Series Router RELATED DOCUMENT...

Page 521: ...1 Attach an electrostatic discharge ESD grounding strap to your bare wrist and connect the strap to one of the ESD points on the chassis 2 Gripping the flap on the extended EMI cover tilt it away fro...

Page 522: ...interference EMI covers attaches to the router over the card cage 1 Attach an electrostatic discharge ESD grounding strap to your bare wrist and connect the strap to one of the ESD points on the chass...

Page 523: ...84 Figure 264 Installing the Extended EMI Cover Mounting Brackets g000421 4 Orient the cover so that the arrows point up in front of the card cage 5 Angle the extended EMI cover so that the points at...

Page 524: ...he MX2010 Standard EMI Cover 502 Preventing Electrostatic Discharge Damage to an MX Series Router RELATED DOCUMENTATION Replacing the MX2010 Standard EMI Cover 502 Preventing Electrostatic Discharge D...

Page 525: ...temporary fasteners so that they are not supporting their own weight as they hang from the connector 3 Loosen the two captive screws on each side of the fan tray access panel and open 4 Loosen the two...

Page 526: ...emoving a fan tray make sure the fan blades have stopped completely Figure 267 Removing Lower Fan Trays g007039 SEE ALSO Preventing Electrostatic Discharge Damage to an MX Series Router Installing an...

Page 527: ...fasteners so that they are not supporting their own weight as they hang from the connector 3 Loosen the two captive screws on the access panel and open 4 Remove the fan tray from the antistatic mat o...

Page 528: ...ys g007040 SEE ALSO Preventing Electrostatic Discharge Damage to an MX Series Router Maintaining the MX2010 Fan Trays 615 Removing an MX2010 Fan Tray 509 RELATED DOCUMENTATION Preventing Electrostatic...

Page 529: ...your bare wrist and connect the strap to one of the ESD points on the chassis 2 Loosen the four captive screws located on either side of the air baffle that is attached to the upper fan tray access do...

Page 530: ...th the holes located on either side of the upper fan tray access door see Figure 178 on page 387 5 Tighten the four captive screws to secure the air baffle to the upper fan tray access door 6 Open the...

Page 531: ...trostatic bag or antistatic mat on a flat stable surface to receive the MIC If the MIC connects to fiber optic cable have ready a rubber safety cap for each transceiver and cable 2 Attach an electrost...

Page 532: ...g its own weight as it hangs to the floor Place excess cable out of the way in a neatly coiled loop CAUTION Avoid bending fiber optic cable beyond its minimum bend radius An arc smaller than a few inc...

Page 533: ...of the ESD points on the chassis 2 If you have used a dual wide MIC and are now replacing it with two single wide MICs install the septum see Figure 182 on page 391 a Place the MPC on a flat surface...

Page 534: ...the MIC you are installing away from the MPC faceplate 5 Align the rear of the MIC with the guides located at the corners of the MIC slot 6 Slide the MIC into the MPC until it is firmly seated in the...

Page 535: ...e which stresses the cable at the fastening point CAUTION Avoid bending fiber optic cable beyond its minimum bend radius An arc smaller than a few inches in diameter can damage the cable and cause pro...

Page 536: ...ur bare wrist and connect the strap to one of the ESD points on the chassis 2 Remove the septum if necessary see Figure 172 on page 380 a Place the MPC on a flat surface If necessary remove the MPC fr...

Page 537: ...5 Align the rear of the MIC with the guides located at the corners of the MIC slot 6 Slide the MIC into the MIC slot until it is firmly seated in the chassis CAUTION Slide the MIC straight into the sl...

Page 538: ...angle which stresses the cable at the fastening point CAUTION Avoid bending fiber optic cable beyond its minimum bend radius An arc smaller than a few inches in diameter can damage the cable and cause...

Page 539: ...s on the MICs are very close to an ejector lever of the MPC6E that houses the MICs This proximity makes the MIC ejector levers difficult to access The MPC6E has a unique mechanism by which you can shi...

Page 540: ...ESD grounding strap to your bare wrist and connect the strap to one of the ESD points on the chassis 2 Identify the slot in the MPC6E where you want to install the MIC 3 On the MPC6E hold the ejector...

Page 541: ...LATED DOCUMENTATION Preventing Electrostatic Discharge Damage to an MX Series Router MX2010 Modular Interface Card Description 79 Maintaining MX2010 MICs 651 Troubleshooting the MX2010 MICs 725 Replac...

Page 542: ...begins to blink Hold the button down until the LED goes off Issue the following CLI command user host request chassis fpc slot slot number offline For more information about the command see the Junos...

Page 543: ...the chassis CAUTION The weight of the MPC with the adapter card is concentrated in the back end Be prepared to accept the full weight up to 25 lb 11 34 kg as you slide the cards out of the chassis Whe...

Page 544: ...ect the cables to the correct ports 4 Use one of the following methods to take the MPC offline Press and hold the corresponding MPC LC online button on the craft interface The green OK LED next to the...

Page 545: ...ter card 9 Grasp both the knobs and slide the MPC straight out of the adapter card 10 Place one hand around the front of the MPC and the other hand under it to support it Slide the MPC completely out...

Page 546: ...533 Removing an MX2010 Adapter Card An adapter card weighs up to 15 lb 6 80 kg Be prepared to accept its full weight To remove an adapter card 1 Have ready a replacement adapter card and an antistatic...

Page 547: ...nseat the adapter card 5 Grasp the ejector handles and slide the adapter card about halfway out of the chassis 6 Place one hand underneath the adapter card to support it and slide it completely out of...

Page 548: ...ign the sides of the adapter card with the guides inside the card cage 6 Slide the adapter card all the way into the card cage until you feel resistance 7 Grasp both ejector handles and gently close t...

Page 549: ...red to accept its full weight To install an MPC see Figure 279 on page 535 1 Attach an electrostatic discharge ESD grounding strap to your bare wrist and connect the strap to one of the ESD points on...

Page 550: ...ger to prevent it from dislodging or developing stress points Secure the cable so that it is not supporting its own weight as it hangs to the floor Place excess cable out of the way in a neatly coiled...

Page 551: ...d the system s total power decreases CAUTION After the OK LED turns green wait at least 30 seconds before removing the MPC again removing an MPC from a different slot or inserting a MPC in a different...

Page 552: ...er Card 528 Removing an MX2010 MPC with Adapter Card 525 RELATED DOCUMENTATION Preventing Electrostatic Discharge Damage to an MX Series Router MX2010 MPC Terminology 78 Maintaining MX2010 MICs 651 Tr...

Page 553: ...tor handles outward simultaneously to unseat the SFB 4 Grasp the ejector handles and slide the SFB about halfway out of the chassis CAUTION The weight of the SFB is concentrated in the back end Be pre...

Page 554: ...Removing an SFB MX2010 g007417 OK FAIL OK FAIL OK FAIL OK FAIL OK FAIL OK FAIL OK FAIL OK FAIL Figure 282 Removing an SFB MX2020 19 0 g007024 OK FAIL OK FAIL OK FAIL OK FAIL OK FAIL OK FAIL OK FAIL O...

Page 555: ...t or blank panel to install 1 Attach an electrostatic discharge ESD grounding strap to your bare wrist and connect the strap to one of the ESD points on the chassis 2 Take each SFB to be installed out...

Page 556: ...7 Check the status of the SFB by using the show chassis environment sfb command user host show chassis environment sfb SFB 0 status State Online Intake Zone0 Temperature 32 degrees C 89 degrees F Exha...

Page 557: ...degrees F IntakeA Zone0 Temperature 27 degrees C 80 degrees F IntakeB Zone1 Temperature 29 degrees C 84 degrees F Exhaust Zone0 Temperature 31 degrees C 87 degrees F SFB XF2 Zone1 Temperature 56 degre...

Page 558: ...mV LTC3880 XF2 1 5v CH1 1500 mV LTC3880 XF2 1 0v RAIL 1029 mV LTC3880 XF2 1 0v CH0 1029 mV LTC3880 XF2 1 0v CH1 1032 mV LTC3880 XF1 1 5v RAIL 1499 mV LTC3880 XF1 1 5v CH0 1499 mV LTC3880 XF1 1 5v CH1...

Page 559: ...29 mV LTC3880 XF0 1 0v CH0 1029 mV LTC3880 XF0 1 0v CH1 1032 mV LTC3880 3 3v RAIL 3300 mV LTC3880 3 3v CH0 3300 mV LTC3880 3 3v CH1 3300 mV SFB 4 status State Online Intake Zone0 Temperature 32 degree...

Page 560: ...Exhaust Zone0 Temperature 32 degrees C 89 degrees F SFB XF2 Zone1 Temperature 54 degrees C 129 degrees F SFB XF1 Zone0 Temperature 50 degrees C 122 degrees F SFB XF0 Zone0 Temperature 50 degrees C 122...

Page 561: ...v RAIL 1499 mV LTC3880 XF1 1 5v CH0 1499 mV LTC3880 XF1 1 5v CH1 1500 mV LTC3880 XF1 1 0v RAIL 1029 mV LTC3880 XF1 1 0v CH0 1029 mV LTC3880 XF1 1 0v CH1 1033 mV LTC3880 XF0 1 5v RAIL 1500 mV LTC3880 X...

Page 562: ...C3880 XF0 1 5v RAIL 1499 mV LTC3880 XF0 1 5v CH0 1499 mV LTC3880 XF0 1 5v CH1 1501 mV LTC3880 XF0 1 0v RAIL 1029 mV LTC3880 XF0 1 0v CH0 1029 mV LTC3880 XF0 1 0v CH1 1033 mV LTC3880 3 3v RAIL 3300 mV...

Page 563: ...ent CAUTION Before you replace a CB RE you must take the host subsystem offline If there is only one host subsystem taking the host subsystem offline shuts down the router 1 Take the host subsystem of...

Page 564: ...f the chassis 7 Place the CB RE on the antistatic mat or into an antistatic bag 8 If you are not replacing the CB RE immediately install a blank panel over the empty slot Figure 284 Removing a CB RE M...

Page 565: ...talled out of its electrostatic bag and identify the slot on the CB RE where it will be connected 3 Verify that each fiber optic CB RE has a rubber safety cap covering the transceiver If it does not c...

Page 566: ...ould light steadily a few minutes after the CB RE is installed If the OK FAIL LED is red remove and install the CB RE again If the OK FAIL LED still lights steadily the CB RE is not functioning proper...

Page 567: ...CB 1 status State Online Standby IntakeA Zone0 Temperature 30 degrees C 86 degrees F IntakeB Zone1 Temperature 25 degrees C 77 degrees F IntakeC Zone0 Temperature 39 degrees C 102 degrees F ExhaustA Z...

Page 568: ...minutes after the CB RE is installed If the OK FAIL LED is red remove and install the CB RE again If the OK FAIL LED still lights steadily the CB RE is not functioning properly Contact your customer...

Page 569: ...one0 Temperature 33 degrees C 91 degrees F ExhaustB Zone1 Temperature 28 degrees C 82 degrees F TCBC Zone0 Temperature 31 degrees C 87 degrees F Power 1 1 0 V 1015 mV 1 2 V 1211 mV 1 8 V 1814 mV 2 5 V...

Page 570: ...from an MX2010 MPC or MIC Removing an SFP or XFP does not interrupt MPC or MIC functioning but the removed transceiver no longer receives or transmits data To remove an SFP or XFP see Figure 288 on p...

Page 571: ...N Make sure that you open the ejector handle completely until you hear it click This prevents damage to the transceiver Use needle nose pliers to pull the ejector handle out from the transceiver 7 Gra...

Page 572: ...ake each transceiver to be installed out of its electrostatic bag and identify the slot on the component where it will be installed 3 Verify that each transceiver is covered by a rubber safety cap If...

Page 573: ...rom an MX2020 MPC or MIC Prevention of Electrostatic Discharge Damage 794 RELATED DOCUMENTATION Preventing Electrostatic Discharge Damage to an MX Series Router Replacing an MX2010 MIC 515 Replacing a...

Page 574: ...2 Attach an electrostatic discharge ESD grounding strap to your bare wrist and connect the strap to one of the ESD points on the chassis 3 Loosen the two captive screws on the PSM faceplate 4 While g...

Page 575: ...Figure 289 Removing an MX2020 Router AC Power Supply Module g007061 Figure 290 Removing an MX2010 Router AC Power Supply Module g007437 D 559...

Page 576: ...t breakers that can physically disconnect AC current from the router After AC feeds have been connected to the PDM the AC voltage is always present on the power midplane and is distributed to the PSM...

Page 577: ...is only one PSM installed and operational the power supply switch must be placed in the off O position 2 Attach an electrostatic discharge ESD grounding strap to your bare wrist and connect the strap...

Page 578: ...Figure 292 Installing an MX2020 Router AC Power Supply Module g007062 Figure 293 Installing an MX2010 Router AC Power Supply Module D g007438 562...

Page 579: ...Delta AC Power Cord The MX2010 router has either one redundant PDM or two redundant PDMs An AC power cord on a redundant PDM is hot insertable and hot removable When a redundant PDM is powered down t...

Page 580: ...e to the off O position NOTE After powering off a PSM wait at least 60 seconds before turning it back on 4 Remove the ESD grounding strap from the ESD point on the chassis and attach it to an approved...

Page 581: ...slotted screwdriver for the slotted screws Use a 5 32 in 4 mm Allen wrench for the 5 16 in hex screws To remove wires from the terminal block that serves six PSMs a Remove the wire labeled L3 from the...

Page 582: ...t of the metal wiring compartment 13 Carefully move the AC power cable out of the way 14 Disconnect the AC power cord from the AC PDM SEE ALSO Installing an MX2010 Three Phase Delta AC Power Cord 566...

Page 583: ...wires of the AC power cord through the hole of the metal wiring compartment 10 Connect the wires to the AC terminal block on the three phase delta AC PDM see Figure 297 on page 568 Loosen each of the...

Page 584: ...C power wire might vary The MX2010 chassis is not sensitive to phase rotation sequence either CW or CCW will operate correctly CAUTION Wire label configuration is for Juniper Networks supplied cable o...

Page 585: ...terminal blocks A1 B1 B1 C1 C1 A1 A2 B2 B2 C2 and C2 A2 for three phase delta PDM is not more than 264 VAC when measured with a digital voltage meter DVM Then turn off the AC breaker de energizing th...

Page 586: ...from the approved site ESD grounding point See the instructions for your site Reconnect the strap to one of the ESD points on the chassis 19 Verify the LED on the PDM faceplate is lit steadily indicat...

Page 587: ...Module NOTE The MX2008 MX2010 and MX2020 routers support the same power modules AC DC PSMs and AC DC PDMs Before you remove a three phase delta AC PDM be aware of the following WARNING Before performi...

Page 588: ...e Figure 298 on page 572 from the power source Figure 298 Three Phase Delta AC Power Cord g007084 4 Remove the ESD grounding strap from the approved site ESD grounding point See the instructions for y...

Page 589: ...Cord from a Three Phase Delta AC Power Distribution Module g007066 g007066 C1 B1 A1 C2 B2 A2 C1 B1 A1 C2 B2 A2 To remove wires from the terminal block that serves three PSMs a Remove the wire labeled...

Page 590: ...iring compartment 11 Carefully move the AC power cable out of the way 12 Disconnect both of the AC power cords from the AC PDM 13 Loosen the two captive screws on the locking levers of the PDM facepla...

Page 591: ...Figure 300 Removing a Three Phase Delta AC Power Distribution Module MX2020 Router g007064 Figure 301 Removing a Three Phase Delta AC Power Distribution Module MX2010 Router D g007439 575...

Page 592: ...trical Specifications 178 Installing an MX2000 Router Three Phase Delta AC Power Distribution Module Before you install a three phase delta AC power distribution module PDM be aware of the following W...

Page 593: ...ome active during the installation process 2 Attach an electrostatic discharge ESD grounding strap to your bare wrist and connect the strap to one of the ESD points on the chassis 3 Optional If you ar...

Page 594: ...s on the cover of the metal wiring compartment that protects the AC terminal block Figure 303 Installing a Three Phase Delta AC Power Distribution Module MX2020 g007065 Figure 304 Installing a Three P...

Page 595: ...ment 14 Connect the wires to the AC terminal block on the three phase delta AC PDM see Figure 197 on page 414 Loosen each of the input terminals or grounding point screws and insert the wire into the...

Page 596: ...re might vary The MX2000 chassis is not sensitive to phase rotation sequence either clockwise or counterclockwise will operate correctly CAUTION Wire label configuration is for Juniper Networks suppli...

Page 597: ...ltage between AC terminal blocks A1 B1 B1 C1 C1 A1 A2 B2 B2 C2 and C2 A2 for three phase delta PDM is not more than 264 VAC when measured with a digital voltage meter DVM Then turn off the AC breaker...

Page 598: ...D grounding strap from the approved site ESD grounding point See the instructions for your site Reconnect the strap to one of the ESD points on the chassis 23 Verify that the LED on the PDM faceplate...

Page 599: ...e phase wye AC power cord 1 Switch off the customer site circuit breakers to the PDM being removed Make sure that the voltage across the AC power source cord is 0 V and that there is no chance that th...

Page 600: ...e 308 on page 585 Loosen each of the input terminals or grounding point screws and remove each wire from the grounding point or input terminal NOTE The terminal connections have either slotted screws...

Page 601: ...the wire labeled L2 from the input terminal labeled B2 d Remove the wire labeled L1 from the input terminal labeled A2 e Remove the grounding wire from the grounding point labeled GND NOTE The three...

Page 602: ...llation process 2 Attach an electrostatic discharge ESD grounding strap to your bare wrist and connect the strap to one of the ESD points on the chassis 3 Switch all the power switches on the PSM face...

Page 603: ...t serves six PSMs a Insert the grounding wire into the grounding point labeled GND b Insert the wire labeled L1 into the input terminal labeled A1 c Insert the wire labeled L2 into the input terminal...

Page 604: ...The terminal connections have either slotted screws or hex screws Use a 1 4 in slotted screwdriver for the slotted screws Use a 5 32 in 4 mm Allen wrench for the 5 16 in hex screws WARNING To protect...

Page 605: ...AC power cord does not touch or block access to router components and that it does not drape where people could trip on it 14 Remove the ESD grounding strap from the ESD points on the chassis Connect...

Page 606: ...ing Electrostatic Discharge Damage to an MX Series Router MX2000 Three Phase Wye AC Power Distribution Module Description 102 MX2000 Three Phase Delta and Wye AC Power Distribution Module LEDs 107 Rep...

Page 607: ...move a PDM you must install a replacement PDM or a blank panel shortly after the removal NOTE After powering off a PDM wait at least 60 seconds before turning the circuit breaker back on To remove a t...

Page 608: ...8 Disconnect the wires from the AC terminal block on the three phase wye AC PDM see Figure 311 on page 593 loosen each of the input terminals or grounding point screws and remove each wire from the g...

Page 609: ...move the wire labeled L2 from the input terminal labeled B2 d Remove the wire labeled L1 from the input terminal labeled A2 e Remove the grounding wire from the grounding point labeled GND NOTE The th...

Page 610: ...mpletely 15 Pull the locking levers on either side of the faceplate up to unseat the PDM 16 Grasp the levers on the PDM faceplate and pull firmly Slide it halfway out of the chassis see Figure 312 on...

Page 611: ...Figure 313 Removing an MX2010 Three Phase Wye AC Power Distribution Module D g007458 Figure 314 Removing an MX2008 Three Phase Wye AC Power Distribution Module 595...

Page 612: ...tain either a PDM or a blank panel If you remove a PDM you must install a replacement PDM or a blank panel shortly after the removal NOTE After powering off a PDM wait at least 60 seconds before turni...

Page 613: ...faceplate away until they stop 5 Using both hands slide the PDM into the chassis until you feel resistance see Figure 198 on page 418 Figure 199 on page 418 or Figure 200 on page 419 Figure 315 Instal...

Page 614: ...ure 316 Installing a Three Phase Wye AC PDM MX2010 g007440 D Figure 317 Installing an Three Phase Wye AC PDM MX2008 6 Push the lock levers completely in until they make contact with the PDM faceplate...

Page 615: ...AC power cord through the hole of the metal wiring compartment 14 Connect the wires to the AC terminal block on the three phase wye AC PDM see Figure 201 on page 420 Loosen each of the input terminal...

Page 616: ...nsitive to phase rotation sequence either CW or CCW will operate correctly CAUTION Wire label configuration is for Juniper Networks supplied cable only If using your own cable make sure you use the pr...

Page 617: ...energizing the PDM and install the metal cover and engage all AC PSMs NOTE The terminal connections have either slotted screws or hex screws Use a 1 4 in slotted screwdriver for the slotted screws Use...

Page 618: ...cord plug to the power source 21 Switch on the customer site circuit breakers to provide voltage on the AC power cord 22 Remove the ESD grounding strap from the approved site ESD grounding point See...

Page 619: ...5 PART Maintaining the Chassis and Components Maintaining Components 605 Packing and Returning Components 693 Powering Off the Router 697...

Page 620: ......

Page 621: ...the MX2010 Fan Trays 633 Maintaining the MX2010 Air Baffle 646 Maintaining the MX2010 Host Subsystem 647 Maintaining MX2010 MICs 651 Maintaining MX2010 MPCs 653 Maintaining MX2010 Packet Forwarding E...

Page 622: ...0 Online 4 hours 7 minutes 42 seconds 1 Online 6 days 22 hours 33 minutes 16 seconds 2 Online 6 days 18 hours 49 minutes 55 seconds 3 Online 6 days 18 hours 49 minutes 17 seconds 4 Online 6 days 22 h...

Page 623: ...ables from dislodging or developing stress points Figure 319 Lower Cable Manager Cable Routing g007424 LC 10 11 12 13 14 15 16 17 18 19 NOTE The MX2010 supports a standard and extended upper and lower...

Page 624: ...truments that is expensive to repair Instead attach a short fiber extension to the optical equipment Any wear and tear due to frequent plugging and unplugging is then absorbed by the short fiber exten...

Page 625: ...e MX2010 SFB on page 680 Maintaining the MX2010 Switch Processor Mezzanine Board SPMB on page 681 Maintaining and Verifying the MX2010 Router Version on page 682 Maintaining and Verifying the Status o...

Page 626: ...Router Hardware Components and CLI Terminology 25 MX2010 Cooling System Description 45 Replacing the MX2010 Air Filters 449 Installing the MX2010 Air Filter 361 Maintaining the MX2010 Air Vents Purpo...

Page 627: ...aintaining the MX2010 Power Usage 672 Preventing Electrostatic Discharge Damage to an MX Series Router Troubleshooting the MX2000 Router Power System 320 Maintaining the MX2010 Control Boards Purpose...

Page 628: ...ExhaustB Zone1 Temperature 33 degrees C 91 degrees F TCBC Zone0 Temperature 35 degrees C 95 degrees F Power 1 1 0 V 1011 mV 1 2 V 1211 mV 1 8 V 1814 mV 2 5 V 2545 mV 3 3 V 3319 mV 5 0 V 5014 mV 5 0 V...

Page 629: ...MX2010 Air Filters 614 Maintaining the MX2010 Air Baffle 614 Maintaining the MX2010 Fan Trays 615 Maintaining the MX2010 Cooling System Zones 627 Maintaining the MX2010 Air Vents Purpose For optimum...

Page 630: ...of polyurethane filter varies from two years to five years depending on the storage conditions Store in a cool dry and dark environment Wrap the media in plastic and store in an environment with relat...

Page 631: ...n proper cooling A red alarm is triggered when a fan fails and a yellow alarm is triggered when a fan tray is removed During normal operation the fans in each fan tray function at normal speed To disp...

Page 632: ...93 degrees F Routing Engine 1 OK 38 degrees C 100 degrees F Routing Engine 1 CPU OK 34 degrees C 93 degrees F SFB 0 Intake Zone0 OK 45 degrees C 113 degrees F SFB 0 Exhaust Zone1 OK 37 degrees C 98 d...

Page 633: ...SFB 5 Intake Zone0 OK 33 degrees C 91 degrees F SFB 5 Exhaust Zone1 OK 34 degrees C 93 degrees F SFB 5 IntakeA Zone0 OK 28 degrees C 82 degrees F SFB 5 IntakeB Zone1 OK 27 degrees C 80 degrees F SFB...

Page 634: ...s F FPC 1 LU 1 TCAM TSen OK 39 degrees C 102 degrees F FPC 1 LU 1 TCAM Chip OK 42 degrees C 107 degrees F FPC 1 LU 1 TSen OK 39 degrees C 102 degrees F FPC 1 LU 1 Chip OK 44 degrees C 111 degrees F FP...

Page 635: ...9 MQ 2 TSen OK 39 degrees C 102 degrees F FPC 9 MQ 2 Chip OK 36 degrees C 96 degrees F FPC 9 MQ 3 TSen OK 39 degrees C 102 degrees F FPC 9 MQ 3 Chip OK 38 degrees C 100 degrees F Fans Fan Tray 0 Fan 1...

Page 636: ...OK 34 degrees C 93 degrees F SFB 0 Intake Zone0 OK 45 degrees C 113 degrees F SFB 0 Exhaust Zone1 OK 38 degrees C 100 degrees F SFB 0 IntakeA Zone0 OK 35 degrees C 95 degrees F SFB 0 IntakeB Zone1 OK...

Page 637: ...ees F SFB 5 IntakeB Zone1 OK 27 degrees C 80 degrees F SFB 5 Exhaust Zone0 OK 31 degrees C 87 degrees F SFB 5 SFB XF2 Zone1 OK 44 degrees C 111 degrees F SFB 5 SFB XF1 Zone0 OK 39 degrees C 102 degree...

Page 638: ...C 100 degrees F FPC 1 LU 1 Chip OK 44 degrees C 111 degrees F FPC 1 MQ 1 TSen OK 38 degrees C 100 degrees F FPC 1 MQ 1 Chip OK 44 degrees C 111 degrees F FPC 2 Intake OK 32 degrees C 89 degrees F FPC...

Page 639: ...grees F FPC 9 MQ 3 TSen OK 39 degrees C 102 degrees F FPC 9 MQ 3 Chip OK 37 degrees C 98 degrees F For the chassis temperature threshold settings the output for the show chassis temperature thresholds...

Page 640: ...56 62 75 63 82 70 87 SFB 0 SFB XF2 Zone1 70 80 90 90 100 107 110 SFB 0 SFB XF1 Zone0 70 80 90 90 100 107 110 SFB 0 SFB XF0 Zone0 70 80 90 90 100 107 110 SFB 1 Intake Zone0 56 62 75 63 82 70 87 SFB 1...

Page 641: ...FB XF1 Zone0 70 80 90 90 100 107 110 SFB 3 SFB XF0 Zone0 70 80 90 90 100 107 110 SFB 4 Intake Zone0 56 62 75 63 82 70 87 SFB 4 Exhaust Zone1 56 62 75 63 82 70 87 SFB 4 IntakeA Zone0 56 62 75 63 82 70...

Page 642: ...90 100 107 110 SFB 7 Intake Zone0 56 62 75 63 82 70 87 SFB 7 Exhaust Zone1 56 62 75 63 82 70 87 SFB 7 IntakeA Zone0 56 62 75 63 82 70 87 SFB 7 IntakeB Zone1 56 62 75 63 82 70 87 SFB 7 Exhaust Zone0 5...

Page 643: ...an Tray 2 Fan 6 OK 50 4560 RPM Fan Tray 3 Fan 1 OK 50 4560 RPM Fan Tray 3 Fan 2 OK 52 4680 RPM Fan Tray 3 Fan 3 OK 52 4680 RPM Fan Tray 3 Fan 4 OK 52 4680 RPM Fan Tray 3 Fan 5 OK 50 4560 RPM Fan Tray...

Page 644: ...The fan trays each contain multiple fans that work in unison to cool the router components If one fan fails the host subsystem adjusts the speed of the remaining fans to maintain proper cooling A red...

Page 645: ...s Action On a regular basis Check the LEDs on the craft interface for upper and lower fan trays The green status LEDs labeled 0 and 1 for lower fan trays and 2 and 3 for the upper fan trays light stea...

Page 646: ...es F Condition WARM TEMP Num Fans Missing 0 Num Fans Failed 0 RELATED DOCUMENTATION MX2010 Cooling System Description 45 Troubleshooting the MX2010 Cooling System 706 Maintaining the MX2010 Ethernet S...

Page 647: ...is full Autonegotiate is Enabled Flow Control TX is Disabled Flow Control RX is Disabled Link is good on GE port 3 connected to device FPC2 Speed is 1000Mb Duplex is full Autonegotiate is Enabled Flow...

Page 648: ...s Disabled Link is good on GE port 9 connected to device FPC9 Speed is 1000Mb Duplex is full Autonegotiate is Enabled Flow Control TX is Disabled Flow Control RX is Disabled Link is good on GE port 20...

Page 649: ...For optimum cooling verify the condition of the fans Action Monitor the status of the fans The fan trays each contain multiple fans that work in unison to cool the router components If one fan fails t...

Page 650: ...tB Zone1 OK 31 degrees C 87 degrees F CB 1 TCBC Zone0 OK 34 degrees C 93 degrees F SPMB 0 Intake OK 33 degrees C 91 degrees F SPMB 1 Intake OK 34 degrees C 93 degrees F Routing Engine 0 OK 38 degrees...

Page 651: ...SFB 4 IntakeA Zone0 OK 27 degrees C 80 degrees F SFB 4 IntakeB Zone1 OK 27 degrees C 80 degrees F SFB 4 Exhaust Zone0 OK 31 degrees C 87 degrees F SFB 4 SFB XF2 Zone1 OK 45 degrees C 113 degrees F SFB...

Page 652: ...grees F FPC 1 LU 0 TCAM TSen OK 42 degrees C 107 degrees F FPC 1 LU 0 TCAM Chip OK 50 degrees C 122 degrees F FPC 1 LU 0 TSen OK 42 degrees C 107 degrees F FPC 1 LU 0 Chip OK 51 degrees C 123 degrees...

Page 653: ...3 degrees F FPC 9 MQ 0 TSen OK 39 degrees C 102 degrees F FPC 9 MQ 0 Chip OK 41 degrees C 105 degrees F FPC 9 MQ 1 TSen OK 39 degrees C 102 degrees F FPC 9 MQ 1 Chip OK 44 degrees C 111 degrees F FPC...

Page 654: ...es F CB 1 ExhaustB Zone1 OK 31 degrees C 87 degrees F CB 1 TCBC Zone0 OK 34 degrees C 93 degrees F SPMB 0 Intake OK 33 degrees C 91 degrees F SPMB 1 Intake OK 34 degrees C 93 degrees F Routing Engine...

Page 655: ...FB 4 IntakeB Zone1 OK 27 degrees C 80 degrees F SFB 4 Exhaust Zone0 OK 31 degrees C 87 degrees F SFB 4 SFB XF2 Zone1 OK 46 degrees C 114 degrees F SFB 4 SFB XF1 Zone0 OK 39 degrees C 102 degrees F SFB...

Page 656: ...7 degrees F FPC 1 LU 0 TCAM Chip OK 49 degrees C 120 degrees F FPC 1 LU 0 TSen OK 42 degrees C 107 degrees F FPC 1 LU 0 Chip OK 49 degrees C 120 degrees F FPC 1 MQ 0 TSen OK 42 degrees C 107 degrees F...

Page 657: ...FPC 9 MQ 0 TSen OK 39 degrees C 102 degrees F FPC 9 MQ 0 Chip OK 40 degrees C 104 degrees F FPC 9 MQ 1 TSen OK 39 degrees C 102 degrees F FPC 9 MQ 1 Chip OK 43 degrees C 109 degrees F FPC 9 MQ 2 TSen...

Page 658: ...95 SFB 0 Intake Zone0 56 62 75 63 82 70 87 SFB 0 Exhaust Zone1 56 62 75 63 82 70 87 SFB 0 IntakeA Zone0 56 62 75 63 82 70 87 SFB 0 IntakeB Zone1 56 62 75 63 82 70 87 SFB 0 Exhaust Zone0 56 62 75 63 82...

Page 659: ...75 63 82 70 87 SFB 3 IntakeA Zone0 56 62 75 63 82 70 87 SFB 3 IntakeB Zone1 56 62 75 63 82 70 87 SFB 3 Exhaust Zone0 56 62 75 63 82 70 87 SFB 3 SFB XF2 Zone1 70 80 90 90 100 107 110 SFB 3 SFB XF1 Zon...

Page 660: ...SFB 6 Exhaust Zone0 56 62 75 63 82 70 87 SFB 6 SFB XF2 Zone1 70 80 90 90 100 107 110 SFB 6 SFB XF1 Zone0 70 80 90 90 100 107 110 SFB 6 SFB XF0 Zone0 70 80 90 90 100 107 110 SFB 7 Intake Zone0 56 62 75...

Page 661: ...an Tray 1 Fan 5 OK 100 9240 RPM Fan Tray 1 Fan 6 OK 100 9120 RPM Fan Tray 2 Fan 1 OK 49 4440 RPM Fan Tray 2 Fan 2 OK 52 4680 RPM Fan Tray 2 Fan 3 OK 52 4680 RPM Fan Tray 2 Fan 4 OK 52 4680 RPM Fan Tra...

Page 662: ...e condition of the air baffle see Figure 320 on page 615 NOTE The air baffle is optional Figure 321 Air Baffle Action On a regular basis check the air baffle and adjust accordingly to redirect exhaust...

Page 663: ...LEDs show the status of the Control Boards For optimum router performance verify the condition of the Routing Engines and the Control Boards Action On a regular basis Check the host subsystem LEDs on...

Page 664: ...1 percent Idle 97 percent Model RE S 1800x4 Serial ID 9009094145 Start time 2013 02 16 18 06 28 PST Uptime 2 days 20 hours 54 minutes 15 seconds Last reboot reason Router rebooted after a normal shut...

Page 665: ...reen host subsystem ONLINE LED on the craft interface is lit The red host subsystem OFFLINE LED on the craft interface is not lit Check the LEDs on the Control Board portion of the CB RE faceplate Dur...

Page 666: ...perature 32 degrees C 89 degrees F ExhaustB Zone1 Temperature 31 degrees C 87 degrees F TCBC Zone0 Temperature 34 degrees C 93 degrees F Power 1 1 0 V 1008 mV 1 2 V 1211 mV 1 8 V 1798 mV 2 5 V 2520 mV...

Page 667: ...fpc pic status Slot 0 Online MPC4E 3D 2CGE 8XGE PIC 0 Online 4x10GE SFPP PIC 1 Online 1X100GE CFP PIC 2 Online 4x10GE SFPP PIC 3 Online 1X100GE CFP Slot 1 Online MPC4E 3D 2CGE 8XGE PIC 0 Online 4x10G...

Page 668: ...IC 2 Online 4x 10GE LAN SFP PIC 3 Online 4x 10GE LAN SFP Slot 9 Online MPCE Type 2 3D PIC 0 Online 1x 10GE XFP PIC 1 Online 1x 10GE XFP PIC 2 Online 1x 10GE XFP PIC 3 Online 1x 10GE XFP For further de...

Page 669: ...s fpc command to check the status of installed MPCs As shown in the sample output the value Online in the column labeled State indicates that the MPC is functioning normally user host show chassis fpc...

Page 670: ...DR DRAM 6656 MB Start time 2013 02 17 02 21 36 PST Uptime 2 days 12 hours 41 minutes 16 seconds Max Power Consumption 520 Watts Slot 9 information State Online Temperature 31 Total CPU DRAM 2048 MB To...

Page 671: ...P PIC 3 Online 1X100GE CFP Slot 5 Online MPC 3D 16x 10GE PIC 0 Online 4x 10GE LAN SFP PIC 1 Online 4x 10GE LAN SFP PIC 2 Online 4x 10GE LAN SFP PIC 3 Online 4x 10GE LAN SFP Slot 6 Online MPC 3D 16x 10...

Page 672: ...10 Component LEDs on the Craft Interface 31 Troubleshooting the MX2010 MPCs 726 Replacing an MX2010 MPC and Adapter Card 525 Maintaining MX2010 Packet Forwarding Engine Components IN THIS SECTION Main...

Page 673: ...PU Utilization Memory Utilization Slot State C Total Interrupt DRAM MB Heap Buffer 0 Online 59 13 0 2048 16 14 1 Online 59 13 0 2048 16 14 2 Online 58 14 0 2048 17 14 3 Online 58 18 0 2048 17 14 4 Onl...

Page 674: ...Total RLDRAM 1324 MB Total DDR DRAM 6144 MB Start time 2013 02 17 02 21 47 PST Uptime 2 days 12 hours 41 minutes 5 seconds Max Power Consumption 440 Watts Issue the CLI show chassis fpc pic status co...

Page 675: ...C 3D 16x 10GE PIC 0 Online 4x 10GE LAN SFP PIC 1 Online 4x 10GE LAN SFP PIC 2 Online 4x 10GE LAN SFP PIC 3 Online 4x 10GE LAN SFP Slot 7 Online MPC 3D 16x 10GE EM PIC 0 Online 4x 10GE LAN SFP PIC 1 On...

Page 676: ...e MX Series Interface Module Reference If the MPC that houses the MIC detects a MIC failure the MPC generates an alarm message to be sent to the Routing Engine Issue the CLI show chassis fpc pic statu...

Page 677: ...x 10GE EM PIC 0 Online 4x 10GE LAN SFP PIC 1 Online 4x 10GE LAN SFP PIC 2 Online 4x 10GE LAN SFP PIC 3 Online 4x 10GE LAN SFP Slot 8 Online MPC 3D 16x 10GE PIC 0 Online 4x 10GE LAN SFP PIC 1 Online 4x...

Page 678: ...the CLI show chassis ethernet switch command user host show chassis ethernet switch Displaying summary for switch 0 Link is good on GE port 0 connected to device FPC0 Speed is 1000Mb Duplex is full Au...

Page 679: ...s Disabled Link is good on GE port 6 connected to device FPC6 Speed is 1000Mb Duplex is full Autonegotiate is Enabled Flow Control TX is Disabled Flow Control RX is Disabled Link is good on GE port 7...

Page 680: ...ected to device Debug GigE Link is good on GE port 23 connected to device SPMB Speed is 1000Mb Duplex is full Autonegotiate is Enabled Flow Control TX is Disabled Flow Control RX is Disabled Link is d...

Page 681: ...16 17 18 19 NOTE The MX2010 supports a standard and extended upper and lower cable manager Place excess cable out of the way in the lower cable manager Do not allow fastened loops of cable to dangle f...

Page 682: ...ion which is easy and inexpensive to replace Keep fiber optic cable connections clean Small microdeposits of oil and dust in the canal of the transceiver or cable connector could cause loss of light r...

Page 683: ...tate Online Temperature OK DC Input Feed Voltage V Current A Power W INP0 50 40 18 90 952 56 INP1 0 00 0 00 0 00 DC Output Voltage V Current A Power W Load 51 75 16 50 853 88 40 66 Hours Used 6140 PSM...

Page 684: ...perature OK DC Input Feed Voltage V Current A Power W INP0 50 00 20 40 1020 00 INP1 0 00 0 00 0 00 DC Output Voltage V Current A Power W Load 51 75 17 00 879 75 41 89 Hours Used 3380 PSM 11 status Sta...

Page 685: ...tate Online Temperature OK DC Input Feed Voltage V Current A Power W INP0 0 00 0 00 0 00 INP1 48 80 18 90 922 32 DC Output Voltage V Current A Power W Load 52 00 16 25 845 00 40 24 Hours Used 6143 PSM...

Page 686: ...eed Voltage V Current A Power W INP0 51 20 14 35 734 72 INP1 0 00 0 00 0 00 DC Output Voltage V Current A Power W Load 51 25 12 75 653 44 26 14 Hours Used 2008 PSM 2 status State Online Temperature OK...

Page 687: ...PSM 6 status State Online Temperature OK DC Input Feed Voltage V Current A Power W INP0 50 80 14 70 746 76 INP1 0 00 0 00 0 00 DC Output Voltage V Current A Power W Load 51 25 13 00 666 25 26 65 Hour...

Page 688: ...s Periodically inspect the site to ensure that the grounding and power cables connected to the router are securely in place and that no moisture accumulates near the router RELATED DOCUMENTATION MX201...

Page 689: ...city PSM 2 State Online AC input OK Both feed expected Both feed connected Capacity 2500 W maximum 2500 W DC output 375 19 W 7 25 A at 51 75 V 15 01 of capacity PSM 3 State Online AC input OK Both fee...

Page 690: ...ximum 22500 W Allocated power 6660 W 15840 W remaining Actual usage 3280 00 W The following output displays the DC chassis power for 2500 W capacity NOTE The capacity of the DC PSM is fixed and is lim...

Page 691: ...5 State Online DC input OK INP0 feed expected INP0 feed connected Capacity 2500 W maximum 2500 W DC output 624 75 W 12 25 A at 51 00 V 24 99 of capacity PSM 6 State Online DC input OK INP0 feed expec...

Page 692: ...State Empty Input Absent PSM 4 State Empty Input Absent PSM 5 State Online DC input OK INP1 feed expected INP1 feed connected Capacity 2100 W maximum 2500 W DC output 345 94 W Lower Zone 6 75 A at 51...

Page 693: ...bsent PSM 12 State Empty Input Absent PSM 13 State Online DC input OK INP1 feed expected INP1 feed connected Capacity 2100 W maximum 2500 W DC output 269 06 W Upper Zone 5 25 A at 51 25 V 12 81 of cap...

Page 694: ...remaining Actual usage 1345 31 W Total system capacity 18900 W maximum 22500 W Total remaining power 3380 W For further description of the command output see the Junos OS System Basics and Services Co...

Page 695: ...how the status of the Routing Engines and separate LEDs show the status of the Control Boards The green host subsystem ONLINE LED on the craft interface is lit The red host subsystem OFFLINE LED on th...

Page 696: ...RAM 16351 MB 16384 MB installed Memory utilization 7 percent CPU utilization User 0 percent Background 0 percent Kernel 0 percent Interrupt 0 percent Idle 99 percent Model RE S 1800x4 Serial ID 900909...

Page 697: ...s 55 minutes 9 seconds 2 Online 2 days 12 hours 54 minutes 58 seconds 3 Online 2 days 12 hours 54 minutes 47 seconds 4 Online 2 days 12 hours 54 minutes 36 seconds 5 Online 2 days 12 hours 54 minutes...

Page 698: ...tate Online Standby Total CPU Utilization 0 Interrupt CPU Utilization 0 Memory Heap Utilization 0 Buffer Utilization 22 Start time 2012 12 03 11 47 19 PST Uptime 2 hours 16 minutes 43 seconds master F...

Page 699: ...OS Services Captive Portal and Content Delivery Container package 12 3 20130216 0 JUNOS Services HTTP Content Management package 12 3 20130216 0 JUNOS IDP Services 12 3 20130216 0 JUNOS Services LL PD...

Page 700: ...e To display the status of the craft interface issue the show chassis craft interface command user host show chassis craft interface Front Panel System LEDs Routing Engine 0 1 OK Fail Master Front Pan...

Page 701: ...Components 613 Maintaining the MX2010 Fan Trays 615 Maintaining the MX2010 Control Boards 611 Maintaining the Power Supply Modules on the MX2000 Line of Routers 666 Taking an MX2000 Host Subsystem Of...

Page 702: ...Last reboot reason Router rebooted after a normal shutdown Load averages 1 minute 5 minute 15 minute 0 00 0 00 0 00 Routing Engine status Slot 1 Current state Backup Election priority Backup default...

Page 703: ...ne cleanly so its state information is preserved user host request system halt CAUTION When you request a host subsystem halt only one Routing Engine will be halted You must use the request chassis bo...

Page 704: ...ielding strip do not press hard on it 3 Place your other hand at the bottom edge of the MPC If the MPC is horizontal before you grasp it place your left hand around the faceplate and your right hand a...

Page 705: ...e Connector Edge Never carry the MPC by the faceplate with only one hand Do not rest any edge of an MPC directly against a hard surface see Figure 324 on page 689 Do not stack MPCs Figure 324 Do Not R...

Page 706: ...is heavy and because antistatic bags are fragile inserting the MPC into the bag is easier with two people To do this one person holds the MPC in the horizontal position with the faceplate facing the...

Page 707: ...modules PSMs replacing them every 6 months for optimum cooling system performance Inspect the air filter at the bottom rear of the router replacing it every 6 months for optimum cooling system perform...

Page 708: ...for Shipment To pack and ship individual components When you return components make sure that they are adequately protected with packing materials and packed so that the pieces are prevented from mov...

Page 709: ...alt Wait until a message appears on the console confirming that the operating system has halted For more information about the command see the Junos OS System Basics and Services Command Reference 3 A...

Page 710: ...ack attachment Securing the brackets to the router chassis Position the router in front of the shipping crate and raise the pallet jack Remove the shipping brackets and hardware and set aside 10 Place...

Page 711: ...support webpage at https support juniper net support For product problems or technical support issues contact the Juniper Networks Technical Assistance Center JTAC by using the Service Request Manager...

Page 712: ...g Engine cleanly so the state information is preserved If the router contains only one CB RE issue the request system halt command user host request system halt both routing engines 2 Wait until a mes...

Page 713: ...ESD points on the chassis 4 Move the DC power switch on the DC PSM faceplate for each DC PSM to the off O position and move the DC circuit breaker from the power source input for each DC PDM to the OF...

Page 714: ...vention of Electrostatic Discharge Damage 794 Grounding an MX2000 Router 289 Powering On the DC Powered MX2010 Router 315 Powering On the DC Powered 48 V MX2020 Router Powering On the DC Powered 240 V...

Page 715: ...6 PART Troubleshooting Hardware Troubleshooting Components 703...

Page 716: ......

Page 717: ...ace 703 Chassis and Interface Alarm Messages 704 Alarm Relay Contacts 704 Craft Interface LEDs 704 Component LEDs 705 Command Line Interface To troubleshoot an MX2010 router you use the Junos OS CLI a...

Page 718: ...Board and Routing Engine CB RE detects an alarm condition it lights the red or yellow alarm LED on the craft interface as appropriate trips the alarm relay and reports the cause of the alarm in the cr...

Page 719: ...LC9 for the ten line cards MPCs indicate the status Green indicates the line card is online green blinking indicates that the line card is booting and red indicates a failure The line card LEDs are lo...

Page 720: ...that PSM RELATED DOCUMENTATION MX2010 Craft Interface Description 29 Troubleshooting the MX2010 Cooling System 706 Troubleshooting the MX2010 MPCs 726 Troubleshooting the MX2010 MICs 725 Troubleshooti...

Page 721: ...screen 3 If the craft interface display lists only one fan failure and the other fans are functioning normally the fan is probably faulty and you need to replace the fan tray 4 Use the CLI to check t...

Page 722: ...ts the router shuts down Temperature Hot Red Temperature sensors Contact JTAC A temperature sensor failed Temperature sensor failure Verify that the room temperature is within acceptable limits Verify...

Page 723: ...MX2000 Host Subsystem CB RE Description 51 MX2010 Craft Interface Description 29 Troubleshooting the MX2000 Router Power System Problem Description The following alarms LEDs and other conditions indi...

Page 724: ...d and functioning normally the PWR OK INP0 and INP1 LEDs light steadily and the FAULT LED is not lit 2 Check the LEDs on each DC power distribution module PDM faceplate 48V or 240 V China PDM LED is o...

Page 725: ...d 6 Connect the PDM to a different power source with new power cables If the PSM PWR OK LED still does not light the PSM is the source of the problem Replace the PSM with a spare If the PWR OK LED on...

Page 726: ...2 PSM 3 status State Online Temperature OK AC Input Feed Voltage V Current A Power W INP0 223 75 1 50 335 62 INP1 3 75 0 00 0 00 DC Output Voltage V Current A Power W Load 52 00 5 00 260 00 12 38 Hour...

Page 727: ...9 29 Hours Used 7462 PSM 8 status State Online Temperature OK AC Input Feed Voltage V Current A Power W INP0 225 00 1 40 315 00 INP1 3 75 0 00 0 00 DC Output Voltage V Current A Power W Load 52 00 4 0...

Page 728: ...Power W Load 52 00 8 25 429 00 20 43 Hours Used 6838 PSM 13 status State Online Temperature OK AC Input Feed Voltage V Current A Power W INP0 225 00 2 30 517 50 INP1 0 00 0 00 0 00 DC Output Voltage...

Page 729: ...0 00 DC Output Voltage V Current A Power W Load 51 75 8 25 426 94 20 33 Hours Used 7462 Here is an example of the DC PSM 48 input status for an MX2020 user host show chassis environment psm PSM 4 sta...

Page 730: ...PSM 8 status State Online Temperature OK DC Input Feed Voltage V Current A Power W INP0 0 00 0 00 0 00 INP1 51 60 11 20 577 92 DC Output Voltage V Current A Power W Load 51 25 10 00 512 50 24 40 Hour...

Page 731: ...1 25 9 25 474 06 22 57 Hours Used 2970 PSM 17 status State Online Temperature OK DC Input Feed Voltage V Current A Power W INP0 0 00 0 00 0 00 INP1 51 60 10 15 523 74 DC Output Voltage V Current A Pow...

Page 732: ...Temperature OK DC Input Feed Voltage V Current A Power W INP0 0 00 0 00 0 00 INP1 240 00 1 10 264 00 DC Output Voltage V Current A Power W Load 52 75 4 25 224 19 8 97 Hours Used 2640 PSM 4 status Stat...

Page 733: ...State Online Temperature OK DC Input Feed Voltage V Current A Power W INP0 0 00 0 00 0 00 INP1 240 00 1 10 264 00 DC Output Voltage V Current A Power W Load 52 50 4 25 223 12 8 93 Hours Used 2640 PSM...

Page 734: ...2 PSM 13 status State Online Temperature OK DC Input Feed Voltage V Current A Power W INP0 240 00 0 60 144 00 INP1 0 00 0 00 0 00 DC Output Voltage V Current A Power W Load 52 25 1 75 91 44 3 66 Hours...

Page 735: ...t wiring are connected to the PDM the PSM reports both inputs to be active and reports the higher of the two 240V DC input source This is the case even if one negative input source is switched off thr...

Page 736: ...tempt to power on the power supply if the LED is still lit and the fan is still running If you do the router will not reboot 4 Turn on power to where the AC line goes into the power distribution modul...

Page 737: ...334 Figure 325 Setting the MX2000 Router DIP Switch PWR OK FAULT INP0 INP1 1 0 ON g007109 Position 0 indicates that only one AC or DC feed is provided Position 1 indicates that two AC or DC feeds are...

Page 738: ...e Online AC input OK 1 feed expected 2 feed connected Capacity 4100 W maximum 4100 W DC output 855 W zone 0 15 A at 57 V 20 of capacity In this example the DIP switch is in the wrong position since th...

Page 739: ...he MIC slots in the MPC are labeled PIC 0 1 and PIC 2 3 top to bottom user host show chassis fpc pic status Slot 0 Online MPCE Type 1 3D Q PIC 0 Online 10x 1GE LAN SFP PIC 1 Online 10x 1GE LAN SFP PIC...

Page 740: ...s installed and requested online through the CLI or the push button on the front panel The MPC then runs diagnostics during which the OK LED blinks When the MPC is online and functioning normally the...

Page 741: ...al For further description of the command output see the Junos OS System Basics Configuration Guide user host show chassis fpc detail Slot 0 information State Online Temperature 26 Total CPU DRAM 2048...

Page 742: ...on State Online Temperature 29 Total CPU DRAM 2048 MB Total RLDRAM 1324 MB Total DDR DRAM 6144 MB Start time 2013 02 20 02 22 06 PST Uptime 5 hours 28 minutes 31 seconds Max Power Consumption 440 Watt...

Page 743: ...7 PART Contacting Customer Support and Returning the Chassis or Components Contacting Customer Support 731 Locating Component Serial Numbers 733 Packing and Returning Components 751...

Page 744: ......

Page 745: ...our 12 digit service request number followed by the pound key if this is an existing case or press the star key to be routed to the next available support engineer When requesting support from JTAC by...

Page 746: ...Serial Numbers Before contacting Juniper Networks Inc to request a Return Materials Authorization RMA you must find the serial number on the router or component To display all the router components an...

Page 747: ...tch Fabric Board SFB 4 REV 06 711 032385 ZV1826 Switch Fabric Board SFB 5 REV 07 711 032385 CAAB4900 Switch Fabric Board SFB 6 REV 06 711 032385 ZV1821 Switch Fabric Board SFB 7 REV 06 711 032385 ZV84...

Page 748: ...MIC 1 REV 08 750 036233 CAAM1168 2X40GE QSFP PIC 2 BUILTIN BUILTIN 2X40GE QSFP Xcvr 0 REV 01 740 043308 2XDX44N00007 QSFP 40G LR4 Xcvr 1 REV 01 740 046565 QC480260 QSFP 40G SR4 FPC 6 REV 17 750 03735...

Page 749: ...1 740 045050 1E022240006 DC 52V Power Supply Module PSM 2 REV 03 740 045050 1EDB2350091 DC 52V Power Supply Module PSM 3 REV 01 740 045050 1E02224000X DC 52V Power Supply Module PSM 4 REV 03 740 04505...

Page 750: ...G SR Xcvr 7 REV 01 740 021308 ANA0NJ1 SFP 10G SR Xcvr 8 REV 01 740 021308 ANA0N5C SFP 10G SR Xcvr 9 REV 01 740 021308 ANA0MMT SFP 10G SR Xcvr 10 REV 01 740 021308 ANA09VW SFP 10G SR Xcvr 11 REV 01 740...

Page 751: ...20 REV 01 740 021308 ANA0QHZ SFP 10G SR Xcvr 21 REV 01 740 021308 ANA0NGA SFP 10G SR Xcvr 22 REV 01 740 021308 ANA0QJ3 SFP 10G SR Xcvr 23 REV 01 740 021308 ANA0NDV SFP 10G SR ADC 1 REV 13 750 043596 A...

Page 752: ...2010 CB RE Serial Number Label 739 MX2010 SFB Serial Number Label 749 MX2010 Power Distribution Module Serial Number Label 745 MX2010 Power Supply Module Serial Number Label 747 MX2010 Fan Tray Serial...

Page 753: ...10 Router Components and Serial Numbers 733 Contacting Customer Support 731 Returning a Hardware Component to Juniper Networks Inc 696 Guidelines for Packing Hardware Components for Shipment 693 MX201...

Page 754: ...abel 744 MX2010 MIC Serial Number Label 743 MX2010 CB RE Serial Number Label 739 MX2010 SFB Serial Number Label 749 MX2010 Power Distribution Module Serial Number Label 745 MX2010 Power Supply Module...

Page 755: ...mponents and Serial Numbers 733 Contacting Customer Support 731 Returning a Hardware Component to Juniper Networks Inc 696 Guidelines for Packing Hardware Components for Shipment 693 MX2010 Fan Tray S...

Page 756: ...a Hardware Component to Juniper Networks Inc 696 Guidelines for Packing Hardware Components for Shipment 693 MX2010 MIC Serial Number Label The serial number label location varies according to the nu...

Page 757: ...Numbers 733 Contacting Customer Support 731 Returning a Hardware Component to Juniper Networks Inc 696 Guidelines for Packing Hardware Components for Shipment 693 MX2010 MPC Serial Number Label The s...

Page 758: ...rt 731 Returning a Hardware Component to Juniper Networks Inc 696 Guidelines for Packing Hardware Components for Shipment 693 MX2010 Power Distribution Module Serial Number Label For the three phase d...

Page 759: ...odule Three Phase Delta and Wye Serial Number Label g007069 Figure 334 DC Power Distribution Module Serial Number Label g007071 Figure 335 DC Power Distribution Module 240 V China Serial Number Label...

Page 760: ...orks Inc 696 Guidelines for Packing Hardware Components for Shipment 693 MX2010 Power Supply Module Serial Number Label The serial number label is located on the side of the AC PSM see Figure 336 on p...

Page 761: ...7 DC Power Supply Module Serial Number Label CAUTION To completely de energize the system disconnect all power cords sets Apparaten skall anslutas till jordat uttag nar den ansluts till ett natverk g0...

Page 762: ...pply Module 48 V 475 Displaying MX2010 Router Components and Serial Numbers 733 Contacting Customer Support 731 Returning a Hardware Component to Juniper Networks Inc 696 Guidelines for Packing Hardwa...

Page 763: ...D DOCUMENTATION Replacing an MX2000 SFB 536 Displaying MX2010 Router Components and Serial Numbers 733 Contacting Customer Support 731 Returning a Hardware Component to Juniper Networks Inc 696 Guidel...

Page 764: ...of the device or hardware component you want to return open a service request with Juniper Networks Technical Assistance Center JTAC on the Web or by telephone Before you request an RMA number from J...

Page 765: ...pieces are prevented from moving around inside the carton Use the original shipping materials if they are available Place individual components in antistatic bags Write the RMA number on the exterior...

Page 766: ...rs CAUTION Apply force to any other parts of chassis other than the shipping covers can damage the chassis 9 Remove the router from the rack Using a pallet jack with attachment Install the pallet jack...

Page 767: ...Remove the shipping brackets and hardware and set them aside Guide the router in the shipping crate 754...

Page 768: ...transport mounting plates and wheel assembly to both sides of the chassis using the captive screws tighten to secure NOTE You may have to adjust the wheel assembly to installed the router transport mo...

Page 769: ...RMA number on the exterior of the box to ensure proper tracking RELATED DOCUMENTATION Preventing Electrostatic Discharge Damage to an MX2020 Router Powering Off the DC Powered MX2020 Router Powering...

Page 770: ...ps support juniper net support or at 1 888 314 JTAC within the United States or 1 408 745 9500 from outside the United States To return a defective hardware component 1 Determine the part number and s...

Page 771: ...nd Warnings 761 Installation and Maintenance Safety Guidelines and Warnings 769 Radiation and Laser Warnings 779 Maintenance and Operational Safety Guidelines and Warnings 785 Electrical Safety Guidel...

Page 772: ......

Page 773: ...services Keep the area around the device clear and free from dust before during and after installation Keep tools away from areas where people could trip over them while walking Do not wear loose clo...

Page 774: ...shock Some parts of the chassis including AC and DC power supply surfaces power supply unit handles SFB card handles and fan tray handles might become hot The following label provides the warning of...

Page 775: ...763...

Page 776: ...befinden sich in einer Situation die zu einer K rperverletzung f hren k nnte Bevor Sie mit der Arbeit an irgendeinem Ger t beginnen seien Sie sich der mit elektrischen Stromkreisen verbundenen Gefahr...

Page 777: ...ention Tout installation ou remplacement de l appareil doit tre r alis par du personnel qualifi et comp tent Warnung Ger t nur von geschultem qualifiziertem Personal installieren oder auswechseln lass...

Page 778: ...Halotron are most effective for suppressing electrical fires Type C fire extinguishers displace oxygen from the point of combustion to eliminate the fire For extinguishing fire on or around equipment...

Page 779: ...ent for Norway and Sweden WARNING The equipment must be connected to an earthed mains socket outlet Advarsel Apparatet skal kobles til en jordet stikkontakt Varning Apparaten skall anslutas till jorda...

Page 780: ...ance Safety Guidelines and Warnings IN THIS CHAPTER Installation Instructions Warning 770 Chassis and Component Lifting Guidelines 770 Ramp Warning 771 Rack Mounting and Cabinet Mounting Warnings 771...

Page 781: ...s til str mkilden Aviso Leia as instru es de instala o antes de ligar o sistema sua fonte de energia Atenci n Ver las instrucciones de instalaci n antes de conectar el sistema a la red de alimentaci n...

Page 782: ...yt sellaista kaltevaa pintaa jonka kaltevuus ylitt 10 astetta Attention Ne pas utiliser une rampe dont l inclinaison est sup rieure 10 degr s Warnung Keine Rampen mit einer Neigung von mehr als 10 Gra...

Page 783: ...772...

Page 784: ...er Networks switch moet in een stellage worden ge nstalleerd die aan een bouwsel is verankerd Dit toestel dient onderaan in het rek gemonteerd te worden als het toestel het enige in het rek is Wanneer...

Page 785: ...ten dieser Einheit in einem Gestell m ssen Sie besondere Vorkehrungen treffen um sicherzustellen da das System stabil bleibt Die folgenden Richtlinien sollen zur Gew hrleistung Ihrer Sicherheit dienen...

Page 786: ...skal kabinettet lastes fra bunnen og opp med den tyngste komponenten nederst i kabinettet Hvis kabinettet er utstyrt med stabiliseringsutstyr skal stabilisatorene installeres f r montering eller utf...

Page 787: ...ning F r att undvika kroppsskada n r du installerar eller utf r underh llsarbete p denna enhet p en st llning m ste du vidta s rskilda f rsiktighets tg rder f r att f rs kra dig om att systemet st r s...

Page 788: ...ieses Ger t mu geerdet werden Stellen Sie sicher da das Host Ger t w hrend des normalen Betriebs an Erde gelegt ist Avvertenza Questa apparecchiatura deve essere collegata a massa Accertarsi che il di...

Page 789: ...ped with laser transmitters which are considered a Class 1 Laser Product by the U S Food and Drug Administration and are evaluated as a Class 1 Laser Product per EN 60825 1 requirements Observe the fo...

Page 790: ...laser could permanently damage the eye Class 1 Laser Product Warning WARNING Class 1 laser product Waarschuwing Klasse 1 laser produkt Varoitus Luokan 1 lasertuote Attention Produit laser de classe I...

Page 791: ...s Luokan 1 valodiodituote Attention Alarme de produit LED Class I Warnung Class 1 LED Produktwarnung Avvertenza Avvertenza prodotto LED di Classe 1 Advarsel LED produkt i klasse 1 Aviso Produto de cla...

Page 792: ...truments optiques Warnung Nicht direkt in den Strahl blicken und ihn nicht direkt mit optischen Ger ten pr fen Avvertenza Non fissare il raggio con gli occhi n usare strumenti ottici per osservarlo di...

Page 793: ...Vermeiden Sie es sich den Strahlungen auszusetzen und starren Sie nicht in die ffnungen Avvertenza Quando i cavi in fibra non sono inseriti radiazioni invisibili possono essere emesse attraverso l ap...

Page 794: ...ings 785 Maintenance and Operational Safety Guidelines and Warnings IN THIS SECTION Battery Handling Warning 786 Jewelry Removal Warning 787 Lightning Activity Warning 789 Operating Temperature Warnin...

Page 795: ...ichen oder vom Hersteller empfohlenen Batterietyp Entsorgen Sie die benutzten Batterien nach den Anweisungen des Herstellers Advarsel Det kan v re fare for eksplosjon hvis batteriet skiftes p feil m t...

Page 796: ...Jewelry Removal Warning 787...

Page 797: ...der Arbeit an Ger ten die an das Netz angeschlossen sind jeglichen Schmuck einschlie lich Ringe Ketten und Uhren abnehmen Metallgegenst nde erhitzen sich wenn sie an das Netz und die Erde angeschloss...

Page 798: ...n te sluiten of te ontkoppelen Varoitus l ty skentele j rjestelm n parissa l k yhdist tai irrota kaapeleita ukkosilmalla Attention Ne pas travailler sur le syst me ni brancher ou d brancher les c bles...

Page 799: ...Operating Temperature Warning 790...

Page 800: ...einer Gegend betrieben werden in der die Umgebungstemperatur das empfohlene Maximum von 40 C berschreitet Um L ftungsverschlu zu verhindern achten Sie darauf da mindestens 15 2 cm lichter Raum um die...

Page 801: ...isia lakeja ja s nn ksi noudattaen Attention La mise au rebut d finitive de ce produit doit tre effectu e conform ment toutes les lois et r glementations en vigueur Warnung Dieses Produkt mu den gelte...

Page 802: ...ectrical Accident 809 General Electrical Safety Guidelines and Warnings WARNING Certain ports on the device are designed for use as intrabuilding within the building interfaces only Type 2 or Type 4 p...

Page 803: ...rom a circuit Always check the circuit before starting to work Carefully look for possible hazards in your work area such as moist floors ungrounded power extension cords and missing safety grounds Op...

Page 804: ...g strap is available touch the exposed bare metal of the device to ground yourself before handling the component Avoid contact between the component that is subject to ESD damage and your clothing ESD...

Page 805: ...ly a grounding type power outlet Do not circumvent this safety feature Equipment grounding must comply with local and national electrical codes You must provide an external certified circuit breaker 2...

Page 806: ...r in der N he von Netzger ten arbeiten ziehen Sie bei Wechselstromeinheiten das Netzkabel ab bzw Avvertenza Prima di lavorare su un telaio o intorno ad alimentatori scollegare il cavo di alimentazione...

Page 807: ...uparijohtimia Attention Utilisez uniquement des conducteurs en cuivre Warnung Verwenden Sie ausschlie lich Kupferleiter Avvertenza Usate unicamente dei conduttori di rame Advarsel Bruk bare kobberledn...

Page 808: ...DC Power Disconnection Warning 799...

Page 809: ...en tre s r localiser le disjoncteur situ sur le panneau de service du circuit en courant continu placer le disjoncteur en position ferm e OFF et l aide d un ruban adh sif bloquer la poign e du disjonc...

Page 810: ...y sujetar con cinta la palanca del interruptor autom tico en posici n de Apagado OFF Varning Innan du utf r n gon av f ljande procedurer m ste du kontrollera att str mf rs rjningen till likstr mskret...

Page 811: ...emier et d connect e en dernier Warnung Der Erdanschlu mu bei der Installation der Einheit immer zuerst hergestellt und zuletzt abgetrennt werden Avvertenza In fase di installazione dell unit eseguire...

Page 812: ...DC Power Wiring Sequence Warning 803...

Page 813: ...le fil de masse devrait toujours tre reli d abord et d branch pour la derni re fois Warnung Die Stromzufuhr ist nur mit geeigneten Ring sen an das DC Netzteil anzuschliessen Die richtige Anschlussseq...

Page 814: ...seq ncia apropriada da fia o mo da para moer RTN a RTN ent o 48 V a 48 V Ao desconectar a pot ncia a seq ncia apropriada da fia o 48 V a 48 V RTN a RTN moeu ent o para moer Anote que o fio terra deve...

Page 815: ...DC Power Wiring Terminations Warning 806...

Page 816: ...e conducteur Warnung Wenn Litzenverdrahtung erforderlich ist sind zugelassene Verdrahtungsabschl sse z B f r einen geschlossenen Regelkreis oder gabelf rmig mit nach oben gerichteten Kabelschuhen zu v...

Page 817: ...ndas t ex kabelsko av sluten eller ppen typ med upp tv nd tapp Storleken p dessa kontakter m ste vara avpassad till ledningarna och m ste kunna h lla b de isoleringen och ledaren fastkl mda Midplane E...

Page 818: ...rtenza Questa unit ha pi di una connessione per alimentatore elettrico tutte le connessioni devono essere completamente rimosse per togliere l elettricit dall unit Advarsel Denne enheten har mer enn n...

Page 819: ...2 Disconnect power from the device 3 If possible send another person to get medical aid Otherwise assess the condition of the victim then call for help 810...

Page 820: ...gency Approvals for MX2010 Routers 811 Compliance Statements for NEBS for the MX2010 Router 813 Compliance Statements for EMC Requirements for the MX2010 Router 813 Compliance Statements for Environme...

Page 821: ...EN 300386 2 Telecommunication Network Equipment Electromagnetic Compatibility Requirements The router is designed to comply with the following standards NEBS GR 1089 Core EMC and Electrical Safety for...

Page 822: ...ance Statements for EMC Requirements for the MX2010 Router 813 Compliance Statements for Environmental Requirements 814 Compliance Statements for EMC Requirements for the MX2010 Router IN THIS SECTION...

Page 823: ...ul interference when the equipment is operated in a commercial environment This equipment generates uses and can radiate radio frequency energy and if not installed and used in accordance with the ins...

Page 824: ...is is a Class A product In a domestic environment this product might cause radio interference in which case the user might be required to take adequate measures Israel Translation from Hebrew Warning...

Page 825: ...radio communications Operation of this equipment in a residential area is likely to cause harmful interference in which case the user will be required to correct the interference at his own expense Co...

Reviews: