


Selected for : 13 days, 23 hours, 14 minutes, 23 seconds
Selected since : 2012-10-29 18:29:29 EDT
SEE ALSO
Clocking Ports Specifications on the ACX2000 and the ACX2100 Router | 89
Connecting ACX2000 or ACX2100 Routers to an External Alarm-Reporting
Device
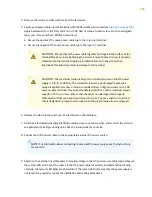
To connect the router to external alarm-reporting devices, attach wires to the ALARM relay contacts on
the front panel of the router. A system condition that triggers the red or yellow alarm on the router also
activates the corresponding alarm relay contact.
The terminal blocks that plug into the alarm relay contacts are supplied with the router. They accept wire
of any gauge between 20 AWG and 14 AWG (0.52 and 2.08 mm
2
), which is not provided. Use the gauge
of wire appropriate for the external device you are connecting.
To connect an external device to an alarm relay contact:
1. Prepare the required length of wire with gauge between 8 AWG and 14 AWG (0.08 and 2.08 mm
2
.
2. Attach an electrostatic discharge (ESD) grounding strap to your bare wrist, and connect the strap to
one of the ESD points on the chassis.
3. While the terminal block is not plugged into the relay contact, use a 2.5-mm flat-blade screwdriver to
loosen the small screws on its side. With the small screws on its side facing left, insert wires into the
slots in the front of the block based on the wiring for the external device. Tighten the screws to secure
the wire.
4. Orient the terminal block according to the labels to the left of the appropriate relay contact (NC means
“normally closed, C means “common,” and (NO means “normally open”).
5. Plug the terminal block into the relay contact and use a 2.5-mm flat-blade screwdriver to tighten the
screws on the face of the block.
6. Attach the other end of the wires to the external device.
110
Summary of Contents for ACX2000
Page 1: ...ACX2000 and ACX2100 Universal Metro Router Hardware Guide Published 2020 09 07 ...
Page 91: ...Front Panel of an ACX2000 Router 47 LEDs on ACX2000 and ACX2100 Routers 57 91 ...
Page 116: ...4 CHAPTER Maintaining Components Maintaining ACX2000 and ACX2100 Components 117 ...
Page 125: ...5 CHAPTER Troubleshooting Hardware Troubleshooting ACX2000 and ACX2100 126 ...
Page 139: ...139 ...
Page 144: ...Restricted Access Warning 144 ...
Page 148: ...148 ...
Page 161: ...Jewelry Removal Warning 161 ...
Page 164: ...Operating Temperature Warning 164 ...
Page 174: ...DC Power Disconnection Warning 174 ...
Page 178: ...DC Power Wiring Sequence Warning 178 ...


