background image

– 98 –

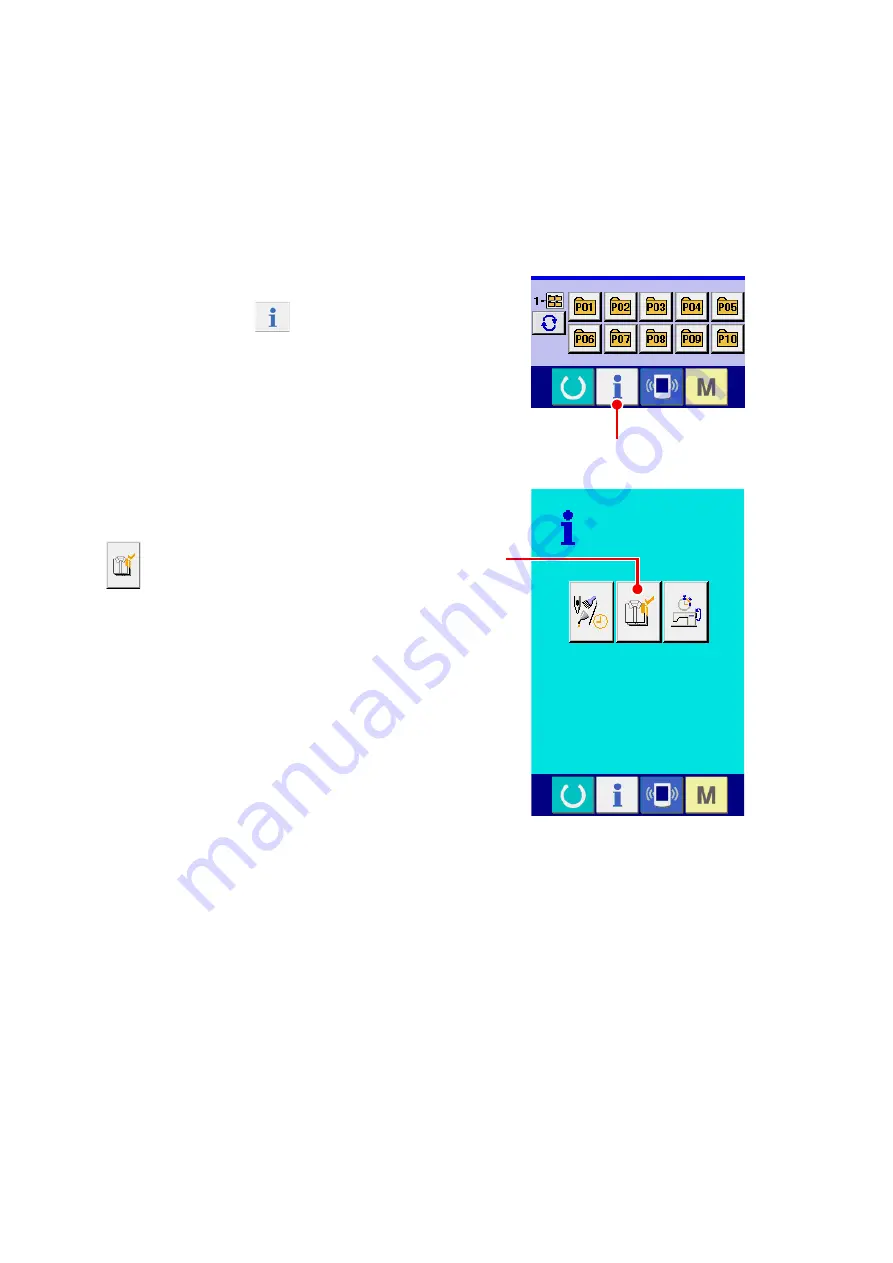
27-4 Observing the production control information

It is possible to designate the start, display the number of pieces of production from the start to the existing 
time, display the number of pieces of production target, etc. in the production control screen.
There are two kinds of display ways for the production control screen.

27-4-1 When displaying from the information screen


Display the information screen.

  When information key 


A

 of the switch seat 

section is pressed in the data input screen, the 
information screen is displayed.


Display the production control screen.

  Press production control screen display button 


B

 in the information screen. The production 

control screen is displayed.

A

B

Summary of Contents for LK-1900B/IP-420

Page 1: ... CompactFlash TM is the registered trademark of SanDisk Corporation U S A ENGLISH INSTRUCTION MANUAL LK 1900B IP 420 ...

Page 2: ...ING TEMPORARY STOP 26 10 1 To continue performing sewing from some point in sewing 27 10 2 To perform re sewing from the start 28 11 WINDING BOBBIN THREAD 29 12 USING COUNTER 30 12 1 Setting procedure of the counter 30 12 2 Count up releasing procedure 33 12 3 How to change the counter value during sewing 33 13 PERFORMING NEW REGISTER OF USERS PATTERN 34 14 PERFORMING NEW REGISTER OF PATTERN BUTTO...

Page 3: ...in of the data 90 26 6 Taking in plural data together 92 27 INFORMATION FUNCTION 94 27 1 Observing the maintenance inspection information 94 27 2 Inputting the inspection time 96 27 3 Releasing procedure of the warning 97 27 4 Observing the production control information 98 27 4 1 When displaying from the information screen 98 27 4 2 When displaying from the sewing screen 100 27 5 Performing setti...

Page 4: ...er motor origin sensor check 131 34 9 Performing thread clamp motor origin sensor check 132 34 10 How to carry out the continuous operation 133 35 COMMUNICATION SCREEN OF MAINTENANCE PERSONNEL LEVEL 134 35 1 Data which are possible to be handled 134 35 2 Displaying maintenance personnel level 135 35 3 Performing rewriting of program 136 36 INFORMATION SCREEN OF THE MAINTENANCE PERSONNEL LEVEL 138 ...

Page 5: ... 1 1 NAME OF EACH SECTION OF THE OPERATION PANEL 1 1 Body Front Right side ...

Page 6: ...rmed COMMUNICATION key Changeover of the data input screen and the communication screen can be performed MODE key Changeover of the data input screen and the mode changeover screen which performs various detail settings can be performed Contrast control Brightness control CompactFlash TM eject button CompactFlash TM slot Cover detection switch Connector for external switch Connector for control bo...

Page 7: ... button This button performs the release of error NUMERAL INPUT button This button displays ten keys and input of numerals can be performed CHARACTER INPUT button This button displays the character input screen Refer to 18 NAMING PATTERN p 46 PRESSER DOWN button This button lowers the presser and displays the presser down screen To raise the presser press PRESSER UP button displayed in the presser...

Page 8: ...esser is raised be careful that fingers are notcaught in the presser since the presser moves after havinglowered When READY key B is pressed the back color of LCD display is changed to green and the sewing machine is set to the sewing possible state When ending the selection screen with CANCEL button or ENTER button without selecting the language the selection screen of the language is again displ...

Page 9: ... 5 3 LCD DISPLAY SECTION AT THE TIME OF SEWING SHAPE SELECTION 3 1 Sewing shape data input screen A B C D E F G H J I L K M P N O ...

Page 10: ...r press the presser up button which is displayed in the presser down screen E BOBBIN WINDER button Bobbin thread can be wound Refer to 11 WINDING BOBBIN THREAD p 29 F SEWING SHAPE No display Kind and No of the sewing shape being selected at present are displayed There are three kinds of sewing shapes below Standard pattern Media pattern Users pattern G SEWING SHAPE SELECTION button Sewing shape be...

Page 11: ... by setting memory switch Y actual size value setting button is displayed Refer to 6 PERFORMING ITEM DATA CHANGE p 17 L Y SCALE RATE SETTING button Scale rate in Y direction of sewing shape being selected at present is displayed on this button When the scale input is set to non selection by setting memory switch the button goes out and the Y scale is displayed Refer to 6 PERFORMING ITEM DATA CHANG...

Page 12: ... 8 3 2 Sewing screen A B C F N E D O P R Q G J M K H I L ...

Page 13: ...HAPE No display Kind and No of sewing shape being selected at present are displayed There are three kinds of sewing shapes below Standard pattern Media pattern Users pattern G SEWING SHAPE display Sewing shape being selected at present is displayed H SEWING SHAPE Total number of stitches display Total number of stitches of the sewing shape being selected at present is displayed I NEEDLE THREAD TEN...

Page 14: ...er of rotations of the sewing machine can be changed O Y ACTUAL SIZE VALUE display Actual size value in Y direction of sewing shape being selected is displayed P Y SCALE RATE display Scale rate in Y direction of sewing shape being selected is displayed Q MAX SPEED LIMITATION display Maximum speed limitation which is set at present is displayed R PATTERN REGISTER button Pattern register buttons sto...

Page 15: ...shape is possible In case of the sewing screen green press READY key and display the data input screen blue Call the sewing shape selection screen Press SEWING SHAPE button A and the sewing shape selection screen is displayed Select the kind of sewing shape There are three different sewing shapes Press SEWING SHAPE SELECTION button B A B ...

Page 16: ...pe you desire from SEWING SHAPE SELECTION buttons C and press ENTER button D The sewing shape list screen corresponding to the kind of sewing shape you selected is displayed Pictograph Name Maximum number of patterns Standard pattern 1900 1901 1902 51 1903 50 Users pattern 200 Media pattern 999 D C F G E Select the sewing shape When UP or DOWN SCROLL button E is pressed SEWING SHAPE buttons F are ...

Page 17: ...EWER button I Then the viewer screen is displayed and the selected shape is displayed When the sewing shape is users pattern or media pattern the screen as shown on the right side is displayed PATTERN No SELECTION buttons H which have been registered to users pattern or media pattern are displayed Press the button of the pattern No you desire to select In addition when you desire to confirm the sh...

Page 18: ... 0 8 5 30 28 20 0 15 21 2 0 8 16 28 2 0 8 Other side Other side Other side Other side Other side Other side Other side Other side Large bar tacking Small bar tacking Knit goods bar tacking Linear bar tacking Lengthwise bar tacking Lengthwise linear bar tacking Number of stitches Lengthwise Crosswise Note 2 No of presser Lengthwise Crosswise Note 2 No of presser Number of stitches This side This si...

Page 19: ...75 30 2 5 12 46 42 30 2 5 12 47 91 Φ8 15 48 99 49 148 50 164 Number of stitches Lengthwise Crosswise Note 2 No of presser Number of stitches Lengthwise Crosswise Note 2 No of presser Semilunar bar tacking Large bartacking Knit goods bartacking Round bar tacking Lengthwise bar tacking Radial tacking Pattern Nos 41 to 46 are for the optional work clamp foot No 12 They are different from the lengthwi...

Page 20: ... 10 28 48 6 6 12 40 6 6 29 10 10 13 41 8 8 30 49 5 5 5 3 0 2 5 14 10 10 31 8 8 8 15 42 6 6 32 50 5 5 5 16 43 8 8 33 8 8 8 17 10 10 The standard sewing sizes of X and Y are when the enlargement reduction rate is 100 Use pattern Nos 34 to 50 when the button hole is small φ1 5 mm or less For the sewing machine provided with the bird s nest preventing and shorter thread remaining type thread trimmer p...

Page 21: ...n be changed to actual size value input by selection of the memory switch Max inputting range of max limitation speed D and the initial value are determined with memory switch Item Input range Initial value A Scale rate in X direction 20 to 200 100 B Scale rate in Y direction 20 to 200 100 C Thread tension 0 to 200 50 D Max speed limitation 1900 400 to 3200 sti min 3200 sti min 1901 and 1902 400 t...

Page 22: ...f pattern No X Y scale and number of max rotation are not memorized E F H I In the case of adding or deleting the thread tension and the thread tension command for the patterns stored on a medium the pattern type section display H will change from to In case of change display H the change con firmation screen is displayed at the time of the change of pattern When ENTER button I is pressed the info...

Page 23: ...to green and sewing is possible Display the step sewing screen When STEP SEWING button B is pressed the step sewing screen is displayed WARNING Make sure without fail of the contour of the sewing pattern after selection of the sewing pattern If the sewing pattern extends outside the work clamp feet the needle will interfere with the work clamp A B ...

Page 24: ...s STOP button G When ORIGIN MOVE button F is pressed the machine moves to the origin and the screen returns to the sewing screen When pressing the presser forward or presser backward button with the needle bar lowered the presser moves after automatically returning the needle bar to UP position So be careful Finish checking the shape When CANCEL button E is pressed the screen returns to the sewing...

Page 25: ...achine does not start even when the foot switch is depressed under this mode Specify the command position you desire to change Specify the position you desire to add the thread tension command or that you desire to change the thread tension command value with ONE STITCH BACKWARD button C or ONE STITCH FORWARD button D in the state that the presser is lowered In addition the machine moves to the ne...

Page 26: ...ase decrease value input screen is displayed Input the value you desire with TEN keys and keys J When ENTER button K is pressed the data is determined J K I For the standard patterns the thread tension command entry button is displayed only at the position where the thread tension command already exists ...

Page 27: ...en selecting a standard pattern user pattern or a pattern stored on a medium press thread tension button A on the sewing screen to display the thread tension setting screen When THREAD TENSION COMMAND CHANGE button B on the thread tensionsetting screen is pressed the thread tension command change screen is displayed A B ...

Page 28: ...ommand exists with E or F When you desire to stop the move press STOP button G When ORIGIN MOVE button H is pressed the machine moves to the origin When the present needle entry point exists on the thread tension command COMMAND DELETE button L is displayed Delete the thread tension command When COMMAND DELETE button L is pressed the command delete screen is displayed When ENTER button M is presse...

Page 29: ... clear after replenishing grease E220 is displayed each time turning ON the power until clearing is performed When the number of stitches of grease up exceeds 120 million stitches or more E221 grease up error occurs when READY key is pressed When E221 occurs it is not possible to sew Clear the number of stitches of grease up with memory switch grease up error clear after replenishing grease Displa...

Page 30: ...tton A is displayed on the sewing screen When the TEMPORARY STOP button A is pressed during sewing the sewing machine can be stopped At this time the error screen is displayed to inform that the TEMPORARY STOP button A is pressed Perform the same operation when the external switch is used for the temporary stop A ...

Page 31: ...has been performed FEED BACK button D FEED FORWARD button E and RETERN TO ORIGIN button F are displayed on the screen Adjust the presser to the re sewing position When FEED BACK button D is pressed the presser returns stitch and by stitch and when FEED FORWARD button E is pressed it advances stitch by stitch Move the presser to the re sewing position Re start the sewing When the pedal is depressed...

Page 32: ...imming is performed FEED BACK button D FEED FORWARD button E and RETURN TO ORIGIN button F are displayed on the screen C D F E B Return to the origin When RETURN TO ORIGIN button F is pressed the pop up is closed the sewing screen is displayed and the machine returns to the position of the start of sewing Perform again the sewing work from the start When the pedal is depressed sewing starts again ...

Page 33: ... after setting pattern No or the like pressing READY key and making the sewing screen display B A Start bobbin winding Depress the start pedal and the sewing machine rotates and starts winding bobbin thread Stop the sewing machine Press STOP button B and the sewing machine stops and returns to the normal mode Or depress the start pedal again during winding bobbin and the sewing machine stops while...

Page 34: ...ting screen is displayed Selection of kinds of counters This sewing machine has three different counters i e the sewing counter No of pcs counter and bobbin counter When SEWING COUNTER TYPE SELECT button B NO OF PCS COUN TER TYPE SELECT button C or BOBBIN COUNTER TYPE SELECT button D is pressed the corresponding counter type select screen is displayed On this screen the counter type can be selecte...

Page 35: ...et value the count up screen is displayed DOWN counter Every time one combination sewing is performed the existing value is counted down When the existing value is reached to 0 the count up screen is displayed Counter disuse The No of pcs counter does not perform counting The counter screen of the No of pcs counter is not displayed Sewing counter UP counter Every time the sewing of one shape is pe...

Page 36: ...counter to display the corresponding counter set value input screen Press button H for the sewing counter button I for the No of pcs counter or button J for the bobbin counter to display the corresponding counter current value input screen Here input the set value When 0 is inputted in the set value the display of count up screen is not performed Here input the existing value ...

Page 37: ... counter value during sewing Display the counter value change screen When you desire to revise the counter value during sewing work due to the mistake or the like press COUNTER VALUE CHANGE button I on the sewing screen The counter value change screen is displayed Change the counter value Input the value you desire with ten keys or or key J H I L K J Determine the counter value When ENTER button L...

Page 38: ...ers pattern No you desire to newly register with the ten keys B When the users pattern No which has been already registered is inputted press ENTER button E and E403 is displayed Then select the users pattern No which has not been registered New register to the users pattern No which has been already registered is prohibited It is possible to retrieve the users pattern No which has not been regist...

Page 39: ...ed New register to the pattern button No which has been already registered is prohibited It is possible to retrieve the pattern button No which has not been registered with the or button C and D When the sewing screen is displayed and pressing P1 to P50 keys the presser comes down Be careful not to allow the fingers to be caught in it Select the folder to be stored It is possible for the pattern b...

Page 40: ... 36 15 LCD DISPLAY SECTION AT THE TIME OF PATTERN BUTTON SELECTION 15 1 Pattern button data input screen R V Q A B C D E M N O P G S T H F I U J K L ...

Page 41: ...bin thread can be wound Refer to 11 WINDING BOBBIN THREAD p 29 F PATTERN BUTTON No display Pattern button No being selected at present is displayed on this button and when the button is pressed the pattern button No selection screen is displayed Refer to 16 PERFORMING PATTERN BUTTON No SELECTION p 42 G SEWING SHAPE Sewing shape which is registered to the pattern button No being selected is display...

Page 42: ... size value which is registered to the pattern button No being selected is displayed P Y SCALE RATE display Y scale rate which is registered to the pattern button No being selected is displayed Q MAX SPEED LIMITATION Maximum speed limitation which is registered to the pattern button No being selected is displayed R Pattern button edit screen is displayed Pattern button edit screen is displayed Ref...

Page 43: ... 39 15 2 Sewing screen A D E F C H R I G L M N Q O P B S V J K T U ...

Page 44: ...RN TO ORIGIN button Presser is returned to the start of sewing and is raised G PATTERN No display Pattern button No being sewn is displayed H SEWING SHAPE display Sewing shape being sewn is displayed I SEWING SHAPE No display Kind of sewing and sewing shape No which are registered to the pattern being sewn are displayed J Y ACTUAL SIZE VALUE display Actual size value in Y direction which is regist...

Page 45: ... sewing screen is displayed Checking the pattern shape can be performed Refer to 7 CHECKING PATTERN SHAPE p 19 R FOLDER No display Folder No in which the displayed pattern register buttons are stored is displayed S SPEED variable resistor Number of revolutions of the sewing machine can be changed T MAX SPEED LIMITATION display Maximum speed limitation which is registered to the pattern button No b...

Page 46: ...tern button No When UP or DOWN SCROLL button B is pressed pattern button No buttons C which have been registered are changed over in order The contents of sewing data which have been inputted in the pattern button No are displayed in the button Here press the pattern button No button C you desire to select Determine the pattern button No When ENTER button D is pressed the pattern button No selecti...

Page 47: ...lamp feet the needle will interfere with the work clamp feet during sewing causing dangerous troubles including needle breakage 2 When the sewing screen is displayed and pressing P01 to P50 keys the presser comes down Be careful not to allow the fingers to be caught in it B A Select the pattern No Pattern button is displayed with every folder which is specified when the pattern is newly created Wh...

Page 48: ...n 1900 400 to 3200 sti min 3200 1901 and 1902 400 to 3000 sti min 3000 1903 and 1900 double capacity hook 400 to 2700 sti min 2700 F Travel amount in X direction 20 0 to 20 0 mm 0 0 G Travel amount in Y direction 20 0 to 10 0 mm 0 0 H Sewing shape I Folder No 1 to 5 J Thread clamp With without With K 2 step stroke height 50 to 90 70 L Last stitch position X travel amount 2 0 to 2 0 0 0 M Last stit...

Page 49: ...ith the ten keys or or key K When ENTER button L is pressed the data is determined Close the pattern button data change screen When the change is over press CLOSE button M The pattern button data change screen is closed and the screen returns to the data input screen It can be performed to change the other item data by the same operation K L M ...

Page 50: ... performed The cursor can be moved with CURSOR LEFT TRAVEL button C and CURSOR RIGHT TRAVEL button D When you desire to delete the inputted character adjust the cursor to the position of the character you desire to delete and press DELETE button E Finish the input of character When ENTER button F is pressed the input of character is finished After the finish the inputted character is displayed on ...

Page 51: ... the data input screen Only in case of the data input screen blue at the time of pattern button selection it is possible to copy In case of the sewing screen green press READY key to display the data input screen blue Call the pattern copy screen When PATTERN BUTTON COPY button A is pressed the pattern button copy copy source selection screen is displayed Select the pattern No of copy source Selec...

Page 52: ...th and buttons E and F In addition the folder to be stored can be selected with FOLDER SELECTION button G Start copying When ENTER button H is pressed copying starts The copied pattern button No in the selection state returns to the pattern button copy copy source selection screen after approximately two seconds Combination data can be copied in the same way H F E D G ...

Page 53: ... mode changes over alternately to the individual and the combination sewing The image of the button of sewing mode selection button changes according to the sewing mode which is selected at present When individual sewing is selected When combination sewing is selected When even one of the pattern buttons has not been registered it is not possible to change over from the individual sewing to the co...

Page 54: ... be inputted Use this function when sewing plural different shapes on the sewing product In addition it is possible to register as many as 99 of the combination sewing data Use this function for new creation and copying in case of need Refer to 14 PERFORMING NEW REGISTER OF PATTERN BUTTON p 35 and 19 COPYING PATTERN BUTTON p 47 21 1 Pattern input screen J B C D E F A H I G ...

Page 55: ...thread can be wound Refer to 11 WINDING BOBBIN THREAD p 29 G COMBINATION DATA No SELECTION button Combination data No being selected is displayed in the button When the button is pressed the combination data No selection screen is displayed H SEWING ORDER display Sewing order of the inputted pattern data is displayed When the screen is changed over to the sewing screen the pattern which is sewn fi...

Page 56: ... 52 21 2 Sewing screen B A C D S U W T Q R V E O J H I P M N K F X G L ...

Page 57: ...o pattern button No being sewn is displayed H SEWING ORDER RETURN button Pattern to be sewn can be returned by one I SEWING ORDER ADVANCE button Pattern to be sewn can be advanced by one J SEWING ORDER ADVANCE button Pattern to be sewn can be advanced by one K TOTAL NUMBER OF REGISTERS display Total number of patterns which is registered to combination No being sewn is displayed L TOTAL NUMBER OF ...

Page 58: ... actual size value of the sewing shape which is registered to pattern button No being sewn is displayed U Y SCALE RATE display Y scale rate of the sewing shape which is registered to pattern button No being sewn is displayed V MAX SPEED LIMITATION display Maximum speed limitation which is registered to pattern button No being sewn is displayed W TRAVEL AMOUNT IN Y DIRECTION display Travel amount i...

Page 59: ... been registered in the initial state and the first pattern selection button is displayed in the blank state Display the pattern No selection screen When PATTERN SELECTION button A is pressed the pattern No selection screen is displayed Select the pattern No When UP DOWN SCROLL button B is pressed pattern No buttons C which have been registered are changed over in order The contents of pattern dat...

Page 60: ...se of the data input screen pink it is possible to select the combination data No In case of the sewing screen green press READY key to display the data input screen pink Call the combination data No screen When COMBINATION DATA No button A is pressed the combination data No selection screen is displayed Combination data No which is selected at present and the contents are displayed in the upper p...

Page 61: ...he combination data are changed over in order and displayed Determine the combination data No When ENTER button D is pressed the combination data No selection screen is closed and the selection is finished D B E C A B 22 3 How to delete combination data Select the combination data No Perform the steps to of 22 2 Selection of combination data p 56 and display the combination data to be deleted Dele...

Page 62: ...he pattern No selection screen When PATTERN SELECTION button A of the step you desire to delete is pressed the pattern No selection screen is displayed A B C Delete the step of the selected combination data When DATA STEP DELETE button B is pressed the combination data step delete confirmation screen is displayed When ENTER button C is pressed the step is deleted from the selected combination data...

Page 63: ...emory switch data list screen of level 1 is displayed Select the memory switch button you desire to change Press UP DOWN SCROOL button C and select the data item B you desire to change 23 1 How to change memory switch data 23 1 1 Level 1 Change the memory switch data There are data items to change numerals and those to select pictographs in the memory switch data C A B ...

Page 64: ... value can be changed with keys D displayed in the change screen D No in blue color such as is put on the data items to select pictographs and the pictographs displayed in the change screen can be selected For the details of memory switch data refer to 23 2 Memory switch data list p 62 ...

Page 65: ... as long as 6 seconds the memory switch button 2 A is displayed When this button is pressed the memory switch data list screen of level 2 is displayed Change the memory switch data Perform the steps and of the level 1 similarly and the change of memory switch data can be performed A ...

Page 66: ...lamp 400 to 3200 100sti min 3200sti min Sewing speed of 5th stitch In case of with thread clamp 400 to 3200 100sti min 3200sti min Thread tension of 1st stitch In case of with thread clamp 0 to 200 1 200 Thread tension setting at the time of thread trimming 0 to 200 1 0 Thread tension changeover timing at the time of thread trimming 6 to 4 1 0 Sewing speed of 1st stitch In case of without thread c...

Page 67: ...2 step stroke Optional pedal Optional pedal 2 step stroke Start pedal selection In case of LK 1903B BR35 the initial value is Standard pedal Optional pedal Optional pedal 1 motion In case of LK 1903B BR35 the initial value is OFF by toe down OFF by releasing Optional pedal 2 motion OFF by toe down OFF by releasing Height of presser at the time of 2 step scrolling 50 to 90 1 70 Scale rate reference...

Page 68: ...thread clamp release is set 1 to 20 1 2 Clamping timing of thread clamp can be delayed 10 to 4 1 0 Thread clamp control can be prohibited In case of LK 1903 the initial value is Normal Prohibited Feed motion timing is selected Set the timing in direction when stitch is not well tightened 8 to 16 1 12 State of the presser after end of sewing is selected Presser goes up after moving at start of sewi...

Page 69: ...command can be selected Presser rise Presser rise with presser switch Presser rise is prohibited Needle stop position is set UP position Upper dead point Thread trimming can be prohibited Normal Thread trimming prohibited Route of return to origin by return to origin button can be selected Linear return Reverse return of pattern Bobbin winding speed can be set 800 to 2000 100sti min 1600sti min Mo...

Page 70: ... is not displayed for the machines other than LK 1903B Tie stitching effective Tie stitching ineffective Unit of sewing shape size change can be selected input Actual size input Origin position is located on the front side by 5 mm This item is necessary when using the presser and pattern for LK 1904 Standard Front side Used to select either common or individual for the 2 step work clamp height str...

Page 71: ...ead releasing thread waste retaining posi tion can be changed Language selection With this switch the language to be displayed on the panel is se lected Not yet se lected Japanese English Chinese traditional Chinese simplified Spanish Italian French German Portuguese Turkish Vietnamese Korean Indonesian Russian Grease up error clear Clearing of number of stitches of grease up is performed Refer to...

Page 72: ...ork clamp lifting speed 100 to 4000pps 10pps 1500pps Thread trimmer drive speed presser rise 100 to 4000pps 10pps 3000pps Presser rise motion at sewing end can be set Normal Presser rise prohibited Thread trimming speed 400sti min 800sti min Effective ineffective selection of thread trimming jump feed control Ineffective Effective Diameter of needle hole guide at the time of thread trimming jump f...

Page 73: ...ion 20 to 10mm 1mm 10mm Range of move limit in Y direction 20 to 10mm 1mm 20mm In case of LK 1901 LK 1903 the initial display is 10mm X Y jump feed speed is set 100 to 4000pps 10pps 2000pps X Y feed forward backward speed is set 100 to 4000pps 10pps 500pps Selection of effective ineffective of automatic preparation motion at the time of turning on the power Ineffective Effective Selection of effec...

Page 74: ...tch is displayed only for the LK 1903BBS LK 1900BB Thread waste suction actuation time Length of time to be elapsed from the turning ON of the thread waste suction nozzle thread waste suction to the 0 to 3000ms 100 600 turning OFF of it This memory switch is displayed only for the LK 1903BBS LK 1900BB Thread waste suction nozzle actuation time 0 to 1000ms 10 600 Length of time to be elapsed from t...

Page 75: ...9 Y travel amount of material feed from the last stitch before the actuation of the shorter thread remaining type thread trimmer This memory switch is displayed only for the LK 1903BBS LK 1900BB X travel amount of material feed for shorter thread remaining type thread trimmer actuation 3 0 to 3 0 0 1 F o r t h e L K 1900BB 0 6 F o r t h e L K 1903BB 0 8 X travel amount of material feed from the la...

Page 76: ... LK 1900BFS 3 LK 1900BMS 4 LK 1901BSS 5 LK 1902BSS 6 LK 1902BHS 7 LK 1903BSS 301 8 LK 1903BSS 302 9 LK 1903BSS 311 BR35 10 LK 1903BSS 312 BR35 11 LK 1900BWS 12 LK 1900BBS 13 LK 1900BBF 14 LK 1903BBS301 15 LK 1903BBS302 0 to 15 1 Initial display is the set value on the left side depending on the model ...

Page 77: ...OM or setting of reading inoperative is performed Possible to re enter after reset Previous screen E011 External media not inserted External media is not inserted Possible to re enter after reset Previous screen E012 Read error Data read from external media cannot be performed Possible to re start after reset Previous screen E013 Write error Data write from external media cannot be performed Possi...

Page 78: ...rror Data read from server cannot be performed Possible to re start after reset Previous screen E028 Write error Data write from server cannot be performed Possible to re start after reset Previous screen E029 Lid of media slot is open Possible to re start after reset Previous screen E030 Needle bar position error Needle bar is not in the specified position Turn hand pulley and return the needle b...

Page 79: ...204 USB connection error With the number of times of sewing has reached 10 or more with a USB device connected to the sewing machine Possible to re start after reset Sewing screen E220 Grease up warning At the time of operation of 100 million stitches Possible to re start after reset Data input screen E221 Grease up error At the time of operation of 120 million stitches The sewing machine is put i...

Page 80: ...tion nozzle cylinder error The suction nozzle cylin der fails to operate Tu r n O F F t h e power switch Check whether the air pressure is adequate and whether the suc tion nozzle cylin der sensor and MAIN PCB CN54 have loosened or fallen off E398 Shorter thread remain ing type thread trimmer cylinder sensor error The shorter thread re maining type thread trim mer cylinder sensor fails to detec Tu...

Page 81: ... disapproval error The selected pattern No cannot be found Possible to re start after reset Previous screen E405 Pattern delete error The pattern cannot be deleted since it is used for the pattern button Possible to re start after reset Previous screen E435 Set value exceeds the range Possible to re start after reset Previous screen E703 Panel is connected to the sewing machine which is not suppos...

Page 82: ... of main shaft motor When the sewing machine motor rotates in the reverse direction Turn OFF the power E811 Overvoltage When input power is more than the specified value Turn OFF the power E813 Low voltage When input power is less than the specified value Turn OFF the power E901 Main shaft motor IPM abnormality When SERVO CONTROL p c b is abnormal Turn OFF the power E903 Stepping motor power abnor...

Page 83: ...rieval error When origin sensor signal is not inputted at the time of origin retrieval motion Turn OFF the power E913 Thread clamp origin retrieval error When origin sensor signal is not inputted at the time of origin retrieval motion Turn OFF the power E914 Feed defective error Timing lag between feed and main shaft occurs Turn OFF the power E915 Communication abnormality between operation panel ...

Page 84: ... slip error Turn OFF the power 1 Step screen 2 Sewing screen 3 E929 Thread clamp motor out of position error Turn OFF the power E931 X motor overload error Turn OFF the power E932 Y motor overload error Turn OFF the power E934 Thread clamp motor overload error Turn OFF the power E943 MAIN CONTROL p c b trouble When data writing to MAIN CONTROL p c b cannot be performed Turn OFF the power E946 HEAD...

Page 85: ...3 Erase confirmation of backup data Pattern data is not stored in memory Erase is O K M528 Confirmation of overwriting of users pattern Overwriting is performed O K M529 Confirmation of overwriting of media Overwriting is performed O K M530 Vector data sewing standard format data of panel Overwriting is performed O K M531 Vector data sewing standard format data of media data Overwriting is perform...

Page 86: ...letion of thread tension command Deletion is performed O K M542 Confirmation of formatting Formatting is performed O K M544 Data corresponding to panel does not exist Data does not exist M545 Data corresponding to media does not exist Data does not exist M546 Data corresponding to PC does not exist Data does not exist M547 Over writing prohibition of pattern data Overwriting cannot be performed si...

Page 87: ...g prohibition of data on PC Overwriting cannot be performed since data exists M653 During formatting Formatting is performed M669 During reading data Data is being read M670 During writing data Data is being written M671 During converting data Data is being converted ...

Page 88: ...ddition it is also possible to upload the aforementioned data on a medium A medium and a USB port are provided as communication media File No 26 1 Handling possible data The data format that is supported is as shown in the table below Data name Extension Description of data Vector format data VD00 VDT Data of needle entry point created with PM 1 Format of the data which can be used in common among...

Page 89: ...goes no further Check that the inserting direction of the media is proper 1 When the inserting direction is wrong panel or media may be damaged 2 Do not insert any item other than the CompactFlash TM 3 The media slot in the IP 420 accommodates to the CompactFlash TM of 2 GB or less 4 The media slot in the IP 420 supports the FAT16 which is the format of the CompactFlash TM FAT32 is not supported 5...

Page 90: ...data to be used from the USB device onto the main body After completion of copying the data remove the USB device Remove the USB device Put the cover back in place Cautions when using the media Do not wet or touch it with wet hands Fire or electric shock will be caused Do not bend or apply strong force or shock to it Never perform disassembling or remodeling of it Do not put the metal to the conta...

Page 91: ...USB terminal on the IP panel until it will go no further Do not turn the power OFF while the data on the USB flash drive is being accessed USB specifications Conform to USB 1 1 standard Applicable devices 1 Storage devices such as USB memory USB hub FDD and card reader Not applicable devices CD drive DVD drive MO drive tape drive etc Format supported FD floppy disk FAT 12 Others USB memory etc FAT...

Page 92: ...ium before formatting When formatting is performed the inside data are erased In case of re formatting the media be sure to perform it with IP 420 The media formatted with the personal computer cannot be read with IP 420 When two or more media are connected to the sewing machine the medium to be formatted is determined by the predetermined priority order High Low CF TM slot USB device 1 USB device...

Page 93: ...t part becomes dirty failure of contact will be caused Do not touch by hand and control so that dust oil or other foreign material does not adhere to it In addition the inside element is damaged by static electricity or the like So be very careful when handling Performing communication by using the media For handling way of the media read 26 USING COMMUNICATION FUNCTION p 84 ...

Page 94: ...om panel to personal computer server Select the button of communication procedure you desire Select the data No When F is pressed the writing file selection screen is displayed Input the file No of the data you desire to write For the file No input the numerals of the part xxx of VD00xxx vdt of the file name Designation of the pattern No of writing destination can be performed in the same way When...

Page 95: ...is pressed the data communication starts The during communication screen is displayed during communication and the screen returns to the communication screen after the end of communication Do not open the cover during reading the data Data may not be read in H ...

Page 96: ...of media to select plural No Display the writing file selection screen When PLURAL SELECTION button A is pressed the data No plural selection screen is displayed Perform the data No selection Since the list of existing data file numbers is displayed press FILE No button B you desire to write It is possible to invert the selected state of the button with INVERSION button C Determine the data No Whe...

Page 97: ...have ended the data communication are displayed in the during communication screen When performing writing to the pattern No which already exists the overwriting confirmation screen is displayed before writing When performing overwriting press ENTER button F When performing overwriting all without displaying the overwriting confirmation screen press OVERWRITING button G in all cases G F ...

Page 98: ...5 Performing setting of the production control information p 101 3 Information on machine working ratio pitch time machine time and machine speed can be displayed from the working state of the sewing machine Refer to 27 6 Observing the working measurement information p 105 In addition information on plural sewing machines can be controlled by the server when this function is used by connecting SU ...

Page 99: ... up to the replacement is cleared The interval to inform button C of the inspection for each item is displayed at D and the remaining time up to the replacement is displayed at E In addition remaining time up to the replacement can be cleared Display the threading diagram When threading button F displayed in the maintenance inspection information screen is pressed the needle thread threading diagr...

Page 100: ... buttons are displayed Display the maintenance information screen Press maintenance inspection information screen display button B in the information screen For the two buttons displayed in the bottom stage at the time of the maintenance personnel level refer to 36 INFORMATION SCREEN OF THE MAINTENANCE PERSONNEL LEVEL p 138 The same information as that in the normal maintenance inspection informat...

Page 101: ...utted value is determined 27 3 Releasing procedure of the warning When the designated inspection time is reached the warning screen is displayed In case of clearing the inspection time press CLEAR button F The inspection time is cleared and the pop up is closed In case of not clearing the inspection time press CANCEL button G and close the pop up Every time one sewing is completed the warning scre...

Page 102: ...ntrol screen There are two kinds of display ways for the production control screen 27 4 1 When displaying from the information screen Display the information screen When information key A of the switch seat section is pressed in the data input screen the information screen is displayed Display the production control screen Press production control screen display button B in the information screen ...

Page 103: ... target of products is displayed Input the number of pieces referring to 27 5 Performing setting of the production control information p 101 D Pitch time Time second required for one process is displayed Input the time unit second referring to 27 5 Performing setting of the production control information p 101 E Number of times of thread trimming Number of times of thread trimming per process is d...

Page 104: ...ressed in the data input screen the sewing screen is displayed Display the production control screen When information key B of the switch seat section is pressed in the sewing screen the production control screen is displayed The contents and functions are common to 27 4 1 When displaying from the information screen p 98 A B ...

Page 105: ...e production control information p 98 Input the final target value First input the number of pieces of the target of production in the process to which sewing is performed from now on When final target value button C is pressed the final target value input screen is displayed Input the value you desire with TEN keys or keys O After the input press ENTER button F F C D E O ...

Page 106: ...ber of times of thread trimming Next input the number of times of thread trimming per process When number of times of thread trimming button E in the previous page is pressed the number of times of thread trimming input screen is displayed Input the value you desire with TEN keys or keys O After inputting press ENTER button H When the input value is 0 count of the number of times of thread trimmin...

Page 107: ...rol screen referring to 27 4 Observing the production control information p 98 When the count is being performed STOP button J is displayed When STOP button J is pressed the count is stopped After the stop START button is displayed at the position of STOP button When continuing the count press START button again The counted value is not cleared until CLEAR button K is pressed J I K ...

Page 108: ...K The value to be cleared is the present target value L and actual results value M only When CLEAR button N is pressed in the clear confirmation screen the counted value is cleared K N L M CLEAR button K is displayed only in case of stop state When CLEAR button K is pressed the clear confirmation screen is displayed ...

Page 109: ...n When information key A of the switch seat section is pressed in the data input screen the information screen is displayed Display the working measurement screen Press working measurement screen display button B in the information screen The working measurement screen is displayed B A ...

Page 110: ...ly displays the machine time from the time of starting the measurement E Number of times of thread trimming is displayed Input the number of times referring to the next step The number of times of thread trimming When number of times of thread trimming button E in the previous page is pressed the number of times of thread trimming input screen is displayed Input the value you desire with TEN keys ...

Page 111: ...erving the working measurement information p 105 When the measurement is being performed STOP button H is displayed When STOP button H is pressed the measurement is stopped After the stop START button is displayed at the position of STOP button In case of continuing the measurement press again START button The measured value is not cleared until CLEAR button is pressed I G H I ...

Page 112: ...unt to the stop state and press CLEAR button I When CLEAR button I is pressed the clear confirmation screen is displayed When CLEAR button J is pressed in the clear confirmation screen the counted value is cleared CLEAR button I is displayed only in case of stop state J I ...

Page 113: ...e trial sewing data from PM 1 When the trial sewing data vector format data is transmitted from PM 1 the screen on the right side is displayed and the needle entry diagram of the transmitted data is displayed in the center of the screen The display color of the needle entry diagram is different according to the thread tension value Edit the vector parameter For the vector format data transmitted f...

Page 114: ...ng buttons A through C is pressed ten keys are displayed Input the value you desire After inputting press ENTER button D Perform trial sewing When READY key E in the previous page is pressed the trial sewing screen is displayed Trial sewing can be performed in this state D C A B ...

Page 115: ... F and the register screen is displayed Input the users pattern No you desire to register with ten keys G Display the data input screen After the register the data input screen is automatically displayed Determine the register of data When ENTER button H is pressed the register screen is closed and the register is finished H F G ...

Page 116: ...hread tension value which is set to the needle entry point The color displayed according to the thread tension is as described below Thread tension value Display color 0 to 20 Gray 21 to 40 Purple 41 to 60 Blue 61 to 80 Light blue 81 to 100 Green 101 to 120 Yellow green 121 to 140 Orange 141 to 160 Red 161 to 180 Pink 181 to 200 Black ...

Page 117: ...erns which have been registered are displayed on the standard pattern selection screen When UP DOWN SCROLL button B is pressed the page is changed over Every time STANDARD PATTERN button C is pressed the normal state and the reverse state alternate with each other In case of the normal state reading is disapproved and in case of the reverse state reading is approved However in case of the standard...

Page 118: ...IGIN ADJUSTMENT button A is displayed When this button is pressed the presser origin adjustment screen is displayed Perform the adjustment of the presser origin Perform the origin retrieval with the start switch When CANCEL button B is pressed the presser origin adjustment screen is closed and the mode screen is displayed A B ...

Page 119: ...own the key lock setting screen is displayed The existing setting status is displayed on the key lock button Key lock non setting status Key lock setting status A B C In the case the DIP switch 1 1 on the MAIN PCB is in the OFF state the key lock button is not displayed on the mode screen Select the key lock status and determine Select KEY LOCK STATUS button B in the key lock setting screen and pr...

Page 120: ... When the mode screen is closed and the data input screen is displayed pictograph C showing the key lock status is displayed on the right side of the pattern No display In addition only the buttons which can be used even in the key lock status are displayed C C ...

Page 121: ...ils display screen When DETAILS SCREEN DISPLAY button F is pressed the details screen of the panel program is displayed B Version information on panel program C Version information on main program D Version information on main shaft program When CANCEL button E is pressed the version information screen is closed and the mode screen is displayed G Module name H RVL I Check sum When CANCEL button J ...

Page 122: ...ECK PROGRAM 34 1 To display the check program screen When key is held pressed for three seconds CHECK PROGRAM button A is displayed on the screen When this button is pressed down the check program screen is displayed A ...

Page 123: ...otor check p 127 Output check Refer to 34 6 Performing output check p 128 Adjusting X Y origins Refer to 34 7 Performing X Y motors origin sensors check p 130 Adjusting presser and thread trimmer Refer to 34 8 Performing presser thread trimmer motor origin sensor check p 131 Adjusting thread clamp Refer to 34 9 Performing thread clamp motor origin sensor check p 132 Continuous operation Refer to 3...

Page 124: ...n If it is not necessary to correct the touch panel press cancel button I to return to the check program screen Checking the correction on the touch panel correction confirmation screen The touch panel correction confirmation screen is displayed Respectively press the correction marks D E F and G displayed on the four corners of the screen Then display H will change as described below When pressin...

Page 125: ...s CANCEL button I Press the lower position on the right side Press red circle E located on the lower right side in the screen When ending the compensation press CANCEL button I Press the upper position on the left side Press red circle F located on the upper left side in the screen When ending the compensation press CANCEL button I I I D E I F ...

Page 126: ...CEL button I Store data When the four points have been pressed the compensation data are stored and the screen showing power OFF K forbidden is displayed Do not turn OFF the power while this screen K is displayed When the power is turned OFF the compensated data are not stored When storing ends the check program screen is automatically displayed I G K ...

Page 127: ...n the LCD check screen is displayed Check whether there is any dot omission of LCD For the LCD check screen the screen is displayed with one color only Perform checking of LCD When checking has ended press a suitable place in the screen The LCD check screen is closed and the check program screen is displayed A ...

Page 128: ...ensor check screen is displayed Performing sensor check Input status of various sensors can be checked in the sensor check screen Input status of each sensor is shown as B The display of ON status OFF status is as shown below ON status OFF status Press UP DOWN SCROLL button C and display the sensor information you desire to confirm C A B ...

Page 129: ...PSW2 2 DIPSW2 3 DIPSW2 4 Optional start SW Optional presser SW Optional presser 2 SW Pedal SW Pedal input value is displayed Needle upper dead point 5 to 30 Needle lower dead point 185 to 215 Needle lower position 80 to 123 Needle UP position 40 to 62 TG 45 times rotation Feed reference 125 to 155 ...

Page 130: ... sensor Main motor Z phase 0 to 180 Head tilt SW Temporary stop switch Thread breakage detection switch Angle of the needle bar of the sewing machine 0 to 359 Suction nozzle Shorter thread remaining type thread trimmer cylinder switch ...

Page 131: ... rotations of main motor check screen is displayed Rotate main motor and perform checking the observed value Number of rotations can be set with buttons B and C When READY key D is pressed the sewing machine can be rotated with the number of rotations which has been set At this time the number of rotations which has been observed is displayed at E When RESET button F is pressed the sewing machine ...

Page 132: ...hen OUTPUT CHECK button A in the check program screen is pressed the output check screen is displayed Perform output check Output check such as 1901 Material fitting magnet Press OUTPUT CHECK button B Cloth open magnet ON is output while the button is held pressed A B ...

Page 133: ... 129 No Pictograph Description of input 1901 material fitting Operation for BR35 is enabled Operation for BR35 of during sewing Air output 1 Air output 2 Spare solenoid valve Thread waste suction ...

Page 134: ...on the positions of the X and Y motors is displayed on B Press ARROW MARK buttons C and X Y motors are driven by 0 1 mm at a time in the direction A Perform the origin retrieval of X Y motors to both shafts with the start switch The current position is brought to the XY origin by keeping DETERMINE TO ORIGIN button D held pressed for two seconds The information on the X Y positions will be set to z...

Page 135: ...sensor is displayed at the position of C according to the status of presser origin sensor Presser thread trimmer motor is driven by one pulse at a time with and buttons E and D In addition when NORMAL POSITION TRAVEL button F is pressed the presser thread trimmer motor is driven to the normal positions below and the pictograph showing the position is displayed in gray G Presser UP position H Press...

Page 136: ...ead clamp motor is driven by one pulse at a time with and buttons C and D In addition when NORMAL POSITION TRAVEL button I is pressed thread clamp motor is driven to the normal positions below and the pictograph showing the position changes the color E Waiting position front F Thread bend position G Thread clamp position H Retracted position rear side A The positions above are effective after perf...

Page 137: ...g end 0 None 1 Once every 100 times 2 Every time The continuous operation setting is determined by pressing enter button D At this time the sewing machine is set in the continuous operation mode Carrying out the continuous operation Turn ON set ready key E to display the sewing screen In this state the sewing machine starts the continuous operation When the pause switch is pressed the sewing machi...

Page 138: ...RVL 6 digits IXX Program data and display data of panel Main program data MA RVL 6 digits PRG Program data of main Servo program data MT RVL 6 digits PRG Program data of servo File No For the communication screen the level which is normally used and the one which is used by the maintenance personnel are different in the kinds of data to be handled 35 1 Data which are possible to be handled In case...

Page 139: ...t the upper left position is changed to orange color B and the communication screen of the maintenance personnel level is displayed For the operating procedure refer to 26 4 Performing communication p 89 When the adjustment data or the all sewing machine data is selected the display becomes as shown on the 0right hand side and it is not necessary to specify No on the panel side A B ...

Page 140: ... of the maintenance personnel level the data selection screen is displayed Select PANEL PROGRAM DATA B Select the file When FILE SELECTION button C is pressed in the communication screen the file selection screen is displayed Press FILE RETRIEVAL button D select DOWNLOAD PROGRAM E and press ENTER button F B C E A F D ...

Page 141: ...rmality screen is displayed quickly turn OFF the power and perform setup again after confirming Confirmation items below Confirmation items 1 Media cover is opened during data communication from the media 2 Data of the media is not correct 3 Contact part of the media is dirty Defective contact End screen Data writing abnormality screen Do not perform cut off of the power and closing opening of the...

Page 142: ...roximately three seconds in the data input screen the information screen of the maintenance personnel level is displayed In case of the maintenance personnel level the pictograph located at the upper left position changes from blue color to orange color and 5 buttons are displayed Display the error record screen Press ERROR RECORD SCREEN DISPLAY button B in the information screen The error record ...

Page 143: ...of error When CANCEL button G is pressed the error record screen is closed and the information screen is displayed Display the details of error When you desire to know the details of error press ERROR button F you desire to know The error detail screen is displayed Pictograph H and description of error I corresponding to the error code are displayed in the details of error screen Refer to 24 ERROR...

Page 144: ... cumulative working information screen Press CUMULATIVE WORKING INFORMATION SCREEN DISPLAY button A of the information screen The cumulative working information screen is displayed Information on the following 4 items are displayed in the cumulative working information screen B Cumulative working time hour of the sewing machine is displayed C Number of cumulative times of thread trimming is displa...

Reviews: