


– 67 –
3
lowering the work clamp foot by means of the start switch
In this mode, the sewing machine will not start even if
you press the start switch.
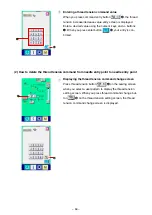
1
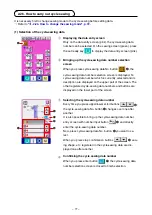
Displaying the sewing screen
Brng up the data entry screen (lght blue). When you press the
set ready key
, the background color of the LCD changes
from blue to green. On ths screen, sewng s enabled.
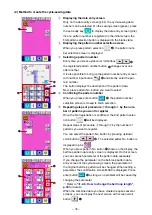
2-21. How to check the sewing shape
4
Performing jump sewing with the work clamp foot lowered
Check the sewng shape by means of the work clamp foot back-
ward button
B
and work clamp foot forward button
C
.
When you keep ether button held pressed, the work clamp foot
keeps moving even if you release your finger from the button.
When you want to stop the work clamp foot, press stop button
F
When you press "move to ntal poston" button
E
,
the screen s closed and the LK unt sewng screen s dsplayed.
B
E
F
C
D
If you press the work clamp foot forward/backward
button with the needle bar lowered, the work clamp
foot will automatically lift the needle bar to its upper
position before moving. Be careful.
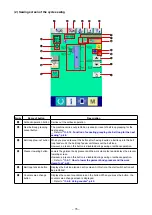
2
Displaying the machine-head jump step sewing screen
When you press step sewng button
A
, the machne-
head jump step sewng screen s dsplayed.
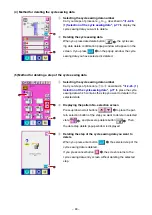
5
Finishing checking the sewing shape
When you press cancel button
D
, the screen returns to
the sewng screen.
cAutIon
:
After the pattern selection, be sure to check the shape of the sewing pattern you have
selected at all times. If the pattern size is larger than the work clamp foot, the needle can
interfere with the work clamp foot during sewing resulting in needle breakage.
A


