4
INSTALLATION INSTRUCTIONS
IMPORTANT NOTICE
Before installing this product, make sure it
complies with your request and that it suits
your application!
•
Do not install in direct sunlight
•
Clean strainer periodically
1. Unpack the unit and visually inspect for any
transport damage incurred after leaving our
factory.
2. Depressurise the system before installation or maintenance is carried out!
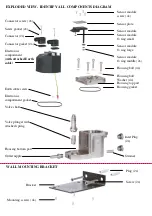
3. We strongly recommend to use the wall
mounting bracket to avoid damaging the unit
by strong vibrations. Fix the mounting bracket
against a wall or structure before installing the
KAPTIV-CS-HP-S. Use the supplied screws
and plugs.
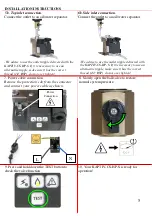
5a. Top inlet connection.
If you choose to use the top inlet, please locate
a suitable condensate draining point on your
compressed air system and connect your
KAPTIV-CS-HP-S as illustrated.
-We strongly recommend to use flexible tubing to
avoid damaging the unit by strong vibrations
caused by the compressor.
-The use of a ball valve is advisable.
4. Use the four mounting screws to secure the
KAPTIV-CS-HP-S to the mounting bracket.
6a. Side inlet connection.
If you choose to use the side inlet, locate a
suitable condensate draining point on your
compressed air system and connect your
KAPTIV-CS-HP-S as illustrated below.
- We strongly recommend to use flexible tubing to
avoid damaging the unit by strong vibrations
caused by the compressor.
-The use of a ball valve is advisable.
-The use of a venting line may be required.


