DHBPS
– Rev. C – 15 October 2019
800-543-4149
507-342-5169
Page 1 of 2
JonTi-Craft, Inc.
171 Hwy 68
P.O. Box 30
Wabasso, MN 56293
WARNING:
CHOKING HAZARD/SHARP POINTS- Assembly
hardware contains small parts and components
with sharp points.
Adult assembly required.
Hardware Illustrations
Not Actual Size
Tools Required:
-Medium Phillips
Screwdriver
-4mm Hex Wrench
(Provided)
Instructions for:
2429JC & 2439JC Kitchen Stove
Hardware Package
HBPS
Qty.
Description
(2)
XBHD
1-9/16” Decorative Screw
(1)
XCOR
Restraint Kit
(1)
XFIG
#8 Flat Washer
(1)
XAUS
4mm Hex Wrench
Assembly Instructions:
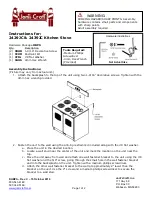
(Picture may vary from actual unit.)
1.
Attach the backsplash to the top of the unit using two 1-9/16” decorative screws. Tighten with the
4mm hex wrench provided.
2.
Fasten the unit to the wall using the anti-tip restraint kit included along with the #8 flat washer.
a.
Place the unit in the desired location.
b.
Locate a wall stud near the center of the unit and mark the location on the unit near the
top.
c.
Move the unit away from wall and attach one wall fastener bracket to the unit using the #8
flat washer and the 5/8” screw, going through the small hole in the wall fastener bracket
and into the backsplash on the unit. Tighten with a medium phillips screwdriver.
d.
Attach the other wall fastener bracket to the wall at approximately 2” lower than the
bracket on the unit. Use the 2” screw and a medium phillips screwdriver to secure the
bracket to a wall stud.


