background image

 JS1 Jet Sustainer Flight Manual Supplement - Issue 1 

Date of issue: 31.03.2016 


Accepted section


Page 5–23   

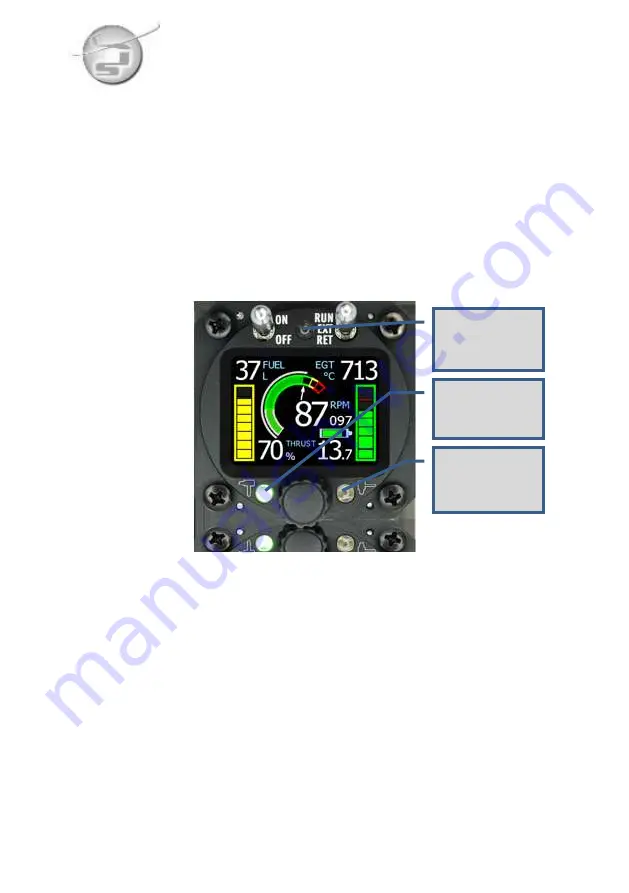
5. Engine status and information display 

Information is displayed to the pilot on the Jet Display Unit (JDU). 

5.1.  Status Indicators  

Power-plant status is indicated by coloured LEDs above and below 
the screen, as illustrated in 

Error! Reference source not found.

 as 

follows: 


Figure 5-1: Status indicators 


Engine 

retraction 

System 

Status 

Engine 

extension 

error 

Summary of Contents for JS1 Series

Page 1: ...JS1 Jet Sustainer Flight Manual Supplement Issue 1 Date of issue 01 04 2016 Accepted section Page 0 0...

Page 2: ...ment Model JS1 with TJ 42 sustainer engine Serial number Registration Number Document number 1A 5 04 50 Title JS1 Jet Sustainer Flight Manual Supplement Date of issue 01 04 2016 Prepared by Name J S U...

Page 3: ...present manual except actual weighing data must be recorded in the following table and in the case of approved Sections specifically endorsed by the Agency New or amended text in the revised page s wi...

Page 4: ...ht Manual Supplement Issue 1 Date of issue 01 04 2016 Accepted section Page 0 3 Rev No Affected Section Affected Pages Date of Issue Description Approved by Date of Approval Date of Insertion Signatur...

Page 5: ...t Manual Supplement Issue 1 Date of issue 01 04 2016 Accepted section Page 0 4 0 2 List of effective pages Affected Date of Affected Date of Affected Date of Affected Date of Pages Issue Pages Issue P...

Page 6: ...imits 2 5 2 3 Airspeed indicator markings 2 6 2 4 Power plant fuel and oil 2 7 2 5 Power plant instrument markings 2 8 2 6 Power plant limitations 2 9 2 7 Approved manoeuvres 2 10 2 8 Kinds of operati...

Page 7: ...ne status and information display 5 23 5 1 Status Indicators 5 23 5 2 Error messages 5 31 6 Performance 6 2 6 1 Engine performance 6 2 6 2 Flight performance 6 3 7 System description 7 1 7 1 Kinematic...

Page 8: ...Engine Shut down procedure placard 2 14 Figure 4 1 JDU primary controls 4 1 Figure 4 2 Modes Overview 4 3 Figure 5 1 Status indicators 5 23 Figure 5 2 Display 5 25 Figure 6 1 Static thrust and fuel c...

Page 9: ...2 4 Engine technical data 2 9 Table 4 1 Throttle settings and thrust 4 6 Table 5 1 Status indicators description 5 24 Table 5 2 RPM limitations display 5 26 Table 5 3 Temperature limitations display...

Page 10: ...ge 0 9 LIST OF ABBREVIATIONS ECU Electronic Control Unit EGT Exhaust Gas Temperature JDU Jet Display Unit JS Jonker Sailplanes OAT Outside Air Temperature RPM Revolutions Per Minute L H Liters Per Hou...

Page 11: ...ent operation of the JS1 sailplanes equipped with jet sustainer system 1 2 Certification basis The JS1 fitted with the turbine jet engine is simply a sustainer version of the pure sailplane A jet syst...

Page 12: ...y CAUTION means that the non observation of the corresponding procedure leads to a minor or to a more or less long term degradation of the flight safety NOTE draws the attention on any special item no...

Page 13: ...d 38 daN Consumption at maximum rotary speed 60 kg h Specific consumption at maximum RPM 0 161 kg Nh Thrust at idle speed 1 8 kgf Consumption at idle speed 7 47 kg h Air consumption 0 5 m3 s Compressi...

Page 14: ...JS1 Jet Sustainer Flight Manual Supplement Issue 1 Date of issue 31 03 2016 Accepted section Page 1 4 1 6 Engine system illustration Figure 1 1 Jet system illustration...

Page 15: ...e systems The limitations included in this section have been approved by the SACAA 2 2 Airspeed limits Speed limitations and their operational significance are shown below Speed IAS Remarks 18 m 21 m...

Page 16: ...n Page 2 6 2 3 Airspeed indicator markings The airspeed indicator requires the following additional markings when fitted with the jet turbine Marking IAS Significance 18 m 21 m Blue line _ 135 km h 73...

Page 17: ...n Page 2 7 2 4 Power plant fuel and oil Table 2 3 gives the power plant fuel and oil information Engine technical data Fuel Diesel mixed with 2 2 stroke oil Oil 2 stroke oil Castrol Super TT or Castro...

Page 18: ...strument markings The following information is displayed to the pilot on the Jet Display Unit JDU RPM Throttle setting EGT Fuel quantity Battery voltage Fuel flow Engine status Error messages Refer to...

Page 19: ...pted section Page 2 9 2 6 Power plant limitations Parameter Limitation Max Engine RPM 97 000 RPM Max Continuous RPM 80 000 RPM Max continuous EGT 790 C Minimum operational outside air temperature 15 C...

Page 20: ...llowing aerobatic manoeuvres are permitted 18 m configuration only Lazy Eight Chandelle Steep turns Positive loops Stall turns Spins Refer to the Aircraft Flight Manual Section 4 5 10 for the recommen...

Page 21: ...nd for maintenance purposes only 2 8 3 Self launch Self launch with the jet sustainer is not approved 2 8 4 Approach and landing Approaches and landing with the jet sustainer running is not approved N...

Page 22: ...with the engine running Flights in conditions below 15 C are prohibited When the outside air temperature is less than 15 C a descent to lower altitudes higher temperatures must be conducted or the eng...

Page 23: ...d section Page 2 13 2 12 Limitations and jet system operation placards The limitation placard for the operation of the Jet System is listed below This placard is positioned on the left hand side of th...

Page 24: ...JS1 Jet Sustainer Flight Manual Supplement Issue 1 Date of issue 31 03 2016 Accepted section Page 2 14 Figure 2 3 Engine Start up procedure placard Figure 2 4 Engine Shut down procedure placard...

Page 25: ...ed Procedure to restart engine in flight 1 Restore normal flight attitude and stabilize airspeed at a safe flying speed 100km h 54 kts to 120km h 65 kts 2 Ensure that the fuel shut off valve is open a...

Page 26: ...ction Page 3 16 NOTE If no action is taken after an engine failure the engine will be automatically cooled down provided that the electrical supply is sufficient CAUTION After an engine failure the no...

Page 27: ...ne is burnt 3 If engine EGTs are within normal range operation can continue normally 4 If EGTs seem to be too high the engine should be shut down by closing the fuel valve in the cockpit 5 Do not retr...

Page 28: ...te action is required 1 Close the fuel valve in the cockpit 2 If the engine is not fully extended and the engine bay doors are open extend engine immediately to close the bay doors by moving the Jet C...

Page 29: ...not running 1 Close the fuel valve 2 Leave the Jet Control toggle switch in RUN position until engine stops 3 Move the Jet Control toggle switch to EXT position Do not retract engine 4 Observe the EGT...

Page 30: ...coming from the instrument panel take the following action 1 Switch off the master switch supplying the circuits 2 If a circuit breaker pops reset once only This is most probably the faulty circuit 3...

Page 31: ...primary Controls The JDU has 3 primary controls Jet Master Switch OFF ON Jet Control toggle switch RETR EXT RUN Jet Thrust Dial Figure 4 1 JDU primary controls The Jet Master switch is a 2 position O...

Page 32: ...l combined with a push button The rotating dial is used to adjust the throttle setting and to enter information in the settings and configuration mode The Jet Thrust Dial is used as follows in the set...

Page 33: ...n Page 4 3 4 2 Modes overview The main operating modes for the jet sustainer are selected using the JDU Jet Control toggle switch The primary modes are Retracted mode Extended mode Run mode RUN mode E...

Page 34: ...ctable by the pilot are Starting Extending Retracting Cooling 4 3 Primary Modes 4 3 1 Retracted Mode The retracted mode is selected by moving the Jet Control toggle switch to the bottom position The p...

Page 35: ...ended mode the RUN screen can be displayed on the JDU by pressing the Thrust Control Dial This allows the pilot to familiarize himself with the Jet screen in the run mode without having to actually st...

Page 36: ...eases the thrust and anti clockwise decreases the thrust During Normal Operation the Status LED the top LED will be constant green The thrust control dial is programmed for 18 different speed settings...

Page 37: ...practice to advance the RPM slowly At higher density altitudes a flameout may occur if the throttle is advanced rapidly from idle To shut down the turbine engine the Jet Control toggle switch is move...

Page 38: ...ransition from the current mode to the newly selected mode The following main transition modes are explained Extending Starting Cooling Retracting 4 4 1 Extending Extending is initiated when the Jet e...

Page 39: ...ine to main fuel supply line Starter motor is disengaged ECU ramps engine up to idle RPM 30 000 During Start Mode the Status LED the top LED will be flashing green CAUTION Do not advance the throttle...

Page 40: ...R bottom position after the engine was running During this mode the starter motor will be turning the compressor to facilitate the correct cooling down of the engine The JDU will display the pylon in...

Page 41: ...R bottom position and the temperature EGT is below a pre set threshold If the measured EGT exceeds the maximum set temperature factory default is 55 C or 131 F the system will remain in the Cooling Mo...

Page 42: ...em returns to normal operation The pilot can only increase the power after normal operation has been restored 4 5 2 Over temperature protection If the measured EGT exceeds the normal operation EGT lim...

Page 43: ...the left hand side of the cockpit is in the OPEN forward position 2 Move the Jet Master Switch on the JDU to the ON position 3 Maintain a safe airspeed 100km h 54 kts to 120km h 65 kts 4 Move the Jet...

Page 44: ...OTE The time duration from initiating extension to idle power is approximately 40 seconds NOTE If a start was unsuccessful or the engine stops running in RUN mode a restart can be initiated by cycling...

Page 45: ...ntain a safe airspeed below VPE 140km h or 76 kts 2 Allow the temperatures to stabilise for at least 30 seconds 3 Switch the Jet Control toggle switch to the RETR position 4 Close the fuel valve this...

Page 46: ...creen The Settings Screen is selected by pressing and holding the Thrust Control Dial The maintenance mode option is visible by scrolling down on the menu The maintenance mode can be used to set the p...

Page 47: ...that the Jet blast will not cause damage or irritation to property aircraft or people Position the nose of the aircraft into the wind Crosswinds may vector the hot exhaust gasses onto the fin Securin...

Page 48: ...all Jet running tests WARNING Do not touch the engine or have any object close to the intake or exhaust nozzle during operation NOTE If the fuel supply lines to the engine require bleeding it may tak...

Page 49: ...the main spar If the system is overfilled fuel will dump out of the vent located on the bottom of the fuselage behind the main wheel CAUTION Keep the Jet system powered up while refueling to avoid th...

Page 50: ...N connector As labeled on Refueling Kit The other end of this hose is then connected to the fuel supply source 3 Connect Fuel Hose 2 Quick Connector fitting at both ends to the OUT connector As labele...

Page 51: ...ue 31 03 2016 Accepted section Page 4 21 CAUTION If the vent hole is blocked do not continue refueling Pressure build up could rupture the tanks CAUTION Ensure refueling equipment is kept free of cont...

Page 52: ...eling Reverse flow is achieved by changing the tube connected to the refueling point in the jet box to the IN quick connector and connecting the tube from the OUT connector to an empty container After...

Page 53: ...ormation display Information is displayed to the pilot on the Jet Display Unit JDU 5 1 Status Indicators Power plant status is indicated by coloured LEDs above and below the screen as illustrated in E...

Page 54: ...e in progress Steady amber Caution condition example low fuel Steady red Warning condition Retraction Status Steady green Engine fully retracted Flashing green Engine in retraction process Flashing re...

Page 55: ...on Page 5 25 5 1 1 Display Information is displayed to the pilot on the 50mm colour display screen Figure 5 2 gives the detail of symbols used on the display EGT C EGT bar Battery capacity Battery vol...

Page 56: ...RPM Colour of bar Normal range 30 000 to 97 000 Green Over speed Above 97 000 Red Table 5 2 RPM limitations display 5 1 3 Throttle setting The throttle setting is indicated by the light grey arc on t...

Page 57: ...l Supplement Issue 1 Date of issue 31 03 2016 Accepted section Page 5 27 EGT range EGT Bar Colour Normal range 450 C to 790 C 842 F to 1454 F Green Over temperature Above 790 C 1454 F Red Table 5 3 Te...

Page 58: ...ration The options are Probe Calculations or Both 5 1 6 Probe When Probe is selected both the fuel bar and the quantity text are determined using the input from the fuel probe The fuel bar and quantit...

Page 59: ...The fuel bar and quantity text display may therefore show different values If the fuel level is below the minimum set level the fuel bar is displayed in amber The maximum fuel quantity and low fuel w...

Page 60: ...016 Accepted section Page 5 30 5 1 10 Other information Additional information is displayed on the bottom left of the screen Pressing the Thrust Control Dial cycles the bottom left display window betw...

Page 61: ...ror messages Error messages are displayed on the bottom of the JDU screen 5 2 1 Errors during Starting The following lists the error messages that may occur during start up No Ignition No Idle Speed N...

Page 62: ...a result the start sequence was terminated Possible Causes Fuel valve not open No fuel in fuel tanks No fuel in start or main fuel lines priming required Glow plug not warm enough due to o Battery vol...

Page 63: ...idle RPM after a pre set time interval factory default is 30 seconds As a result the start sequence was terminated Possible Causes Fuel valve not open No fuel in fuel tanks No fuel in start or main f...

Page 64: ...age 5 34 5 2 1 3 Heater No Current Error Description No current was detected after the glow plug was switched on Possible Causes Glow plug fuse blown on the ECU Defective glow plug Wiring defect Pilot...

Page 65: ...Page 5 35 5 2 1 4 Heater Over current Error Description Glow plug exceeded maximum allowed current Possible Causes Defective glow plug Wiring defect Pilot action required Attempt one more start Retra...

Page 66: ...5 2 1 5 Starter Over current Error Description Starter motor exceeded maximum allowable current Possible Causes Defective starter motor Serious engine defect Pilot action required Attempt one more st...

Page 67: ...3 2016 Accepted section Page 5 37 5 2 1 6 Start valve Over current Error Description Start fuel line exceeded maximum allowable current Possible Causes Electrical defect Pilot action required Retract...

Page 68: ...016 Accepted section Page 5 38 5 2 1 7 Fuel valve Over current Error Description Main Fuel line solenoid exceeded maximum allowable current Possible Causes Electrical defect Pilot action required Retr...

Page 69: ...Manual Supplement Issue 1 Date of issue 31 03 2016 Accepted section Page 5 39 5 2 2 Errors during Running The following lists the error messages that may occur during the RUN state Overheat Flameout...

Page 70: ...easured EGT exceeded 850 C 1562 F Possible Causes Defective engine Engine fire Defective RPM sensor causing an engine over speed Incorrect EGT measured Pilot action required Close fuel valve Toggle Je...

Page 71: ...GT dropped below minimum pre set value Possible Causes Fuel starvation Throttle advance too fast after start up Spool up failure at high density altitudes Low battery voltage Incorrect EGT measured Pi...

Page 72: ...e 5 42 5 2 2 3 No RPM Error Description No RPM signal is measured during operation Possible Causes Engine stopped during RUN mode RPM sensor failure RPM EGT sensor board failure Pilot action required...

Page 73: ...43 5 2 2 4 Pump overcurrent Error Description Fuel pump exceeded maximum allowable current Possible Causes Fuel pump failure Blocked or restricted fuel filters Fuel solenoid failure Pilot action requi...

Page 74: ...ement Issue 1 Date of issue 31 03 2016 Accepted section Page 5 44 5 2 3 Other errors The following are error messages not associated specifically with Start or Run modes Kinematic overcurrent Kinemati...

Page 75: ...Description The electromechanical actuator driving the pylon exceeded maximum allowable current Possible Causes Mechanical obstruction in the jet box area Limit switches not set up accurately Damage t...

Page 76: ...Kinematic timeout Error Description The electromechanical actuator driving the pylon did not reach the limit switches within the pre set time duration Possible Causes Mechanical defect in the jet box...

Page 77: ...cepted section Page 5 47 5 2 3 3 No data from ECU Error Description The JDU cannot establish communication with ECU Possible Causes Cable not plugged into the JDU Wiring defect ECU defect possible int...

Page 78: ...ge 5 48 5 2 3 4 No SD Card Error Description The ECU cannot detect the internal SD card Possible Causes Internal SD card is removed from ECU Defective SD card ECU defect Pilot action required Attempt...

Page 79: ...sue 31 03 2016 Accepted section Page 6 2 6 Performance 6 1 Engine performance Error Reference source not found provides an indication of the change in static thrust and fuel consumption versus RPM Fig...

Page 80: ...mum continuous power and glide with engine off and retracted Note The range specified in Table 6 1 applies to both the 18m and 21m configurations In 21m configuration fly 3 less than specified climb a...

Page 81: ...km Total Dist km 85 000 SL 1000 157 0 7 116 91 207 1000 2000 151 0 6 129 86 216 2000 3000 146 0 5 145 81 226 90 000 SL 1000 162 1 0 103 111 214 1000 2000 155 0 9 114 108 222 2000 3000 149 0 8 128 103...

Page 82: ...NM Glide Dist NM Total Dist NM 85 000 SL 3300 85 1 4 63 49 112 3400 6700 82 1 2 70 46 117 6700 10000 79 1 0 78 44 122 90 000 SL 3300 87 1 9 56 60 116 3300 6700 84 1 8 62 58 120 6700 10000 80 1 6 69 56...

Page 83: ...JS1 Jet Sustainer Flight Manual Supplement Issue 1 Date of issue 31 03 2016 Accepted section Page 6 6 Figure 6 2 Expected saw tooth profile flown between 2000 and 3000 meters at 95000 RPM...

Page 84: ...mm Range km h kts km nm 300 m 1000 ft 70000 146 79 01 13 181 98 75000 173 93 01 00 176 95 80000 194 105 00 50 165 89 85000 211 114 00 43 152 82 90000 227 123 00 36 140 76 95000 242 131 00 31 129 70 1...

Page 85: ...imit switches The actuator is controlled by the JDU and is used to operate the front pylon main doors as well as the front finger door The system is described in more detail in this section Figure 7 1...

Page 86: ...n doors is operated by a cam driven bellcrank assembly Two pushrods attached to the bellcrank assembly open and close the main doors The opening and closing cycle of the doors is controlled by a cam f...

Page 87: ...opened and closed by a pushrod and spring attached to the cam Error Reference source not found shows the pylon in the extended raised position with the finger door opened downwards movement into the e...

Page 88: ...tioned above the left main fuel tank The fuel circuit is comprised of aluminum tubing and aluminum aerospace fittings except for portions of the circuit inside the engine box which are flexible hoses...

Page 89: ...tanks Alternatively the fuel drain fitting installed in the rear of the main landing gear wheel box can be used to drain fuel The fuel system is vented by means of a single vent tube running from the...

Page 90: ...JS1 Jet Sustainer Flight Manual Supplement Issue 1 Date of issue 31 03 2016 Accepted section Page 7 6 Figure 7 5 Fuel system layout diagram...

Page 91: ...ughout the glider from this point Three wiring looms connect the ECU to the individual system throughout the glider The Main Loom contains the Glow plug Starter Limit Switches Signal Fuel Panel Power...

Page 92: ...JS1 Jet Sustainer Flight Manual Supplement Issue 1 Date of issue 31 03 2016 Accepted section Page 7 8 Figure 7 6 Schematic layout of electrical system...

Page 93: ...8 Settings The Settings Screen is selected by pressing and holding the Thrust Control Dial The following options are available in the Settings menu Setting fuel and battery Levels Setting operation a...

Page 94: ...ion section to change this configuration The remaining battery capacity can be seen when selecting the Set battery capacity selection box As it is normally not possible to measure the remaining capaci...

Page 95: ...s Optionally the JDU may in future be linked with the instruments that would provide these values in real time The Engine Control Unit ECU logs all engine parameters including the set Altitude and OAT...

Page 96: ...entries The complete logbook is saved on the ECU and accessible by approved maintenance personnel using the Turbine Tool software 8 4 Password The Configurations section is accessible by entering the...

Page 97: ...Trust Dial default or via an external analogue throttle The second option is not available in JS installations In the Throttle start RPM setting the power setting after start can also be selected The...

Page 98: ...m quantity box The default setting for the JS1 is 42l 11 1 gal 8 5 2 3 Max Fuel probe level In case the fuel probe cannot read the full fuel range the Max Fuel probe level can be adjusted This is typi...

Page 99: ...ckets 692d represents the measured fuel level from the fuel probe 0 is empty 1024 is full When rotating the Thrust Control Dial the d value is updated from the fuel probe Calibration of the fuel probe...

Page 100: ...f fuel leaks Extend the engine using maintenance mode and check the following Wiring plugs on right hand side of box attached Fuel tubing on left hand side attached No loose articles in box No signs o...

Page 101: ...pit to test for smooth operation Operation Compare EGT with ambient air temperature when OAT is available Manually spin compressor blade and verify positive RPM indication on JDU If airfield is suitab...

Reviews: