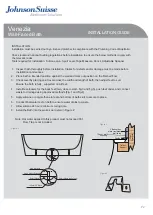
INSTALLATION GUIDE
Venezia
Wall-Faced Bath
1660
1620
1170
800
660
500
20
300
10
580
595
1650
795
15
450
120
JBTV3166
P.1
Page 1: ...INSTALLATION GUIDE Venezia Wall Faced Bath 1660 1620 1170 800 660 500 20 20 300 10 20 580 595 1650 795 15 450 120 800 1660 JBTV3166 P 1 ...
Page 2: ...n adjust feet to suit Ensure the bath is fully supported on all feet 4 Install feet lockers for the back feet two close to wall fig 3 and fig 5 push feet under and connect waste to drainage using approved methods Fig 1 and Fig 4 5 Apply silicone or polyurethane to feet and bottom of bath skirt to secure to place 6 Conduct final water test on bath to ensure water drains to waste 7 Allow silicone 24 ho...
Page 3: ...our towel After polishing wipe with a clean damp microfiber cloth to completely remove excess residue and remove any electrostaticcharges which may attract dust particles Deep scratches can be removed with fine grit wet dry sand paper and buffed to a shine using Ultra Gloss Caution Window cleaning fluids scouring compounds harsh chemical cleaners gritty cloths leaded or ethyl gasoline or strong solven...
Page 4: ...2 6882 2733 F 02 6882 2169 www johnsonsuisse com au WARRANTY INFORMATION This warranty is provided by Bathroom Products Australia Pty Ltd ABN 87 079 297 617 2 97 Banksia St Botany NSW 2019 P 1300 717 717 F 1300 746 480 E bpa warranty johnsonsuisse com au Visit www johnsonsuisse com au to view full warranty terms Our goods come with guarantees that cannot be excluded under the Australian Consumer L...