SECTION
4
- BOO
M
& PLATFOR
M
4-18
3121160
4.7
UPRIGHT
Removal
HYDRAULIC LINES AND PORTS SHOULD BE CAPPED IMMEDIATELY AFTER DIS-
CONNECTING LINES TO AVOID ENTRY OF CONTAMINANTS INTO SYSTEM.
1.
Remove the main boom.
2.
Tag and disconnect hydraulic lines to main boom lift
cylinder. Use a suitable container to collect any residual
hydraulic fluid. Cap hydraulic lines and ports.
3.
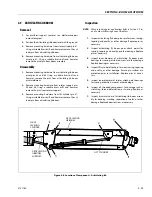
Remove mounting hardware from main boom lift cylin-
der barrel end. Using a suitable brass drift and hammer,
remove pin #1 from upright and remove main boom lift
cylinder.
4.
Disconnect wiring harness to horizontal limit switch.
5.
Upright Level Cylinder Removal.
a.
Using a suitable lifting device, support the upright.
b.
Remove mounting hardware securing hose bracket
in upright, and remove the hose bracket.
c.
Remove mounting hardware from the upright level
cylinder. Using a suitable brass drift and hammer,
remove pin #3 from upright.
d.
Remove Upright Level Cylinder from upright.
6.
Remove mounting hardware from the Upright Pivot Pin
using a suitable brass drift and hammer. Remove pin # 4
from tower boom assembly.
Upright Level Cylinder Removal
1.
With upright removed, override tower telescope limit
switch and extend the tower boom to gain access to the
upright level cylinder barrel end attach pin.
2.
Tag and disconnect hydraulic lines to the upright lift cyl-
inder. Use a suitable container to collect any residual
hydraulic fluid. Cap hydraulic lines and ports.
3.
Using an overhead crane or suitable lifting device, sup-
port the upright lift cylinder, remove mounting hard-
ware from the barrel end of the upright lift cylinder and
remove the pin.
4.
Carefully remove the upright lift cylinder and place on a
suitable work surface.
Installation
NOTE:
Steps 1 through 4 are only necessary if the upright level cyl-
inder is to be removed.
1.
Using a suitable lifting device, carefully install the
upright lift cylinder into place in the tower boom.
2.
Install the pin and mounting hardware at the barrel end
of the upright lift cylinder.
3.
Connect the hydraulic lines to the upright lift cylinder as
tagged during removal.
4.
Override the tower telescope limit switch and retract the
tower boom.
5.
Using an adequate lifting device, install the upright into
position. Install pin #4 into the tower boom assembly
and secure it in place with the mounting hardware.
6.
Connect the Upright Level Cylinder as follows:
a.
Align the holes in the cylinder and upright for pin
#3, and install the pin into the upright and connect
the upright level cylinder to the upright. Install the
mounting hardware securing the pin.
b.
Install the hose bracket and secure in place with the
mounting hardware.
7.
Connect the wiring harness to horizontal limit switch.
8.
Align the holes in the main boom lift cylinder and
upright for pin #1 and install the pin. Secure the pin in
place with the mounting hardware.
9.
Connect the hydraulic lines to the main boom lift cylin-
der as tagged during removal.
10.
Install the main boom. Refer to Section 4.7, Main Boom
Assembly.
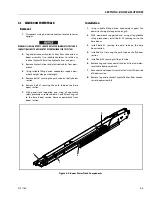
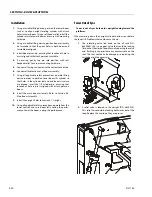
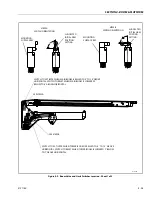
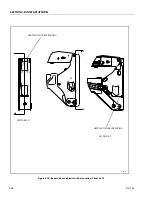
Figure 4-6. Location of Components - Upright
MAIN BOOM
TELESCOPE CYLINDER
UPRIGHT
MAIN BOOM
LIFT CYLINER
UPRIGHT
LEVEL CYINDER
Summary of Contents for 740AJ
Page 2: ......
Page 55: ...SECTION 3 CHASSIS TURNTABLE 3121160 3 3 This page left blank intentionally...
Page 116: ...SECTION 3 CHASSIS TURNTABLE 3 64 3121160 Figure 3 44 Swing Hub Prior to SN 0300074383...
Page 203: ...SECTION 3 CHASSIS TURNTABLE 3121160 3 151 Figure 3 77 EFI Component Location...
Page 206: ...SECTION 3 CHASSIS TURNTABLE 3 154 3121160 Figure 3 78 ECM EPM Identification ECM EPM...
Page 224: ...SECTION 3 CHASSIS TURNTABLE 3 172 3121160 Figure 3 83 Deutz EMR 2 Troubleshooting Flow Chart...
Page 228: ...SECTION 3 CHASSIS TURNTABLE 3 176 3121160 Figure 3 87 EMR 2 Engine Plug Pin Identification...
Page 229: ...SECTION 3 CHASSIS TURNTABLE 3121160 3 177 Figure 3 88 EMR 2 Vehicle Plug Pin Identification...
Page 230: ...SECTION 3 CHASSIS TURNTABLE 3 178 3121160 Figure 3 89 EMR2 Fault Codes Sheet 1 of 5...
Page 231: ...SECTION 3 CHASSIS TURNTABLE 3121160 3 179 Figure 3 90 EMR2 Fault Codes Sheet 2 of 5...
Page 232: ...SECTION 3 CHASSIS TURNTABLE 3 180 3121160 Figure 3 91 EMR2 Fault Codes Sheet 3 of 5...
Page 233: ...SECTION 3 CHASSIS TURNTABLE 3121160 3 181 Figure 3 92 EMR2 Fault Codes Sheet 4 of 5...
Page 234: ...SECTION 3 CHASSIS TURNTABLE 3 182 3121160 Figure 3 93 EMR2 Fault Codes Sheet 5 of 5...
Page 303: ...SECTION 4 BOOM PLATFORM 3121160 4 31 Figure 4 20 Rotator Assembly HELAC...
Page 460: ...SECTION 5 BASIC HYDRAULIC INFORMATION AND SCHEMATICS 5 116 3121160 NOTES...
Page 467: ...SECTION 6 JLG CONTROL SYSTEM 3121160 6 7 Figure 6 2 ADE Block Diagram...
Page 534: ...SECTION 6 JLG CONTROL SYSTEM 6 74 3121160 NOTES...
Page 580: ...SECTION 7 BASIC ELECTRICAL INFORMATION SCHEMATICS 7 46 3121160 NOTES...
Page 581: ......


