background image

70 


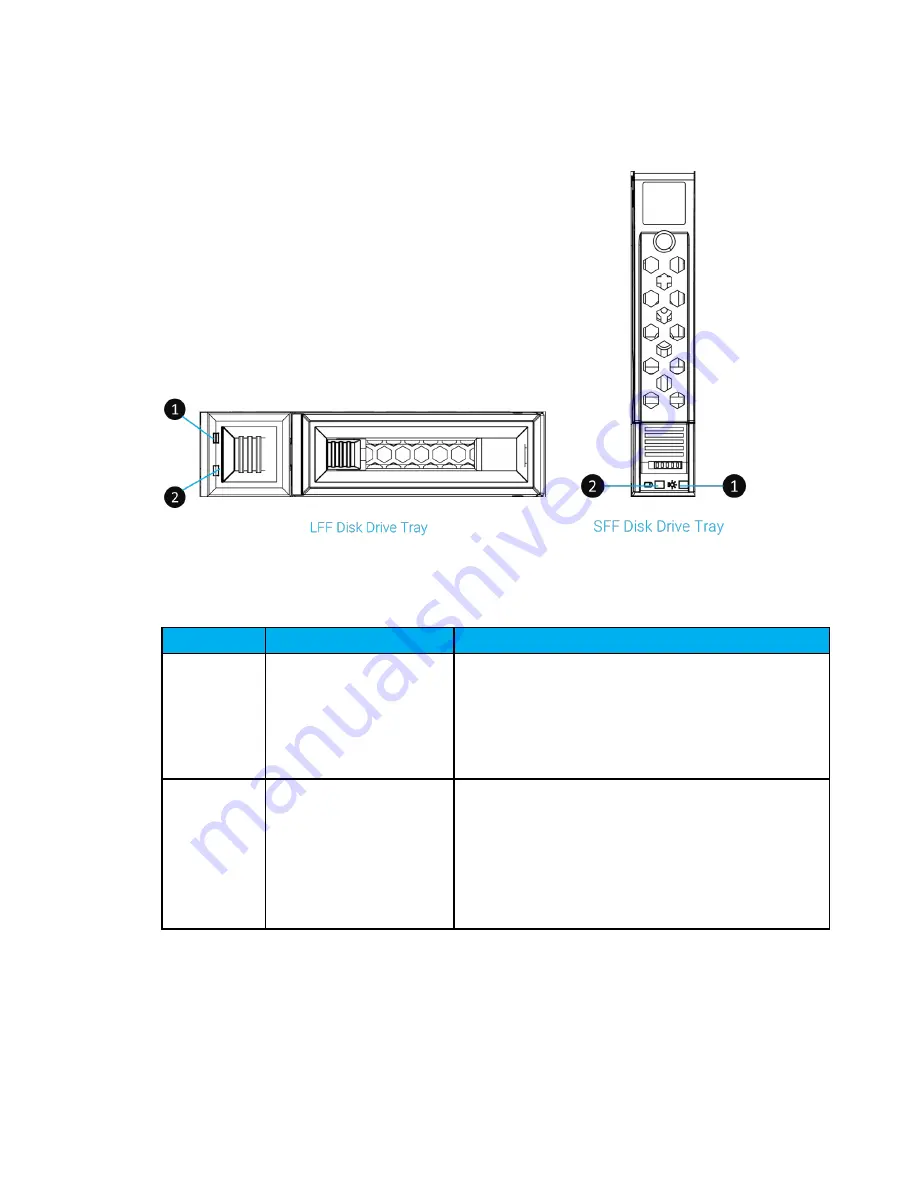
Disk Drive LEDs 

Figure 5-2 

Disk Drive Indicators of LFF & SFF Disk Drive Tray 

Table 5-2 

Descriptions of Disk Drive LEDs 

Number 

Description 

Definition 

Disk Drive Power LED 

Blue

 on: the disk drive is inserted and no 

data access. 

Blue

 blinking: the disk drive is accessing 

data. 

Off: no disk drive is inserted.


Disk Drive Status LED 

Off: the disk drive is healthy. 

Amber

 ON: the disk drive is error. 

Amber

 blinking (interval of 0.5 sec): the disk 

drive is rebuilding. 

Amber

 blinking (interval of 0.05 sec): 

identify the disk drive. 

Summary of Contents for FX Series

Page 1: ...JetStor FX Series Hardware Manual Applicable Models Advanced Computer Network Corp www acnc com 812FX 812FXD 816FX 816FXD 824FX 824FXD 826FXD...

Page 2: ...Corporation in the United States and or other countries Linux is a trademark of Linus Torvalds in the United States and or other countries UNIX is a registered trademark of The Open Group in the Unit...

Page 3: ...SV Storage System 2U 19 Rack Mount Models Model Name Controller Type Form Factor Bay Count and Rack Unit Dual Controller LFF 12 disk 2U Chassis Single Controller LFF 12 disk 2U Chassis YEP Controller...

Page 4: ...ent This information contains examples of data and reports used in daily business operations To illustrate them as completely as possible the examples include the names of individuals companies brands...

Page 5: ...oading Mounting of the equipment in the rack should be such that a hazardous condition is not achieved due to uneven mechanical loading 4 Circuit Overloading Careful consideration should be given to t...

Page 6: ...127 Vac 50 60Hz 10 0A 200 240 Vac 50 60Hz 5 0A CAUTION English Risk of explosion if battery is replaced by incorrect type Please replace the same or equivalent type battery use and dispose of used bat...

Page 7: ...nd peripheral product s 3 years limited warranty from date of original purchase Battery Backup Module or super capacitor module applies for cache to flash module 1 year limited warranty from date of o...

Page 8: ...Disk Drive Numbering 12 2 3 Supported Disk Drives and SSDs 13 2 4 Rear Panel 14 2 4 1 Rear Panel Layout 14 2 4 2 Controller Module 15 2 5 Power Supply Unit 17 2 6 Fan Module 19 2 7 Cache to Flash Memo...

Page 9: ...tion Rules 57 4 2 2 Multiple Path MPIO Deployment 58 4 2 3 Single Path Deployment 61 4 2 4 Multi server Attached Cabling 62 4 2 5 Introduction of Remote Replication 64 5 LED Descriptions 68 5 1 Front...

Page 10: ...Drive Trays 26 Figure 3 2 Unlock and Open the Carrier Handle of a Disk Drive Tray LFF 27 Figure 3 3 Unlock and Open the Carrier Handle of a Disk Drive Tray SFF 27 Figure 3 4 Hold the Carrier Handle an...

Page 11: ...AS Systems Multiple Path Cabling 60 Figure 4 4 One Server One HBA Ten DAS Systems Multiple Path Cabling 61 Figure 4 5 One Server One HBA Single Path Cabling 61 Figure 4 6 One Server One HBA One DAS Sy...

Page 12: ...85 Figure 6 17 Example of a Failed Port on the 10GbE iSCSI Host Card 86 Figure 6 18 Procedures of Removing the Host Card from the Controller Cage 87 Figure 6 19 Procedures of Pull out the Host Card a...

Page 13: ...h Module 22 Table 2 12 Maximum System Memory Protection by Different Power Module Type 24 Table 3 1 Installation Checklist 25 Table 3 2 Front Side Components of LFF SFF Disk Drive Trays 26 Table 3 3 L...

Page 14: ...works network administration storage system installation and configuration storage area network management and relevant protocols CAUTION Do NOT attempt to service change disassemble or upgrade the eq...

Page 15: ...provides useful knowledge definition or terminology for reference TIP TIP provides helpful suggestions for performing tasks more effectively CAUTION CAUTION indicates that failure to take a specified...

Page 16: ...target file square brackets Indicates optional values Example a b indicates that you can choose a b or nothing braces Indicates required or expected values Example a b indicates that you must choose...

Page 17: ...rear panel redundant power supply and fan modules cache to flash module by using battery backup module or super capacitor module and expansion slots for optional Fibre Channel or 10GbE 1GbE iSCSI host...

Page 18: ...19 Rack Mount Models Model Name Controller Type Form Factor Bay Count and Rack Unit 824FXD Dual Controller LFF 24 bay 4U Chassis 824FX Single Controller LFF 24 bay 4U Chassis Table 1 2 FX Series Stor...

Page 19: ...pacity DDR4 8GB for 826FXD and DDR4 4GB for 812FX D 816FX D and 824FX D Maximum system memory capacity 64GB per controller four DDR4 16GB SAS 3 0 backplane board Built in two 10GbE iSCSI ports per con...

Page 20: ...1 4 826FXD Hardware Specifications Model name 826FXD dual RAID Controller Dual active controller Host Connectivity per Controller Built in 2 x 10GBASE T iSCSI RJ45 ports Built in 1 x 1GbE management...

Page 21: ...Units of Expansion Enclosures 10 units Max of drives 446 Form Factor 2U 26 bay Dimension H x W x D 19 Rack mount 88 x 438 x 491 mm LCM USB LCM module optional Power Supply 80 PLUS Platinum 1 1 redund...

Page 22: ...rts 1 Slot 2 provides 20Gb bandwidth Processor Intel D1500 family 4 core processor Memory per controller DDR4 ECC 4GB up to 64GB four DIMM slots Disk Drive Interface Native 12Gb SAS backplane 3 5 SAS...

Page 23: ...0 to 40 C Shipping temperature 10 C to 50 C Relative Humidity Operating Relative Humidity 20 to 80 non condensing Non Operating Relative Humidity 10 to 90 1 4 FX Series Optional Components Following...

Page 24: ...10GSFP GBIC Transceiver 8Gb SFP model name GBC 08GSFP HDD Tray and MUX Board 3 5 disk drive tray model name HDT 351 MUX board with bracket for 3 5 disk drive tray model name HDM 351 2 5 disk drive tr...

Page 25: ...mbering Supported Disk Drives and SSDs Rear Panel Power Unit Fan Module Cache to Flash Module 2 1 Front Panel The JetStor FX Series features a unique design the system controls and indicators is locat...

Page 26: ...ons of System Controls and Indicators Number Description 1 System Power Button LED 2 UID Unique Identifier Button LED 3 System Access LED 4 System Status LED 5 USB Port for USB LCM module Figures and...

Page 27: ...er Description 1 System Left Ear 2 Disk Drive Tray 3 System Right Ear 4 The System Controls and Indicators Disk Drive Tray Indicators figures and the table below illustrate LFF and SFF disk drive tray...

Page 28: ...ing for LFF system starts from the top of first row in left column this kind of disk drive numbering rule helps to balance the system weight distribution and enable easy management of disk drives zoni...

Page 29: ...AS HDDs or SAS SATA SSDs from the market to suit your budget performance We hope that this will significantly reduce your IT infrastructure investment cost If you want to check the compatible HDDs or...

Page 30: ...of the JetStor FX series rear panel and components In this section you will learn the name and location of the key components and modules in the rear panel 2 4 1 Rear Panel Layout Figures and the tabl...

Page 31: ...or Cache to Flash Module Flash Module 4 Controller Module 1 5 Controller Module 2 6 Fan Module 2 7 Power Supply Unit 2 8 Slot for Cache to Flash Module Power Module 2 4 2 Controller Module The followi...

Page 32: ...ler Module Table 2 6 Description of the Controller Module Components Number Description 1 Host Card Slot 1 host card is an optional part 2 Buzzer Mute Button 3 Host Card Slot 2 host card is an optiona...

Page 33: ...ect the system to the UPS via the included cable for communication The cable plugs into the serial cable that comes with the UPS Then set up the shutdown values for when the power goes out For a great...

Page 34: ...18 Figure 2 8 Location of the Power Supply Unit in the LFF or SFF System Table 2 7 Location of the Power Supply Unit in the LFF or SFF System Number Description 1 PSU 1 2 PSU 2...

Page 35: ...nd behavior of the PSU LED please refer to the chapter 5 2 Rear Panel LEDs section in the LED Descriptions chapter 2 6 Fan Module All JetStor FX series models are equipped with two redundant and hot s...

Page 36: ...Figure 2 10 Location of Each Fan Module Installed in the LFF or SFF System Table 2 9 Location of Each Fan Module Installed in the LFF or SFF System Number Description 1 Fan 1 and Fan 2 2 Fan 3 and Fan...

Page 37: ...he I O cache data stored in the volatile memory will be lost this can cause data inconsistency especially in database applications The JetStor FX series can provide an optional Cache to Flash memory p...

Page 38: ...22 Figure 2 12 Location of the Cache to Flash Module Table 2 11 Location of the Cache to Flash Module Number Description 1 Slot for Flash Module 2 Slot for Power Module...

Page 39: ...ge is the working sequence of Cache to Flash workflow Figure 2 15 Cache to Flash Workflow Cache to Flash technology will first flush CPU cache to memory RAM then flush memory RAM to M 2 flash module t...

Page 40: ...flash module and either a BBM or a SCM All modules are hot pluggable with zero system downtime for extra availability and reliability M 2 flash module can be plugged in on the left hand side from the...

Page 41: ...e 1 Install the disk drive in the tray Chapter 3 2 2 Installing the optional host cards Chapter 3 3 3 Installing the optional cache to flash module Chapter 3 5 4 Installing the optional rail kit Chapt...

Page 42: ...ck disk drive trays before starting to install drives into the system chassis The following content is the detailed steps for removing a disk drive tray from the system Unlock release button lock shif...

Page 43: ...ck and Open the Carrier Handle of a Disk Drive Tray SFF The following content is the procedure for removing disk drive trays from the system Hold the carrier handle and pull the disk drive tray out un...

Page 44: ...28 Figure 3 4 Hold the Carrier Handle and Pull out the Disk Drive Tray LFF Figure 3 5 Hold the Carrier Handle and Pull out the Disk Drive Tray SFF...

Page 45: ...disk drive tray screw holes located on both sides of the hard drive Install and tighten all four screws to secure the disk drive within the tray Figure 3 6 Align the Disk Drive Install into the Tray...

Page 46: ...ng a SFF disk drive into the SFF tray Place a disk drive tray onto a stable surface Remove the supporting bracket Then align the disk drive with the connector facing away from the carrier handle Align...

Page 47: ...le below shows the available host card type model name and description Table 3 3 List of Available Host Cards for JetStor FX Series Host Card Type Model Name Description 16Gb Fibre Channel HQ 16F4S2 F...

Page 48: ...ed Installing Location and Combination of Host Cards Connection Type Model Type Controller Number Slot 1 Slot 2 FC SAN Single Controller CTRL 1 HQ 16F4S2 N A N A Dual Controller CTRL 1 HQ 16F4S2 N A C...

Page 49: ...want to learn more about how to reset your system to factory please refer to the chapter 6 5 5 Rest to Factory Default section in JetStor FX Series Software Manual All dual controller JetStor FX seri...

Page 50: ...er Description 1 Release Lever 2 Screw The following content and images are detailed steps for removing the controller module from the system chassis Use a Phillips screwdriver to loosen the thumb scr...

Page 51: ...1 Steps of Removing the Controller Module Remove the dummy host card cage by loosening two screws of the dummy host card cage and then take dummy host card cage from controller module Figure 3 12 Proc...

Page 52: ...t adapter cards need to be installed You must install GBIC s for the Fibre Channel or 10GbE host cards before connecting the cables from the JetStor FX to the host sides Install the controller module...

Page 53: ...e refer to the following image and table for the suggested sequence of memory module installation It is requested that the installation slot and capacity of the memory module MUST be exactly the same...

Page 54: ...38 Figure 3 15 The Installation Sequence of the Memory Module The following table is the suggested installation sequence for optional memory module...

Page 55: ...B 36GB 4GB 4GB 4GB 12GB 4GB 4GB 4GB 4GB 16GB 4GB 4GB 8GB 16GB 4GB 4GB 8GB 8GB 24GB 4GB 4GB 16GB 24GB 4GB 4GB 16GB 16GB 40GB 8GB 8GB 8GB 8GB 16GB 8GB 16GB 24GB 8GB 16GB 16GB 40GB 8GB 8GB 8GB 24GB 8GB 8...

Page 56: ...ries Power Module Type Model Name Description BBM C2F BMC2F Battery Backup Module Retain memory up to 64GB SCM C2F SPC2F Super Capacitor Module Retain memory up to 16GB CAUTION Flash module of Cache t...

Page 57: ...e 3 17 Components of the Cache to Flash Modules Table 3 9 Components of the Cache to Flash Modules Item Number Description Flash Module 1 Flash Module Release Tab 2 Flash Module Attention Button 3 Fla...

Page 58: ...Cache to Flash Module Align the flash module cage to the slot and then push it all the way into the system chassis until hear a click sound for 4U 3U chassis release tabs of both flash and power modu...

Page 59: ...Module Confirm the Cache to Flash Module Installation After the cache to flash modules are installed you can check the status and information about cache to flash module in the SANOS UI SYSTEM SETTING...

Page 60: ...s bracket AA612508 series please contact AC NC CAUTION The populated JetStor FX system can be very heavy to avoid any potential injury or harm to installers or damage to the system we strongly recomme...

Page 61: ...n 2 Second Step of the Rail Kit Installation Install the inner member onto the chassis Figure 3 23 Second Step of the Rail Kit Installation 3 Third Step of the Rail Kit Installation Install the outer...

Page 62: ...l bearing retainer is located at the front of the middle member Insert chassis into middle outer member When hitting the stop pull push release tab to unlock and retract chassis into rack Use M5x20 sc...

Page 63: ...LFF and SFF systems The following content and images are detailed steps for installing a disk drive into the system Align a disk drive with the tray to the empty bay you would like to install and the...

Page 64: ...nnecting the System to the Host The JetStor FX series products are equipped with two on board 10GbE iSCSI RJ45 ports per controller for data host connections and dual SAS3 expansion ports for expansio...

Page 65: ...management system The following image is the example of the cabling for the JetStor FX management ports Figure 3 28 Cabling Example of the Administrator to JetStor FX Management Port 3 8 2 Multi Path...

Page 66: ...One Server One HBA One Switch Dual Path Figure 3 29 One Server One HBA Two Switches Dual Path Two Servers One HBA per Server Dual Path Figure 3 30 Two Servers One HBA per Server Two Switches Dual Pat...

Page 67: ...ecommend customers upgrade their single controller JetStor FX systems to dual controller to ensure a constant and reliable connection to your valuable data if the connection path fails One Server One...

Page 68: ...d to connect the power outlet Power cord ratings 100 127V 10A 200 240 V 5A Install all disk drives in the system so the controllers can identify and configure them at power up Connect cables that conn...

Page 69: ...C Shipping temperature 10 C to 50 C Relative Humidity Operating Relative Humidity 20 to 80 non condensing Non Operating Relative Humidity 10 to 90 3 10 Power off the System To power off the system ple...

Page 70: ...users want to install a UPS uninterruptible power supply to provide clean power and also offer protection against mains power failures please follow the following instructions Before you purchase a UP...

Page 71: ...on cable Connect the male side of the USB extension cable to the USB port on the system front pillar To learn more how to use USB LCM please refer to the chapter 4 4 Accessing the Management USB LCM i...

Page 72: ...a multiple path deployment both controllers in the system are used A multi path deployment will provide two or more paths to the SAN A dual controller system supports real time fail over so the data a...

Page 73: ...The table below shows the rule of configuration for the JetStor FX series and JX JBOD expansion enclosures You can refer the table below for maximum number of extension enclosures and disk drives prio...

Page 74: ...6JX 3U16 10 24 10x 16 184 1 472 TB 1 840 TB 824JX 4U24 10 24 10x 24 264 2 112 TB 2 640 TB 826FXD SFF 2U26 826JXD 2U26 10 26 10x 26 286 572 TB 572 TB 4 2 2 Multiple Path MPIO Deployment The following i...

Page 75: ...erver One HBA Two Switches Multiple Path Cabling Figure 4 1 One Server One HBA Two Switches Multiple Path Cabling One Server One HBA One DAS System Multiple Path Cabling Figure 4 2 One Server One HBA...

Page 76: ...60 One Server One HBA Two DAS Systems Multiple Path Cabling Figure 4 3 One Server One HBA Two DAS Systems Multiple Path Cabling...

Page 77: ...erver One HBA Ten DAS systems Multiple Path Cabling Figure 4 4 One Server One HBA Ten DAS Systems Multiple Path Cabling 4 2 3 Single Path Deployment One Server One HBA Single Path Cabling Figure 4 5 O...

Page 78: ...abling Figure 4 6 One Server One HBA One DAS System Single Path Cabling 4 2 4 Multi server Attached Cabling Two Servers One HBA per Server Two Switches Multiple Path Cabling Figure 4 7 Two Serves One...

Page 79: ...e Path Cabling Figure 4 9 Four Servers One HBA per Server Single Path Cabling If customers purchase optional host cards the following is the cabling example Ten Servers One HBA per Server Dual Path Ca...

Page 80: ...Cabling 4 2 5 Introduction of Remote Replication If users purchase two or more JetStor FX series systems and plan to deploy them in different locations the Remote Replication function in JetStor SANO...

Page 81: ...data A Source Volume S1 in Site A is replicating to a Target Volume T1 in Site B And a Source Volume S2 in Site B is replicating to a Target Volume T2 in Site A One to Many Figure 4 13 One to Many Rem...

Page 82: ...ite A So does S3 in Site D to T3 in Site A Many to Many Figure 4 15 Many to Many Remote Replication Combination with bi Directional one to many and many to one remote replication also supports Many to...

Page 83: ...topology The maximum replication task quantity per system is 32 It means that 32 systems are the maximum quantity of any many to one or one to many replication configuration If you want to learn more...

Page 84: ...ve a basic understanding about the current status of the system or specific components by recognizing the LED status 5 1 Front Panel LEDs JetStor FX features the button and indication module on the ri...

Page 85: ...n one time to turn it ON press it again to turn it OFF UID Unique Identifier LED Press the button to turn it ON and press it again to turn it OFF Blue the system has been identified Off the system has...

Page 86: ...Drive Power LED Blue on the disk drive is inserted and no data access Blue blinking the disk drive is accessing data Off no disk drive is inserted 2 Disk Drive Status LED Off the disk drive is healthy...

Page 87: ...olid Green This is the Master controller Off This is the Slave controller 3 Dirty Cache LED Solid Amber Data on the cache waiting for flush to disks Off No data on the cache 4 UID Unique Identifier LE...

Page 88: ...Descriptions of the Power Supply Unit LED Number Description Definition 1 PSU LED Green PSU is on and OK Blinking Green PSU is off 5VSB is on Amber critical event caused shutdown Blinking Amber PSU wa...

Page 89: ...recommend that all maintenance is carried out by a certified technician Do not attempt to carry out any maintenance outside of those outlined in the following section of this guide System damage due...

Page 90: ...ovided for the empty slot to ensure the proper system cooling If you see the system health becomes Controller Degraded in the SANOS UI Dashboard System Information or the controller status LED shows s...

Page 91: ...odule Table 6 1 Mechanical Components of the Controller Module Number Description 1 Release Lever 2 Thumb Screw The following are detailed steps for removing the controller module from the system chas...

Page 92: ...and images are the detail steps of installing the controller module into the system chassis Make sure the position of both release levers of the controller is at downward Align and place the controll...

Page 93: ...nds from the time you have installed the controller module into the system chassis the status LED will show solid green if controller module is successfully installed then the web UI will show figure...

Page 94: ...ce for removing the controller module the system is in a well secured rack or on a stable surface If you see the System Health showing PSU Fault or the PSU LED shows solid or blinking amber color that...

Page 95: ...cription 1 PSU Release Tab 2 PSU Handle Before removing the PSU disconnect the power cord from the wall outlet then remove the other end that is connected to the PSU The following are detailed steps o...

Page 96: ...talling the PSU into the system chassis Use one hand to hold one end of the power supply unit the side with release tab and handle and the other hand hold the bottom of the power supply unit then alig...

Page 97: ...h is Good and no warning message on the upper right side of the SANOS UI Figure 6 11 Screen Shot of the PSU Successfully Installed in the SANOS UI 6 3 Removing Installing the Fan Module The standard J...

Page 98: ...ing is highly recommended Recommended place for installing removing a fan module the system is on the well secured rack or onto stable surface If you see the System Health showing Fan Fault that means...

Page 99: ...llowing details the steps of removing the fan module from the system chassis Hold the fan module handle first and then press the release tab Pull out the fan module around half of the total fan module...

Page 100: ...the system chassis Use one hand to hold one end of the fan module the side with release tab and handle and the other hand hold the bottom of the module then align it with the empty slot Installation...

Page 101: ...right side of the SANOS UI Figure 6 16 Screen Shot of the Fan Module Successfully Installed in the SANOS UI 6 4 Removing the Host Card If you encounter data connection problems from the host s side bu...

Page 102: ...ule section Press the host card release button and disconnect the host card with the connector in the controller cage Pull the host card out until it is free from the controller cage Install the subst...

Page 103: ...e 87 Figure 6 18 Procedures of Removing the Host Card from the Controller Cage Figure 6 19 Procedures of Pull out the Host Card and Install Dummy Host Card Cage Figure 6 20 The Finished Installed Dumm...

Page 104: ...it shows Failed that means your power module or flash is not functioning correctly and can t provide real time data protection anymore You may need to replace the power module or flash to ensure conti...

Page 105: ...ess attention button of flash module until the flash module status LED is blinking Figure 6 23 Pressing Attention Button of the Flash Module Press the release button of flash module and pull it out un...

Page 106: ...until it is free from system chassis Install the dummy cache to flash cage and then use a Phillips screw driver to tighten it To ensure proper cooling of the system please install all dummy cache to...

Page 107: ...ng system name and version Firmware version Error messages or capture screenshots Product specific reports and logs Add on products or components installed Third party products or components installed...

Page 108: ...92 Figure 7 1 Download Service Package in the SANOS UI...

Page 109: ...ow to setup the online help environment for JetStor support team The following procedure will help users to setup the serial console via the console cable that is enclosed in the shipping carton The f...

Page 110: ...HyperTerminal or Putty to open the console after the connection is made 3 Here we first demonstrate HyperTerminal The console settings are the following Baud rate 115200 8 data bit no parity 1 stop b...

Page 111: ...Support and Other Resources 95 Figure 7 4 The Procedures of Setup Serial Console by HyperTerminal 4 If you are using PuTTY instead please refer to below...

Page 112: ...96...

Page 113: ...Following is the procedure to setup the connection for online support via TeamViewer 1 Please download the TeamViewer from following hyper link https www teamviewer com en download 2 Install TeamView...

Page 114: ...at meets and exceeds your expectations To help us improve the documentation email any errors suggestions or comments to support acnc com When submitting your feedback include the document title part n...

Page 115: ...exclusive non transferable non distributable non assignable non sub licensable license to install and use the Product pursuant to the terms of this EULA Any right beyond this EULA will not be granted...

Page 116: ...SOEVER INCLUDING BUT NOT LIMITED TO LOSS OF DATA INFORMATION REVENUE PROFIT OR BUSINESS ARISING OUT OF OR RELATING TO THE USE OR INABILITY TO USE THE PRODUCT OR OTHERWISE UNDER OR IN CONNECTION WITH T...

Page 117: ...ULA will be binding upon and will inure to User s successors and permitted assigns This EULA shall be governed by and constructed according to the laws of R O C Any disputes arising from or in connect...

Reviews: