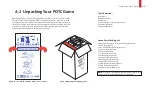

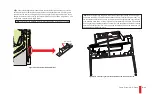


Game Assembly & Setup
A-16
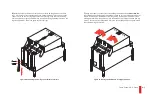
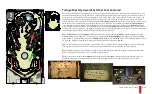
1)
Load balls into the treasure chest to qualify
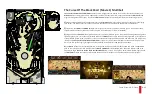
Dead Man's Chest Multiball
. Start by shooting both the
LOAD
and
CHEST
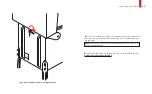
targets (blue inserts, opposite). The insert for a target that hasn't been hit will be flashing green; the insert for
a target that's been hit will be solid green. When both targets have been hit, the 3-ball lock forks (under the treasure
chest) will be raised, through the playfield.
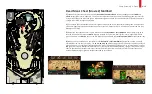
2)
The treasure chest lane Jackpot arrow insert (green Jackpot arrow insert, opposite) will flash green. Shoot the lane
(red arrow, opposite) to load a ball inside the treasure chest, a 3-ball physical lock. A new ball will be served into play
(attempt a skill shot!).
3)
Repeat the two steps above twice more to finish qualifying
Dead Man's Chest Multiball
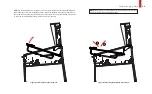
. When the forks go up to
lock the third ball in the chest, the
Movie 2
square inserts & Jackpot arrow insert (green inserts, opposite) will flash
green and white. The
Movie 2
path on the LCD screen will also indicate that the
Movie 2 Multiball
is ready (below, left).
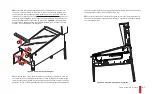
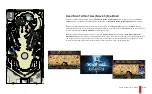
4)
When you lock the third ball in the treasure chest,
Dead Man's Chest Multiball
begins (below, center). The balls
are released from the chest, into play. The
2X
,
3X
,
4X
,
5X
&
6X
multiplier target inserts (red inserts, opposite) will flash
green and white. The number of Jackpot shots that will be lit (in green) depends upon which of these targets is hit first
(
2X
lights two Jackpots,
3X
lights three Jackpots, etc.). During the 3-ball multiball (below, right), hit all of the lit Jackpot
shots to light the Super Jackpot shot in the treasure chest lane (red arrow, opposite). Collect the Super Jackpot, hit
another multiplier target, light new Jackpot shots and go for another!
Dead Man's Chest (Movie 2) Multiball
1
3
1
3
4
4
4
4
4
3
2
Summary of Contents for Pirates of the Caribbean
Page 2: ......
Page 13: ...Game Assembly Setup A 1 Game Assembly Setup Section A...
Page 37: ...The POTC Menu System B 1 The POTC Menu System Section B...
Page 93: ...Game Parts Information C 1 Game Parts Information Section C...
Page 98: ...Game Parts Information C 6 1 2 3 4 5 6 7 8 9 14 12 16 11 10 13 15...
Page 112: ...Game Parts Information C 20 1 2 5 9 3 13 6 10 4 15 16 11 8 7 12 18 17 14 12 18 17 14...
Page 114: ...Game Parts Information C 22 2 4 12 3 16 17 10 11 5 7 6 18 8 14 9 13 1 15 8...
Page 146: ...Game Parts Information C 54 7 14 1 4 9 11 3 2 5 8 8 10 10 12 13 15 16 16 17 6...
Page 166: ...Game Parts Information C 74 15 1 25 2 3 4 5 6 9 10 11 12 13 14 19 17 18 20 21 26 27 28...
Page 168: ...Game Parts Information C 76 1 2 3 4 5 6 9 10 11 12 13 14 15 25 17 18 20 19 26 21 27 28...
Page 170: ...Game Parts Information C 78 49 51 50 55 56 41 42 43 44 45 46 46 46 47 48 76 77 46...
Page 172: ...Game Parts Information C 80 49 51 50 55 56 41 42 43 44 45 46 46 46 47 48 76 77...
Page 200: ...Game Parts Information C 108 79 65 69 70 71 72 73 74 75 76 77 78 81 80 82 83 84 85 86 87 88...
Page 202: ...Game Parts Information C 110 9 10 12 13 14 15 66 67 68 9 10 12 15 13 14 66 67 68...
Page 208: ...Game Parts Information C 116 32 79 65 69 70 71 72 75 74 73 76 77 78 80 81 82 83 84 85 86 87 88...
Page 212: ...Game Parts Information C 120 23 16 4 6 15 12 10 9 5 2 3 17 13 18 7 22 8 21 20 19 27...
Page 214: ...Game Parts Information C 122 1 14 25 24 11 26 26 26 26 34 32 32 32 30 31 31...
Page 216: ...Game Parts Information C 124 8 3 4 5 1 2 6 7...
Page 220: ...Game Parts Information C 128 0 1 14 2 3 5 4 11 7 6 9 10 12 15...
Page 222: ...Game Parts Information C 130 13 4 5 5 4 4 3 1 2 2 1 7 6 6 6 6 6 6 6 6 6 6 6 6 8 8 8 13 13...
Page 230: ...Game Parts Information C 138 1 2 3 4 5 10 9 8...
Page 232: ...Game Parts Information C 140 1 1 1 2 2 3 3 4 5 8 7 7 7 7 7 7...
Page 234: ...Game Parts Information C 142 1 1 1 1 1 1 1 1 1 1...
Page 248: ...Game Parts Information C 156...
Page 249: ...Reference Diagrams Schematics D 1 Reference Diagrams Schematics Section D...
Page 302: ...Reference Diagrams Schematics D 54...
Page 308: ...Reference Diagrams Schematics D 60...
Page 337: ...Reference Diagrams Schematics D 89 1 Fuse Locations Bottom of Cabinet 4 2 3 In Backbox...
Page 343: ...Game Service Troubleshooting E 1 Game Service Troubleshooting Section E...
Page 353: ...Appendices...
Page 358: ......