MP1516BT
Mobile Audio SystemOwner’s Manual
160
watts peak
40W x 4
Page 1: ...MP1516BT Mobile Audio System Owner s Manual 160watts peak 40W x 4...
Page 2: ...heir respective owners WARNING Stop your vehicle before carrying out any operation that could interfere with your driving WARNING Never disassemble or adjust the unit Do not attempt to modify the unit...
Page 3: ...ONS 15 CONTROLS AND INDICATORS 17 REMOTE CONTROL OPERATION 20 Battery Installation 20 Using the Remote Control 21 Remote Control Functions 21 BASIC OPERATION 24 Turning the Unit On of Off 24 Selecting...
Page 4: ...Pod iPhone OPERATION 38 BLUETOOTH WIRELESS DEVICE OPERATION 39 SPECIFICATIONS 43 TROUBLESHOOTING 44 CARE AND MAINTENANCE 46 COMMON REPLACEMENT PARTS 47 FEATURES AM FM Receiver RDS EON Operation CD MP3...
Page 5: ...and the ground becomes detached there is a risk of damage to the products or fire Be sure to connect the color coded leads according to the wiring diagram Incorrect connections may cause the unit to...
Page 6: ...ng the insulation of the power supply lead of the unit and tapping into the lead The current capacity of the lead will be exceeded causing overheating Since an unique audio I C circuit is employed nev...
Page 7: ...alling interior panels carpeting dashboards or other components of your vehicle please call your dealer in order to have the unit professionally installed If noise is still experienced when the motor...
Page 8: ...ing diagram of the existing head unit before disconnecting any wires If you are not positive of the polarity of the existing wires from the speakers to the head unit install new wires 1 While the old...
Page 9: ...arts included with the unit The use of unauthorized parts can cause malfunctions Consult with your nearest dealer if installation requires the drilling of holes or other modifications to the vehicle I...
Page 10: ...before installation DIN Front Mount Method A Installation Opening This unit can be installed in any dashboard having an opening as shown below Installing the Unit Be sure you test all connections firs...
Page 11: ...firmly in place 3 Attach the wires from the unit to existing wires See the wiring connections diagram Insert the radio into the dashboard Then apply the trim frame to the outside of radio 4 Support th...
Page 12: ...acturer for specific instructions NOTE Outer trim frame hook and mounting sleeve are not used for this installation 1 Remove the hooks on both sides 2 Align the screw holes of the mounting bracket sup...
Page 13: ...G THE DETACHABLE FACEPLATE Removing the Faceplate 1 Press the release button on the faceplate and pull off the faceplate Release Button Faceplate 2 Keep the faceplate in the protective case Faceplate...
Page 14: ...r control buttons when detaching or re installing the faceplate 3 Do not touch the contacts on the faceplate or on the main unit body It may result in poor electrical contact 4 If any dirt or foreign...
Page 15: ...4 Battery 12V Yellow 5 Antenna Power Blue 6 Panel Light White 7 ACC Red 8 Ground Black A B External Microphone Jack Speaker Wiring Notes Follow the above wiring diagram to install the head unit with n...
Page 16: ...ys supplied with power regardless of ignition switch position Blue Remote Wire Connect the Blue Remote wire to an Auto antenna or power amp control wire remote connection Maximum current 300Ma 12 V DC...
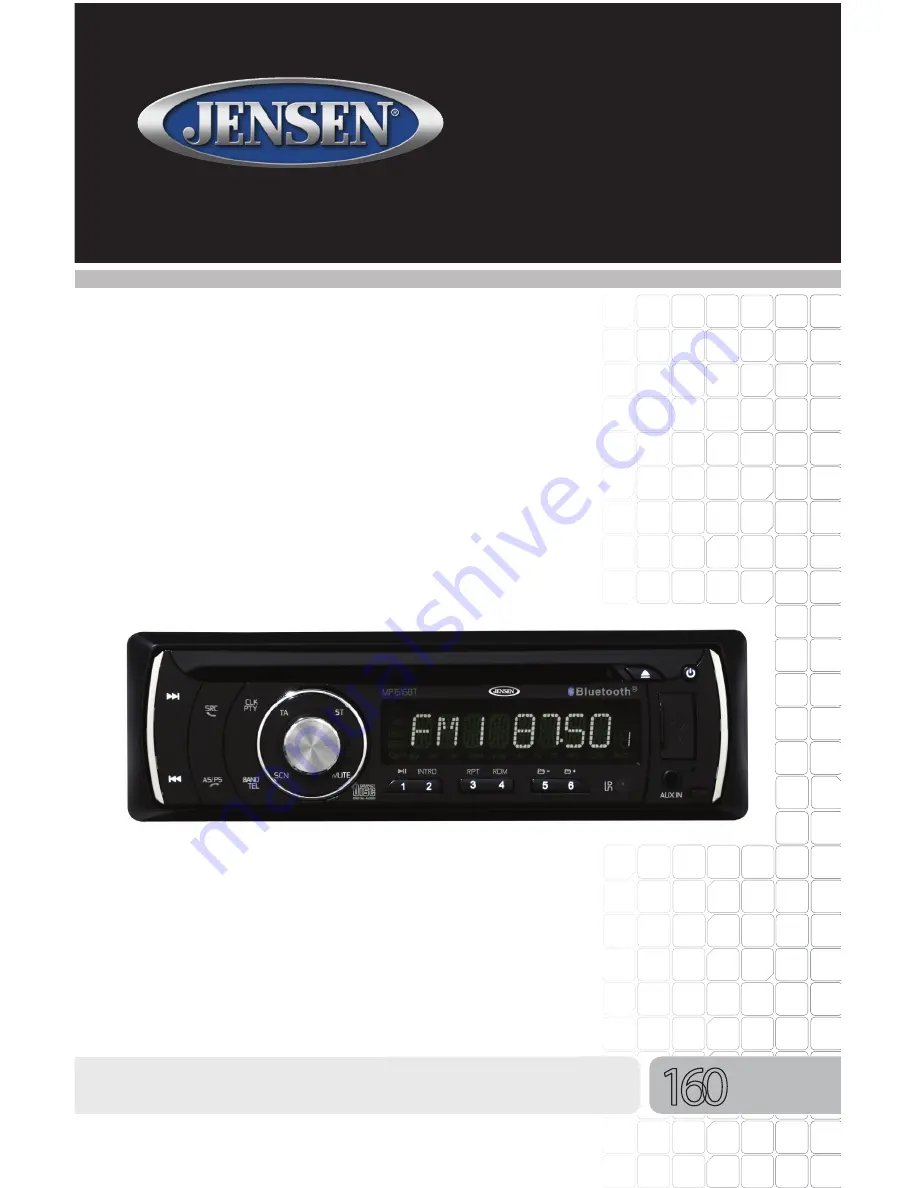
Page 17: ...espectively In Bluetooth mode press this button to answer a call 3 CLK Clock PTY Program Type Button Press this button to show the clock on the display panel In FM radio mode press this button to show...
Page 18: ...e disc is not removed from the slot within 5 seconds it will automatically be loaded into the slot again When the disc is ejected and removed the unit will automatically switch to radio mode 10 Power...
Page 19: ...memory locations for FM1 FM2 and FM3 If the radio is in AM mode it will scan and store up to twelve strong stations into the six preset memory locations for AM1 and AM2 If you have already set the pre...
Page 20: ...sal remote control and will not control other equipment To replace the batteries 1 While holding the remote control insert your thumbnail into the battery door side notch 1 and index fingernail into b...
Page 21: ...l the system Note The maximum distance at which signals can be received is about 6 feet Do not drop or throw the remote control Do not place the remote control in a location that is exposed to direct...
Page 22: ...er 7 Stations Tune Seek Down Track Down Button Press the button briefly to activate the automatic seek function and tune to the previous strong station In MP3 WMA mode press the button to move to the...
Page 23: ...e star symbol 17 0 Button Press this button to enter 0 18 7 AF Alternative Frequencies Button Press this button to turn the Alternative Frequencies function on or off 19 8 TA Traffic Announcement Butt...
Page 24: ...eplate or press the VOL or VOL button on the remote control to adjust the volume level The larger the number the higher the volume level Mute Control Press the MUTE button briefly to mute the sound in...
Page 25: ...e volume knob or press the SEL button on the remote control repeatedly until BAL appears on the display panel 2 Rotate the volume knob to adjust the balance between the left and right speakers To adju...
Page 26: ...pears on the display panel 2 Rotate the volume knob to select BEEP OFF or BEEP ON 3 Leave the unit idle for the setting to take effect Setting the Clock The time clock can be set anytime when the powe...
Page 27: ...e or button for 2 seconds MANUSEEK appears on the display panel Press the or button once to manually adjust the radio frequency Tuning Press the or button once The radio will seek the next strong and...
Page 28: ...the 2 AM bands Note If you have already set the preset memories to your favorite stations activating the Auto Store feature will erase those stations and enter the new strong stations Radio Data Syste...
Page 29: ...1 Rock Country Classical News Personality 2 Classic Rock Oldies RB Information Public 3 Adult Hits Soft Soft RB Sports College 4 Soft Rock Nostalgia Language Talk Weather 5 Top 40 Jazz Religious Musi...
Page 30: ...s and hold the button to fast forward Press the button to go to a previous track Track numbers will appear on the display Press and hold the button to fast reverse The disc will play normally when the...
Page 31: ...go back one folder Folder Up Press the 6 button once to advance one folder Search Modes There are three search modes to help find your favorite MP3 and WMA tracks The search modes only works with MP3...
Page 32: ...p Protection The unit is equipped with Electronic Skip Protection ESP circuits Electronic Skip Protection is for driving on rough roads The CD will play for 10 seconds on rough roads without skipping...
Page 33: ...is also called closing the session in some CD R CD RW software Please refer to your CD R CD RW recorder or CD R CD RW software manual for more information on the finalization process Depending on the...
Page 34: ...sc from the center to the outside edge Don t use CDs with blobs of glue or ink on its surface Don t use CDs with labels or stickers on its surface If the labels start to rub away any remainder of glue...
Page 35: ...e MP3 player first and then connected to the USB port Otherwise damage to the batteries may result Note This unit supports a USB device with up to 8GB storage size If there is any compatibility proble...
Page 36: ...Slot 4 Install the faceplate The unit will search the MP3 files in the card and start to play MP3 files automatically SD PLAY appears on the display panel 5 If the unit is in another mode of operatio...
Page 37: ...es are stored in folders on the SD card the unit will start by playing the first song in the first folder After playing all the files sequentially in the first folder the unit will play sequentially a...
Page 38: ...play Repeating a Track When playing a track press the RPT button briefly to repeat the current track RPT appears on the display panel Press the RPT button again to repeat all Press the RPT button aga...
Page 39: ...ooth functions you must pair your mobile phone and the unit Pairing is a special process used when two devices connect for the first time The pairing process is used to generate a link key that is use...
Page 40: ...Before dialing you need to confirm that BT CONNECTED appears on the display within ten seconds of the following conditions When you turn off the unit and then turn it on again Switch off the ACC wire...
Page 41: ...irectly using the remote control To Make an Outgoing Call Using the Received Dialed or Missed Lists 1 Press the button on the remote control to enter the telephone menu 2 Press the volume knob to acce...
Page 42: ...Wireless Technology Music Function Wireless products featuring Bluetooth technology provides an Advanced Audio Distribution Profile A2DP profile for streaming music from a mobile phone or a portable m...
Page 43: ...08 00MHz Mono sensitivity 12dBf 50dB quieting sensitivity stereo 16dBf Stereo separation 1kHz 35dB Frequency response 30Hz 17kHz 3dB AM Tuner Tuning range USA 530 kHz 1710kHz Tuning range Europe 522kH...
Page 44: ...ack The disc is inserted in the wrong direction Incompatible disc is used Disc is warped or scratched The compact disc is extremely dirty or defective The laser pickup is dirty The temperature inside...
Page 45: ...s not operating properly due to noise Press the RESET button The faceplate is not properly installed The radio does not work The antenna cable is not connected Insert the antenna cable firmly The radi...
Page 46: ...conditions occur allow the interior of the vehicle to reach a normal temperature before using player 7 When the vehicle warms up during cold weather or under damp conditions condensation may appear on...
Page 47: ...Detachable Faceplate 30213850 Owner s Manual Kit 30613850 Wire Harness 30313840 Trim Ring 30413840 Main Sleeve 30113840 Hardware Bag 30513840 Remote Control 30713850 Microphone 34413850 COMMON REPLAC...
Page 48: ...Audiovox Electronics Corporation Hauppauge NY 11788 Technical Assistance 1 800 323 4815 www mobile jensen com 2013 Audiovox Printed in China 128 9191...