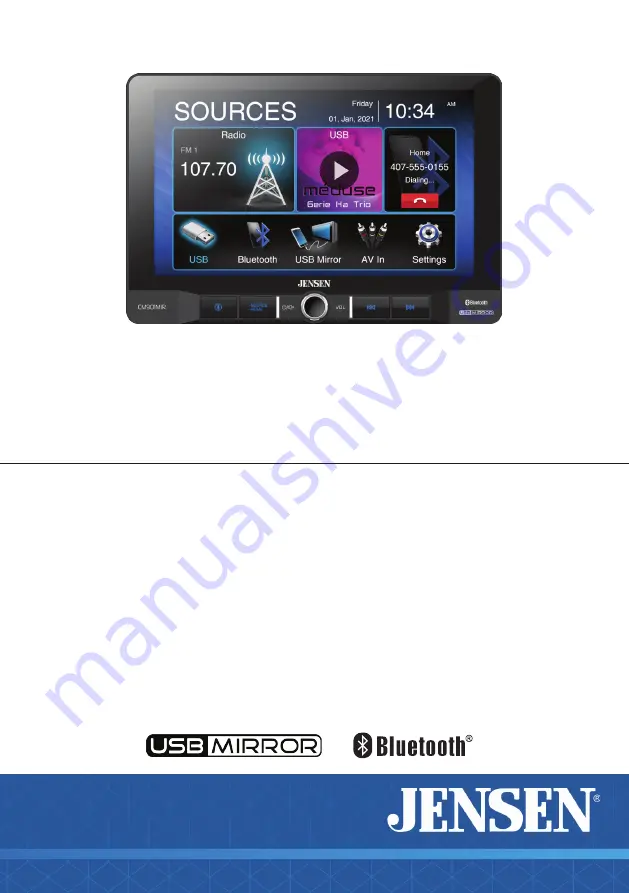
background image

INSTALLATION &

OWNER’S MANUAL

CM901MIR

Multimedia Receiver with USB Mirror

featuring a 9" Digital TFT Display

AM-FM

USB Media Player

Rear Camera Input

Summary of Contents for CM901MIR

Page 1: ...INSTALLATION OWNER S MANUAL CM901MIR Multimedia Receiver with USB Mirror featuring a 9 Digital TFT Display AM FM USB Media Player Rear Camera Input...

Page 2: ...xcessive shock When replacing a fuse only use a new one with the correct rating Using a fuse wit the wrong rating may cause the unit to malfunction To prevent short circuits when replacing a fuse disc...

Page 3: ...cations General Operation Audio Operation AM FM Tuner Operation USB Operation Media Compatibility Bluetooth Operation USB Mirror Operation Auxiliary Inputs Rear Camera Operation SWC Input Operation Tr...

Page 4: ...the vehicle is not in Park and or the parking brake is not fully engaged When installing this unit the installer must connect the parking brake detect wire to the parking brake mechanism in order to m...

Page 5: ...d found to comply with the limits for a Class B digital device pursuant to Part 15 of the FCC Rules These limits are designed to provide reasonable protection against harmful interference in a residen...

Page 6: ...t would be subject to high temperatures such as from direct sunlight or where it would be subject to dust dirt or excessive vibration Preparation 3 A 1 2 3 4 90 90 2 C 8 2 7 1inch 0inch A C 1inch 0inc...

Page 7: ...6 CM901MIR Screen Rotation Screen angle can pivot side to side Screen depth can be adjusted from 0 to 0 5 to 1 forward Screen height adjusts up to 1 5 down Screen tilts forward and back...

Page 8: ...BLUE RED WHITE RED WHITE YELLOW RED YELLOW WHITE GND CAMERA 12V AV IN R AV IN L VIDEO IN CAMERA IN LINE OUT FRONT L LINE OUT FRONT R LINE OUT REAR L LINE OUT REAR R SUB WOOFER 1 SUB WOOFER 2 BLACK BL...

Page 9: ...MIR Control Locations VOICE ACTIVATION BUTTON SOURCE HOME POWER VOLUME MUTE PREVIOUS BUTTON NEXT BUTTON RESET USB PORT 1 2 3 4 5 6 The radio display features the following functions and displays 1 2 3...

Page 10: ...operation can also be accessed by selecting the corresponding icon from the main menu Operation Mode Selection Press the icon at the top left corner of the screen to display the OSD main menu Press th...

Page 11: ...lectric Pop Soft allows user to enter custom EQ settings Time Alignment To adjust time correction settings select PRESET 1 PRESET 2 or PRESET 3 Loudness Touch screen button to turn the Loudness functi...

Page 12: ...Setting Speaker Positions Reset to Default Settings 1 2 3 4 Adjustments To properly set the time alignment you will need measure the distance from each speaker in ft to where you want the center stage...

Page 13: ...egin playback of that station Hold this button down for a few seconds and it will switch between AS and PS Press the icon to adjust the brightness Press DX LOC text to turn on the local or distance Au...

Page 14: ...hat folder and press to return to the file list Use the up and down arrows to navigate the file list Press the arrow to return to the previous screen Press icon to repeat current track and adjust to r...

Page 15: ...2 12 16 22 05 24kHz MPEG 2 5 8 11 025 12kHz Bitrate MPEG 1 32 320kbps MPEG 2 8 160kbps MPEG 2 5 8 160kbps Other Information Directory Depth Unlimited File Name Length 32 bytes Total File Number 2000...

Page 16: ...numbers 0 9 and _ underscore Some characters may not be displayed correctly depending on the character type This device can play back files in Joliet and other standards that conform to ISO9660 MP3 wr...

Page 17: ...when the connect feature is set to Auto connect On If the connect feature is set to Auto Connect Off the head unit will not automatically connect to any device From the main menu touch the Bluetooth o...

Page 18: ...eturn to the beginning of the current track Press icon to pause or resume playback Touch icon to skip ahead to the next song Press the icon to adjust Equalizer setting Press MUSIC to transfer audio be...

Page 19: ...3 Rotation icon Press rotation icon to Rotate the Mirrored screen from horizontal to vertical Tip Manually rotate the monitor to the left or right until locked in the vertical horizontal position 4 Au...

Page 20: ...ernal audio source as needed if connected to the headphone output of the device Connect an optional rear camera to the Camera Input Black RCA connector Refer to the camera s wiring diagram for install...

Page 21: ...t supported or not desired then the function MUST be skipped as per the PAC SWI RC instructions 4 The SWC function MUST be programmed in the correct order per the PAC SWI RC radio function mapping ord...

Page 22: ...blows fuse s Yellow or red wire touching chassis ground Check for pinched wire Speaker wires touching chassis ground Check for pinched wire Incorrect fuse rating Use fuses with correct rating Unit has...

Page 23: ...class Panel size 9 diagonal measurement View angle up down left right 50 70 70 70 Resolution 1024 H x 600 V Brightness cd m2 500 NITS Contrast ratio 500 1 Pixels 1 152 000 Speaker output impedance 4 o...

Page 24: ...senmobile com Warranty Coverage Limited 1 year warranty when purchased from an authorized Jensen dealer or Limited 2 year warranty when purchased from and professionally installed by an authorized Jen...

Page 25: ...21 V01 Namsung America Inc 2021 Namsung America Inc All rights reserved All rights reserved No part of this publication may be reproduced distributed or transmitted in any form or by any means includi...

Reviews: