background image

49

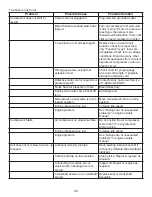
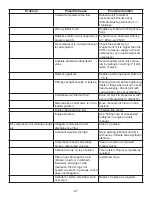
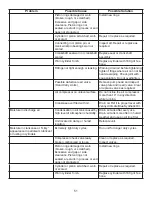
Problem

Possible Cause

Possible Solution

Fittings not tight enough or leaking. Warning drain air before tightening: 

tighten f ttings where air can not be 

heard escaping. Check joint with 

soap solution. Do not overtighten.

Pressure regulator knob not 

turned to high enough pressure or 

defective pressure regulator.

Adjust pressure regulator knob to 

proper setting or replace.

Hose or hose connections are to 

small or long.

Replace with larger hose or 

connectors.

Possible defective reed valve. 

(Hand Carry Units)

Remove pump head and inspect 

valve plate and (reed) valve. Clear 

or replace valves as required.

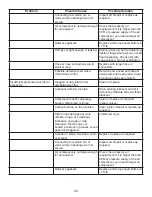
High oil consumption.

Lubricant viscosity too low

Drain existing lubricant and ref ll 

with Jenny Ultimate Blue Synthetic 

lubricant.

Extremely light duty cycles. 

Run unit for longer duty cycles

Piston rings damaged or worn 

(broken, rough, or scratched). 

Excessive end gap or side 

clearance. Piston rings not

seated, are stuck in grooves or end 

gaps not staggered.

Install new rings.

Cylinder or piston scratched, worn, 

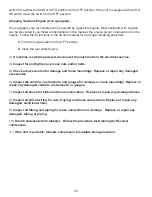
or scored.

Repair or replace as required.

Connecting rod, piston pin, or 

crank wrist pin bearings worn or 

scored.

Inspect all. Repair or replace as 

required.

Crankshaft seal worn or crankshaft 

scored.

Replace seal or crankshaft 

assemby.

Worn cylinder f nish.

Deglaze cylinder with 180 grit f ex-

hone.

Air compressor on unlevel surface. Do not incline the air compressor 

more than 10° in any direction 

while running.

Plugged oil crankcase vent.

Clean.

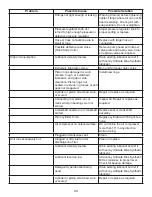
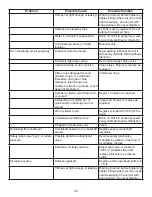
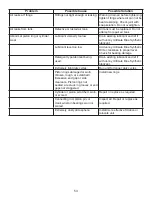
Unit runs excessively hot.

Clogged or dirty inlet and or 

discharge line f lter.

Clean or replace.

Lubricant viscosity too low

Drain existing lubricant and ref ll 

with Jenny Ultimate Blue Synthetic 

lubricant.

Lubricant level too low

Add Jenny Ultimate Blue Synthetic 

Oil to crankcase to proper level. 

Check for bearing damage.

Detergent type lubricant being 

used.

Drain existing lubricant and ref ll 

with Jenny Ultimate Blue Synthetic 

lubricant.

Cylinder or piston scratched, worn, 

or scored.

Repair or replace as required.

Summary of Contents for Reciprocating Air Compressors

Page 1: ...ting Air Compressors Operation and Maintenance Manual Jenny Products Inc 850 North Pleasant Avenue Somerset PA 15501 1069 Ph 814 445 3400 Fx 814 445 2280 www jennycompressor com info jennycompressor c...

Page 2: ...fety Valve Dual Control Switch Dual Voltage Switch Preparation for Use Lubrication Air Cleaner AdjustingRegulator Connecting and Disconnecting Hoses Draining Air Receiver Condensate Humid Areas Dual V...

Page 3: ...you Over the years we have found that when troubles are reported by our customers both of us prof t So please help us to serve you properly which is our f rst desire In the march of progress engineer...

Page 4: ...4 Section 1 Safety and Health Instructions...

Page 5: ...astened into the chassis to facilitate supplemental grounding as permitted by NEC 250 91 Do not connect any other equipment to the electrical circuit serving this unit Important THIS PRODUCT CAN CAUSE...

Page 6: ...The pressurized spray from this unit can cause severe injury to the eyes It also may contain irritants particles or caustic chemicals 3 Do not operate with protective covers or guards removed Operati...

Page 7: ...t occurs and the spray appears to have penetrated the skin even if the injury appears to be minor seek medical care immediately Do not treat as a simple cut Be prepared to tell a physician what partic...

Page 8: ...ace all damaged hoses and or f ttings with ones which meet or exceed the specif cations of the original equipment Do not use the hose if cuts leaks abrasions bulges or coupling damage is evident Never...

Page 9: ...re system and in the receiver tanks before removing any air lines or receiver connections 17 Do not operate at pressures temperatures and rotational speeds in excess of the manufacturers recommendatio...

Page 10: ...use damage to property and can injure or kill people nearby All pressure vessels should be inspected once every year or more often depending on use To f nd your state pressure vessel inspector look un...

Page 11: ...insecticides herbicides pesticides and arsenic and chromium found in treated lumber 24 Keep compressor as far away from spraying area as possible At least 25 feet minimum 25 Do not leave loose parts r...

Page 12: ...es could cause them to explode or f y apart Exceeding the pressure rating of air tools spray guns air operated accessories tires and other inf atables could cause them to explode or f y apart Always f...

Page 13: ...involved in running this type of equipment never attempt to refuel this unit while it is in operation or anywhere close to open f res or sparks Do not smoke while refueling the unit 38 Do not over f...

Page 14: ...14 Section 2 Introduction and Description...

Page 15: ...5 15 HP Electric 240 240 Gallon S Sprinkler 20 20 HP Electric B Base Plate DP Dryer Package 25 25 HP Electric 4HG 4 HP Honda Gas 5HG 5 HP Honda Gas 6HG 6 HP Honda Gas 8HG 8 HP Honda Gas 9HG 9 HP Honda...

Page 16: ...R A single or three phase open drip proof electric motor is furnished to drive the air compressor assembly Depending on the horsepower rating of the motor and phase the motor is capable of operating o...

Page 17: ...nd closing a ball valve The pilot valve is used to control the compressor when operating in the constant run and the pressure switch is used to control the compressor when operating in the stop start...

Page 18: ...wo components the contractor and a heater overload block The contractor is a switch designed to engage and disengage all the power to an electric motor The heater overload block is a protective device...

Page 19: ...19 Section 3 Preparation for Use and Initial Installation Instructions...

Page 20: ...nst the packing list Examine identif cation plates for positive identif cation of the equipment received If any of these components are missing please notify the distributor from whom the machine was...

Page 21: ...the most important service requirements for long term maintenance free operation is to replace or clean the air cleaner element regularly Excessive wear high oil consumption and poor performance will...

Page 22: ...both amperage and voltage Ensure that all connections are properly tightened Improper connections could result causing damage injury or death of the equipment operator This machine must be connected...

Page 23: ...he unit is equipped with an On Off switch move the switch to the On position Dual Control If the unit is Dual Control equipped and does not have an On Off switch turn the OFF AUTO MAN switch from the...

Page 24: ...24 Section 4 Operating Instructions...

Page 25: ...e crankcase of the pump through a clear window or sight glass Pressure Switch Start Stop Control Dual Control Starts and stops the unit at predesignated high and low pressures The compressor will star...

Page 26: ...a pressure switch to start and stop the electric motor The magnetic starter is primarily a switch which can take the full load of starting and stopping an electric motor when other switching devices...

Page 27: ...amage to the regulator may result CONNECTING AND DISCONNECTING HOSES To Connect 1 Ensure that the regulated pressure gauge reads 0 PSI and that all system pressure is relieved 2 Hold hose in hand at t...

Page 28: ...an be kicked up into face Use ear protection as air f ow noise is loud when draining All compressed air systems generate condensate that accumulates in any drain point e g tanks f lter aftercoolers dr...

Page 29: ...ISE CONSIDERATIONS Consult local off cials for information regarding acceptable noise levels in your area Hearing protection may be required if in close proximity to the compressor To reduce excessive...

Page 30: ...unit into position for use grasp the handle at the center of the unit and lift the unit off the ground Use proper lifting procedures in order to avoid injury Ensure proper footing and use caution whe...

Page 31: ...leaking from carburetor STORAGE Always store the compressor in the horizontal position on the machine s rubber feet and or wheels Always ensuring the pump is upright so that the oil does not f ow into...

Page 32: ...t three feet of clearance to all adjacent construction Failure to allow adequate ventilation or restrict the air f ow may cause the machine to overheat Damage to the machine operator and any other uni...

Page 33: ...gher rating without being certain the wire size is adequate to handle the increased electrical load Keep all electrical connections dry and off of the ground Observe all local and national codes for t...

Page 34: ...rt Continue until engine is running 2b If electric start turn switch past the On position to the Start position Hold switch in Start position until engine is running then release SHUTDOWN PROCEDURE 1...

Page 35: ...ne from the electrical service 3 Inspect for and tighten any loose nuts and or bolts 4 Check all accessories for damage and loose mountings Replace or repair any damaged accessories 4 Inspect the cont...

Page 36: ...36 Section 5 Maintenance Instructions...

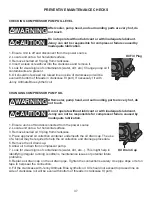
Page 37: ...touch Do not operate without lubricant or with inadequate lubricant Jenny can not be responsible for compressor failure caused by inadequate lubrication 1 Ensure unit is off and disconnected from the...

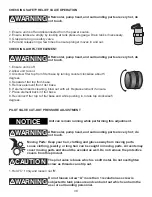
Page 38: ...place element if unsure 7 Place element back in f lter base 8 Reconnect f lter top to f lter base and while pushing in rotate top clockwise 5 degrees PILOT VALVE CUT OUT PRESSURE ADJUSTMENT Unit can r...

Page 39: ...s away from moving parts Loose clothing jewelry or long hair can be caught in moving parts Air vents may cover moving parts and should be avoided as well Do not remove the protective covers from this...

Page 40: ...o decrease the differential cut in pressure Do not set the pressure switch cut out pressure higher than the maximum factory setting This will cause the motor to draw excessive amps and cause damage to...

Page 41: ...tension with the gauge 11 Repeat steps 6 7 until the proper belt tension is achieved If no belt tension gauge is available then use this f gure to roughly approximate the belt drive tension The amoun...

Page 42: ...most defects will be discovered and corrected or avoided before they result in serious damage Dirt is the most common cause of faulty operation and excessive wear Every precaution should be taken to p...

Page 43: ...ce centers or other qualif ed service organizations always using identical replacement parts For the closest warranty repair center please contact us WARRANTY Full One Year Warranty Jenny Compressors...

Page 44: ...44 Section 6 Troubleshooting Instructions...

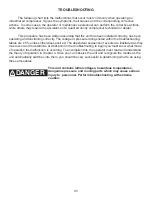
Page 45: ...ratings listed within the troubleshooting tables are 5 unless otherwise specif ed The dependent sequence of events are illustrated as they must occur and to determine at what point in the troubleshoot...

Page 46: ...nny Customer Service at 1 888 4 A JENNY Tanks have air pressure in them Bleed tanks fully Engine oil too low Low oil shut off is on Add engine oil Manual lock on pilot valve is in the loaded position...

Page 47: ...scaping Check joint with soap solution Do not overtighten Crankcase overf lled with oil Drain oil Ref ll to proper level with Jenny Ultimate Blue Synthetic Oil Manual lock on pilot valve is in the loa...

Page 48: ...cient pressure at air tool or accessory Clogged or dirty inlet and or discharge line f lter Clean or replace Lubricant viscosity too high Drain existing lubricant and ref ll with Jenny Ultimate Blue...

Page 49: ...nce Piston rings not seated are stuck in grooves or end gaps not staggered Install new rings Cylinder or piston scratched worn or scored Repair or replace as required Connecting rod piston pin or cran...

Page 50: ...air required Check the accessory air requirement If it is higher than the CFM or pressure supply of the air compressor you need a larger air compressor Defective gaskets Replace and torque head bolts...

Page 51: ...alves as required Air compressor on unlevel surface Do not incline the air compressor more than 10 in any direction while running Crankcase overf lled with oil Drain oil Ref ll to proper level with Je...

Page 52: ...end gaps not staggered Install new rings Cylinder or piston scratched worn or scored Repair or replace as required Connecting rod piston pin or crank wrist pin bearings worn or scored Inspect all Repa...

Page 53: ...low Add Jenny Ultimate Blue Synthetic Oil to crankcase to proper level Check for bearing damage Detergent type lubricant being used Drain existing lubricant and ref ll with Jenny Ultimate Blue Synthe...

Reviews: