background image

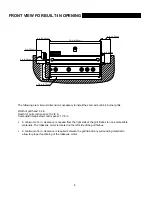
FRONT VIEW FOR BUILT-IN OPENING 


32 in.(81.28cm)

6 in.(15.24cm)

8 in.(20.32cm)

10 7/8 

in.(27

.62cm)

350

300

250

200

150

100

50
°

C

°

F

700

600

500

400

300

200

100

3 in.(7.62cm)

9

 in

.(22.86cm)

1 7/8 in.(4.76cm)

2 in.(5.08cm)

2 in.(5.08cm)


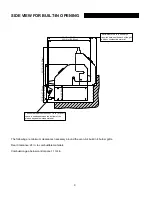
The following are minimum dimensions necessary to install the Jenn-Air built-in 4 burner grills. 
 
Width of grill head: 32 in. 
Depth for grill control panel: 10 7/8 in. 
Combustion Gap below control panel: 1 7/8 in. 
 

ƒ


A minimum of 6 in. clearance is needed from the right side of the grill firebox to non-combustible 
materials. The rotisserie motor is located on the left side of the grill firebox.   


ƒ


A minimum of 8 in. clearance is required between the grill lid and any surrounding material to 
allow for proper functioning of the rotisserie motor. 


8

Summary of Contents for 750-0141

Page 1: ...EM s 168932 168931 Jenn Air is a Trademark of the Maytag Corporation and is used under license to Lowe s Companies Incorporated 800 700 600 500 400 300 200 100 FOR OUTDOOR USE ONLY A22Y07 3 PLEASE CON...

Page 2: ...ated surface Keep the rotisserie motor electric cord away from the heated surfaces of the grill When not in use remove and store the motor in a dry location RECOGNIZED SAFETY SYMBOLS WORDS AND LABELS...

Page 3: ...from the gas supply piping system by closing its individual manual shutoff valve during any pressure testing of the gas supply piping system at test pressures equal to or less 1 2 psi 3 5 kpa WARNING...

Page 4: ...r or replace any part of the grill unless specifically recommended in this manual All other service should be referred to a qualified technician This grill is not intended to be installed in or on rec...

Page 5: ...der Turn off grill controls and make certain the grill is cool before using any type of aerosol cleaner on or around the grill The chemical that produces the spraying action could in the presence of h...

Page 6: ...ncluded with quick connect fitting for attachment to house natural gas line Gas Requirements Liquid Propane Supplied with hose regulator assembly for connection to standard 5 gal 20 lb liquid propane...

Page 7: ...learance of at least 24in 60 96cm from all sides to combustible materials Non Combustible material needs to be used for built in enclosure The proper selection of material could be brick firewall or s...

Page 8: ...attaching the NG regulator to the island 7 750 0141 1 7 16 in 3 65cm 10 1 8 in 25 72cm 13 16 in 2 06cm 16 7 8 in 42 86 16 7 8 in 42 86 7 7 8 in 20cm 10 1 8 in 25 72cm 1 7 16 in 3 65cm 16 7 8 in 42 86...

Page 9: ...he Jenn Air built in 4 burner grills Width of grill head 32 in Depth for grill control panel 10 7 8 in Combustion Gap below control panel 1 7 8 in A minimum of 6 in clearance is needed from the right...

Page 10: ...is required between the back of the grill and any combustible material To ensure proper combustion 1 7 8 in 4 76cm space is needed between the bottom of the qrease tray andthe island material The fol...

Page 11: ...ition button housing by turning counterclockwise 2 Insert the battery into the housing with the positive terminal facing outward 3 Replace the ignition button housing after the battery has been instal...

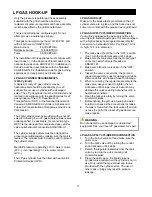
Page 12: ...with an Overfill Protection Device OPD LP GAS HOOK UP Make sure the black plastic grommets on the LP cylinder valve are in place and the hose does not come into contact with the grease tray or grill h...

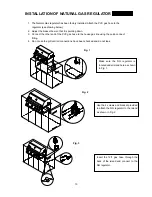
Page 13: ...00 3 00 2 00 10 0 Fig 2 Use the 4 screws and clamp provided to attach the brass connector to the island as shown in Fig 2 The brass connector is located between the flex tube and gas hose CL OS E O P...

Page 14: ...k connect fitting 4 Do not use the grill until all connections have been checked and do not leak 13 80 0 7 00 6 00 500 4 00 300 200 100 Fig 1 80 0 70 0 60 0 50 0 4 00 30 0 20 0 100 800 700 600 5 00 40...

Page 15: ...se assembly must be specified by the grill manufacturer The installation of this appliance must conform with the local codes or in the absence of local codes to the national fuel gas code ANSI Z223 1...

Page 16: ...ion or wear or the hose is cut it must be replaced prior to the outdoor cooking gas appliance being put into operation Only those parts recommended by the manufacturer should be used on the grill Subs...

Page 17: ...vidual shutoff valve must be disconnected from the gas supply piping system during any pressure testing of that system at test pressure in excess of 1 2 psi 3 5 kpa 2 The outdoor cooking gas appliance...

Page 18: ...ntrol knob may be positioned at any setting between IGNITE HI and LO USING THE ROTISSERIE BURNER Your grill is capable of performing back burner rotisserie cooking Light the rear burner as described i...

Page 19: ...ecure insert the skewer into the motor It is normal for the skewer to flex when larger cuts of meat are being cooked It may also be necessary to remove the cooking grids for larger cuts of meat If the...

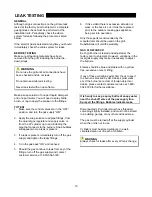
Page 20: ...nd then try again 4 If the burners still do not light follow the match lighting instructions on page 21 Yellow flames indicate insufficient air Noisy flames or flames that lift away from the burner in...

Page 21: ...ic ignition button until burner is lit Once lit release electronic ignition button and still hold in the Rear Burner knob for another 15 seconds if the burner does not ignite follow match lighting ins...

Page 22: ...t through the cooking grids to the burner 3 Press and turn the control knob to the IGNITE HI setting Continue to press the knob until the burner ignites The burner should light immediately 4 If the bu...

Page 23: ...urners have cooled GRILL BURNER CLEANING 1 Turn off the gas supply and make sure the control knobs are in the OFF position 2 Make certain the grill is cool and clean the exterior of the burner with a...

Page 24: ...tact customer service at 1 800 554 5799 Low heat with the knob on HI Check to see if the fuel hose is bent or kinked Make sure the grill area is clear of dust Check your gas supply and gas pressure If...

Page 25: ...EXPLODED VIEW MODEL 750 0141 01 03 02 05 14 41 40 39 38 11 12 08 28 27 24 13 10 09 37 17 18 34 36 22 15 16 26 25 20 21 31 30 29 33 19 42 35 23 32 800 700 600 500 400 300 200 100 04 04 04 04 24...

Page 26: ...tor A 1 9 Thermocouple Bracket 1 30 Regulator NG 1 10 Thermocouple 1 31 NG Brass Connector B 1 11 Rotisserie Burner 1 32 NG Regulator Clamp 1 12 Rotisserie Orifice W Brass Elbow 1 33 NG Hose W Quick C...

Page 27: ...EXPLODED VIEW MODEL 740 0141 01 03 02 05 14 38 37 36 35 11 12 08 30 29 28 27 24 13 10 09 34 17 18 04 04 31 33 22 15 16 26 25 20 21 19 42 39 23 32 41 800 700 600 500 400 300 200 100 40 04 04 26...

Page 28: ...gulator LP 1 9 Thermocouple bracket 1 30 90 Degree Brass Adaptor 1 10 Thermocouple 1 31 Flange Right 1 11 Rotisserie Burner 1 32 Main Burner Flex Gas Clamp 1 12 Rotisserie Orifice W Brass Elbow 1 33 M...

Page 29: ...egin to bubble to the surface Trim excess fat from the meat before cooking To prevent steaks or chops from curling during cooking slit the fat around the edges at 2 inch intervals WARNING Do not leave...

Page 30: ...h intervals Grill turning once 1 1 2 inch High 11 to 18 minutes Medium 1 inch Medium to 12 to 22 minutes 1 1 2 inch High 16 to 27 minutes Well done 1 inch Medium 18 to 30 minutes 1 1 2 inches Medium 1...

Page 31: ...ryer 2 to 3 pounds Low or 1 to 1 1 2 hours Place skin side up Grill turning and brushing frequently with melted butter margarine oil or marinade Halved or Medium 40 to 60 minutes Quartered well done B...

Page 32: ...with the marinade occasionally Serve with mixed salad dressed with vinaigrette flavored with fresh dill BARBECUED POTATOES and CHEESE 1 1 2 cups shredded cheddar cheese 1 can 10 3 4 oz condensed crea...

Page 33: ...e ingredients in a large mixing bowl and marinate the chicken for 8 hours in the refrigerator Drain the chicken and spread on the spit running the rod on the fleshier side of the bone Bake using the r...

Page 34: ...ur factory service center The warranty period is not extended by such repair or replacement Product repair as provided under this warranty is your exclusive remedy Nexgrill Industries Inc shall not be...

Page 35: ...e Grill Care and Maintenance Troubleshooting SECTION FIVE Exploded View Model 750 0141 Parts List Model 750 0141 Exploded View Model 740 0141 Parts List Model 740 0141 SECTION SIX Grilling Hints Grill...

Reviews: