Validator
™
-series
Ethernet Speed Certifier
Validator and Validator-NT
Quick Start Guide, page 1
Essentials of Auto Testing
A.
Turn on unit with Power Button (12)
B.
Use Navigation Arrows (8) to highlight Auto test
C.
Press Select Button (9)
D.
Navigate to Job Utilities and press Select Button (9)
E.
Select NEW for new job
F.
Use Alphanumeric Keypad (13) to name the job and press
Accept Button (6)
G.
Now press the Function Key (5) labeled OK (F3)
H.
Select Cable Test Schedule
I.
Use the F1 Function Button to add cables. Change cable Type
and identify where the cable runs FROM and TO. Use
navigation Arrows (8), Select Button (9), and Accept Button (6)
and Alphanumeric Keypad (13) to enter information.
J.
Connect Cable to Main unit and Smart Remote then press
Test Button (11)
K.
Continue adding and testing cables until the job is complete
Network Test Mode (Validator-NT)
A.
Turn on unit with Power Button (12)
B.
Use Navigation Arrows (8) to highlight Network Tests
C.
Press Select Button (9)
D.
Navigate to type of test you wish to perform and press
Select Button.
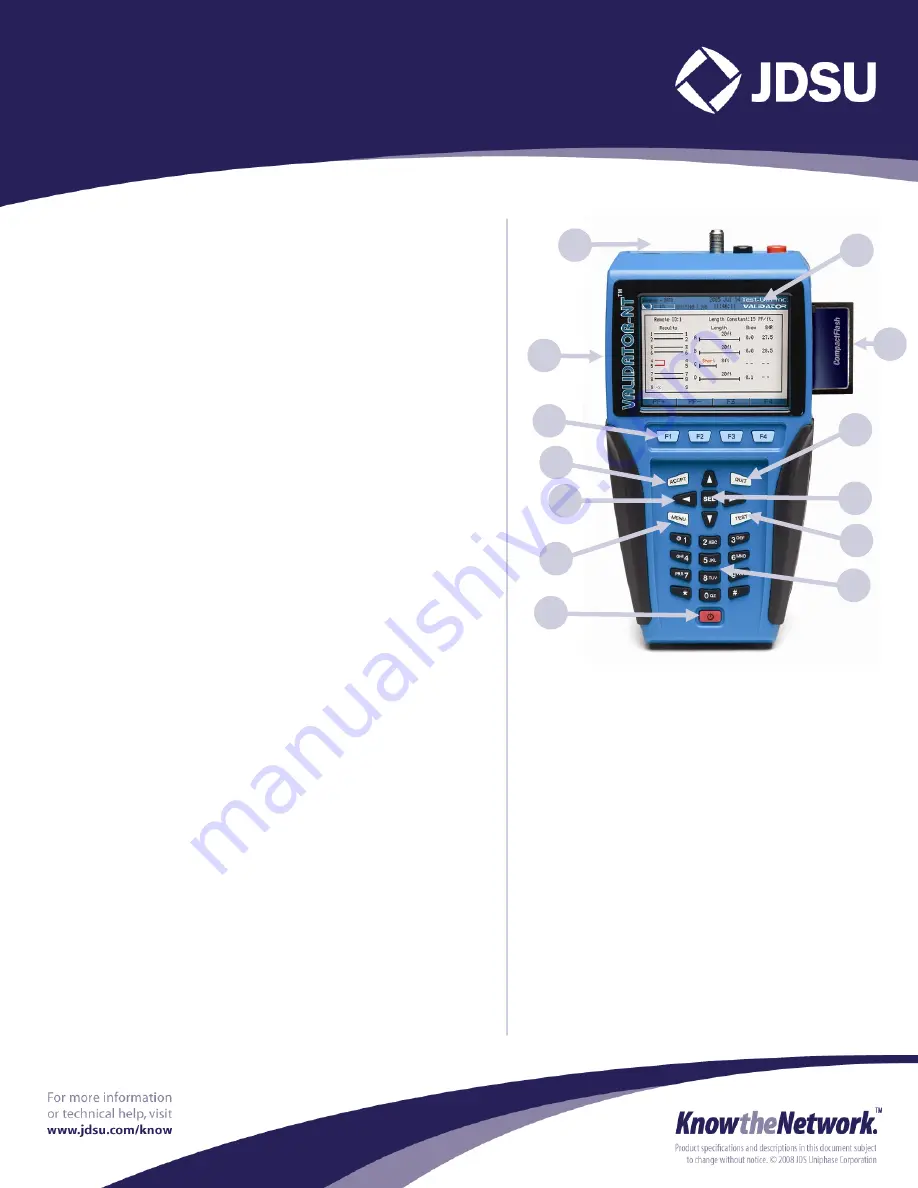
Main Unit Connections
and Buttons
1.
Test Jacks
2.
Color LCD Screen
3.
Serial/USB ports & Power Plug
4.
Compact Flash Card
5.
Context Sensitive Function Keys
6.
Accept Button
7.
Quit Button
8.
Navigation Arrows
9.
Select Button
10. Menu Button
11. Test Button
12. Power Button
13. Alphanumeric Keypad
Manual Test Mode
A.
Turn on unit with Power Button (12)
B.
Use Navigation Arrows (8) to highlight Manual Tests
C.
Press Select Button (9)
D.
Navigate to type of cable to be tested and press Select
Button.
E.
Use Navigation Arrows and Select Key to select the
type of test you would like to perform on the selected
cable type.
F.
Note that some tests require the use of the Validator
Remote. Other tests can be performed with full test
remotes (#1-#8) or with ID-only remotes (#1-#20)
2
7
11
5
6
9
8
13
1
4
12
3
8
10


