

TA327 SPOT LIGHT RED DOT
USER INSTRUCTIONS
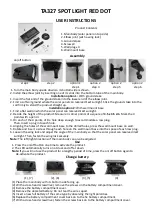
Product Contents
1. Main body (solar panel on top side)
2. Elbow joint (with a wing lock)
3. Ground stake
4. Screw x4
5. Wall plug x 4
6. Wall mount base
Assembly
step 1 step 2 option 1 option 2 option 2 option 2
step 1 step 4 step 5 step 6
1. Turn the main body upside down so its bottom side is shown.
2. Install the elbow joint by inserting one of its ends into the bottom tube of the main body.
Installation option 1:
With ground stake
1.
Insert the flat end of the ground stake into the lower end of the elbow joint.
2. Find a soft soil ground where the solar panel can receive direct sunlight. Stick the ground stake into the
soil firmly to stand the product straight up.
Installation option 2:
With wall mount base
1. Find a flat wall on which the solar panel can receive direct sunlight.
2. Decide the height of the product. Measure 4 corner points of a square of
3.5 x 3.5 cm
. Mark the 4
points with a pencil.
3. On each of the 4 points, drill a hole deep enough to accommodate a raw plug.
Then, Insert a plug into each hole.
4. Aligning the holes of the wall mount base to the drilled holes, press the wall mount base on wall.
5. Rotate and insert a screw through each hole on the wall mount base into the space of each raw plug.
6. Loosen the wing lock and adjust the angle of the main body so that the solar panel can receive direct
sunlight. Then, fasten the wing lock securely.
Note:
The left/right directions of the main body can also be adjusted.
Use
1. Press the on/off button one time to activate the product.
2. The LED automatically turns on at dusk and off at dawn.
Note:
If you will not use the product for a lengthy period of time, press the on/off button again to
de-activate the product.
Change battery
(1), (7) (2), (6) (3), (5) (4)
(1) Place the main body with its bottom side facing up.
(2) With a cross-head screwdriver, remove the screws on the battery compartment cover.
(3) Remove the battery compartment cover.
(4) Remove the depleted battery. Do not tear the wires apart.
(5) Insert a new full battery of the same type by observing the right polarities.
(6) Replace the battery compartment cover back on to the he battery compartment.
(7) With a cross-head screwdriver, fasten the screws back on to the battery compartment cover.
1
3
2
4
5
6
on/off button


