background image

5.

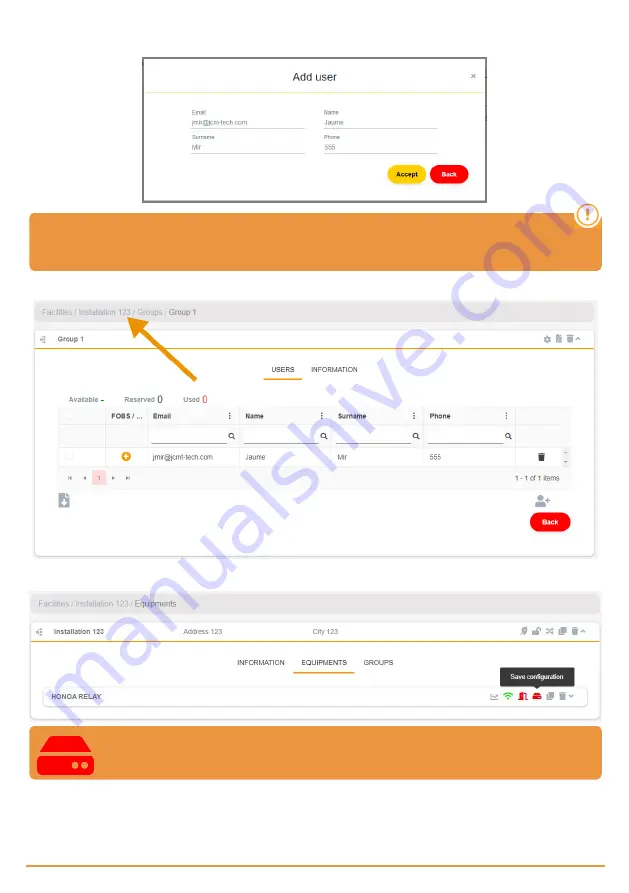
Complete the fields with the user information.

Accept

. The different users must provide the email used for their Honoa

account.

When a user is registered with cloudAssistant, they will automatically have access to the install-

ation with the Honoa application.

6.

Click "Installation Name" in the upper gray bar to go to installation.

7.

Equipments

->

Save configuration

.

Every time an equipment parameter is modified, you must Save con-
figuration.

It is not necessary to press Save configuration to update HONOA user authorizations.

Configure relays and assign traffic schedules

On the equipment's "Relays" screen:

jcm

technologies

15

Summary of Contents for HONOARELAY

Page 1: ...HONOARELAY User Manual...

Page 2: ...onfiguration with cloudAssistant 10 Registering the equipment 10 Registering groups and users 13 Configure relays and assign traffic schedules 15 Set group schedules 17 Administration Honoa 18 Events...

Page 3: ...tem must only be installed by qualified professionals that have with automated garage doors and knowledge of the relevant European standards The user instructions for this device must always be in the...

Page 4: ...g the entry status in cloudAssistant Reading events in cloudAssistant Remote activation of the device with the HONOA APP No Internet connection is required for Setting up the device in cloudAssistant...

Page 5: ...ivation BETA function may be disabled for the entire device in cloudAssistant WIFI GSM Module The equipment has a WIFI GSM communication module for connection to the Internet and for remote opening wi...

Page 6: ...jcmtechnologies 6...

Page 7: ...t switches POWER INPUT 12 24Vdc power supply Relay 1 Output Channel 1 relay contact normally open Relay 2 Output Channel 2 relay contact normally open Characteristics of output relays for resistive lo...

Page 8: ...4007 along with the electric lock or suction cups is necessary in parallel Example relay connection 1 AC inductive loads 30Va 30Vac 1A 750000 manoeuvres A varistor V68ZA2 with electric lock or suction...

Page 9: ...e LED lights see the image on page 6 Use your phone or computer to connect to the WIFI network HONOARELAY_0000000000 0000000000 is in reference to the device s serial number found on the label on the...

Page 10: ...ernet connection it can be configured 1 Enter cloudAssistant https cloudassistantv4 jcm tech com login and login 2 Add facility orange button located in the lower right corner 3 Fill the fields Save T...

Page 11: ...Equipments Add equipment orange button located in the lower right corner 5 Enter a name for the device and select HONOARELAY Save The name of the device will appear in the HONOA APP jcmtechnologies 1...

Page 12: ...te see Operational Mode The Activation key and the Timezone are the only mandatory fields to register users when the device is disconnected Reminder the device need not be configured to operate proper...

Page 13: ...Registering groups and users 1 Groups Add orange button located in the lower right corner 2 Enter Name and Description Save jcmtechnologies 13...

Page 14: ...ng any of the channels HONOA activates relays Back If this is a group of devices working with fobs the selected channels match the function that the fob will have 4 On the group screen Add user to add...

Page 15: ...to the install ation with the Honoa application 6 Click Installation Name in the upper gray bar to go to installation 7 Equipments Save configuration Every time an equipment parameter is modified you...

Page 16: ...cally based on the assigned weekly hours Without assigned hours the relay operates normally Custom open door time schedule Activation time goes from 1 second to the time selected in Door open time bas...

Page 17: ...roups Group users can only activate the relay when within the assigned hours If there is no assigned schedule it can always be activated For the schedule to work the device must be connected to the In...

Page 18: ...oa HONOA users may view your contact information by clicking on the logo to the bottom left of the device in the HONOA APP Contact information can be changed on the Honoa screen under Administration j...

Page 19: ...connection the device keeps working but without sending the events in real time In this case the events are stored locally on the device To load the list of events from the device go to the Events scr...

Page 20: ...have it connected to the Internet Go to Facilities Facility name Equipments Select Remote State button with the door We can view the status of the inputs and remotely activate the equipment s relays...

Page 21: ...ing Use embedded web or WPS to configure connectivity Wi Fi GSM Configuring timeout Reset device Connecting Wi Fi GSM WAIT WIFI GSM Error WRONG WI FI GSM PASSWORD Internet Connecting WAIT Internet Err...

Page 22: ...Notes jcmtechnologies 22...

Page 23: ...Notes jcmtechnologies 23...

Page 24: ...roduct HONOARELAY complies with the relevant fun damental requirements of the Radio Equipment Regulations 2017 and of the RoHS Regulations 2012 EU Declaration of conformity The manufacturer JCM TECHNO...

Reviews: