Operation Manual
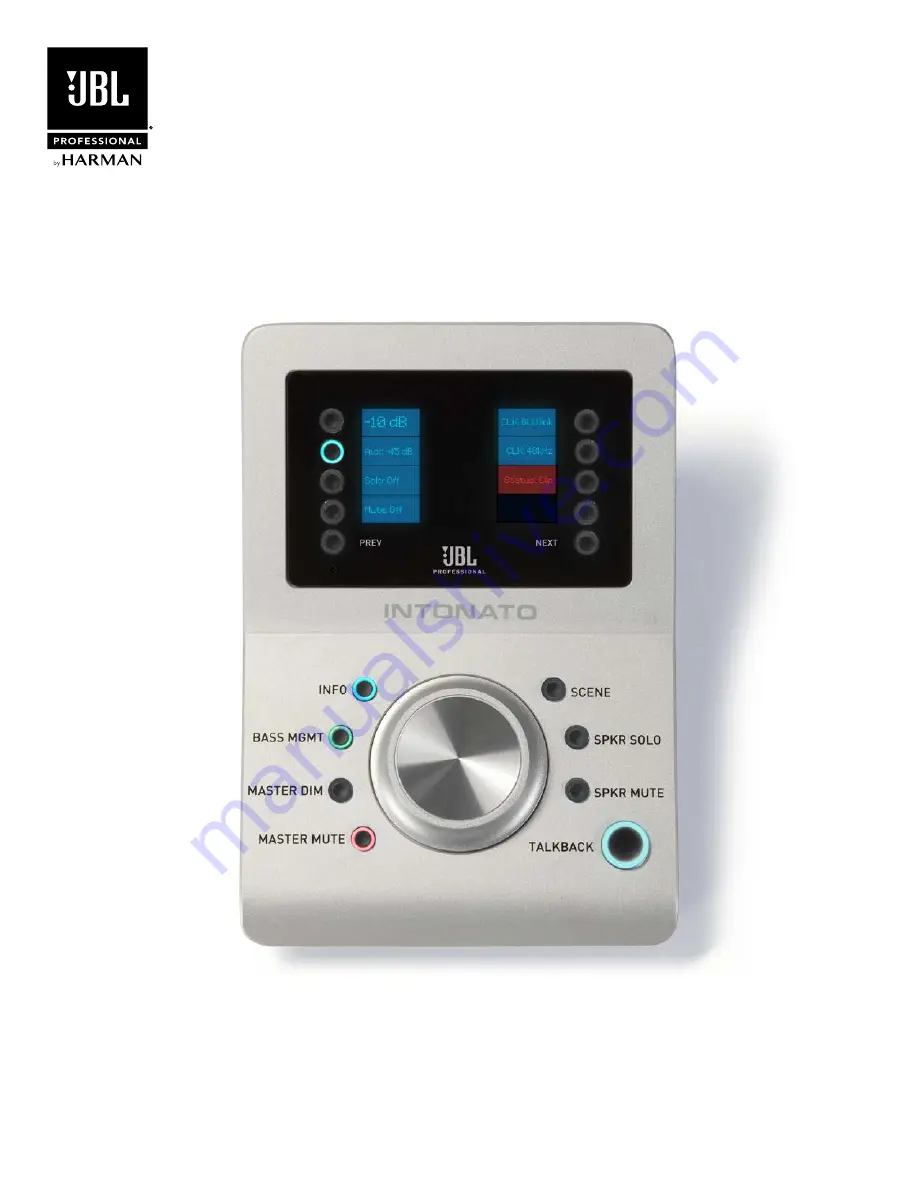
INTONATO
DC
Monitor Management Desktop Controller
Page 1: ...Operation Manual INTONATO DC Monitor Management Desktop Controller ...
Page 2: ... 11 Operating the Intonato DC 13 The Info Screen 13 Turning Bass Management On or Off 13 Dimming the System 14 Dimming and Muting the System 14 Adjusting System Volume 15 Adjusting Aux Output Volume 15 Muting Individual Speakers 16 Soloing Individual Speakers 16 Recalling Scenes 17 Modifying the Scene Order 17 Using Talkback 18 Using the Boot Menu 19 Updating Firmware 20 Networking 21 Networking O...
Page 3: ...erpiece for a scalable audio production monitoring system Features System volume mute and dim control Aux output volume control Solo and mute control for each speaker output with support for muting and soloing multiple channels simultaneously Bass management on off button Scene recall scenes can be used to select a different input source to monitor select an alternate monitoring system for referen...
Page 4: ...ons Pressing these buttons will navigate to the next or previous screen of available options in the LCD where applicable The PREV and NEXT button LEDs will light when other screens of options are available for selection 4 Recessed Button Press and hold this recessed button upon power up to enter the Boot menu See Using the Boot Menu on page 19 for more information 5 ROTARY VOLUME Control Adjusting...
Page 5: ...ed for master volume control in the intonato 24 device The aux outputs will not be affected by the MASTER MUTE button 10 SCENE Button Scenes are used to select between sources or speaker systems for monitoring or for monitoring fold down mixes Press the SCENE button then use the NEXT PREV and OPTION buttons to select the desired scene for recall When the SCENE button is illuminated the OPTION butt...
Page 6: ...oller via an IEEE 802 3af compliant PoE Power over Ethernet device NOTE PoE IEEE 802 3at compliant devices are backwards compatible with the IEEE 802 3af standard and can also be used with the Intonato DC There are two types of PoE PoE devices that can be used to supply power to the Intonato DC A PoE enabled network switch referred to as an endspan or endpoint An inline power injector referred to ...
Page 7: ...gotiate with the network so it can be assigned an IP address this can take a few minutes The Boot menu can be used to verify that the Intonato DC is being assigned an IP address by the DHCP server See Using the Boot Menu on page 19 for more information NOTE For more information on networking including troubleshooting tips see Networking on page 21 TIP Once connection to the network has been establ...
Page 8: ...ntonato DC is being assigned an IP address by the DHCP server See Using the Boot Menu on page 19 for more information NOTE For more information on networking including troubleshooting tips see Networking on page 21 TIP Once connection to the network has been established using a DHCP server the Netsetter application can be used to edit network and HiQnet address settings for all connected HiQnet de...
Page 9: ... address by the DHCP server See Using the Boot Menu on page 19 for more information NOTE For more information on networking including troubleshooting tips see Networking on page 21 TIP Once connection to the network has been established using a DHCP server the Netsetter application can be used to edit network and HiQnet address settings for all connected HiQnet devices See Using HiQnet NetSetter o...
Page 10: ...e Intonato 24 for control It is available for compatible Android iOS Mac and Windows devices Device Requirements Visit http www jblpro com intonato24 for the latest information on device requirements for the JBL Intonato control app Downloading and Installing the App Download and install the JBL Intonato control app from the iTunes Store Google Play or from http www jblpro com intonato24 ...
Page 11: ...e Controlling an Intonato 24 Device Follow these steps to pair the Intonato DC with an Intonato 24 for control 1 Launch the JBL Intonato control app 2 Press the Connect button for the Intonato 24 that will be controlled 3 From the Main User Menu select Desktop Controller ...
Page 12: ... the connected Intonato 24 for control 5 Select the desired LCD and button brightness using the Brightness dropdown menu 4 brightest 1 dimmest In most cases it is recommended that a high Brightness setting be used e g 4 as this will allow a higher contrast between active and inactive LED states 6 The Intonato DC is now ready for use ...
Page 13: ...k Turning Bass Management On or Off Press the BASS MGMT button to toggle bass management on LED lit or off LED off When turned off the satellite speakers configured for bass management will receive a full range signal and the subwoofer s will not receive any bass managed signal Note that assigned LFE channels will still be routed to the subwoofer s NOTE In order to use the bass management feature ...
Page 14: ...e Master Dim button 21 0dB Aux 9dB Solo Off Mute Off CLK Internal CLK 48000Hz Status Ok 21 0dB Aux 9dB Solo Off Mute Off CLK Internal CLK 48000Hz Status Ok Dimming and Muting the System Press the MASTER MUTE button to mute the speaker system NOTE Only speakers configured for master volume control in the Intonato 24 will be controlled by the Master Mute button 21 0dB Aux 9dB Solo Off Mute Off CLK I...
Page 15: ...d for master volume control in the Intonato 24 will be controlled by the Rotary Volume control 21 0dB Aux 9dB Solo Off Mute Off CLK Internal CLK 48000Hz Status Ok 21 0dB Aux 9dB Solo Off Mute Off CLK Internal CLK 48000Hz Status Ok Adjusting Aux Output Volume From the Info screen press the OPTION button next to the Aux level indication on the screen and then turn the ROTARY control to raise and low...
Page 16: ...olo Off Mute Off CLK Internal CLK 48000Hz Status Ok Speaker 1 Speaker 2 Speaker 3 Speaker 4 Speaker 7 Speaker 8 Speaker 6 Speaker 5 Soloing Individual Speakers Press the SPKR SOLO button then use the PREV NEXT and OPTION buttons to select the speaker outputs to solo Multiple speaker outputs can be soloed simultaneously Press the INFO button to exit Speaker Solo mode 21 0dB Aux 9dB Solo Off Mute Of...
Page 17: ...ton SCENE LED lit Navigate to the scene that will be moved use the PREV and NEXT buttons if required Press and hold the OPTION button for the scene to move once the display next to the OPTION button begins to flash release the button Navigate to the location where the selected scene will be moved use the PREV and NEXT buttons if required Press and hold the OPTION button for the location where the ...
Page 18: ...a momentary button so the talkback mic will remain active for as long as the TALKBACK button is held NOTE Talkback functionality is only available if the Intonato 24 has been configured for talkback control 21 0dB Aux 9dB Solo Off Mute Off CLK Internal CLK 48000Hz Status Ok 21 0dB Aux 9dB Solo Off Mute Off CLK Internal CLK 48000Hz Status Ok ...
Page 19: ...as a paper clip or pin for approximately 10 seconds INTONATO 3 Select the desired menu option using the OPTION buttons to the left of the display 21 0dB Aux 9dB Solo Off Mute Off CLK Internal CLK 48000Hz Status Ok Reboot Factory Reset Demo Mode Network Status Firmware Version NOTE When performing the factory reset all settings in the Intonato DC will be reset i e any static IP address settings and...
Page 20: ... to update the firmware 1 From the Main User Menu in the JBL Intonato control app select Desktop Controller 2 Ensure the Intonato DC is connected If the Connect button is visible press it 3 Navigate to the second screen by swiping left or selecting the second bubble at the bottom then press the Check for Updates button If an update is available the update can be downloaded and installed ...
Page 21: ... mask code 255 identifies the part of the address that is the Network ID For example suppose the IP address of a device is 192 168 xx yy and the subnet mask is 255 255 x y That means 192 168 is the Network ID The remaining set of numbers xx yy is the Host ID If the network stands alone it is not part of a larger network then the Host ID identifies each device in the network If the network is part ...
Page 22: ... the Intonato DC and all network peripherals switches routers bridges etc are powered on and wait a few minutes to allow all devices to boot and get assigned IP addresses Look at the Intonato 24 s back panel LCD and ensure it has an IP address Also ensure the Intonato DC is being assigned an IP address by using the Boot menu see Using the Boot Menu on page 19 If either the Intonato 24 or Intonato ...
Page 23: ...ed IP addresses If the DHCP server is properly configured and the Intonato DC Intonato 24 and control device have compatible network settings but still won t communicate traffic is likely being prohibited by a software or hardware firewall If connecting using a router switch that has an enabled hardware firewall try disabling the firewall and then relaunching the JBL Intonato control app If this f...
Page 24: ...f discovered devices and the IP address of the DHCP server There is also information regarding the PC HiQnet Address IP Address and Subnet Mask Follow these steps to configure Intonato devices with static IP addresses 1 Uncheck the DHCP Auto IP checkbox 2 Click in the IP Address field and enter the desired IP address for each Intonato device Note that each device must have a unique IP address 3 Cl...
Page 25: ...ual Dimensions Dimensions 21 0dB Aux 9dB Solo Off Mute Off CLK Internal CLK 48000Hz Status Ok 21 0dB Aux 9dB Solo Off Mute Off CLK Internal CLK 48000Hz Status Ok 0 100 2 54mm 4 700 119 38mm 6 734 171 044mm 2 836 72 034mm 0 952 24 181mm ...
Page 26: ... Rotary volume control OTHER Operating Temperature Range 0º to 40º C 32º to 104º F POWER REQUIREMENTS Voltage 44 57 VDC Power Consumption 13 Watts PHYSICAL Unit Weight 1 0 lb 0 45 kg Shipping Weight 1 7 lbs 0 76 kg Unit Dimensions 2 84 H x 6 73 L x 4 70 W 72 0mm H 117 0mm L x 119 4mm W Shipping Carton Dimensions 5 75 H x 8 75 L x 7 W 146 mm H x 222 25 mm L x 177 8 mm W Specifications subject to ch...
Page 27: ... trademark of 3Com Corporation NETGEAR and ProSafe are trademarks and or registered trademarks of NETGEAR Inc and or its subsidiaries in the United States and or other countries Dell and PowerConnect are trademarks and or registered trademarks of Dell Inc in the United States and or other countries ...
Page 28: ...e be sure to save the original shipping cartons because a charge will be made if replacement cartons are requested Payment of shipping charges is discussed in the next section of this warranty How to Obtain Warranty Service If your JBL product ever needs service write or telephone us at JBL Incorporated Attn Customer Service Department 8500 Balboa Boulevard PO Box 2200 Northridge California 91329 ...
Page 29: ...rea A complete list of JBL Professional international distributors is provided at our U S A website www jblpro com En Dehors des Etats Unis Contacter votre Distributeur JBL Professional Une liste complète de nos distributeurs internationaux est disponible sur le site web www jblpro com International Wenden Sie sich an Ihre örtliche JBL Professional Vertretung Eine vollständige Liste der internatio...
Page 30: ...5090347 00 Rev A Issued 6 2017 Operation Manual INTONATO DC 8500 Balboa Boulevard Northridge CA 91329 USA www jblpro com ...