Uncompromising and Extreme Audio Solutions
REFERENCE Turntable
Manual
Page 1: ...Uncompromising and Extreme Audio Solutions REFERENCE Turntable Manual ...
Page 2: ...e cord When choosing a location for the turntable choose a place out of direct sunlight if possible Avoid putting the turntable next to devices emitting high levels of heat such as Class A amplifiers heaters radiators or ovens Excessive heat can damage or shorten the life of plastic elements discolor materials and in extreme situations represent a fire hazard Also avoid placing the turntable s pow...
Page 3: ...2 4 Place the Motors 13 2 5 Remove the Templates 14 2 6 Grease the Bearing 14 2 7 Placing the Platter 17 2 8 Place the Glass Mat 19 2 9 Mount the Drive Belts 20 2 10 Place Arm Tower 22 2 11 Change Tonearm Inserts As needed 22 2 12 Re Level Your Turntable 24 2 13 Connect the Motors 25 2 14 Connect Power Supply 26 3 Using Your Turntable 27 3 1 Powering On Off 27 3 2 Using the Clamp 27 3 3 Starting S...
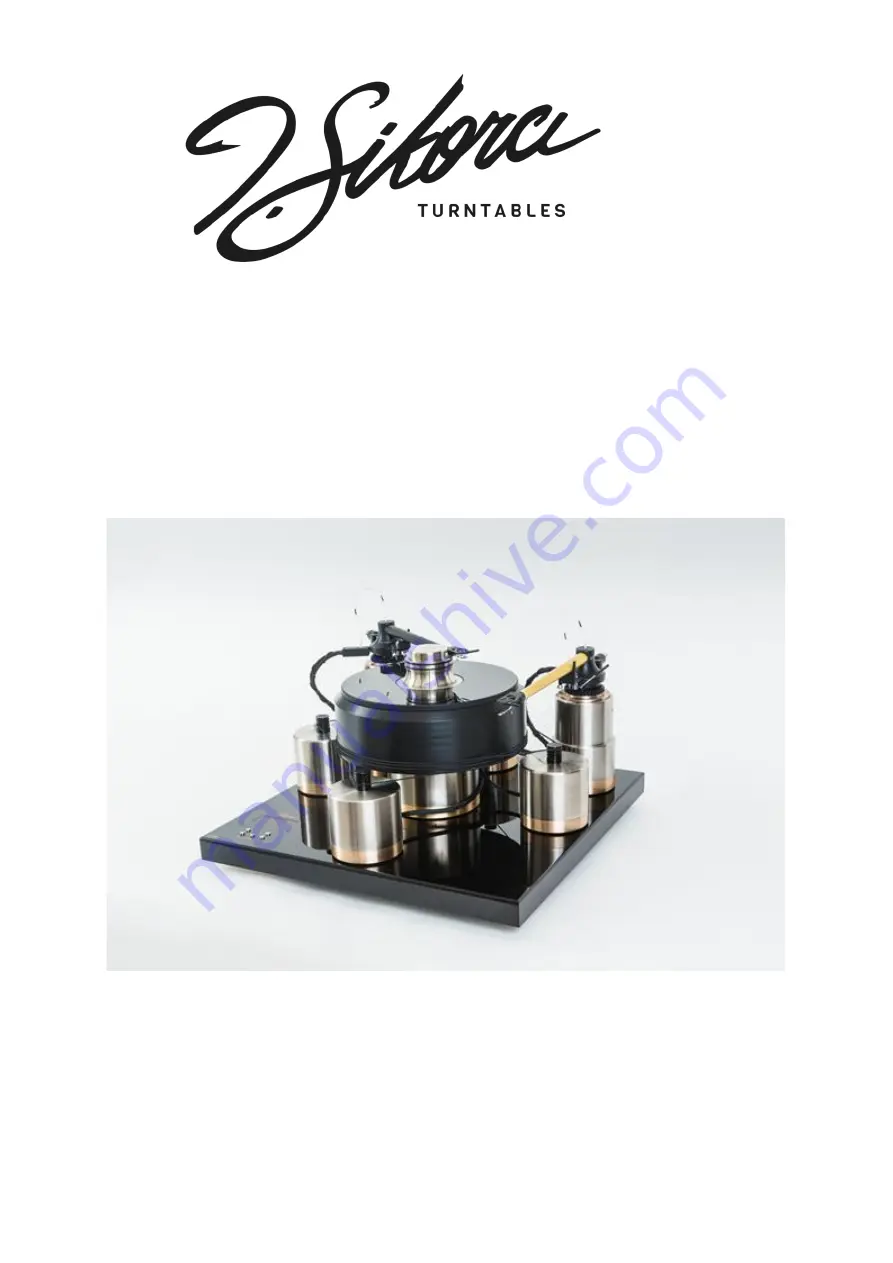
Page 4: ...Dimensions Total weight 115 kg 253 lbs Platter weight 18 kg 40 lbs Motor pcs 4 DC Speeds available 331 3 45 rpm Dimensions WxDxH 560 x 560 x 380 mm 22 x 22 x 15inches Isolation Base Table Chassis Motor Arm Tower Optional Arm Tower Tonearm Not Included Tonearm Not Included Motor Controller Motor Clamp Glass Mat Platter Belts Tonearm Insert Motor ...
Page 5: ...rofiber cloth for cleaning the table 1 x set of silver colored hex wrenches 1 x black hex wrench for adjusting fee 1 x set of J Sikora Monogramed Coasters 3 North American models only 1 x precision bubble level North American models only 1 x pair of white gloves North American models only 1 x plinth with control unit 1 x plexiglass stencil 1 x platter base with bearing 1 x tonearm tower 1 x platte...
Page 6: ... in separate layers of foam The protective cloth can leave lint on some surfaces Use the included lint free cloth to remove any lint before assembling your turntable Before unpacking be sure that you prepare a space on which to assembly your turntable If you think you may need to re pack the turntable sometime in the future we advise that you take pictures of each layer while you unpack the turnta...
Page 7: ...ake the major leveling adjustments to the rack and then perform only the fine leveling with the turntable s feet It is far easier to adjust your rack without a heavy turntable on it 2 1 Set the Isolation Base 2 1 1 Place the Isolation Base The Isolation Base is heavy so if you place the Legs directly on your shelf it may well scratch the shelf So a set of leather J Sikora Coasters are included for...
Page 8: ... Base to its desired location 2 1 2 Add Isolation Feet The next step is to replace the Coasters with the Isolation Feet which are composed of Aluminum Discs and large Ceramic Ball Bearings These parts will act to isolate the table from the shelf Locate the bag with the three Aluminum Discs Place the Discs on the shelf Next locate the bag with the three large Isolation Ball Bearings Note that there...
Page 9: ...lift the Foot into the foot into the Leg and then lower the Isolation Base Doing this with another person will make this step much easier and will help insure you line the bearing of the Foot with the indent in the Leg If you lower the Isolation Base without the proper alignment you may end up chasing Bearings across the room While this is no fun you will not damage the Bearings Take a deep breath...
Page 10: ... on the plinth to determine if your table is level in all directions front to back and side to side Check Level of Isolation Base If your turntable requires levelling insert the black wrench into one of the holes in the Leg on the side of the Isolation Platform that needs to be adjusted Using the wrench rotate the Leg clockwise to raise the Foot and counter clockwise to lower the Foot Repeat that ...
Page 11: ...lation Base You must place the bottom side down to avoid scratching the Isolation Base Also note that there are the numbers 1 and 2 cut into the templates When you place the two templates you must align those numbers of each piece First place one of the Templates felt side down onto the right hand side of the Isolation Base The outer edges of the Template must be aligned with the outer edges of th...
Page 12: ...er Template felt side down onto the left hand side of the Isolation Base Link the two Templates so that same numbers facing one another e g 1 faces 1 Now move the one large Template so that all four outer edges of the Template align with the outer edges of the Isolation Base Align Here Align Here Align Here ...
Page 13: ...plate Most likely the Template will move slightly when placing the Spindle Assembly So after setting down the Assembly realign the Template with the edges of the Isolation Base 2 4 Place the Motors Your REFERENCE turntable uses four high torque Motors to rotate the Platter All four of the Motors are the same You will now place each of the motors into the Template cut outs as shown below In this ex...
Page 14: ...ble and store them back in the shipping containing 2 6 Grease the Bearing Warning The included Bearing Oil can leave stains which are difficult to remove Carefully follow these instructions Vigorously stir the oil in the jar until it has a uniform consistency As shown below properly mixed fluid is fairly thick Note how the liquid clings to the brush There should be no lumps at the bottom jar Using...
Page 15: ...Products www notableaudio com Next place the small ceramic ball in the indentation Note from image below that no gloves were worn in this step It is too difficult to place the Bearing while wearing gloves Also the Bearing Oil will permanently stain the gloves ...
Page 16: ...ableaudio com Now coat the Ball Bearing and the entire Bearing with a thin layer of oil You do not need a lot of oil but you do want to cover the whole Bearing Should you get grease on anything other than the bearing use the provided Cleaning Cloth to remove any excess grease ...
Page 17: ...ter Once again we encourage you to enlist a friend to place the platter It is very heavy Carefully align the opening in the middle of the Platter with the Bearing Gently place your platter over the Bearing Be careful do you don t hit the Bearing with the Platter Also be very careful not to pinch your fingers ...
Page 18: ...le Manual 18 2021 Notable Audio Products www notableaudio com Check to see that the platter spins without any resistance by rotating the platter by hand The Platter should spin freely If there is any resistance repeat this step ...
Page 19: ...at the glass section can break if it is dropped struck or overly stressed Damage caused by any of these conditions is not covered under warranty The Mat is supplied in two parts the aluminum Center Disc and the outer Glass Disc Place the Aluminum Disc over the spindle with the indent side down Next place the Glass Disc over the Aluminum Disc ...
Page 20: ...e Spindle Left Motor Second Grove from Top from Bottom of the Spindle Right Motor Top Groove of the Spindle For each Belt loop it around the platter and into the appropriate Groove The next set of images shows of attaching the first Belt J Sikora uses square belts for improved strength and stability Because the Belts are square they can become twisted when they are but in place Be sure to remove a...
Page 21: ... notableaudio com Keep rotating the platter and removing any twists until you see that the belt is flat against the platter Repeat this procedure for the other three Motors You will know when all of the belts are flat when the belts are fairly evenly spaced on the platter ...
Page 22: ...tonearm 2 11 Change Tonearm Inserts As needed Should you decide to change tonearms you mnost likely will need to order a new Insert from your dealer Changing the insert is very straight forward First loosen the Set Screw Next lift out the existing Insert Then carefully lower the new Insert into place Make sure that the groove in the Insert is aligned with the Set Screw and that you lower the Inser...
Page 23: ...it is not included in the manual Please consult with your J Sikora dealer and your tonearm manufacturer s instructions To set the proper geometry for your tonearm and cartridge you will move the Arm Tower to the necessary position If you are not an expert in the precess on aligned a tonearm and cartridge we suggest you seek the professional services of your J Sikora dealer Below is a image of a co...
Page 24: ...evel Your Turntable It is possible that the additional weight of the turntable may have caused your shelf to shift Now is a good time to re level your turntable using the included bubble level This manual may seem like a stuck record but we cannot emphasize enough the importance of proper leveling ...
Page 25: ...otors It is now time to the plug in the Motors into the bank of power jacks on the back left corner of the Isolation Base The connector at the DIN plug of the Motor s Umbilical Cable can only fit one way Be careful to properly orient the pins of the DIN connector and do not force the cable Motor Power Jacks ...
Page 26: ...ay from the cartridge and your phono stage as possible in order to avoid any potential of generation hum The Umbilical Cable for the Power Supply has a DIN connector on one end and a barrel connector on the other Screw in the DIN side of the cable to the Input Jack on the back of the Power Supply Like you did for the Motor cables be sure to properly orient the pins and do not force the cable It ca...
Page 27: ...rence Power Supply adjusts to keep a steady 24 VDC 3 2 Using the Clamp The included Clamp is an integral part of your turntable The Main Clamp is made from nickel plated bronze Anti resonance grooves are precisely cut to optimally transfer vibrations from the album into the Dampening Rings The second part of the Clamp is a nickel plated brass Insert This Insert adds additional dampening from the i...
Page 28: ...en sound Go ahead and experiment to find what you like best Some records with warps may not lie flat against the Mat In most cases a good tonearm and cartridge will still track the record properly To help flatten the record and improving tracking J Sikora has included a small Clamp O Ring that you can place at the bottom of the spindle To use the O Ring place it over the Spindle and push the O Rin...
Page 29: ...on 3 4 Adjusting Speed Your Speed Controller allows you to finely tune the speed of the Platter s rotation Because of the significant weight of the Clamp please place the Clamp on the platter because adjusting the speed Use your favorite speed accuracy tool not supplied to test the speed of the turntable at 33 1 3 RPM To do this press the 33 RPM button to power on the table and wait 10 seconds for...
Page 30: ...in Once the grease spreads evenly inside the bearing it will stay this way for several years The drive belts also need time to stretch to the optimum length and tension During this settling in period the speed may vary slightly If the speed changes you can adjust it accordingly Check the speed after a few days of use and then again in a month The Decrease Speed Button Increase Speed Button ...
Page 31: ... with a disposable soft lint free cloth Re apply new grease with a lint free applicator Spares of both were included with your table 4 2 Belts Once each year remove all of the drive belts and gently wipe them with a lint free cloth dampened with isopropyl alcohol When the belts lose their tension you will need to replace them You can purchase replacement belts from J Sikora dealer 4 3 Cleaning You...
Page 32: ... responsible for any shipping damage and strongly recommends the purchase of shipping insurance 3 J Sikora reserves the right to inspect any product that is the subject of any warranty claim prior to repairing or replacing it Final determination of warranty coverage lies solely with J Sikora Out of warranty claims will be billed for labor materials return freight and insurance as required Any prod...