background image

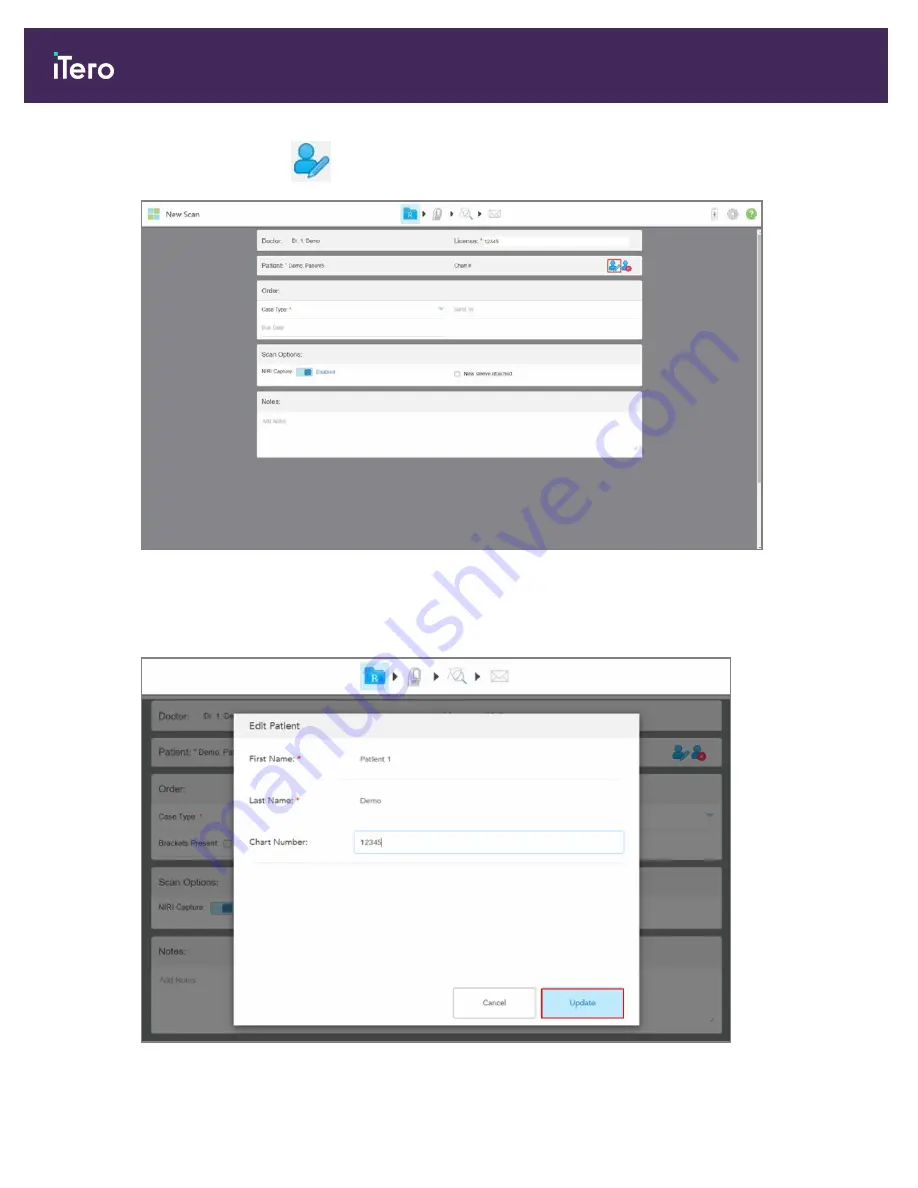
2. In the

Patient

area, tap

.

Figure 81: New Scan window – editing a patient

The

Edit Patient

window is displayed.

3. Edit the patient’s details as required and then tap

Update

.

Figure 82: Edit Patient window and Update button

iTero Element® 5D Plus User manual

74

© 2020 Align Technology, Inc. All rights reserved.

Summary of Contents for Element 5D Plus

Page 1: ...iTero Element 5D Plus User manual it starts with...

Page 2: ......

Page 3: ...ement and may be used only in accordance with the terms of that agreement No part of this manual may be reproduced photocopied stored in a retrieval system or transmitted in any manner electronic or m...

Page 4: ...0601 1 Medical Electrical Equipment Part 1 General Requirements for Safety EMC compliance This device complies with the following EMC standard IEC 60601 1 2 Medical electrical equipment Part 1 2 Gener...

Page 5: ...st form http b2btool earn service com aligntech select Attention This symbol is used to highlight the fact that there are specific warnings or precautions associated with the device Wherever this symb...

Page 6: ...ent Wand scanning unit This device complies with Council Regulations EU 2017 754 for Medical Devices Indicates the need for the user to consult the instructions for use USB socket Electric battery IEC...

Page 7: ...er serviceable parts inside You can open the cover of the diagnostics panel in case of system failure only when required by Customer Support l Do not connect the scanner to a mains supply without prot...

Page 8: ...e disposal of contaminated medical waste Unpacking installing The system should be unpacked and installed following Align Technology s instructions described in section 2 1 Work environment l The syst...

Page 9: ...Exiting Demo Mode 25 3 Working with the iTero Element 5D Plus scanner 27 3 1 Logging in to the scanner 27 3 1 1 Resetting your password 30 3 1 2 Installing Windows security updates 32 3 2 Logging out...

Page 10: ...wfinder 94 4 5 6 Editing a scan 94 4 6 Viewing the scan 95 4 6 1 Missing scan segment notifications 96 4 6 2 Using the scan timer 97 4 7 Sending the scan 97 4 8 Working with the Viewer 98 4 9 Removing...

Page 11: ...nce 157 10 1 Handling the wand and cable 157 10 2 Cleaning and disinfecting the wand 157 10 2 1 Preparation before cleaning and disinfection 157 10 2 2 Wand cleaning and disinfection 158 10 2 3 Drying...

Page 12: ...ame recommendations 169 B EMC declaration 171 C FCC compliance information statement SDoC 175 D iTero Element product security whitepaper 177 E System specifications 181 iTero Element 5D Plus User man...

Page 13: ...14 Entering the security key 16 Figure 15 Scanner is connected to the Internet and online 16 Figure 16 Verifying the communication with Align 17 Figure 17 Selecting the time zone 17 Figure 18 Registe...

Page 14: ...works 44 Figure 50 Connecting to the clinic Wi Fi network 45 Figure 51 Forgetting or Disconnecting from the network 45 Figure 52 Time zone settings 46 Figure 53 Scan Settings window 47 Figure 54 Only...

Page 15: ...atient data button 76 Figure 85 Selecting the required case type 77 Figure 86 New Scan window iRecord case type 78 Figure 87 New sleeve attached check box 79 Figure 88 New Scan window Restorative case...

Page 16: ...igure 118 Optical surface of the wand 103 Figure 119 Patients page 105 Figure 120 Searching for a patient 106 Figure 121 Patients matching the search criteria are displayed 106 Figure 122 Patient s pr...

Page 17: ...ge trimming tool options 139 Figure 158 Mark the area to be trimmed away 140 Figure 159 Selected area is highlighted and the confirmation icon is enabled 140 Figure 160 Selected area has been removed...

Page 18: ...ts from the Orders page in MyiTero 156 Figure 183 Wand without a wand barrier sleeve 158 Figure 184 Remove gross contaminants using CaviWipes1 159 Figure 185 Remove marks and stains using a soft brist...

Page 19: ...nt 5D Plus software is used with the iTero scanner in capturing 3D digital impressions of teeth oral soft tissue and structures and bite relationship The software controls the processing of the data f...

Page 20: ...action improving clinical outcomes and enhancing office efficiency 1 3 iTero Element 5D Plus hardware Front view of the scanner A Full HD touchscreen B Power switch C Main handle D Wand E Cradle F Whe...

Page 21: ...e B Touchpad C Side buttons Scan on off touchpad activation D Vent cover E Air vents F Detachable wand cable with USB connector Figure 3 iTero Element 5D Plus wand Note In order to protect the wand ca...

Page 22: ...4 Protective sleeve Figure 5 Wand barrier sleeve 1 4 iTero Element 5D Plus software The iTero Element 5D Plus system contains the following exclusive software features l Confirmation that a new wand s...

Page 23: ...e NIRI image the higher the translucency the darker the object and vice versa Tooth enamel is translucent to NIRI and will appear dark Dentin and any interference in the enamel e g caries are reflecti...

Page 24: ...s technology it is possible to make out the following structures Appears Translucency Enamel Dark High Interproximal caries Bright Low Dentin Bright Low The differentiation between carious lesions and...

Page 25: ...enamel making them appear brighter This may cause difficulty in understanding the internal tooth structure and differentiating between enamel and dentin thereby affecting the ability to detect proxim...

Page 26: ...iTero Element 5D Plus User manual 8 2020 Align Technology Inc All rights reserved...

Page 27: ...anner Contact iTero Support for additional help A 2x Allen keys in the white foam on top of the post B Post C Wheel base D Upper handle in the accessory box E Main handle in the accessory box F New sl...

Page 28: ...ke sure the screws are fully tightened 4 Move the wheel stand to an upright position and lock at least 2 wheels 5 Remove the upper handle D from the accessory box Attach it to the post B and tighten u...

Page 29: ...ge and push down Attach the computing unit by pushing in and tightening the screw 11 Tilt the screen upwards and connect the screen cable 12 Place the base of the wand I in the cradle G and then apply...

Page 30: ...The webcam must be disconnected after each training or support session 17 Plug the power cable J into a power outlet and then press the Power button L to switch on the scanner To remove the wand from...

Page 31: ...le to push the scanner If the scanner needs to be lifted use the upper handle and the post Do not use the main handle to lift the scanner Figure 10 Moving the scanner Figure 11 Do not lift the scanner...

Page 32: ...Demo Mode option before the Make It Mine option you will have to restart the scanner to access the Make It Mine option 2 3 Registering the scanner Make It Mine process When registering the scanner yo...

Page 33: ...ect the required language 2 Tap Make It Mine The Connect page is displayed showing a list of available networks Figure 13 Connect page listing the available networks iTero Element 5D Plus User manual...

Page 34: ...work security key Figure 14 Entering the security key 4 Enter the security key and then tap Connect The scanner is now connected to the Internet and online Figure 15 Scanner is connected to the Intern...

Page 35: ...fied Figure 16 Verifying the communication with Align 6 When the verification is complete tap Next The Time Zone page is displayed Figure 17 Selecting the time zone iTero Element 5D Plus User manual 2...

Page 36: ...d Figure 18 Registering the system to customize the setup 8 Enter your email password and company ID in the fields provided and then tap Register The Scanner Configuration page is displayed showing yo...

Page 37: ...g the license agreement select the check box to accept the terms of the agreement and then tap Next The system checks for an upgrade and is upgraded to the latest version if relevant Figure 21 Checkin...

Page 38: ...he aspects of the scanning process and includes a wide variety of sample cases such as clinical cases Invisalign cases and restorative cases In addition demo cases that can be used for demonstration a...

Page 39: ...ogging in 1 Tap the iTero Element logo at the top of the scanner screen Figure 23 iTero Element logo 2 Tap Demo Mode Figure 24 Demo Mode option iTero Element 5D Plus User manual 2020 Align Technology...

Page 40: ...ser Figure 25 Login window with a list of demo users 3 To view iTero restorative cases select the Dr Demo iTero user from the Doctor Name drop down list Figure 26 Demo Login button iTero Element 5D Pl...

Page 41: ...addition to the examples of restorative and orthodontic scan types the following iTero Element 5D Plus demo cases with NIRI are displayed in the list of Past Orders o Demo NIRI Caries in Young o Demo...

Page 42: ...selected case is expanded to show the following options Figure 28 Past Orders pane options For more information on working with orders see section 6 iTero Element 5D Plus User manual 24 2020 Align Te...

Page 43: ...Demo Mode To exit Demo mode l Tap the iTero Element logo and then tap Exit Demo to exit the demo mode Figure 29 Exiting Demo mode iTero Element 5D Plus User manual 2020 Align Technology Inc All right...

Page 44: ...iTero Element 5D Plus User manual 26 2020 Align Technology Inc All rights reserved...

Page 45: ...gin button Notes l In order to ensure that all Windows security patches are up to date a notification will be displayed at the bottom of the Login window and the home screen as soon as security update...

Page 46: ...y if you selected the Remember Me check box in a previous login session 3 Enter your password If you have forgotten your password you can reset it as described in section 3 1 1 4 Select the Remember M...

Page 47: ...security patches are up to date you will see a notification at the bottom of the Login window and home screen as soon as security updates are available For more information on installing security upda...

Page 48: ...ord if required To reset your password 1 In the Login window tap Forgot Password Figure 33 Forgot Password button A window is displayed describing what you should do next iTero Element 5D Plus User ma...

Page 49: ...Email field enter the email address you used to register to myaligntech com 3 Tap Submit Your predetermined security question is displayed Figure 35 Security answer field iTero Element 5D Plus User ma...

Page 50: ...You will receive a notification on the Login window and the home screen when these Windows security updates have been downloaded and are available to be installed Installing the updates should take ab...

Page 51: ...ogin settings described in section 3 6 3 1 To log out of the scanner 1 Tap to return to the home screen 2 Tap to log out of the system The Login window is displayed ready for the next user to log in t...

Page 52: ...NDERSTAND Figure 38 Notification about incorrect scanner shutdown 3 4 Moving the scanner The scanner can be moved between rooms within the office and while you are seated with a patient To move the sc...

Page 53: ...move the scanner in order to prevent the scanner from toppling over or damage to the cable 3 5 User interface The iTero system provides an intuitive user interface for performing digital scans for Re...

Page 54: ...the power and the battery is charging l When using battery power the remaining charge level is displayed on the battery icon l When the remaining charge level falls below 25 it is displayed in red Ta...

Page 55: ...gs Tap to adjust the scanner preferences for example for wand configuration localization user settings and more For more information see section 3 6 Help Tap to display a translucent Help overlay with...

Page 56: ...f their last scan For more information see section 5 Orders Tap to display a list of all your orders For more information see section 6 Messages Tap to view the messages from Align Technology For more...

Page 57: ...ection 4 6 Tap to send the scanned model to the lab described in section 4 7 Tap to create a screenshot of the scanned model described in section 9 11 Note This button is displayed in View mode only D...

Page 58: ...d tools Figure 45 Help overlay In this view the button changes to two additional buttons l Tap for remote assistance from Customer Support Customer Support is available from every Help overlay Note Pl...

Page 59: ...evices Examples of common touch screen gestures 3 6 Defining the scanner settings The scanner settings enable you to define your preferences and the settings that are displayed by default when you use...

Page 60: ...section 3 6 1 o User settings defined in section 3 6 2 o System settings defined in section 3 6 3 The relevant window opens 3 Make your required changes and then tap to save the changes and return to...

Page 61: ...ap to save the changes and return to the Settings window Figure 47 Brightness settings 3 6 1 2 Defining the default volume setting To define the default system volume tap the Volume button move the sl...

Page 62: ...at by default the scanner will connect automatically To connect to the Wi Fi network 1 Tap the Wi Fi button A list of nearby Wi Fi networks is displayed Figure 49 List of nearby Wi Fi networks 2 Selec...

Page 63: ...ct to the network automatically tap the network you are connected to and then tap Forget You will need to select the required network and enter the Wi Fi password the next time you want to connect Fig...

Page 64: ...zone from the drop down list and then tap to save the changes and return to the Settings window Figure 52 Time zone settings Note The time zone settings can be accessed only when you are logged in to...

Page 65: ...pecific user logs in to the scanner 3 6 2 1 Defining the scan settings You can define the default settings that are taken into account when scanning a patient To define the scan settings 1 Tap the Sca...

Page 66: ...n of the viewfinder when scanning the upper jaw Show color while scanning check box Select this check box to scan in color by default Scan Order Select the order in which to scan the jaws l Upper Jaw...

Page 67: ...s Figure 54 Only scanning range is highlighted Additional Scan Feedback Select the relevant check boxes to display areas of missing anatomy while scanning as described in section 4 5 3 1 l Orthodontic...

Page 68: ...gs that are displayed by default when you open the Scan Details window to fill in a new Rx To define the Rx settings 1 Tap the Rx Settings button Figure 55 Rx Settings window iTero Element 5D Plus Use...

Page 69: ...ote The list of available options changes according to the subscription package NIRI Captures Select whether NIRI data should be disabled by default as described in section 3 6 2 3 below 3 Tap to save...

Page 70: ...Rx Settings 2 In the Rx Settings window toggle the NIRI Captures option to Disabled Figure 56 Rx Settings window NIRI Captures option enabled A confirmation message will be displayed notifying NIRI wi...

Page 71: ...3 Tap OK to confirm Figure 58 Rx Settings window NIRI Captures option disabled iTero Element 5D Plus User manual 2020 Align Technology Inc All rights reserved 53...

Page 72: ...ture settings Signature setting Signature options License Add your license number Signature Add your signature Signature Usage Select one of the following signature options l Sign once and save for us...

Page 73: ...new updates from the server and define the export settings 3 6 3 1 Defining the login settings In order to comply with privacy and security regulations you will be logged out of the scanner after a pr...

Page 74: ...e user will be logged out of the scanner Min time 10 minutes Max time 8 hours 3 Select the Keep login active during system restart check box to remember the user s password if the system restarts befo...

Page 75: ...k connection and speed To run system diagnostics 1 Tap the Diagnostics button The network connection and speed are checked Figure 62 Diagnostics window 2 Tap to return to the Settings window iTero Ele...

Page 76: ...o view a list of third party software components installed on the scanner and then tap to return to the Settings window Figure 63 Licensing Information window iTero Element 5D Plus User manual 58 2020...

Page 77: ...to synchronize any new updates from the server for example new software options 3 6 3 6 Export settings You can define how long exported files should be kept before being deleted In addition you can...

Page 78: ...s should be deleted By default this is set at 30 days Figure 65 Export Settings window deleting exported files 3 If required tap Clear Export Data Now to delete the exported files immediately 4 Tap to...

Page 79: ...1 0 1 1 l Apply a new wand barrier sleeve as described below 4 1 Applying a wand barrier sleeve To apply a wand barrier sleeve 1 Place a new wand barrier sleeve in its original packaging near the iTer...

Page 80: ...optical tip of the wand until you feel a click making sure that the transparent sheath is not pinched between the rigid section of the wand barrier sleeve and the wand Figure 68 Slide the rigid sectio...

Page 81: ...inspect the wand barrier sleeve for any noticeable damage for example cracks scratches and holes Replace the wand barrier sleeve in case of noticeable damage 4 2 Starting the scan On the home screen t...

Page 82: ...s displayed you can edit it or clear it from the New Scan window For more information see section 4 3 l Order Enables you to define the details of the required treatment for example the case type l Sc...

Page 83: ...gress is highlighted on the toolbar 4 3 Patient management You control the patient s data management process from the Patient area in the New Scan window l Add a new patient as described in section 4...

Page 84: ...nt while filling in the Rx or at any time before To add a new patient 1 In the New Scan window in the Patient area tap Figure 71 New Scan window adding a new patient iTero Element 5D Plus User manual...

Page 85: ...patient s first name and last name 3 If required enter a chart number 4 Tap Add to add the new patient The new patient s name and chart number if relevant are displayed in the New Scan window iTero E...

Page 86: ...tient who already exists a message is displayed notifying you that a patient with the same details exists Figure 74 Message notifying that a patient with the same details exists iTero Element 5D Plus...

Page 87: ...he patient is displayed in the New Scan window 4 3 2 Searching for existing patients When searching for an existing patient you have to enter at least 3 characters of the patient s name in the search...

Page 88: ...ting patient 1 In the Patient area tap Figure 76 New Scan window searching for an existing patient The Search Patient window is displayed iTero Element 5D Plus User manual 70 2020 Align Technology Inc...

Page 89: ...search field 2 In the Search Patient window enter at least three letters in the search field to display a list of patients matching the search criteria iTero Element 5D Plus User manual 2020 Align Te...

Page 90: ...matching patients 3 Select the required patient and then tap Select Patient Figure 79 Selecting the required patient The selected patient is displayed in the New Scan window iTero Element 5D Plus Use...

Page 91: ...you can edit the patient s details In addition you can edit the patient s details when opening the Rx from the patient s profile page as described in section 5 4 To edit a patient s details 1 Search f...

Page 92: ...ow editing a patient The Edit Patient window is displayed 3 Edit the patient s details as required and then tap Update Figure 82 Edit Patient window and Update button iTero Element 5D Plus User manual...

Page 93: ...patient with the same details already exists To differentiate between patients with the same details use a chart number 4 3 4 Clearing the patient details from the New Scan window If required you can...

Page 94: ...enables you to create a new patient or search for an existing patient It also enables you to enter the details about the case type select whether to include NIRI data in the scan as well as add notes...

Page 95: ...ut the need to send the scan to a laboratory for modeling and milling o iCast The same as iRecord but showing the ABO model and a modeling step that can remove unused data and adjust the bite if neede...

Page 96: ...a multi bite scan is required This enables you to preserve the 2 bite relation based on your needs and delivers precise bite information to the lab for appliance fabrication for example sleep apnea ap...

Page 97: ...case types you need to select the tooth that needs to be restored the type of restoration required as well as the material shade etc of the restoration To scan a restorative or chairside milling case...

Page 98: ...is case the patient must be scanned twice before and after the tooth has been prepped The pre treatment scan enables the lab to copy the original anatomy to the new restoration 3 In the tooth chart ta...

Page 99: ...Inlay and Onlay Relevant only for the molars and premolars o Veneer Relevant only for the incisors and the premolars 4 Select the required treatment option for example Crown You are prompted to select...

Page 100: ...inishing line margin line created by the user during the preparation You can choose this for both the buccal and the lingual o Margin Design The type of ceramic metal border relationship required for...

Page 101: ...eatment options are displayed in the Treatment Information area Figure 91 Treatment Information area You can change the selected treatment options at any time before sending the scan by tapping iTero...

Page 102: ...tured saved or sent If required NIRI capture can also be disabled for all scans by default as described in section 3 6 2 2 To disable NIRI for a specific scan l When starting a new scan in the New Sca...

Page 103: ...der or to enlarge the viewfinder Figure 94 Review tool is not displayed in View mode After scanning you can view the NIRI status of each scan in the Orders page on the scanner and in MyiTero iTero Ele...

Page 104: ...the wand buttons or tapping OK when prompted when trying to access Scan mode as described in section 4 4 3 2 Failure to confirm a new wand barrier sleeve will block you from starting a new scan Both...

Page 105: ...96 Popup confirmation message before scanning You are blocked from scanning until you tap OK on the screen or press either of the wand buttons 4 5 Scanning the patient After you have filled in the Rx...

Page 106: ...ere you can ensure that the scan is complete before sending it to the lab or storage as described in section 4 6 4 5 1 Scanning guidance As soon as you move to Scan mode the recommended scanning seque...

Page 107: ...s the following best practices for use of the scanner and accessories l Ensure that the wand barrier sleeves remain in the labeled box until the point of use l Inspection of the wand barrier sleeve sh...

Page 108: ...laying a color image or a NIRI image in the viewfinder as described in section 4 5 5 l Edit the scan o Delete a segment described in section 9 5 1 o Delete a selection described in section 9 5 2 o Fil...

Page 109: ...n color toggle The color toggle button allows you to toggle between color and monochromatic modes This applies to both scanning and viewing all case types Figure 101 Model displayed in color and monoc...

Page 110: ...Note To enable the wand touchpad press and release both wand buttons simultaneously 4 5 4 Toggling the 3D and viewfinder display By default when scanning the patient s teeth a large 3D image of the sc...

Page 111: ...viewfinder on the left l To switch to a large viewfinder in the center of the screen tap the button Figure 104 Large viewfinder in the center of the screen and 3D image on the left iTero Element 5D Pl...

Page 112: ...wfinder displaying a color image left or a NIRI image right 4 5 6 Editing a scan After you have scanned the model you can edit it using the following tools l Delete Segment tool described in section 9...

Page 113: ...ction 4 6 1 While viewing the scan you can l Delete selected areas of a scan as described in section 9 6 l Trim excess tissues from the scan as described in 9 8 l Manually create the die separation if...

Page 114: ...rom one side only l Discrepancy between the left and the right bite scans In addition the bite section in the navigation controls is highlighted in red The message may be generic or very specific to t...

Page 115: ...he toolbar and scan time 2 Tap OK to close the window 4 7 Sending the scan After you have scanned the patient and reviewed the case to ensure that no data is missing you can send the scan to the lab o...

Page 116: ...ication message is displayed that the model is being sent and then the patient s profile page is displayed showing the status of the order 4 8 Working with the Viewer The Viewer is a tool that enables...

Page 117: ...e the lower jaw Show both jaws Open the Review tool to view an area of interest as both NIRI and color images one below the other as described in section 9 10 Note The Review tool is displayed only fo...

Page 118: ...thodontic case types only Display the model in a 2 window view with the upper and lower jaws in separate windows Occlusal view Each model can be controlled separately for better evaluation Figure 113...

Page 119: ...n the Viewer only after the modeling phase Relevant for Restorative case types only Toggle between viewing the model in color or in monochrome Show hide the occlusal clearance between the opposing tee...

Page 120: ...tip Figure 115 Scrunch the transparent sheath halfway towards the tip 2 Holding the wand by the scrunched transparent sheath slightly release the rigid section of the barrier sleeve from the wand tip...

Page 121: ...is necessary use the anti static cloth found inside the wand barrier sleeve box Figure 118 Optical surface of the wand The iTero Element 5D wand and cradle must be cleaned and disinfected in between p...

Page 122: ...iTero Element 5D Plus User manual 104 2020 Align Technology Inc All rights reserved...

Page 123: ...Patients page displays a list of all your patients their chart number and the last scan date Figure 119 Patients page Once you have selected a patient you can view the patient s profile page with the...

Page 124: ...tients page enter the patient s name or chart number or part thereof in the search field and then tap the search button Figure 120 Searching for a patient The patients that match the search criteria a...

Page 125: ...page From the patient s profile page you can o Create a new scan for the specific patient described in section 5 3 o View the Rx details and edit the patient s details described in section 5 4 o View...

Page 126: ...age New Scan option The New Scan window is displayed with the patients details already filled in Figure 124 New Scan window with patient s details already filled in 2 Fill in the rest of the Rx detail...

Page 127: ...x of a previous order 1 In the patient s profile page select the order for which to view the Rx and then tap View Rx Figure 125 Patient s profile page View Rx option The Rx Details window is displayed...

Page 128: ...2 Tap to return to the patient s profile page 5 5 Viewing previous scans in the Viewer If required you can display previous scans in the Viewer iTero Element 5D Plus User manual 110 2020 Align Techno...

Page 129: ...n the Viewer and then tap Viewer Figure 127 Patient s profile page Viewer option The scan is displayed in the Viewer Figure 128 Scan displayed in the Viewer For more information on working with the Vi...

Page 130: ...iTero Element 5D Plus User manual 112 2020 Align Technology Inc All rights reserved...

Page 131: ...s of the order The order could have one of the following statuses depending on the case type l Rx Created The Rx has been filled in but the patient has not been scanned yet l Scanning The scan process...

Page 132: ...he home screen The Orders page is displayed showing two panes In Progress orders and Past Orders o In Progress Scans have not yet been submitted o Past Orders Scans have already been submitted iTero E...

Page 133: ...order o Scan Opens the Scan window enabling you to create a new scan or continue scanning the patient o View Scans Opens the View window enabling you to review the current scan 3 Tap an order in the P...

Page 134: ...New Scan window and enables you to add a prescription for this order Note This is applicable for Orthodontic orders only and available for up to 21 days after the scan o Invisalign users can also sel...

Page 135: ...the badge on the Messages button Figure 132 Messages page To view the messages 1 Tap the Messages button on the home screen A list of notifications updates and other messages from Align Technology is...

Page 136: ...iTero Element 5D Plus User manual 118 2020 Align Technology Inc All rights reserved...

Page 137: ...a new Rx on any supported device for example a PC or a tablet without using valuable scanner time In addition it enables viewing 3D models after they have been created by the scanner and tracking ord...

Page 138: ...iTero Element 5D Plus User manual 120 2020 Align Technology Inc All rights reserved...

Page 139: ...who are scanned on a regular basis can have their scans analyzed using iTero TimeLapse technology iTero TimeLapse technology compares 2 of the patient s previously captured 3D scans to allow visualiz...

Page 140: ...ges between the scans The darker the color the bigger the change between the scans as displayed in the legend scale measurements are in millimeters Figure 134 iTero TimeLapse window showing the highli...

Page 141: ...to view areas of interest and potential treatment areas in the animation window An animation is displayed comparing the state of the teeth in the current area of interest on the selected scan dates F...

Page 142: ...cale The changes are displayed according to the new scale 5 If required tap the Snapshot tool to capture a screenshot of the images For more information refer to section 9 11 9 2 Invisalign Go system...

Page 143: ...For more information on the Invisalign Outcome Simulator refer to the Invisalign Outcome Simulator User Guide http storagy itero production us s3 amazonaws com download en us iOSim_User_Guide pdf 9 4...

Page 144: ...tools l Delete Segment tool described in section 9 5 1 l Delete Selection tool described in section 9 5 2 l Fill tool described in section 9 5 3 l Disable A I Cleanup tool described in section 9 5 4 T...

Page 145: ...letion The entire scanned segment is deleted 9 5 2 Deleting a selection The Delete Selection tool enables you to delete a section of the scan so that it can be rescanned To delete a selection 1 Press...

Page 146: ...igure 141 Delete Selection tool The Delete Selection tool expands and the model is displayed in monochrome Figure 142 Expanded Delete Selection tool iTero Element 5D Plus User manual 128 2020 Align Te...

Page 147: ...missing anatomy that are not filled even after trying to scan the area numerous times These areas may be caused by the interference of anatomy lips cheeks and tongue or moisture in the scanning segmen...

Page 148: ...re 144 Fill tool Areas that require scanning are highlighted in red Figure 145 Areas that require scanning are highlighted in red Fill tool iTero Element 5D Plus User manual 130 2020 Align Technology...

Page 149: ...urn off this functionality for the current case Notes l This tool is not supported for edentulous gums l Disabling the A I cleanup is relevant for the current case only Excess material will be removed...

Page 150: ...escan only the erased area For example l You can remove moisture and artifacts such as blood or saliva that are covering the margin l If the prepped tooth shows areas of red on the Occlusal Clearance...

Page 151: ...Figure 148 Eraser tool The Eraser tool expands to show the following options Figure 149 Eraser tool options iTero Element 5D Plus User manual 2020 Align Technology Inc All rights reserved 133...

Page 152: ...Mark the area to be modified As soon as you lift your finger the selected area is removed and the scan tool is enabled Figure 151 Selected area removed and scan tool enabled iTero Element 5D Plus Use...

Page 153: ...w the contact and distance between the opposing teeth to ensure that the prepped tooth has sufficient reduction for the material chosen in the Rx The Occlusal Clearance tool can be accessed while in V...

Page 154: ...If necessary reduce the prepped tooth and rescan the area as described in section 9 6 above 3 If required you can change the occlusal values displayed on the opposing teeth iTero Element 5D Plus User...

Page 155: ...take a screenshot of the occlusal clearance For more information on capturing screenshots and adding annotations see section 9 11 To display the occlusal clearance from the Viewer 1 In the Viewer tap...

Page 156: ...ring screenshots and adding annotations see section 9 11 9 8 Working with the Edge Trimming tool The Edge Trimming tool enables you to trim away excess soft tissue such as cheek or lip artifacts from...

Page 157: ...ndow tap the Edge Trimming tool Figure 156 Edge trimming tool The Edge Trimming tool expands to show the following options Figure 157 Edge trimming tool options iTero Element 5D Plus User manual 2020...

Page 158: ...ark the area to be trimmed away The area to be trimmed away is highlighted and the confirmation icon is enabled Figure 159 Selected area is highlighted and the confirmation icon is enabled iTero Eleme...

Page 159: ...ccording to the position of the green hint point which must be located on the center of the prepped tooth after scanning If required the die separation area can be edited or created manually To displa...

Page 160: ...toolbar to move to View mode 3 In the View window tap the Die Separation tool The die separation is displayed in high resolution Figure 162 Die separation is displayed in high resolution iTero Element...

Page 161: ...xpands to show the following options Figure 163 Die Separation tool options 2 Tap and mark the whole segment with your finger The scan is displayed in low resolution Figure 164 Scan is displayed in lo...

Page 162: ...he model is displayed as follows Figure 165 Before selecting the die separation 4 Draw the area for the die separation The selected area is displayed in high resolution iTero Element 5D Plus User manu...

Page 163: ...n l Zoom in and out of the images in the image pane as described in section 9 10 1 l Adjust the brightness and contrast of the images in the image pane as described in section 9 10 2 l Capture screens...

Page 164: ...in the image pane on the right The display in the image pane changes according to the position of the loupe A NIRI and colored intraoral image are displayed one below the other in the image pane on th...

Page 165: ...the image pane using the following methods l Using a spreading or pinching gesture on one of the images displayed in the image pane l Double tapping an image in the image pane to toggle zoom in zoom...

Page 166: ...the images in the image pane The image in the image pane is enlarged and only the specific image is displayed Figure 170 Only the zoomed in image is displayed in the enlarged image pane window 2 Tap...

Page 167: ...ntrols are displayed only when images are displayed in the image pane and not when the loupe is in its default position in the right pane The contrast and brightness image controls are reset to their...

Page 168: ...The Snapshot tool enables you to capture screenshots of the scanned model These screenshots become part of the patient s export package and can later be downloaded from MyiTero In addition these scree...

Page 169: ...arate folder and saved in a folder with the patient s name which can be downloaded from MyiTero as a zipped file Screenshots can be captured from any window that includes the Snapshot tool on the tool...

Page 170: ...if you would like to add annotations to the screenshot The Draw window is displayed showing a screenshot of the entire window with an annotations toolbar on the top Figure 175 Screenshot with an annot...

Page 171: ...y default these will be the same color 3 Tap the required tool and color and then add your annotations After adding text tap to save the text in the color selected Note If you do not tap after enterin...

Page 172: ...ing that the screenshots and annotations will be uploaded to MyiTero where you can access them Figure 179 Notification that the screenshots and annotations will be uploaded to MyiTero 5 To save only t...

Page 173: ...reenshots will be uploaded to MyiTero Figure 181 Notification that the screenshots will be uploaded to MyiTero The screenshots will be sent to the lab together with the scan and can then be downloaded...

Page 174: ...Figure 182 Option to download screenshots from the Orders page in MyiTero iTero Element 5D Plus User manual 156 2020 Align Technology Inc All rights reserved...

Page 175: ...tients undo any twists and knots in the wand cable in order to relieve all tension If the cable cap detaches from the wand gently reattach it 10 2 Cleaning and disinfecting the wand The iTero wand req...

Page 176: ...Brush 1mm diameter Cat 3770 or equivalent o Personal Protective Equipment PPE and work environment l Please follow the cleaning and disinfection material manufacturers instructions Note Replace clean...

Page 177: ...body and wand tip 4 Visually inspect the device in a well lit area to ensure all surfaces are visibly clean Disinfection 1 Using CaviWipes1 thoroughly dampen all external surfaces of the wand body an...

Page 178: ...check that it fits securely on the wand If the vent cover is damaged or you are unable to secure it in place replace it with one of the spare vent covers that were shipped with the system For more in...

Page 179: ...the tip of the wand into the new vent cover 4 Pull on the vent cover until it locks into place Figure 189 Pull on the vent cover until it locks into place 5 Ensure that the vent cover is placed prope...

Page 180: ...d disinfecting steps below to ensure that the cradle is properly reprocessed and ready for use 10 3 1 Preparation before cleaning and disinfection 1 Visually inspect the cradle for any noticeable dama...

Page 181: ...ross contaminants on the cradle for a minimum of one 1 minute Note If you are using an alternative disinfectant please refer to section 10 6 for the required contact time Figure 191 Remove gross conta...

Page 182: ...ust be cleaned between patients as follows 1 Clean all outer surfaces using approved disinfectant wipes or approved disinfectant liquid with a clean lint free wipe and follow the manufacturer s instru...

Page 183: ...id 2 Note If the recommended alternative disinfectants are not available in your region consult your local supplier of disinfecting materials for equivalent products in your region Equivalent products...

Page 184: ...iTero Element 5D Plus User manual 166 2020 Align Technology Inc All rights reserved...

Page 185: ...hen the scanner installation is planned to take place l Make sure that the Wi Fi SSID credentials are available Login password l The minimum Wi Fi strength signal for the system should display at leas...

Page 186: ...by only 2 degrees To achieve the best reception place all the devices so that the Wi Fi signal travels straight through a wall or partition instead of at an angle l Construction materials make a diff...

Page 187: ...443 Cboserver mycadent com 443 Matstore invisalign com 443 Matstore2 invisalign com 443 Matstore3 invisalign com 443 Matstore4 invisalign com 443 Matstoresg invisalign com 443 Matstorechn invisalign...

Page 188: ...iTero Element 5D Plus User manual 170 2020 Align Technology Inc All rights reserved...

Page 189: ...screen as part of the caries detection solution l Stored scan data is accessible and can be displayed Note Due to electromagnetic disturbance in some cases the image may disappear and a non communica...

Page 190: ...ommunications equipment IEC 61000 4 3 EN 61000 4 3 List of frequencies from 9 V m up to 28 V m PM 18 Hz or 217 Hz FM 1 kHz Complies Immunity from Electrical Fast transient EFT IEC 61000 4 4 EN 61000 4...

Page 191: ...EN 55032 Group 1 Class B 230 VAC mains Complies Radiated emissions in freq range 30 6000 MHz ETSI EN 301 489 1 ETSI EN 301 489 17 EN 55032 Class B Complies Harmonic current test ETSI EN 301 489 1 ETSI...

Page 192: ...ains 1 0 kV DM 2 0 kV CM Tr Th 1 2 50 8 20 ms Complies Immunity from conducted disturbances induced by radio frequency fields EN 61000 4 6 AC mains 3 0 VRMS 0 15 80 MHz 80 AM 1 kHz Complies Immunity f...

Page 193: ...trademark iTero Element 5D Modular component used Qualcomm Atheros FCC ID PPD QCNFA364AH complies with FCC requirements according to Declaration of Conformity issued by Advantech Co Ltd Country of ori...

Page 194: ...ication Services Inc l FCC Part15 C E Test report number RF150107E07B 1 by Bureau Veritas Consumer Product Service H K Ltd Declaration of Conformity as issued by Advantech Co Ltd for panel PC model PO...

Page 195: ...committed to addressing and minimizing security and privacy risks in the products that we design develop and maintain We conduct in depth assessments of our products so that we can implement appropri...

Page 196: ...tem and software components Applicable to iTero Element iTero Element 2 iTero Element 5D iTero Element 2 Plus iTero Element 5D Plus iTero Element 5D Plus Lite l User access management controls are enf...

Page 197: ...Tero Element 5D Laptop Configuration iTero Element 2 Plus iTero Element 5D Plus iTero Element 5D Plus Lite l Apply segregation of duties and timely remove staff accounts when no longer needed If custo...

Page 198: ...iTero Element 5D Plus User manual 180 2020 Align Technology Inc All rights reserved...

Page 199: ...C 64 4 F to 78 8 F Storage Transportation Temperature 5 C to 50 C 23 F to 122 F Operating Pressure and Altitude Pressure 520 mmHg to 771 mmHg 69 kPa to 103 kPa Altitude 400 feet to 10 000 Storage Tran...

Page 200: ...for full recharge Scanner and wand cross contamination protection Single use disposable wand barrier sleeves Accessible ports USB Type A and Type C are accessible to the user Type B is the wand port...

Page 201: ...material l Auto margin marking tool Provides automatic marking of the margin line on crown cases Cloud storage Data can be stored and accessed on the web using cloud storage and the MyiTero web portal...

Page 202: ...iTero Element 5D Plus User manual 184 2020 Align Technology Inc All rights reserved...

Page 203: ...94 Color toggle 91 Comparing scans 121 Compliance ii Computer settings 43 Confirming new sleeve 86 87 Contraindications ii D Delete Segment tool 126 Delete Selection tool 127 Demo mode 20 Exit 25 Diag...

Page 204: ...gging in 27 First time 14 Logging out 33 Login settings 55 M Maintenance 157 Make It Mine 14 Messages 117 Missing scan segment notifications 96 Moving the scanner 34 Moving to next segment 92 MyiTero...

Page 205: ...Scan editing 94 Scan options 90 Scan settings 47 Scan timer 97 Scan types Restorative 79 Scanner settings 41 Scanning best practices 89 Scanning guidance 88 Scanning the patient 87 Searching for pati...

Page 206: ...olbar 38 Tools Delete Segment 126 Delete Selection 127 Die Separation 141 Disable A I Cleanup 131 Edge Trimming 138 Eraser 132 Fill 129 Occlusal Clearance 135 Review 145 Snapshot 150 Touch screen Gest...

Page 207: ......

Page 208: ...0 Align Technology Inc All rights reserved Align Invisalign iTero Element among others are trademarks and or service marks of Align Technology Inc or one of its subsidiaries or affiliated companies an...

Reviews: