Iseo X1R Smart Installation Manual Download Page 5

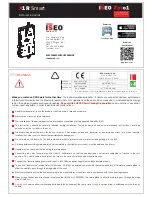
7. EXTERNAL SIDE DOOR ASSEMBLING

External control module assembling on the external panel

=

50

50

25

25

50

33

0

 ma

x

93

Make a 50 mm diam. hole 
only in the external panel in 
order to install the external 
cylinder protection. 

Make a 25x25 mm slot in 
the outside panel and plate, 
to allow the external module 
cable to pass through.

Keyboard with 

RFID reader

Only RFID 

reader

Summary of Contents for X1R Smart

Page 1: ...ous Do not work on the door with the lock installed in order to prevent wood or metal residue getting into the lock Distance between striking plate and latch tip completely in from both motor or key must be between 2 and 3mm Handle must not have any friction during the return phase Connecting rods must have a play of at least 1 millimeters so that the deadbolt does not remain subjected to traction...

Page 2: ...42 max 38 max 0min 33max 15 3 n 4 x 6 37 37 37 30 262 40 14 2 39 2 28 28 28 28 410 35 164 65 n 3 x M5 L 3 8 12 13 21 31 33 262 108 n 2 x M6 To find all available versions and related codes check the IseoZero1 catalogue Add the plug indicated in the picture below only for Single Action version 2 VERSIONS ...

Page 3: ...2 Only if latch version 13mm Max latch projection adjustment 6mm LATCH ADJUSTMENT 4 DOOR CONTACTS REVERSIBILITY AND ADJUSTMENT It is forbidden to lubricate the door contacts It is possible to use ethyl alcohol to clean the door contacts 1 2 ...

Page 4: ...oes not remain engaged which will cause the motor to rotate in neutral 1 2 6 DOOR CLOSED CONTACTS FIXING 21 5 43 54 3 5 mm TOP BOTTOM black red In the case of power supply via door contacts use an external power supply 8 30Vdc 30W Low voltage contacts Do not touch with your fingers Do not connect to power supply that exceed the indicated ones Respect power polarity It is forbidden to lubricate the...

Page 5: ...l panel 50 50 25 25 50 33 0 max 93 Make a 50 mm diam hole only in the external panel in order to install the external cylinder protection Make a 25x25 mm slot in the outside panel and plate to allow the external module cable to pass through Keyboard with RFID reader Only RFID reader ...

Page 6: ...7 1 INTERNAL SIDE DOOR ASSEMBLING Internal control module assembling on the internal panel 50 50 200 max 93 Internal control module is not necessary if Single Action version Opening and closing buttons ...

Page 7: ...rd version 3 Alkaline batteries 4 Power supply 8 30Vdc 30W 5 Cable gland 6 Bipolar cable connection for remote opening command 7 Bipolar connection cable kit 8 Multifunction connection cable 8 pins 9 BATTERY HOLDER HOUSING 84 38 110 min 250 Before powering the x1R Smart make sure the red and black wires are intact and the battery housing connector does not come into contact with the door frame in ...

Page 8: ...act Relay normally open contact Negative power supply Opening command 8 30Vdc ac Relay normally closed contact Not used Positive power supply 8 30Vdc 30W MAX Opening command 8 30Vdc ac brown 4 blue 8 alkaline Relay 30Vdc Vac 1A MAX Only to use X1R Smart without external reader and keyboard functioning as an actuator place the jumper available in the package in the PINs 1 and 2 of connector JP1 Tak...

Reviews: