background image

19

Installing Above Deck Unit (ADU)

5.3  Designing Mast

The installation mast must be robust enough to prevent flex, vibration, and sway when an external force is


exerted on the mast with antenna and radome. Refer to the following mast drawings for more details.

WARNING

WARNING


• When designing a mast, consider the minimum and maximum thickness of the mast plate marked 

on the diagram. If the thickness of the mast plate is different from the recommended size (Min. 

10.0 mm/ Max. 15.0 mm), choose right sized bolts for mounting antenna on the mast according to 

the table below.

Mast Plate Thickness

Recommended Bolt Size

5 ~12 mm

M12 x 55L

10 ~17 mm (Recommended)

M12 x 60L (Supplied)

15 ~ 22 mm

M12 x 65L

20 ~ 27 mm

M12 x 70L

25 ~ 32 mm

M12 x 75L


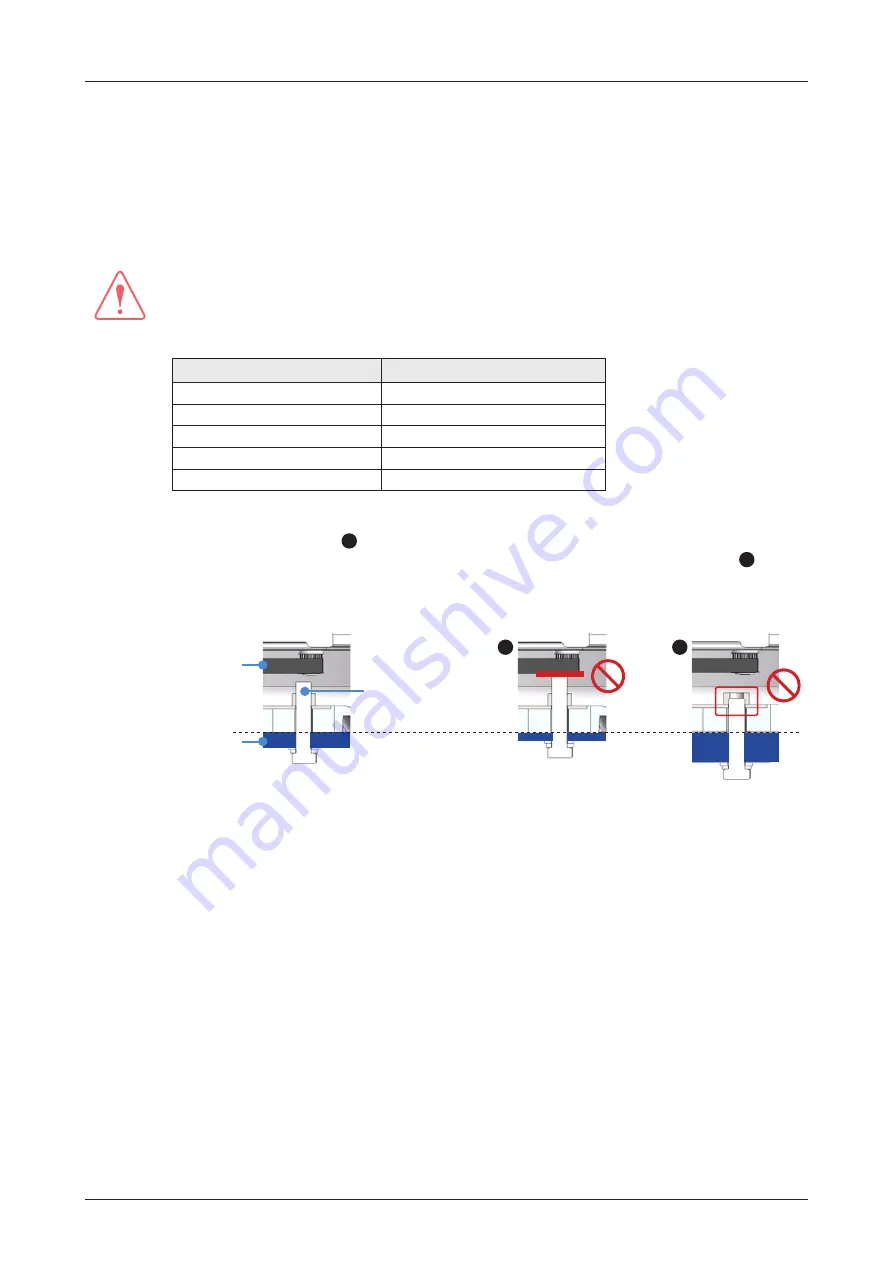
• To use the supplied bolts (M12 x 60L) for mounting antenna on a mast, the thickness of mast 

plate must be 10 ~ 15 mm. 

A


If the mast plate is thinner than 10 mm, the bolt thread stick-out 

protruding beyond the nut inside the radome can damage the AZ belt of the antenna. 

B

 If the 

mast plate is thicker than 15 mm, the supplied antenna-mast mounting bolts can be too short 
to mount the antenna on the mast securely. 

When the mast plate 

thickness is 10 ~ 15 mm

AZ Belt

*Mast Plate 

Supplied Bolt: 
M12 x 60L

When the mast plate is 

thinner than 10 mm

A

When the mast plate is 

thicker than 15 mm

B

Summary of Contents for v60E

Page 1: ...65 cm Ku band Maritime VSAT Antenna System v60E Installation Operation User Guide...

Page 2: ...he furnishing of this document does not give you any license to these patents trademarks copyrights or other intellectual property All other logos trademarks and registered trademarks are the property...

Page 3: ...12 4 2 System Package 13 4 2 1 Above Deck Unit ADU 13 4 2 2 Antenna Control Unit ACU 13 4 2 3 Packing List 14 4 3 System Cables Customer Supplied 15 4 3 1 Antenna RF Cable Customer Supplied 15 4 3 2 G...

Page 4: ...ACU to Antenna 37 6 5 5 Connecting ACU to Modem 38 6 5 6 Connecting ACU to Ship Gyrocompass 39 6 6 ACU to PC Communication Setup 40 6 6 1 TCP IP Connection 40 6 6 2 USB Connection 40 Chapter 7 Operat...

Page 5: ...9 8 5 Graph 69 9 9 System Troubleshooting 70 9 9 1 Diagnosis 70 9 9 2 Antenna Log 72 9 9 3 Antenna Event Log 73 9 9 4 Support 73 9 10 System Setting 74 9 10 1 Ship Setting 74 9 10 2 Antenna Setting 76...

Page 6: ...e of Mast 23 Figure 13 Installing Sequence of Bolts 27 Figure 14 Installing Bolts for Antenna Mast Assembly 27 Chapter 6 Installing Below Deck Unit BDU 30 Figure 15 ACU Dimensions 30 Figure 16 19 inch...

Page 7: ...ssive pressure or shock These may cause surface cracking or other damage DO NOT STACK Do not stack boxes crates as there is a risk boxes crates may fall and be damaged KEEP DRY Always make sure the an...

Page 8: ...h Direction Co Polarization 25 218 f 2 Regulation for Other Direction Co Polarization 25 218 f 3 Regulation for Cross Polarization Intellian Technologies Inc declares that v80E complies with the thres...

Page 9: ...Maritime VSAT Antenna System Intellian v100E 1 05m Ku band Maritime VSAT Antenna System To provide the presumption of conformity in accordance to Annex III encompassing Annex II of Directive 2014 53 E...

Page 10: ...ficient RF Performance Intellian s advanced RF design technology delivers highly efficient performance with compact and light mechanical structure compared to other 65 cm class systems The v60E has im...

Page 11: ...nboard the vessel with little to no RF signal blockage When the antenna is transmitting obstacles in way of the beam path will cause decreased satellite signal strength The antenna unit should have di...

Page 12: ...tions 4 1 3 RF Hazard Precautions The antenna is designed to be used with radiation transmitting equipment manufactured by others Exposure to RF radiation including exposure associated with an imprope...

Page 13: ...h RF components mounted on a stabilized pedestal The radome protects the antenna pedestal assembly unit from the severe marine environment Figure 4 Radome and Pedestal 4 2 2 Antenna Control Unit ACU A...

Page 14: ...0 m label Mounting Template 1 Real size drawing of antenna mounting hole pattern ACU Rack Mount Bracket 2 For installing ACU to 19 inch rack Flat Head Screw 10 M4 x 12L For mounting ACU Rack Mount Bra...

Page 15: ...Type Connector Max DC Resistance Attenuation 2 GHz Max Cable Length 16 dB loss 2 GHz LMR400 N M to N M 0 8 0 196 dB m 60 m LMR600 0 128 dB m 100 m Note Optimal tightening torque for N type RF connect...

Page 16: ...e unpacking 1 Position the FRONT marked side of box to the front then remove all the plastic straps securing the box to the pallet using a cutter 2 Open the top cover 3 Lift up and remove the FRONT ma...

Page 17: ...rall space occupied by the antenna must be sufficient for the fully constructed radome on top of its base frame Using a crane during the antenna installation is strongly suggested Unit mm inch BOW Dir...

Page 18: ...l hole 15 mm 0 59 diameter in 4 positions 3 5 0 m m 1 3 7 7 Antenna Mounting Hole Template Doc No K90011 NOTE This is a real size template Make sure the hole placement for the antenna is the same with...

Page 19: ...e table below Mast Plate Thickness Recommended Bolt Size 5 12 mm M12 x 55L 10 17 mm Recommended M12 x 60L Supplied 15 22 mm M12 x 65L 20 27 mm M12 x 70L 25 32 mm M12 x 75L To use the supplied bolts M1...

Page 20: ...ough Inside Mast Figure 9 Recommended Size of Mast Option 1 BOW 247 5 9 74 247 5 9 74 4 15 0 0 59 Hole 15 110 0 4 33 180 0 7 09 200 0 7 87 Gooseneck 445 0 17 52 22 0 0 87 200 0 7 87 800 0 31 50 200 0...

Page 21: ...ling Cable on Outside of Mast Figure 10 Recommended Size of Mast Option 2 BOW Unit mm inch 247 5 9 74 247 5 9 74 4 15 0 0 59 Hole 445 0 17 52 22 0 0 87 200 0 7 87 840 0 33 07 200 0 7 87 1000 0 39 37 P...

Page 22: ...ling the antenna less than 1200 mm 47 above the deck for safe access and maintenance When installing the antenna more than 1200 mm 47 above the deck make sure to have enough working space around the m...

Page 23: ...he deck and the built in gooseneck on the mast for easier placing of the RF Cable through the inside of the mast as shown in the picture 2 Maintain a sufficient cable length at least 2 m when routing...

Page 24: ...t on the radome with a wrench Then detach the radome bracket from the radome 3 After removing radome bracket install the radome bolt 1 ea back into the radome using a wrench To fasten the bolt firmly...

Page 25: ...radome and the mast for cabling work WARNING WARNING When moving the antenna it may sway by windy Be careful when handling the antenna WARNING WARNING Make sure to remove the radome brackets that sec...

Page 26: ...terproof foam firmly onto the surface of the cable access hole 3 Extend the RF cable up to the radome from the mast A B Cable Access Hole Position of Waterproof Foam Option 1 When Installing Cable Thr...

Page 27: ...to ensure the bolts are fastened firmly Insert the bolts and washers from under the mast into the radome and lightly tighten them by hand into the built in nuts on the bottom of radome Install 4 bolt...

Page 28: ...the cable in place using cable ties 1 Loosen the M4 x 15L wrench bolts 2 ea by using the wrench set then open the cable entry cover NOTE NOTE Make sure the followings before installing system cables...

Page 29: ...to terminate the N connector 3 Connect the terminated RF cable to the connector of the radome as the following Ensure the cable is firmly fastened to the connector Fix the cable position along the rou...

Page 30: ...should be installed below the deck in a location that is dry cool and ventilated The front panel of ACU should be easily accessible to users Figure 15 ACU Dimensions 6 2 ACU Dimensions Confirm the di...

Page 31: ...kets which can be found from the ACU box Attach the rack mount brackets to the sides of the ACU using flat head screws Connect cables to the back side of the ACU WARNING WARNING Ensure that the cables...

Page 32: ...17 Antenna System Configuration 6 4 1 Single Antenna System Configuration The basic system consists of one VSAT antenna and one ACU Connect the cables according to the following configuration Above De...

Page 33: ...anel Connectors Antenna Control Unit ACU NMEA 0183 GYRO Input Modem Interface Console PC Interface Antenna Modem Interface RS232 422 LAN Modem Rx Tx Power 6 5 2 ACU Connector Pinout Guide Check the fo...

Page 34: ...x and Tx Connectors RF F Type Female Conductor Function Inner DATA Outer GND Antenna Connector RF N Type Female Conductor Function Inner RX TX FSK REFERENCE POWER Outer GND NMEA 0183 Input 2 Pin Termi...

Page 35: ...1 9 8 7 6 Pin Signal 1 N C 2 MODEM TX MAX422 RX 3 MODEM RX MAX422 TX 4 N C 5 GND 6 N C 7 MAX422 RX 8 MAX422 TX 9 N C Modem Interface Console Connector D Sub 9 Pin Female 1 2 3 4 5 6 7 8 9 5 4 3 2 1 9...

Page 36: ...ace RS232 Connector D Sub 9 Pin Male 5 4 3 2 1 9 8 7 6 Pin Signal 1 N C 2 PC RX 3 PC TX 4 N C 5 GND 6 N C 7 IARM TO PC_ DBG_ TX 8 PC TO IARM_ DBG_ RX 9 N C LAN Connector 12345678 RJ 45 Female Pin Sign...

Page 37: ...9 Connecting Power to ACU ACU 100 240 VAC Power Supply Power 100 240 VAC 50 60 Hz 1 A 6 5 4 Connecting ACU to Antenna Connect an Antenna RF cable N to N customer supplied from the ANTENNA N port of th...

Page 38: ...odem 2 Connect another RF cable F to F from the MODEM Tx F port of the ACU to the Tx F port of the modem 3 When using the OpenAMIP modem protocol connect an Ethernet cable from the LAN RJ45 port of th...

Page 39: ...screw terminals by rotating them counterclockwise 2 Connect two wires of NMEA 0183 gyrocompass cable to the terminals Figure 23 NMEA 0183 Gyrocompass Cable Connection NOTE NOTE When connecting the NM...

Page 40: ...he following IP address to access Intellian AptusNX page IP Address 192 168 2 1 Default Figure 24 Front Panel Management LAN Port Connection PC Not supplied Management LAN Port ACU Front Panel 6 6 2 U...

Page 41: ...he network is automatically configured by DHCP with no additional PC IP configuration 1 Connect an Ethernet cable from the Management LAN port on the ACU front panel to a LAN port of PC 2 The network...

Page 42: ...ur modem type from the Select Modem drop down list for loading a pre configuration of modem The setting parameters related to the modem interface will be set automatically once the modem type is selec...

Page 43: ...43 Operating Install Wizard 4 On the pop up window select the checkbox if you want the system to perform the iARM Save Reboot automatically Then click the Confirm button 5 Reboot the system...

Page 44: ...INSTALL WIZ on the main menu then follow these steps Welcome Page Welcome message is displayed Click the Next button to start NOTE NOTE Refer to the Chapter 9 Using AptusNX on page 53 for detailed des...

Page 45: ...NONE for the Current Device from the drop down list Then click the Apply button NOTE Skip Step 4 Set Bow Offset if no gyrocompass is connected Click the Next button to go to the next step Step 3 Modem...

Page 46: ...antenna Click the Next button to go to the next step Step 4 Set Bow Offset For setting the bow offset a trackable satellite must be selected There are two methods for tracking a target satellite Opti...

Page 47: ...evation angle where the blockage is set Range 0 90 The blockage is activated below the elevation angle Click the Next button to go to the next step This method is generally recommended Select the Cont...

Page 48: ...modem status for connection readiness by clicking the Check Modem Status button Then connect to iDirect Open AMIP modem by clicking the CLI Connect button 2 Enter the CW signal frequency provided by y...

Page 49: ...is applied automatically The value is assigned according to the satellite band Current IF Frequency MHz The current IF frequency is applied automatically The value is RF Uplink Frequency value BUC LO...

Page 50: ...ptimal signal Relative Azimuth Adjust the relative azimuth angle Absolute Azimuth Adjust the absolute azimuth angle Elevation Adjust the elevation angle LNB Pol Angle Adjust the LNB Pol angle 3 Test R...

Page 51: ...ed items on the Report may change The configuration report is displayed You can save the results to the ACU by clicking the Save Report button and download the report file json by clicking the Export...

Page 52: ...na is initializing TRACKING Steady Green The antenna is in tracking mode LOCK Steady Green The satellite is locked SETUP TEST Steady Green The antenna is in Setup mode Blinking The antenna is in Test...

Page 53: ...where anytime through TCP IP protocol It saves your time and cost generated by various mainte nance activities such as operating firmware upgrades tracking parameter resets and system diagnosis etc 9...

Page 54: ...or safe operation Depending on the user level the accessible range of function in the software can be limited 1 Log into the ACU by typing in User ID and Password The followings are the factory defaul...

Page 55: ...transmit data or not 6 Lock Displays whether the satellite is locked or not 7 Main Menu Selects the Main Menu DASHBOARD INSTALL WIZ TOOLS TROUBLESHOOTING SETUP Each main menu offers side menus on the...

Page 56: ...user ID Current Password Enter the current password New Password Enter the new password Confirm New Password Re enter the new password to verify that it was entered correctly Click the Change Password...

Page 57: ...u can choose either using the IMO number or not If you have the IMO number select Yes and enter the number If you do not have the IMO number select No and enter the Ship Name Type and Owner informatio...

Page 58: ...rsion and network IP address 2 Antenna Information Displays antenna information 3 S W Version Information Displays S W version information 4 Network Information Displays network information 1 3 4 2 xx...

Page 59: ...ate and can control and manage through the control buttons ID displays the registered user ID Description Displays the user s description Controls Each user can be controlled and managed by individual...

Page 60: ...and arrange your panels in various ways to make them more readable and user friendly 9 6 1 How to Add Remove Panels Dashboard Setting Adding Panels 1 On the right side of the page you will see the gea...

Page 61: ...m the dashboard 3 Click the Apply button to apply the settings to the system 1 3 2 9 6 2 How to Arrange Dashboard Layout You can customize the dashboard by rearranging panels as you wish 1 Click and h...

Page 62: ...nformation and manage the each panel s settings 1 Click the Shortcut button indicated by the red mark to open the setting page 2 The setting page will appear on the individualized web page You can che...

Page 63: ...nual Upgrade or Auto Upgrade NOTE When using the Manual Upgrade method refer to the following Antenna Firmware Update Manual Upgrade method Procedures page for more details 4 Rollback Displays the pre...

Page 64: ...uring the upgrade 2 The antenna firmware versions are displayed on the pop up window Check the current version installed and the new version available for each type of firmware then click the Start Up...

Page 65: ...sion Bootstrap displays the Bootstrap Version Main Factory Default Bootloader displays the Bootloader Version Main Factory Default Active Bootloader 4 Kernel File System The ACU has three storage part...

Page 66: ...lation and force the installation to continue warning messages do not appear during the upgrade 2 Once the update starts the update process will be displayed on the screen It will take about two minut...

Page 67: ...iARM and reboots the system All configuration changes made will be saved in the ACU and effective upon the reboot Click the Save Reboot button 3 Reboot without Saving Reboots the system without savin...

Page 68: ...information 4 Common Information Displays selected satellite information Satellite Name displays the satellite name Longitude displays satellite orbit position Skew Offset displays the Skew offset Id...

Page 69: ...ows the graphs of only the checked item s in the Multi Chart Single Chart or AZ EL formats Multi Chart displays multiple graph Items in one graph View Single Chart displays the checked graph Item in e...

Page 70: ...osis Select the checkbox full diagnosis test or single diagnosis test before modifying the settings Select All select to run a full diagnosis test Clear Select select to run a single diagnosis test Vi...

Page 71: ...tem You can save the results to the ACU by clicking the Save Report button and print this page by clicking the Print button To remove the result click the Clear Diagnosis button 4 When you want to che...

Page 72: ...ownload Any log data within three months can be downloaded Select the duration on the calendar view that you want to show Then click the Start Download button NOTE when selecting the box Include Backu...

Page 73: ...racking Method sets the sorting type Descending Ascending Click the Query Event Log button to apply the settings to the system 3 Event Log Displays event log information 9 9 3 Antenna Event Log 1 2 3...

Page 74: ...nna System 9 10 1 Ship Setting 9 10 System Setting This menu sets and displays the Ship Antenna Satellite Network Modem and Backup Restore function No Item Description 1 Ship Sets the ship information...

Page 75: ...It must be set when NMEA is selected on the Current Device list Heading enter the heading information Click the Apply button to apply the settings to the system 4 BOW Offset For setting bow offset you...

Page 76: ...ent antenna position and search parameters These parameters should only be changed by an authorized service technician Improper setting of these parameters will render your system inoperable NOTE NOTE...

Page 77: ...the motors controlling azimuth and elevation Sets the conical range while the antenna is in tracking mode Click the Apply button to apply the settings to the system 6 Conical Range Check Enter Setup M...

Page 78: ...to the system 10 LNB Pol Sensor Calibration Skew Calibrates the LNB pol angle when the control board the skew motor or belt is replaced Sat Skew Offset Displays the skew offset value Mechanical Offse...

Page 79: ...utton to apply the settings to the system 3 NBD Information Sets NBD mode s tracking information Frequency kHz_IF sets the tracking frequency Reserved Parameter kHz sets the reserved parameter Click t...

Page 80: ...el IP Address sets the network IP address Factory default 192 168 2 1 Subnet Mask sets the subnet mask Factory default 255 255 255 0 Lease Start Address sets the lease IP address start range Lease End...

Page 81: ...address UDP Port sets the management port Message Type selects message type Intellian message level to send to the management server Lower number indicates higher emergency Syslog Target Level if you...

Page 82: ...82 v60E Maritime VSAT Antenna System 9 10 5 Modem Setting 1 2 3 4 2 5 6...

Page 83: ...m menu It selects the Tx Mute option The Tx Mute is a transmit inhibit output from the ACU to disable mute the modem transmit through a 5 V HIGH or 0 V LOW current whenever the antenna is blocked sear...

Page 84: ...Choose the target satellite in the list Apply Click the Apply button to apply the selected beam to the system it will switch to the beam desired Lock Within condition given for test or commissioning...

Page 85: ...tenna Restore Restore the antenna setting by uploading the saved backup file from PC Browse the backup file then click the Restore button to restore it 3 iARM Backup Restore iARM Backup Back up iARM s...

Page 86: ...CL motor BLDC Motor Motor Brake Without motor brake Sensor 3 axis Gyro Rate Sensor 2 axis Tilt Sensor Fixed Sensor Rx Frequency 10 7 12 75 GHz Ku band Gain Min 36 3 dBi 11 7 GHz without radome G T ove...

Page 87: ...ort Antenna N Type 1 ea Modem Tx Rx F Type 2 ea Input Power 100 240 V AC 50 60 Hz 1A Test Intellian Standard Temperature ADE Operational 25 C to 55 C IEC 60945 Survival 40 C to 80 C IEC 60945 Storage...

Page 88: ...to a product on which the serial number has been altered mutilated or removed Intellian Technologies will at its sole discretion repair or replace during the warranty period any product which is prov...

Page 89: ...Appendix 12 1 Appendix A Tightening Torque Specification This table shows the recommended values of tightening torques Bolt Size Tightening Torque N m M2 0 5 M2 5 1 M3 1 5 M4 3 M5 6 M6 12 M8 27 M10 50...

Reviews: