background image


48


I0402-1

Integra Division of

ONKYO U.S.A. CORPORATION

18 park Way, Upper Saddle River, N.J. 07458, U.S.A.
Tel: 201-785-2600  Fax: 201-785-2650  http://www.integrahometheater.com

Integra Division of

ONKYO CORPORATION

Sales & Product Planning Div.: 2-1, Nisshin-cho, Neyagawa-shi, OSAKA 572-8540, JAPAN
Tel: 072-831-8023  Fax: 072-831-8124

SN 29343663
(C) Copyright 2004 ONKYO CORPORATION Japan. All  rights reserved.


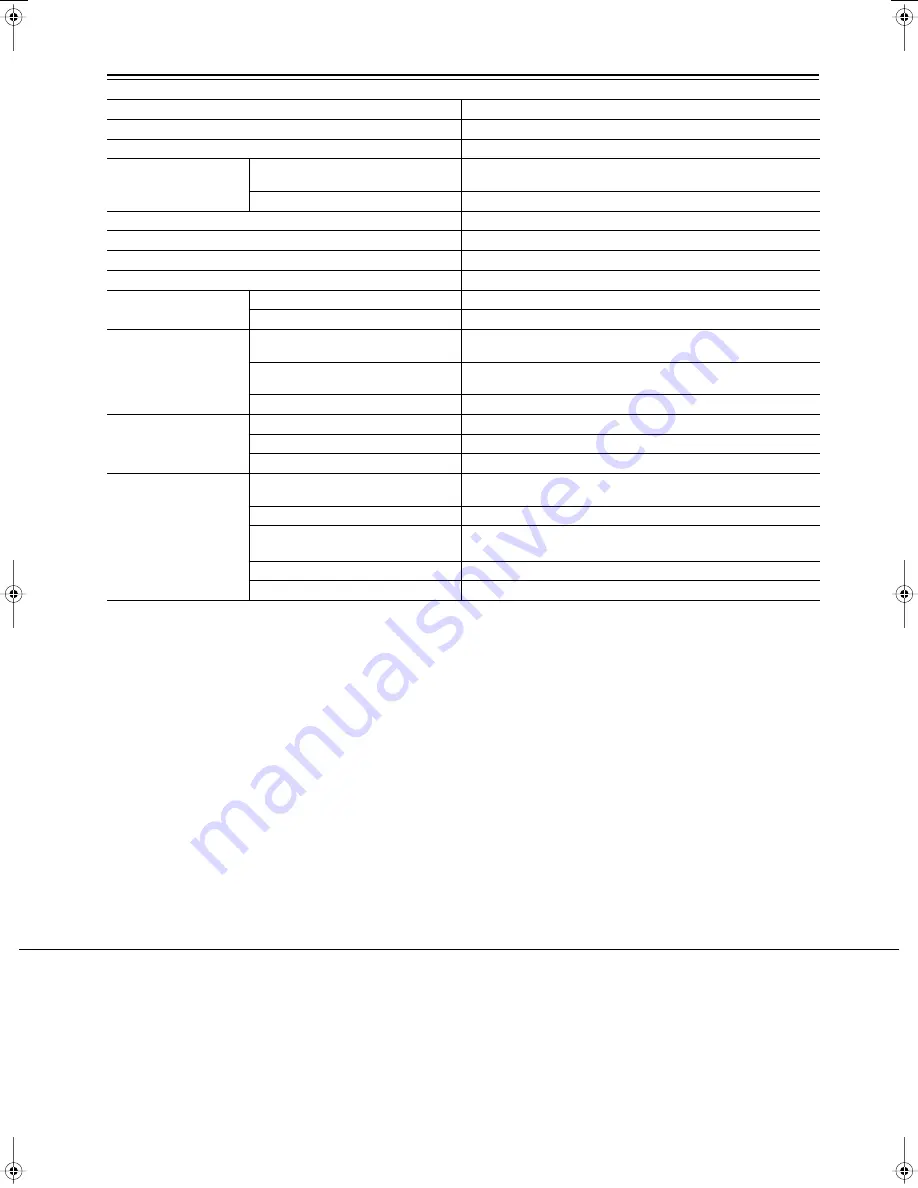
Specifications


Specifications and features subject to change without notice.


Video system


Standard NTSC (U.S. model), PAL/AUTO (Australian model)


Region code


1 (U.S. model), 4 (Australian model)


Laser


Semiconductor laser, wavelength 650 nm (DVD), 780 nm (CD)


Frequency response

DVD linear audio


4 Hz–22 kHz @ 48 kHz sampling rate
4 Hz–44 kHz @ 96 kHz sampling rate


CD audio


4 Hz–20 kHz


Signal-to-noise ratio (digital audio)


100 dB


Audio dynamic range (digital audio)


93 dB


Harmonic distortion (digital audio)


0.006%


Wow and flutter


Below measurable level


Operating conditions

Temperature


5° to 35° C (41° F to 95° F)


Installation


Install horizontally


Video outputs

COMPONENT VIDEO


Y: 1.0 V (p–p), 75 


, negative sync, RCA/phono x1, BNC x1

P


B


/P


R


: 0.7 V (p–p), 75 


S VIDEO (S-Video)


Y: 1.0 V (p–p), 75 


, negative sync, 4-pin mini DIN x2

C: 0.286 V (p–p), 75 


VIDEO (composite video)


1.0 V (p–p), 75 


, negative sync, RCA/phono x2


Audio outputs

OPTICAL


–22.5 dBm, optical connector x1


COAXIAL


0.5 V (p–p), 75 


, RCA/phono x1


ANALOG


2.0 V rms, 440 


, RCA/phono x2


General

Power supply


120 V AC, 60 Hz (U.S. model)
230–240 V AC, 50 Hz (Australian model)


Power consumption


13 W


Power consumption in Standby 
mode


0.99 W (U.S. model)
0.99 W (Australian model)


Weight


6.4 kg (14.1 lbs.)


Dimensions (W x H x D)


435 x 131 x 436 mm (17-1/8" x 5-3/16" x 17-3/16")

DPC-7.5 DVD Changer Page 48Tuesday, February 10, 2004 10:11 AM

Summary of Contents for DPC-7.5

Page 1: ...opera tion will allow you to achieve optimum performance and enjoyment Keep this manual for future reference Contents Important Safety Instructions 3 Precautions 4 Introduction 6 Controls Connectors 10 Before Using the DPC 7 5 15 Connecting the DPC 7 5 16 Powering Up Setting Up the DPC 7 5 21 Basic Playback 22 Advanced Playback 32 Configuring the DPC 7 5 39 Troubleshooting 46 Specifications 48 En ...

Page 2: ...ng Removing Discs 22 Loading Discs During Playback 22 Selecting Discs 23 Starting Pausing Stopping Playback 23 Navigating Disc Menus 25 Selecting Titles Chapters by Number 26 Using the Disc Navigator 27 Memory Playback in the Disc Navigator 28 Selecting Tracks by Number 29 Fast Forward Reverse 29 Frame by Frame Playback 30 Slow motion Playback 30 Adjusting the Display Brightness 30 Using JPEG CDs ...

Page 3: ...paratus does not operate normally by following the operating instructions Adjust only those controls that are covered by the operating instructions as an improper adjust ment of other controls may result in damage and will often require extensive work by a qualified technician to restore the apparatus to its normal operation E If the apparatus has been dropped or damaged in any way and F When the ...

Page 4: ...ication iden tification and the period of manufacture are indicated on the rear panel FCC INFORMATION FOR USER CAUTION The user changes or modifications not expressly approved by the party responsible for compliance could void the user s authority to operate the equipment NOTE This equipment has been tested and found to comply with the limits for a Class B digital device pursuant to Part 15 of the...

Page 5: ...is unit all over with a soft cloth For stubborn stains use a soft cloth dampened with a weak solu tion of mild detergent and water Dry the unit immediately after wards with a clean cloth Do not use abrasive cloths thinners alcohol or other chemical solvents because they may damage the finish or remove the panel lettering 8 Handling Notes If you need to transport this unit use the original packagin...

Page 6: ...older MP3 WMA Supports 4 3 and 16 9 aspect ratio TVs Supports up to 8 soundtracks languages Supports up to 32 subtitle languages Multiple camera angle support Parental Lock function Screen Saver function Audio Audiophile class performance Direct digital path 192 kHz 24 bit D A converter Coaxial digital output Optical digital output Analog output Others Heavy duty power cord Load discs without stop...

Page 7: ...milarly if a disc uses features that are not supported by the DPC 7 5 for example special interactive menu functions this icon will appear onscreen indicating that the feature is not supported by the DPC 7 5 Disc Content Organization DVD Video Format DVD Videos contain titles which are usually subdivided into chapters Video CD Format Video CDs contain tracks Disc Notes Disc Logo Format or file typ...

Page 8: ...incompatible file the message This for mat cannot be played appears on the display MP3 MP3 files must be MPEG1 Audio Layer 3 format 44 1 or 48 kHz fixed bit rate MP3 files must have a mp3 or MP3 filename extension Variable bit rates VBR from 64 kbps to 384 kbps are sup ported Playing times may display incorrectly with VBR WMA WMA files must have the copyright option turned off Sampling rates 44 1 ...

Page 9: ...ater System The 5 1 channel surround format that uses less compression for faithful reproduction DVD R DVD recordable A type of DVD disc that can be recorded only once Can be used to make DVD Videos or to store computer data DVD RW DVD rewritable A type of DVD disc that can be recorded many times Can be used to make DVD Videos or to store computer data DVD Video The format for storing movies on DV...

Page 10: ...31 This button is used with the Chain mode function K Stop button 23 This button is used to stop playback L Play Enter button 23 This button is used to start playback and to cancel fast forward and fast reverse It s also used to start Chain mode playback M Disc tray 22 The disc tray has six bays for loading up to six discs N Disc tray light This light illuminates the disc tray It comes on when the...

Page 11: ...indicator This indicator appears while the total time is being dis played 9 REMAIN indicator This indicator appears while the remaining time is being displayed 0 Camera angle indicator 35 This indicator appears if the DVD Video being played features multiple camera angles A Play indicator 23 This indicator is shown during playback B Pause indicator 23 This indicator appears when playback is paused...

Page 12: ...nectors They output the same audio signal respec tively F IR IN OUT 20 The IR IN connector can be used to connect a commer cially available IR receiver which can be used to pickup signals from the remote controller when the DPC 7 5 is located in another room installed in a rack or is out of range of the remote controller The IR OUT connector can be used to connect a com mercially available IR emit...

Page 13: ...and to restart Video CD menu playback H Audio button 36 This button is used to select foreign language soundtracks and audio formats e g Dolby Digital or DTS I Angle button 35 This button is used to select different camera angles J FR button 29 This button is used to start fast reverse K FF button 29 This button is used to start fast forward L Disc 1 6 buttons 23 These buttons are used to select d...

Page 14: ...itles a Play button 23 This button is used to start playback b Pause button 23 This button is used to pause playback c Stop button 23 This button is used to stop playback d Up button 26 29 This button is used to select the next chapter or track e Down button 26 29 This button is used to select the previous chapter or track During playback it selects the beginning of the current chapter or track f ...

Page 15: ... controller of the same type is used in the same room or the DPC 7 5 is installed close to equipment that uses infrared rays the remote controller may not work reliably Don t put anything such as a book on the remote control ler because the buttons may be pressed inadvertently thereby draining the batteries The remote controller may not work reliably if the DPC 7 5 is installed in a rack behind co...

Page 16: ...o cables away from power cords and speaker cables Before Making Any Connections Analog audio Right red Left white Yellow Right red Left white Yellow Composite video Wrong Right AV Cables Connectors Video Component video Component video separates the luminance Y and color difference signals PR PB providing the best picture quality Some TV manufacturers label their component video inputs slightly di...

Page 17: ... between your DPC 7 5 and TV Doing so may result in picture dis tortion because of the copy protection system used on DVD Videos When you use the analog audio outputs don t play DTS CDs and don t select DTS soundtracks on DVD Videos Doing so will produce unpleasant digital noise which may damage your equipment If your TV or projector has BNC component video inputs use a BNC component video cable t...

Page 18: ...n to a digital connection we recommend also connecting using the stereo analog connection To record the audio from a CD R disc etc to a cassette or CDR recorder that s connected to the AV receiver and when your AV receiver has Zone2 you must connect the DPC 7 5 s analog audio outputs to the AV receiver Make sure that the Digital Out Dolby Digital setting to Dolby Digital see page 42 Otherwise you ...

Page 19: ...h the DPC 7 5 The power cord supplied is designed for use with the DPC 7 5 and should not be used with any other device Never have the power cord disconnected from the DPC 7 5 while the other end is plugged into the wall outlet Doing so may cause an electric shock Always connect by plug ging into the wall outlet last and disconnect by unplugging from the wall outlet first Connecting compatible AV ...

Page 20: ...7 5 s IR IN as shown below Connect the IR emitter to the DPC 7 5 s IR OUT and place the IR emitter in front of the other AV component s remote control sensor usually located on its front panel as shown below See the instructions supplied with the IR emitter Only remote controller signals received by the DPC 7 5 s IR IN are fed through to the IR OUT Signals picked up by the DPC 7 5 s remote control...

Page 21: ...ss the Standby On button or the remote controller s On button The DPC 7 5 comes on the display lights up and the Standby indicator goes off To turn off the DPC 7 5 press the Standby On button or the remote con troller s Standby button The DPC 7 5 enters Standby mode and the Standby indicator comes on First Time Setup 10 Clear 1 2 3 6 4 5 Setup Top Menu Return Audio Stop Down FF FR Up Play Pause An...

Page 22: ...s Tip If you press the Play button the disc tray will close and playback of the disc in the right bay will start automati cally If there is no disc in that bay the DPC 7 5 will check the other bays and play the first disc it finds Tip If you press one of the remote con troller s Disc 1 6 buttons the disc tray will close and playback of the selected disc will start automatically 10 Disc 1 Disc 2 Di...

Page 23: ...ppens next depends on the type of disc you selected as follows DVD Video Typically a menu appears onscreen See page 25 Video CD Playback starts automatically Audio CD Playback starts automatically MP3 WMA JPEG The Disc Navigator appears onscreen See page 27 JPEG only CD With some JPEG CDs picture thumbnails appear onscreen See page 31 10 Disc 1 Disc 2 Disc 3 Disc 4 Disc 5 Disc 6 Disc Skip Progress...

Page 24: ...ing a DVD Video orVideo CD Your DPC 7 5 features a screen saver to protect your TV from the effects of burn in see page 44 With some DVD Videos you may experience picture noise that is not normally visible with regular TV broad casts This is usually because DVD Video uses a lot of high resolution video data The amount of noise if any will depend on your particular TV and the problem can sometimes ...

Page 25: ...PBC menus can be hidden or displayed while playback is stopped by pressing the Top Menu button Navigating Disc Menus 1 Load and select a DVD Video or Video CD See page 22 and page 23 With DVD Videos a menu usually appears automatically If it doesn t try pressing the Top Menu button With some PBC Video CDs you may have to press the Play button to dis play the menu 10 Disc 1 Disc 2 Disc 3 Disc 4 Dis...

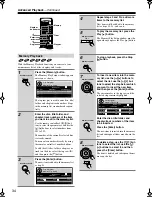
Page 26: ...p Slow Clear 1 2 3 6 4 5 Setup Top Menu Return Audio Stop Down FF FR Up Play Pause Angle Subtitle RC 543DV Open Close On Standby Enter 7 8 9 0 Search Last M Memory Chain Mode Repeat A B Random Display Menu Chain Mode Play Stop Pause Disc Skip Open Close Enter DPC 7 5 Play Enter Search Enter Clear Number buttons Up Down DVD Search Remote controller Disc Navigator Disc 1 DVD Search Title Chapter dis...

Page 27: ...ive Dimmer Step Slow Clear 1 2 3 6 4 5 Setup Top Menu Return Audio Stop Down FF FR Up Play Pause Angle Subtitle RC 543DV Open Close On Standby Enter 7 8 9 0 Search Last M Memory Chain Mode Repeat A B Random Display Menu Chain Mode Play Stop Pause Disc Skip Open Close Enter DPC 7 5 Top Menu Memory Return Enter Up Down Stop Play Enter Stop MP3 WMA JPEG Select Back to previous Back to top ENTER Selec...

Page 28: ...t use the buttons to select it in the track column and then press the Enter button To add a folder to the playlist you need to select the folder at the top of the track col umn ALL will be displayed in the play list Press the Memory button again to open the Memory Play Setup window on which you can add titles chapters tracks and folders from any disc see page 34 3 To start memory playback press th...

Page 29: ...3 6 4 5 Setup Top Menu Return Audio Stop Down FF FR Up Play Pause Angle Subtitle RC 543DV Open Close On Standby Enter 7 8 9 0 Search Last M Memory Chain Mode Repeat A B Random Display Menu Chain Mode Play Stop Pause Disc Skip Open Close Enter DPC 7 5 Play Enter Up Down FR FF Search Number buttons Play VCD CD MP3 WMA Search Remote controller Disc Navigator Search Disc 3 CD Track disc no 3 3 Current...

Page 30: ...peatedly to view subsequent frames Backward frame by frame While paused press the Step Slow button Press the Step Slow button repeatedly to view previous frames Resume playback To resume normal playback press the Play button 10 Disc 1 Disc 2 Disc 3 Disc 4 Disc 5 Disc 6 Disc Skip Progressive Dimmer Step Slow Clear 1 2 3 6 4 5 Setup Top Menu Return Audio Stop Down FF FR Up Play Pause Angle Subtitle ...

Page 31: ... zoomed in To rotate a picture clockwise or counter clockwise use the buttons not while zoomed in To pause the slideshow press the but ton Press the Play button to resume To zoom in or out use the FF and FR buttons Use the and buttons to move around the picture while zoomed in The slideshow pauses while zoomed in To cancel the zoom press the Play button 10 Disc 1 Disc 2 Disc 3 Disc 4 Disc 5 Disc 6...

Page 32: ...ur 25 minutes 30 seconds press the 1 2 5 3 and 0 buttons To enter for example 2 minutes 15 sec onds press the 2 1 and 5 buttons 3 Press the Play button to locate the specified point Playback starts from the specified point 10 Disc 1 Disc 2 Disc 3 Disc 4 Disc 5 Disc 6 Step Slow Clear 1 2 3 6 4 5 Setup Top Menu Return Audio Stop Down FF FR Up Play Pause Angle Subtitle Open Close On Standby Enter 7 8...

Page 33: ...c tion you want to repeat Playback repeats between the A and B points and A B appears onscreen and R_AB appears on the display 3 To cancel A B Repeat Playback press the Clear button or use the A B button to select Off Random Playback 10 Disc 1 Disc 2 Disc 3 Disc 4 Disc 5 Disc 6 Disc Skip Progressive Dimmer Step Slow Clear 1 2 3 6 4 5 Setup Top Menu Return Audio Stop Down FF FR Up Play Pause Angle ...

Page 34: ...y List No Disc Title Folder Chapter Track Current Total Current Total 001 6 DVD 01 02 03 Enter Remote controller Disc Navigator Memory Play Setup Memory List No Disc Title Folder Chapter Track 003 Current Total Current Total 001 001 6 DVD 6 DVD 01 02 03 4 Repeat steps 2 and 3 to add more items to the memory list New items will be added to the memory list as steps 02 03 and so on 5 To play the memo...

Page 35: ...dif ferent camera angles even though the camera indicator is displayed With some DVD Videos you can select camera angles from a menu Some DVD Videos won t allow you to select different camera angles while playback is paused 9 To edit a step use the but tons to select the list use the buttons to select the step and then use the buttons to select the top row again Edit the disc title folder and chap...

Page 36: ...rojector doesn t support progressive scan ning and it s connected to the DPC 7 5 s component video outputs if you turn on the Progressive Scanning function you ll get no picture The S Video and composite video outputs are not affected by the Progressive Scanning function Progressive scanning cannot be turned on or off during playback You must stop playback first Progressive scanning cannot be turn...

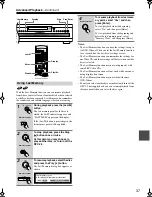
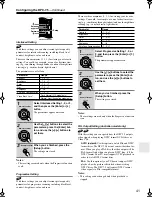
Page 37: ...LAST indicator appears and LAST MEM appears on the display If the Last M button is pressed again the last memory point will be updated 2 To stop playback press the Stop button once or twice At this point you may choose to play another disc or to turn off the DPC 7 5 3 To resume playback select the disc and press the Play button The Last Memory dialog box appears as shown 10 Disc 1 Disc 2 Disc 3 Di...

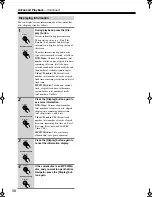
Page 38: ...ime remaining track time and total track time MP3 WMA disc Track name current track elapsed track time folder name current folder total number of tracks total number of folders 2 Press the Display button again to see more information DVD Video Current chapter number total number of chapters in title elapsed chapter time remaining chapter time total chapter time and bit rate Video CD audio CD Curre...

Page 39: ...r not the DPC 7 5 downmixes MPEG digital audio 42 Digital Out Turn on or off the digital audio outputs 42 Dynamic Range Control Dolby Digital only Set the Dynamic Range function 42 Language On Screen Language Select a language for the onscreen setup menus and messages 42 Disc Menu Language Select your preferred language for disc menus 43 Audio Language Select your preferred language for soundtrack...

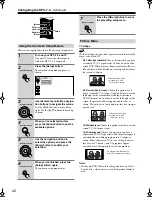
Page 40: ...e DVD Videos this setting may have no effect See the disc s sleeve notes to see which picture format is used Using the Onscreen Setup Menus 1 Turn on your DPC 7 5 and TV On your TV select the video input to which the DPC 7 5 is connected 2 Press the Setup button The onscreen setup menu appears as shown 3 Use the remote controller s naviga tion buttons to navigate the menus Use the buttons to move ...

Page 41: ...c it ll be NTSC format Your TV must support NTSC playback in order to watch NTSC format discs PAL Use this option if your TV doesn t support NTSC playback or the picture is distorted when watching NTSC discs The DPC 7 5 will convert NTSC format video signals to PAL compatible format Notes This setting can be changed only when playback is stopped Parameter Range Contrast 7 0 7 Brightness 7 0 7 Colo...

Page 42: ...C 7 5 s digital audio outputs MPEG Out With this setting you can configure the DPC 7 5 to output MPEG digital audio as it is or downmix it to PCM If you re connecting the DPC 7 5 s digital audio outputs to an AV component with a built in MPEG decoder select MPEG Otherwise select MPEG PCM MPEG default MPEG digital audio is output as it is MPEG PCM MPEG digital audio is downmixed and output as PCM d...

Page 43: ...VD Videos you can select languages from a menu Subtitle With this setting you can select your preferred language for subtitles When you play a DVD Video with multiple lan guage subtitles your preferred language will be selected automatically English default French Spanish German Italian No Subtitle No subtitles will be displayed This option is useful with DVD Videos that always display subtitles O...

Page 44: ... been turned on and a security code set if you want to turn off parental lock or change the parental lock level you ll be prompted to enter the security code Not all discs use parental lock See the disc s sleeve notes for details Discs with parental lock may cut certain scenes replace certain scenes with children friendly scenes or prevent playback of the entire disc If you forget the security cod...

Page 45: ...ese ZH Malagasy MG Dutch NL Maori MI Portuguese PT Macedonian MK Swedish SV Malayalam ML Russian RU Mongolian MN Korean KO Moldavian MO Greek EL Marathi MR Afar AA Malay MS Abkhazian AB Maltese MT Afrikaans AF Burmese MY Amharic AM Nauru NA Arabic AR Nepali NE Assamese AS Norwegian NO Aymara AY Occitan OC Azerbaijani AZ Oromo OM Bashkir BA Oriya OR Byelorussian BE Panjabi PA Bulgarian BG Polish PL...

Page 46: ...se functions This is normal Picture instability or noise The DPC 7 5 is connected to your TV via a VCR or other video equipment and its copy protection system is affecting the picture Connect the DPC 7 5 directly to your TV page 17 Can t start playback No discs loaded Load some discs page 22 The selected disc cannot be played because it s incompatible Load only compatible discs page 7 The disc is ...

Page 47: ...tteries and correct as necessary page 15 You re not pointing the remote controller at the DPC 7 5 s remote sensor Point the remote controller at the DPC 7 5 s remote sensor page 15 You re too far away from the DPC 7 5 Use the remote controller closer to the DPC 7 5 page 15 The remote controller has a range of approximately 16 ft 5 meters A strong light source is interfering with the DPC 7 5 s remo...

Page 48: ...ing rate CD audio 4 Hz 20 kHz Signal to noise ratio digital audio 100 dB Audio dynamic range digital audio 93 dB Harmonic distortion digital audio 0 006 Wow and flutter Below measurable level Operating conditions Temperature 5 to 35 C 41 F to 95 F Installation Install horizontally Video outputs COMPONENT VIDEO Y 1 0 V p p 75 Ω negative sync RCA phono x1 BNC x1 PB PR 0 7 V p p 75 Ω S VIDEO S Video ...

Reviews: