www.InstroTek.com
OPERATING MANUAL
innovators in instrumentation technology
Rapid Asphalt Drying System
CORE
DRY
®
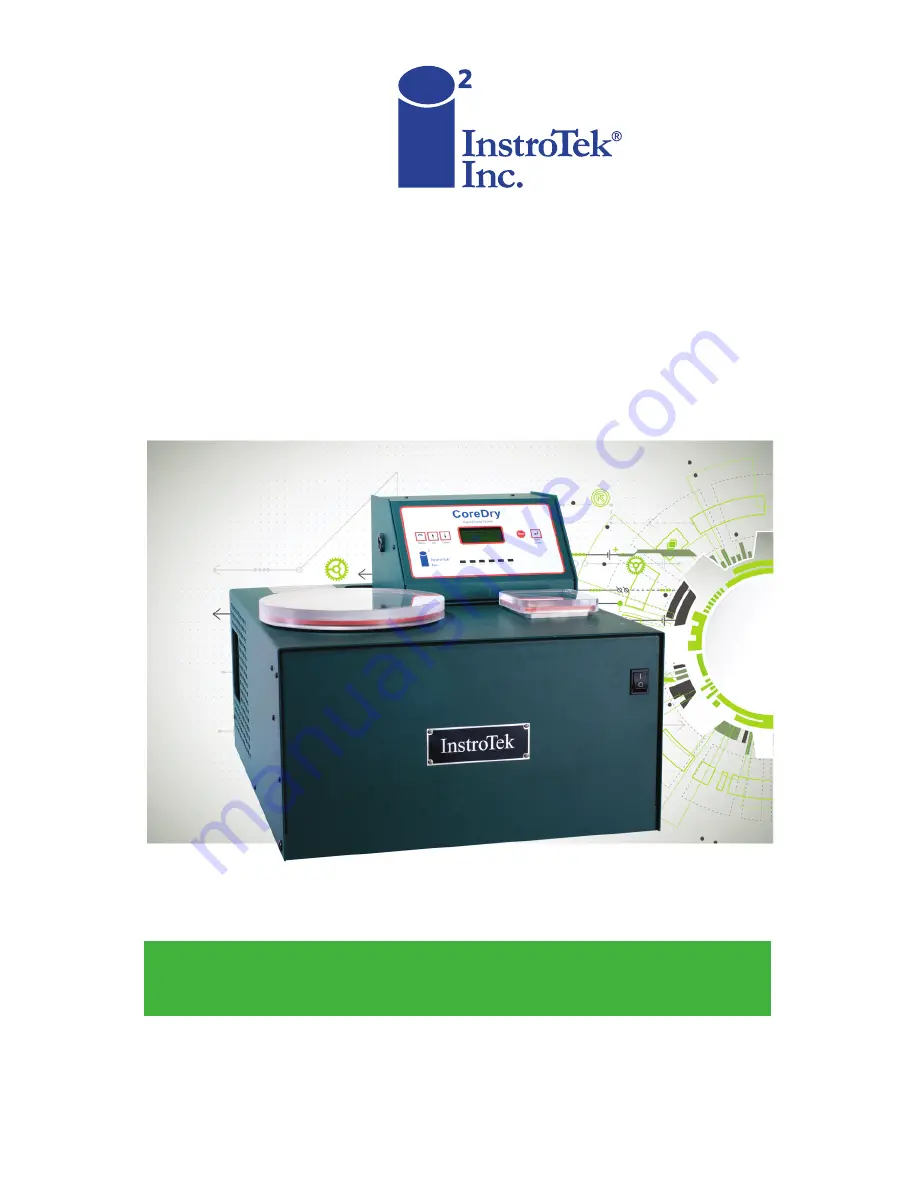
Page 1: ...www InstroTek com OPERATING MANUAL innovators in instrumentation technology Rapid Asphalt Drying System COREDRY...
Page 2: ...2018 InstroTek Inc CoreDry Operation Manual Version 8...
Page 3: ...use PRECAUTIONS WHEN USING THE COREDRY 1 There is an air heater located inside the CoreDry to maintain the sample at room temperature The heat is on during flow cycle THE BOTTOM OF THE DRYING CHAMBER...
Page 4: ...you to do this Only use recommended vacuum oil InstroTek part number 419 0005 6 Change your Tank Filters every 1 to 2 months depending on usage InstroTek part number 977 1004 package of 12 filters 7 C...
Page 5: ...InstroTek 1 1 Table of Contents 1 INTRODUCTION 2 2 GETTING STARTED 5 3 MENU FUNCTIONS 10 4 AGGREGATE TESTING 12 5 EMULSION TESTING 15 6 MAINTENANCE 20 7 TROUBLESHOOTING 26 8 INDEX 28 9 WARRANTY 30...
Page 6: ...user with samples that can be tested in a few minutes Now you can use the dry weight from the CoreDry to measure your core density in minutes or get a quick measure of your stockpile aggregate moistu...
Page 7: ...CoreDry Components CoreDry Front View CoreDry Back View Cold Trap with Lid Sample Chamber with Lid On Off Switch Oil Fill Plug Oil Level Site Glass Glass Drain Valve Power Modules Serial Number Plate...
Page 8: ...InstroTek 4 Flow Plate Wire Mesh Sample Flow Plate and Sample Holder Installed in Sample chamber Tank Filters...
Page 9: ...e the Sample Chamber lid which is located next to the CoreDry unit inside the box The Flow Plate Mesh holder is in the bottom of the large tank along with extra tank filters the Cold Trap lid a bottle...
Page 10: ...X X System Pressurizing XX CoreDry Version X X X Dry Cold Trap T XX CoreDry Version X X X Cold Trap Cooling XX System Ready P1 Start to Begin Auto Mode Program X Cycle XX T XX Pressure XXX mmHg Auto...
Page 11: ...e information Note When you receive the CoreDry or after transport to other locations you might have to run the CoreDry several cycles to achieve 6 mmHg Moisture from humidity might build up within th...
Page 12: ...phalt sample to remove as much of the free water as possible Place the sample on its side then on the wire mesh sample support as shown below place the lid on sample chamber and press start When sampl...
Page 13: ...d trap lid and the divider plate and wipe out the moisture Be sure to always replace the divider before drying the next sample Caution Use a lint free cloth to remove moisture from the cold trap and t...
Page 14: ...yed in hours 3 Run Hours Displays the amount of time the CoreDry unit has operated Time is displayed in hours 4 Max Cycles This menu function shows the maximum number of cycles the CoreDry will run un...
Page 15: ...oil changes back to 80 hours After each oil change it is important to go into this menu function and reset the timer 9 Tank Filter Resets the timer for the tank filters After the tank filters have bee...
Page 16: ...ggregate quantities to use in the fixture Record weight 5 When you determine the sample weight re tare the scale 6 Replace the lid and tighten the fasteners on the aggregate fixture 7 Weight the entir...
Page 17: ...e inside the sample chamber Close the lid and press Enter The unit will continue until the sample is completely dry 12 Determine the moisture content by the following equation Moisture Content Weight...
Page 18: ...InstroTek 14 Aggregate Sample Fixture Aggregate Fixture with one fastener and lid removed...
Page 19: ...nutes using the CoreDryTM It enables laboratories to recover the residual asphalt of emulsion to determine the percent residual asphalt without changing the binder properties The residual binder can b...
Page 20: ...reDry control board necessary for older models Preparing a Sample 1 Prepare a space with a protective sheet to capture any spills of the emulsion 2 Weigh a clean silicone sheet and metal pan to the ne...
Page 21: ...ion The applicator should slide across the surface of the silicon sheet 5 Once the emulsion is spread place the silicone sheet back in the metal pan Be careful not to spill the emulsion 6 Weigh the pa...
Page 22: ...tion process for the remaining 4 pans 10 Turn on the CoreDry and select Program 5 for drying the emulsion a Enter Menu Select option 1 Program Press Enter b Press the Up Down arrows until 5 is shown c...
Page 23: ...sides together to form a ball of asphalt binder NOTE If the residual binder is to be tested use latex or neoprene gloves to remove the binder to prevent contamination of the sample 2 Wash the silicone...
Page 24: ...ared and after you change the filters go into the Menu option 9 to reset the timer for the next change Change Oil Every 80 hours of normal use this will be indicated on the LCD readout and can be chec...
Page 25: ...dispose of the oil in a responsible manner Always discard the oil at certified disposal facilities Caution Carefully remove any spilled oil from the floor to avoid accidents Only use high quality syn...
Page 26: ...edges and 1 on each side in the middle near the bottom 4 Prior to lifting top cover place a piece of foam or other support in front of CoreDry 5 Lift top cover and rotate towards the front to expose t...
Page 27: ...and top cover 14 Replace all exterior screws 15 Go into Menu option 10 and reset the timer for the Exhaust Filter Changing Pump Filter Welch Pump Replacement part number 977 1002 1 Turn the ON OFF swi...
Page 28: ...up CoreDry by running the unit empty with both lids on for three separate tests 2 Dry Cold Trap to make sure there is no moisture inside the Cold Trap 3 Place Vacuum Gauge inside sample chamber and p...
Page 29: ...25 7 If the two readings are not the same take note of the difference between the Vacuum Gauge and the displayed pressure and contact InstroTek at 919 875 8371 for instruction on how to adjust pressu...
Page 30: ...sed completely Run Self Test to make sure everything is working within normal parameters Open CoreDry and make sure no hoses are pinched or loose Contact InstroTek for troubleshooting help 919 875 837...
Page 31: ...on each side in the middle near the base Rotate top cover forward and slowly remove one of the hoses from sample tank WARNING DOING SO WILL RELEASE VACUUM IN TANK AND WILL CAUSE THE LIDS TO BECOME FR...
Page 32: ...egate Type 13 Auto Mode 6 B Busch Pump 21 C Changing Oil 15 Components 3 D Daily Test 7 Drain Valve 26 Dry Plate 4 Drying Samples 8 E Emulsion Cleaning 19 Emulsion Testing 15 F Flow Plate 5 M Maintena...
Page 33: ...reparing a Sample 16 Prep Flow Chart 6 Pump Filter 21 23 Q Quick Start 5 S Self Test 10 11 26 Setup 5 T Tank Filters 4 5 11 20 Tools Needed 22 Troubleshooting 26 V Verifying Vacuum Pressure 24 Views 3...
Page 34: ...ipping charges duties or taxes in the transport to and from the factory or authorized service center Always insure the shipment if a return for repair is needed InstroTek does not take responsibility...
Page 35: ...1 Contact Information Innovators in Instrumentation Technology www InstroTek com 919 875 8371 sales InstroTek com Research Triangle Park NC Austin TX Bensalem PA Grand Rapids MI Denver CO Las Vegas NV...
Page 36: ...sit InstroTek com Call a Location near you Headquarters Research Triangle Park NC phone 919 875 8371 Bensalem PA phone 215 645 1064 Grand Rapids MI phone 616 726 5850 Denver CO phone 303 955 5740 Aust...