background image

12

NS-DD10PDVD19

www.insigniaproducts.com

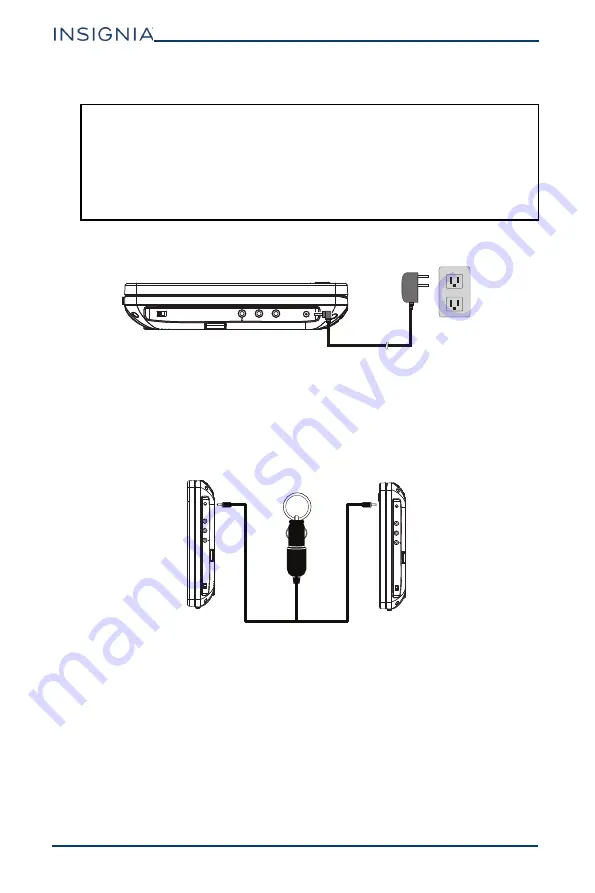
Connecting to AC power

1

Plug one end of the included AC adapter into the 

DC IN

 jack on the side of 

your player, then plug the other end into an AC outlet.

2

Repeat step 1 to connect your other player.

3

Slide the 

ON/OFF

 switch on each player to the 

ON

 position.

Connecting to a 12V power outlet

1

Plug the end of the included Y-type DC vehicle power adapter (the end with 
two connectors) into the 

DC IN

 jacks on your players, then the other end into a 

12V power outlet (for example, a vehicle power outlet).

2

Turn on your player(s).

CAUTIONS: 

• The AC adapter is used to disconnect your player from AC power. When the 

AC adapter is plugged into a power outlet, your player is not completely 
disconnected from power, even when the power is turned off. 

• Make sure that the adapter is easily accessible during use.
• Do not use the included AC adapters with other equipment.
• When you do not plan to use your players for an extended period of time, 

unplug the adapters from the wall outlet.

ON   OFF

ON   OFF

AV   OUT

AV   IN

DC IN 

9-12V

ON   OFFON   OFF

AV

   OUT

AV

   IN

DC IN 

9-12V

ON   OFFON   OFF

AV

   OUT

AV

   IN

DC IN 

9-12V

Summary of Contents for NS-DD10PDVD19

Page 1: ...10 Dual Screen Portable DVD Player NS DD10PDVD19 Before using your new product please read these instructions to prevent any damage USERGUIDE ...

Page 2: ...r 15 Turning your player on 15 Playing a DVD or Audio CD 15 Controlling DVD or Audio CD playback 16 Selecting a chapter or track 16 Viewing photos 16 Setting up a playback program 16 Using zoom mode 17 Using the menus 17 Adjusting general setup options 17 Selecting the audio mode 18 Adjusting video options 19 Setting video and audio preferences 20 Using parental controls 21 Turning parental contro...

Page 3: ...ttachments accessories specified by the manufacturer 12 Do not place your DVD player on an unstable cart stand tripod bracket or table It may fall resulting in possible damage or injury 13 Never place heavy or sharp objects on the LCD panel or frame 14 Unplug your DVD player during lightning storms or when unused for long periods of time 15 Refer all servicing to qualified service personnel Servic...

Page 4: ...ian to perform routine safety checks to determine that your player is in correct operating condition Servicing These servicing instructions are for use by qualified service personnel only To reduce the risk of electric shock do not perform any servicing other than that contained in the operating instructions unless you are qualified to do so End of life directives Your DVD player may contain mater...

Page 5: ...ble to connect your player to a TV or monitor Remote controls 2 AC DC power adapters 2 DC vehicle power adapter Car headrest mounts 2 Travel storage case Quick Setup Guide About discs Your DVD player can play DVDs and Audio CDs including CD R and CD RW Your player is designed and manufactured to respond to the Region Management Information that is encoded on DVDs If the region number printed on th...

Page 6: ...ip forward on a disc Press and hold to increase the volume In menus press to move down 5 Source Setup Press to switch between AV mode to play the same disc on both players and disc mode to watch a different disc on each player 6 Left Play Pause In playback mode press and hold to start or pause playback In menus moves left 7 Right Stop In playback mode press and hold to stop playback If you press t...

Page 7: ...ones into this jack 4 AV OUT jack Connect either the AV connecting cable to this jack to share playback with the other DVD player or the AV adapter cable to view playback on a TV or monitor 5 AV IN jack Connect the AV connecting cable to this jack to receive playback from the other DVD player 6 DC IN 9 12V power connector Plug an AC adapter or 12V car adapter into this jack ON OFF ON OFF AV OUT AV...

Page 8: ...DVD19 www insigniaproducts com Back ITEM DESCRIPTION 1 Strap slots Slide the mounting straps through these slots when installing your player in a vehicle 2 Stand Pull out to set your player on a desktop or table ...

Page 9: ...r displays on your master player appear on your secondary player but changing settings on your master player does not change settings on your secondary player When your players are connected the only remote control buttons that work for your secondary player are VOL VOL MUTE SOURCE MODE and SETUP BUTTON DESCRIPTION 1 SOURCE Toggles the video input between the DVD and AV IN 2 STEP Pauses playback a...

Page 10: ...See Using zoom mode on page 17 14 MUTE Turns off the sound Press this button again to unmute the sound 15 DISPLAY DVD Displays the DVD playtime and status information Audio CD Displays the elapsed and remaining time for the playing track and for the entire CD 16 10 Selects a double digit chapter or track number For example to select 12 press this button then press the 2 button 17 MENU PCB Returns ...

Page 11: ...o the previous chapter or track 26 forward Press to fast forward on a disc Each time you press this button the speed changes 2x to 4x to 8x to 16x to 32x to normal playback You can also press to exit fast forward mode 27 reverse Press to fast reverse on a disc Each time you press this button the speed changes 2x to 4x to 8x to 16x to 32x to normal playback You can also press to exit fast reverse m...

Page 12: ...ers then the other end into a 12V power outlet for example a vehicle power outlet 2 Turn on your player s CAUTIONS The AC adapter is used to disconnect your player from AC power When the AC adapter is plugged into a power outlet your player is not completely disconnected from power even when the power is turned off Make sure that the adapter is easily accessible during use Do not use the included ...

Page 13: ...other player 2 Turn on your players Mounting your DVD player in a vehicle 1 Loosen the straps of the headrest mount 2 Insert your DVD player into the front of your headrest mount Note The player with the AV OUT connection is the master player and the player with the AV IN connection is the secondary player ON OFF ON OFF AV OUT AV IN DC IN 9 12V ON OFF ON OFF AV OUT AV IN DC IN 9 12V ...

Page 14: ...straps E1 E2 F1 and F2 around the headrest and thread them through the plastic buckles Pull the straps tight Connecting headphones When headphones are plugged into the headphone jack sound from the built in speakers is muted 1 Plug your headphones not included into the headphone jack on the side your DVD player 2 Repeat step 1 for the other player A B E1 F1 E2 F2 ON OFF ON OFF AV OUT AV IN DCIN9 1...

Page 15: ...on Playing a DVD or Audio CD 1 Make sure that your player is connected to power 2 Slide the ON OFF switch to the ON position Note You may need to select the correct input on the TV or monitor Notes Most DVDs and your players have region codes that help control illegal distribution of DVDs The region code for your player is 1 You can only play DVDs with a region code of 1 or ALL The region code for...

Page 16: ... selected chapter TITLE Goes to a selected title For Audio CDs DISC GOTO Goes to a selected time on a disc TRACK GOTO Goes to a selected time within a track SELECT TRACK Goes to a selected track 2 Use your remote control to enter a time chapter title or track number The list closes and your player goes to the time chapter title or track you selected Viewing photos You can view photos copied as JPE...

Page 17: ... size Use or to navigate around the picture Using the menus Adjusting general setup options 1 Press SETUP 2 Use or to select GENERAL then press ENTER 3 Press or to select an option then press ENTER You can select TV DISPLAY Selects the aspect ratio You can select 4 3 PANSCAN When you play wide screen video this mode crops the right and left sides of the image so you can view the image on a convent...

Page 18: ...ose the tray with the same disc loaded your player resumes playing where you stopped You can select ON or OFF 4 Use or to select a setting then press ENTER 5 Press SETUP to close the menu Selecting the audio mode 1 Press SETUP 2 Press or to select AUDIO then press ENTER 3 Press or to select DOWNMIX then press ENTER 4 Press or to select a stereo analog audio mode You can select LT RT Select this op...

Page 19: ...o add more dark to light areas of the picture CONTRAST Increases the contrast level to adjust the white areas of the picture or decreases the contrast level to adjust the black areas of the picture HUE Increases the color level to add more green to skin tones or decreases the color level to add more purple to skin tones SATURATION A high saturation level makes vivid colors brighter 4 Press ENTER t...

Page 20: ...titles are available on the DVD If the language you select is not available on the DVD your player displays subtitles in the default language You can select ENGLISH ESPAÑOL FRANÇAIS or OFF DISC MENU Selects a language for a disc menu if multiple languages are available on the DVD If the language you select is not available on the DVD your player displays the default language You can select ENGLISH...

Page 21: ...or to select PASSWORD MODE then press or to select ON or OFF 5 Press ENTER to save your setting then press SETUP to close the menu Setting up a parental control password 1 Make sure that the PASSWORD MODE option is set to ON 2 Press SETUP 3 Press or to select PREFERENCE then press ENTER Notes If the PASSWORD MODE option is set to ON you must enter the password when you select the PARENTAL option t...

Page 22: ...to close the menu Changing the parental control password 1 Press SETUP 2 Press or to select PREFERENCE then press ENTER 3 Press or to select PASSWORD then press ENTER Note The master password is 1369 If you forget your password you can enter the master password PASSWORD SETUP PAGE GOTO PASSWORD SETUP PAGE PASSWORD MODE ON PASSWORD CHANGE ON OFF PASSWORD SETUP PAGE GOTO PASSWORD SETUP PAGE PASSWORD...

Page 23: ...s or to select PARENTAL then press ENTER 4 Press or to select a parental control rating You can select KID SAFE G PG PG 13 PG R R NC17 and ADULT 5 Use the remote control to enter your four digit password 6 Press ENTER to return to the parental control rating menu Maintaining your player Cleaning your player Clean the outside of your player with a clean cloth slightly dampened with water Note If yo...

Page 24: ... plugged in Cannot fast forward or fast reverse through a movie You cannot fast forward through opening credits and warning information at the beginning of a movie Some DVDs do not allow rapid scanning or skipping of titles or chapters The icon appears on the screen The action you tried cannot be done because The DVD software does not allow it The DVD does not support the feature for example the S...

Page 25: ...ts owned by Macrovision Corporation and other rights owners Use of this copyright protection technology must be authorized by Macrovision Corporation and is intended for home and other limited viewing uses only unless otherwise authorized by Macrovision Corporation Reverse engineering or disassembly is prohibited Compatible discs DVDs Region 1 for U S Audio CDs and MP3 discs Signal system PAL or N...

Page 26: ... must pay all labor and parts charges This warranty lasts as long as you own your Insignia Product during the Warranty Period Warranty coverage terminates if you sell or otherwise transfer the Product How to obtain warranty service If you purchased the Product at a Best Buy retail store location or from a Best Buy online website www bestbuy com or www bestbuy ca please take your original receipt a...

Page 27: ...WARRANTY INSIGNIA SHALL NOT BE LIABLE FOR ANY INCIDENTAL OR CONSEQUENTIAL DAMAGES FOR THE BREACH OF ANY EXPRESS OR IMPLIED WARRANTY ON THIS PRODUCT INCLUDING BUT NOT LIMITED TO LOST DATA LOSS OF USE OF YOUR PRODUCT LOST BUSINESS OR LOST PROFITS INSIGNIA PRODUCTS MAKES NO OTHER EXPRESS WARRANTIES WITH RESPECT TO THE PRODUCT ALL EXPRESS AND IMPLIED WARRANTIES FOR THE PRODUCT INCLUDING BUT NOT LIMITE...

Page 28: ... Canada or 01 800 926 3000 Mexico INSIGNIA is a trademark of Best Buy and its affiliated companies Distributed by Best Buy Purchasing LLC 7601 Penn Ave South Richfield MN 55423 U S A 2018 Best Buy All rights reserved Made in China V1 ENGLISH 18 0376 ...

Reviews: