background image

33

Insignia 24" LED TV

www.insigniaproducts.com

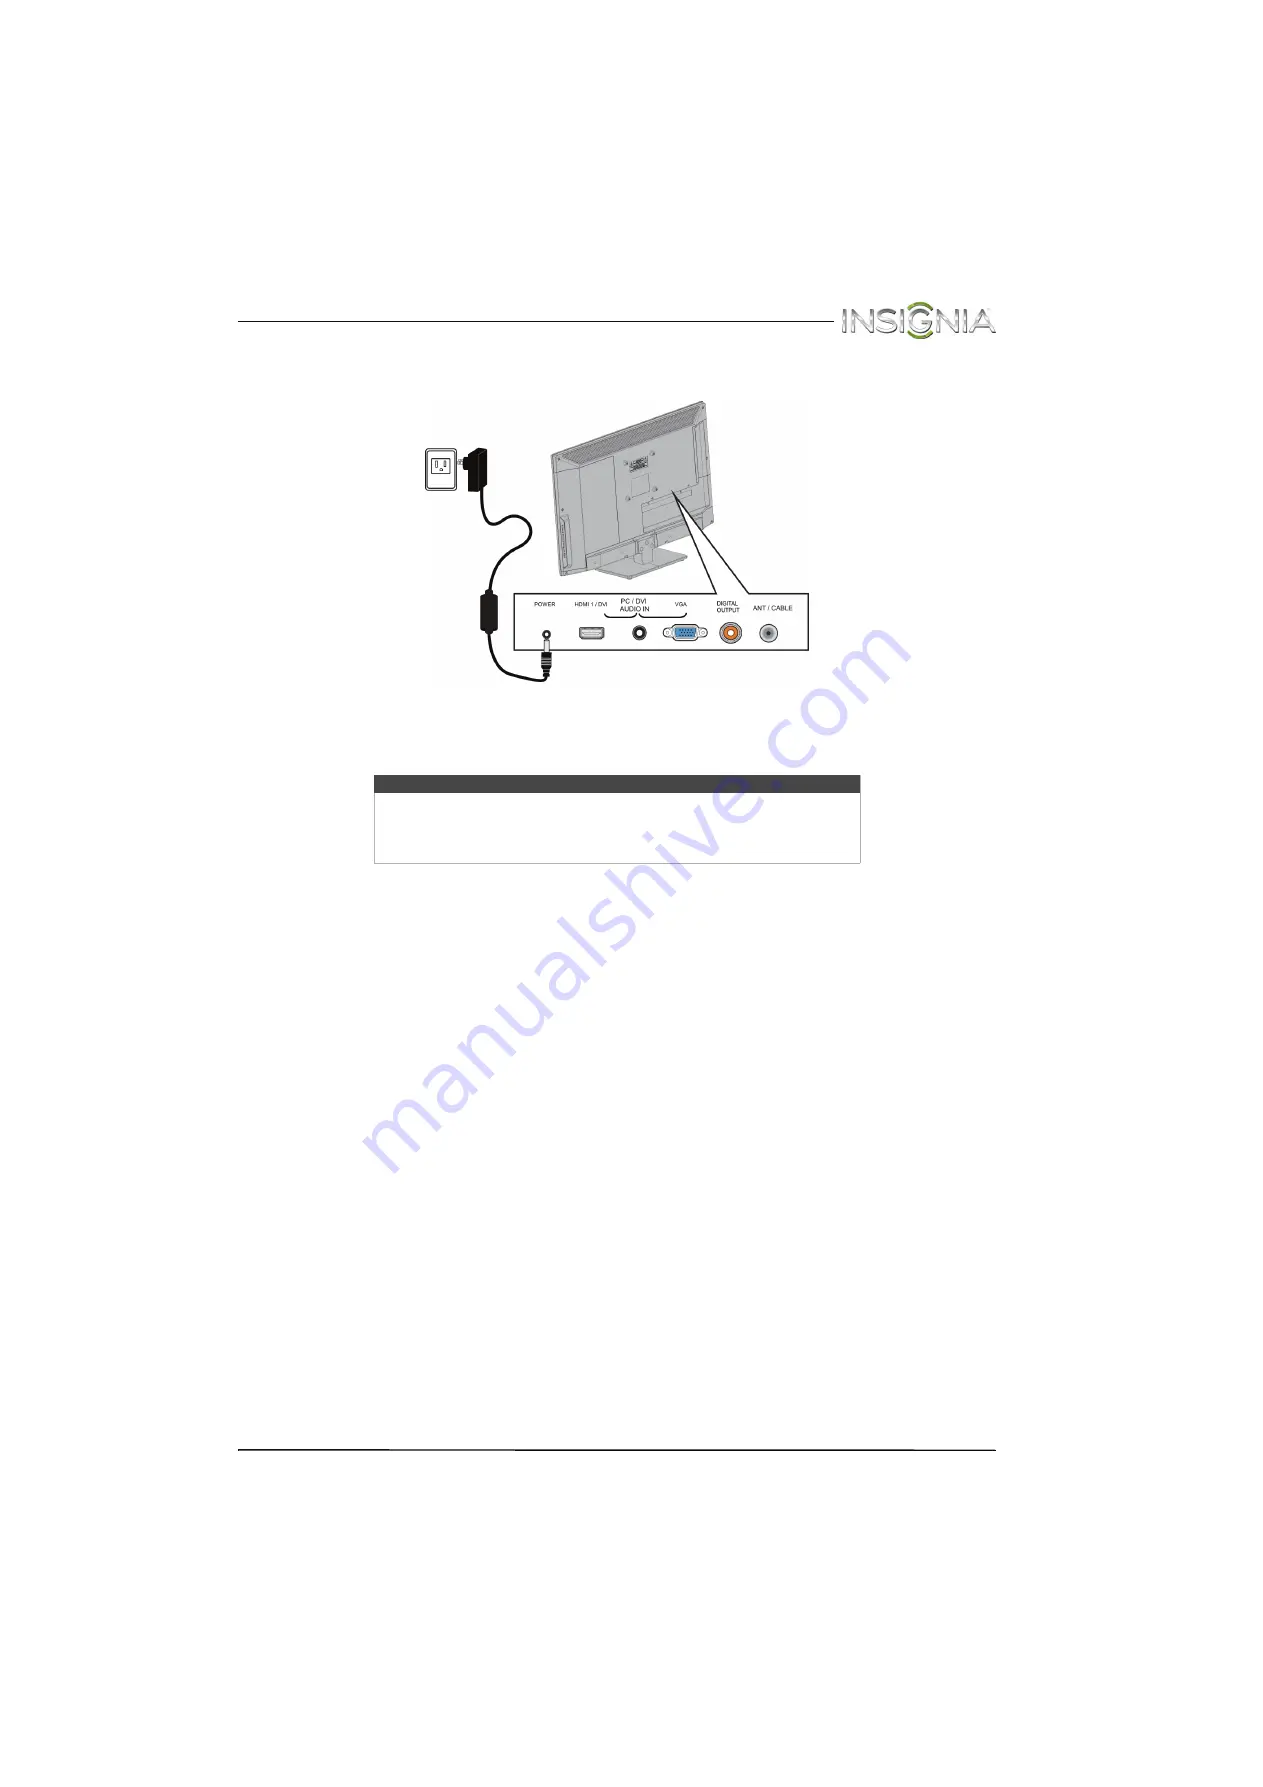
Connecting power

To connect the power:

1

Plug the AC power adapter into the 

POWER

 jack on the back of your TV.

2

Plug the other end of the adapter into a power outlet.

Cautions

• Your TV should only be operated from the power source indicated on 

the label.

• Always unplug the AC power adapter from the power outlet when you 

will not be using your TV for an extended period of time.

Summary of Contents for NS-24E200NA14

Page 1: ...NS 24E200NA14 UserGuide 24 LED TV Before using your new product please read these instructions to prevent any damage ...

Page 2: ...an audio connection 13 Using component video better 14 Using composite video good 15 Using coaxial good 16 Connecting an antenna or cable TV no box 17 Connecting a DVD or Blu ray player 18 Using HDMI best 18 Using DVI same as HDMI but requires an audio connection 19 Using component video better 20 Using composite video good 21 Connecting a game console 22 Using HDMI best 22 Using component video b...

Page 3: ...r on picture mode 41 Adjusting the computer image 42 Adjusting the sound 42 Adjusting sound settings 42 Selecting the audio out mode 43 Playing TV audio only 44 Changing channel settings 44 Automatically scanning for channels 44 Hiding channels 46 Setting up a favorite channel list 46 Viewing a favorite channel 46 Adding or changing a channel label 47 Checking the digital signal strength 47 Automa...

Page 4: ...8 Browsing photos 58 Viewing favorite photos 59 Viewing photos in a slideshow 59 Customizing slideshow settings 60 Maintaining 60 Cleaning the TV cabinet 60 Cleaning the TV screen 60 Troubleshooting 61 Restoring settings to the defaults 61 Viewing system information 61 Video and audio 61 Remote control 63 General 63 Specifications 64 Programming universal remote controls 65 Common universal remote...

Page 5: ...come excited while watching a program especially on a larger than life TV Make sure that you place or install the TV where it cannot be pushed pulled over or knocked down Make sure that you route all cords and cables so that they cannot be pulled or grabbed by curious children Wall mounting If you decide to wall mount your TV always remember One size of wall mount does not fit all Use only a wall ...

Page 6: ...ripping or splashing and no objects filled with liquids such as vases should be placed on the apparatus WARNING Electric shock hazard To reduce the risk of fire or electric shock do not remove any cover or expose the device to rain or moisture No user serviceable parts are inside Refer servicing to qualified service technicians Lightning For added protection for your device receiver during a light...

Page 7: ... the lead in wire to an antenna discharge unit size of grounding conductors location of the antenna discharge unit connection to grounding electrodes and requirements for the grounding electrode Note to CATV system installer Article 820 of the National Electrical Code ANSI NFPA No 40 provides guidance for correct grounding Specifically it states that the cable ground must be connected to the groun...

Page 8: ...ign and is designed for reliable and trouble free performance Installing the stand or wall mount bracket Installing the stand To install the stand 1 Carefully place your TV face down on a cushioned clean surface to protect the screen from damages and scratches Notes If you plan to wall mount your TV do not install the stand Store the stand and stand screws in case you decide to use the stand in th...

Page 9: ...5 Insignia 24 LED TV www insigniaproducts com 2 Secure the TV stand to the stand column with the four provided screws Screw type Screw length of screws B4 18 mm 4 ...

Page 10: ...Carefully place your TV face down on a cushioned clean surface to protect the screen from damages and scratches 2 Remove the three screws that secure the stand column to the TV then remove the stand column Warning This TV is intended to be supported by a UL Listed wall mount bracket with suitable weight load See Miscellaneous on page 65 ...

Page 11: ...s that came with the wall mount bracket for information about how to correctly hang your TV Notes The length of the wall mount screws vary depending on the wall mount bracket you purchased See the instructions that came with the wall mount bracket for screw lengths The mounting holes on the back of your TV take type M4 screws 3 94 in 100 mm 3 94 in 100 mm ...

Page 12: ...g the power adapter 1 2 3 4 5 6 7 Item Description USB Connect a USB flash drive to this jack to view compatible JPEG picture files For more information see Connecting a USB flash drive on page 28 and Using a USB flash drive on page 58 HDMI 2 Connect an HDMI device to this jack For more information see Using HDMI best on pages 12 18 22 or 26 AUDIO OUT Connect headphones an analog audio amplifier a...

Page 13: ...more information see Using VGA most common on page 25 OR Connect the audio for a DVI device to the this jack For more information see Using DVI same as HDMI but requires an audio connection on pages 13 19 or 27 VGA Connect the video VGA for a computer to this jack For more information see Using VGA most common on page 25 DIGITAL OUTPUT coaxial Connect a digital audio amplifier or home theater syst...

Page 14: ...tion see Selecting the videoinput source on page 37 return In TV mode press to return totheprevious channel S T W X Press to navigate in on screen menus and to adjust settings home Press to open the on screen menu INFO Press to display TVstatus information such as the channelnumber channelname ifavailable orsignal source For more information see Viewingchannel information on page 39 CCD Presstotur...

Page 15: ...ices have HDMI HDMI video audio Better than composite or coaxial Component video requires an audio connection Better than coaxial Compositevideo requires an audio connection Good Coaxial video audio Connection type and jack Cable connectors Coaxial digital audio Analog audio input Analog audio output VGA computer video and audio Cautions Check the jacks for position and type before making any conn...

Page 16: ... is turned off 2 Connect the incoming cable from the cable wall jack to the cable in jack on the cable or satellite box 3 Connect an HDMI cable not provided to the HDMI jack on the side or back of your TV and to the HDMI OUT jack on the cable or satellite box 4 Plug your TV s power adapter into a power outlet turn on your TV then turn on the cable or satellite box 5 Press INPUT to open the INPUT S...

Page 17: ...k of your TV 5 Connect a 3 5mm audio cable not provided to the PC DVI AUDIO IN jack on the back of your TV and to the AUDIO OUT jacks on the cable or satellite box 6 Plug your TV s power adapter into a power outlet turn on your TV then turn on the cable or satellite box 7 Press INPUT to open the INPUT SOURCE list 8 Press S or T to highlight HDMI 1 then press ENTER Note You must use the HDMI 1 DVI ...

Page 18: ...the side of your TV and to the audio out jacks on the cable or satellite TV box 5 Plug your TV s power adapter into a power outlet turn on your TV then turn on the cable or satellite box 6 Press INPUT to open the INPUT SOURCE list 7 Press S or T to highlight Component AV then press ENTER Note Cables are often color coded to match color coded jacks Notes The COMPONENT AV Y VIDEO PB and PR video jac...

Page 19: ...r outlet turn on your TV then turn on the cable or satellite box 5 Press INPUT to open the INPUT SOURCE list 6 Press S or T to highlight Component AV then press ENTER Notes Cables are often color coded to match color coded jacks The yellow video connector on the AV cable connects to the green COMPONENT AV Y VIDEO jack Notes The COMPONENT AV Y VIDEO PB and PR video jacks used to connect a component...

Page 20: ...nd to the coaxial out jack on the cable or satellite box 4 Plug your TV s power adapter into a power outlet turn on your TV then turn on the cable or satellite box 5 Press INPUT to open the INPUT SOURCE list 6 Press S or T to highlight TV then press ENTER 7 If you cannot tune to channels you know exist scan for channels See Automatically scanning for channels on page 44 Notes Use a coaxial cable t...

Page 21: ...s Do not bundle the coaxial cable with the power adapter or other cables If the antenna is not installed correctly contact qualified service personnel to correct the problem If the signal level for a channel is weak the picture may be distorted Adjust the antenna or use a highly directional outdoor or set top antenna with a built in amplifier If the picture quality is good on some channels and poo...

Page 22: ...s unplugged and the DVD or Blu ray player is turned off 2 Connect an HDMI cable not provided to the HDMI jack on the side or back of your TV and to the HDMI OUT jack on the DVD or Blu ray player 3 Plug your TV s power adapter into a power outlet then turn on your TV 4 Turn on the DVD or Blu ray player then set it to the correct output mode For more information see the documentation that came with ...

Page 23: ...nd to the AUDIO OUT jacks on the DVD or Blu ray player 5 Plug your TV s power adapter into a power outlet then turn on your TV 6 Turn on the DVD or Blu ray player then set it to the correct output mode For more information see the documentation that came with the player 7 Press INPUT to open the INPUT SOURCE list 8 Press S or T to select HDMI 1 then press ENTER Note You must use the HDMI 1 DVI jac...

Page 24: ...er into a power outlet then turn on your TV 5 Turn on the DVD or Blu ray player then set it to the correct output mode For more information see the documentation that came with the player 6 Press INPUT to open the INPUT SOURCE list 7 Press S or T to select Component AV then press ENTER Note Cables are often color coded to match color coded jacks Notes The COMPONENT AV Y VIDEO PB and PR video jacks...

Page 25: ...formation see the documentation that came with the player 5 Press INPUT to open the INPUT SOURCE list 6 Press S or T to select Component AV then press ENTER Notes Cables are often color coded to match color coded jacks The yellow video connector on the AV cable connects to the green COMPONENT AV Y VIDEO jack Note The COMPONENT AV Y VIDEO PB and PR video jacks used to connect a component device sha...

Page 26: ...DMI jack on the side or back of your TV and to the HDMI OUT jack on the game console 3 Plug your TV s power adapter into a power outlet then turn on your TV 4 Turn on the game console then set it to the correct output mode For more information see the documentation that came with the console 5 Press INPUT to open the INPUT SOURCE list 6 Press S or T to highlight HDMI 1 or HDMI 2 then press ENTER H...

Page 27: ...ocumentation that came with the console 5 Press INPUT to open the INPUT SOURCE list 6 Press S or T to select Component AV then press ENTER Note Cables are often color coded to match color coded jacks Note Your game console may require a special component video cable See the documentation that came with your game console or check the manufacturer s website The COMPONENT AV Y VIDEO PB and PR video j...

Page 28: ...yer 5 Press INPUT to open the INPUT SOURCE list 6 Press S or T to select Component AV then press ENTER Notes Cables are often color coded to match color coded jacks The yellow video connector on the AV cable connects to the green COMPONENT AV Y VIDEO jack Note Most game consoles come with a special AV composite video cable See the documentation that came with your game console or check the manufac...

Page 29: ...o cable with a stereo mini plug not provided to the PC DVI AUDIO IN jack on the back of your TV and to the AUDIO OUT headphone jack on the computer 4 Plug your TV s power adapter into a power outlet then turn on your TV and the computer 5 Press INPUT to open the INPUT SOURCE list 6 Press S or T to select VGA then press ENTER 7 Adjust the display properties on the computer if necessary Audio cable ...

Page 30: ...not provided to the HDMI jack on the side or back of your TV and to the HDMI OUT jack on the computer 3 Plug your TV s power adapter into a power outlet then turn on your TV and the computer 4 Press INPUT to open the INPUT SOURCE list 5 Press S or T to highlight HDMI 1or HDMI 2 then press ENTER 6 Adjust the display properties on the computer if necessary HDMI cable Side of TV HDMI cable connector ...

Page 31: ...ck on the back of your TV and to the AUDIO OUT headphone jack on the computer 5 Plug your TV s power adapter into a power outlet then turn on your TV and the computer 6 Press INPUT to open the INPUT SOURCE list 7 Press S or T to select HDMI 1 then press ENTER 8 Adjust the display properties on the computer if necessary Note You must use the HDMI 1 DVI jack to connect a computer using DVI If you us...

Page 32: ... input source after you plug in the USB flash drive and want to switch back to the drive press INPUT to open the INPUT SOURCE list press S or T to select USB Photos then press ENTER The PHOTOS menu opens Caution Do not remove the USB flash drive or turn off the TV while using the USB flash drive You may lose data or damage the USB flash drive Note The Photos viewer only supports JPEG format images...

Page 33: ...e audio out mode on page 43 Warning Loud noise can damage your hearing When using headphones use the lowest volume setting on your headphones that still lets you hear the sound Note If you connect headphones when your TV is turned off then you turn on your TV the TV speakers are muted and the audio plays through the headphones You can also connect an amplifier home theater system or sound bar to t...

Page 34: ...e home theater system is turned off 2 Connect a digital coaxial audio cable not provided to the DIGITAL OUTPUT jack on the back of your TV and to the coaxial AUDIO IN jack on the digital home theater system 3 Plug your TV s power adapter into a power outlet then turn on your TV and the home theater system Digital coaxial audio cable Home theater system Back of TV Digital coaxial audio cable connec...

Page 35: ...IN jacks on the analog home theater system 3 Plug your TV s power adapter into a power outlet then turn on your TV and the home theater system Note For information about selecting the audio out mode for a home theater see the Headphone Audio Out option in Adjusting sound settings on page 42 You can connect headphones an amplifier a home theater system or a sound bar to the AUDIO OUT jack If you wa...

Page 36: ... Refer to the documentation that came with your devices for connection information Just remember to use the best connection types available for the best picture and sound For information about connection types see What connection should I use on page 11 DVD or Blu ray player Cable or satellite box AV receiver Game console USB flash drive Computer Antenna or cable TV connected directly to the wall ...

Page 37: ...ter into the POWER jack on the back of your TV 2 Plug the other end of the adapter into a power outlet Cautions Your TV should only be operated from the power source indicated on the label Always unplug the AC power adapter from the power outlet when you will not be using your TV for an extended period of time ...

Page 38: ...ntrol To aim the remote control Point the remote control towards the remote sensor on the front of your TV For the location of the remote sensor see Front on page 8 Cautions Batteries should not be exposed to excessive heat such as sunshine heat registers or fire Battery chemicals can cause a rash If the batteries leak clean the battery compartment with a cloth If chemicals touch your skin wash im...

Page 39: ... Mountain Pacific Alaska Hawaii Atlantic or Newfoundland then press ENTER MENU or W 8 Press S or T to highlight Daylight Savings then press X to access the setting 9 Press S or T to select On if your viewing area observes Daylight Savings Time or Off if your viewing area does not observe Daylight Savings Time then press ENTER MENU or W 10 If you selected Manual for Mode Press S or T to highlight Y...

Page 40: ...ected A message asks how you connected the cable box to your TV Select HDMI Component or AV then press ENTER if you connected a cable box to your TV using one of these cables Read the message then press ENTER to close the wizard Select Coaxial then press ENTER if you connected a cable box to your TV using a coaxial cable Read the message then press ENTER to start the channel scan VHF channels only...

Page 41: ...r TV is connected to a cable or satellite box using a component video cable select Component AV If your TV is connected to a cable or satellite box using a composite video cable select Component AV Understanding the basics Turning your TV on or off To turn your TV on or off 1 Make sure that the power adapter is connected to a power outlet 2 Press power to turn on your TV The power indicator turns ...

Page 42: ...the Photos menu Menu items that are not selectable are grayed out Menus in this manual are described in TV mode unless otherwise indicated The screens shown in this manual are for explanation purposes and may vary from the actual screens on your TV Press MENU to open the on screen menu Press the right orleft arrow to move the cursor on the screen or to adjust a selected item Press the up or downar...

Page 43: ...p a favorite channel list on page 46 Adjusting the volume To adjust the volume Press VOL or VOL to increase or decrease the volume Press MUTE to turn off the sound Press MUTE again to turn the sound back on Viewing channel information To view channel information Press INFO to view an information banner The information banner shows the current program information such as channel number video input ...

Page 44: ...ally adjust picture settings such as brightness contrast and sharpness Backlight Sets the overall brilliance of the screen Brightness Adjusts the brightness of the dark areas of the picture Contrast Adjusts the brightness of the light areas of the picture Color Adjusts the color intensity of the picture A low setting may make the color look faded A high setting may make the color look artificial T...

Page 45: ...o factory mode 4 Press W or X to adjust the option or press S or T to select a setting 5 Press MENU to return to the previous menu or press EXIT to close the menu Setting the power on picture mode You can set the picture mode your TV uses when you turn it on To set the power on picture mode 1 Press MENU The on screen menu opens 2 Press W or X to highlight SETTINGS then press T or ENTER The SETTING...

Page 46: ...nd settings 1 Press MENU The on screen menu opens 2 Press W or X to highlight AUDIO then press T or ENTER The AUDIO menu opens 3 Press S or T to highlight an option then press ENTER to access the option You can select Sound Mode Selects the sound mode You can select Standard Balances treble and bass This setting is good for watching standard TV broadcasts Theater Enhances treble and bass for a ric...

Page 47: ...lifier home theater system or sound bar you connected to the AUDIO OUT jack Reset Audio Settings Reset all audio settings to factory defaults 4 Press W or X to adjust the option or press S or T to select a setting 5 Press MENU to return to the previous menu or press EXIT to close the menu Selecting the audio out mode If your TV is on when you connect a device into the AUDIO OUT jack on the side of...

Page 48: ...stores the channel information in the channel list When you press CH or CH your TV goes to the next or previous channel in the channel list If the TV signal source changes for example you change from an outdoor antenna to cable TV no box you need to scan for channels To automatically scan for channels 1 Press MENU The on screen menu opens 2 Press W or X to highlight CHANNELS then press T or ENTER ...

Page 49: ...our TV using a coaxial cable Read the message then press ENTER to start the channel scan VHF channels only C If you select Satellite Box a message asks how you connected the satellite box to your TV Select HDMI Component or AV then press ENTER if you connected a satellite box to your TV using one of these cables Read the message then press ENTER to close the wizard Select Coaxial then press ENTER ...

Page 50: ...ens 2 Press W or X to highlight CHANNELS then press T or ENTER The CHANNELS menu opens 3 Press S or T to highlight Favorites then press ENTER The CHANNELS FAVORITES screen opens 4 Press S T W or X to highlight the channel you want to add to the favorites list then press ENTER A check mark appears next to the channel 5 Press MENU to return to the previous menu or press EXIT to close the menu Viewin...

Page 51: ...tal signal strength You can check the digital signal strength to determine if you need to adjust your antenna or digital cable input The higher the signal strength the less likely you are to experience picture degradation To check the digital signal strength 1 Press MENU The on screen menu opens 2 Press W or X to highlight CHANNELS then press T or ENTER The CHANNELS menu opens 3 Press S or T to hi...

Page 52: ...ress W or X to highlight SETTINGS then press T or ENTER The SETTINGS menu opens 3 Press S or T to highlight Parental Controls then press ENTER The Enter password screen opens 4 Press the number buttons to enter the four digit password The default password is 0000 You should change the password to a number you can remember The SETTINGS PARENTAL CONTROLS menu opens 5 Press S or T to highlight Change...

Page 53: ...ess MENU to return to the previous menu or press EXIT to close the menu Blocking unrated TV Some TV programs such as news and sports shows are not rated When Block Unrated TV is turned on TV programs that do not have ratings are blocked When you try to watch a blocked program you are prompted to enter the parental controls password To block unrated TV 1 Press MENU The on screen menu opens 2 Press ...

Page 54: ...eneral audiences TV PG Parental guidance suggested TV 14 Parental guidance strongly suggested TV MA Mature audiences only U S TV content ratings All All ratings are blocked FV Fantasy violence L Stronglanguage S Sexual situations V Violence D Suggestive dialog U S movie MPAA ratings None Movie not rated G General audiences PG Parental guidance suggested PG 13 Suitable for children 13 and older R P...

Page 55: ...EXIT to close the menu Downloading rating information If the program you are viewing has downloadable rating information you can download the information to use when setting parental controls To download rating information 1 Press MENU The on screen menu opens 2 Press W or X to highlight SETTINGS then press T or ENTER The SETTINGS menu opens 3 Press S or T to highlight Parental Controls then press...

Page 56: ...Using closed captioning Closed captioning displays a text version of the TV program audio or displays information provided by the broadcaster Turning closed captioning on or off To turn closed captioning on or off 1 Press MENU The on screen menu opens 2 Press W or X to highlight SETTINGS then press T or ENTER The SETTINGS menu opens 3 Press S or T to highlight Closed Caption then press ENTER The S...

Page 57: ...dcaster 6 Press MENU to return to the previous menu or press EXIT to close the menu Selecting the digital closed captioning mode Digital channels usually have one or more closed captioning modes The CC1 mode usually displays a text version of the TV program audio in a small banner The other CC modes display information provided by the broadcaster CS1 mode displays a text version of the audio in th...

Page 58: ...Press S or T to highlight Digital CC Settings then press ENTER The SETTINGS CLOSED CAPTION DIGITAL CC SETTINGS menu opens with Style highlighted 6 Press ENTER then press W or X to select Custom 7 Press S or T to highlight an option then press ENTER You can select Size Selects the font size Font Selects the font style Text Color Selects the color for the words Text Opacity Selects the opacity level...

Page 59: ... signal source 7 Press ENTER to close the menu 8 Press S or T to highlight Time Zone then press ENTER The TIME TIME ZONE menu opens 9 Press S or T to select your time zone then press ENTER You can select Eastern Central Mountain Pacific Alaska Hawaii Atlantic or Newfoundland 10 Press ENTER to close the menu 11 If your viewing area observes daylight savings time press S or T to highlight Daylight S...

Page 60: ...off the sleep timer select Off 6 Press MENU to return to the previous menu or press EXIT to close the menu Adjusting menu settings Selecting the menu language Your TV can display the on screen menu in English French or Spanish When you set your TV up for the first time the language was selected You can change the menu language to a different language To select the menu language 1 Press MENU The on...

Page 61: ...you have completed the label press ENTER 7 Press MENU to return to save your label and return to the previous menu The next time you press INPUT your label will appear in the INPUT SOURCE list 8 Press EXIT to close the menu Turning Input Sensor on or off When the Input Sensor feature is turned on your TV automatically detects which video jacks have devices connected to them Your TV uses this infor...

Page 62: ...w a highlighted photo full screen or open a highlighted folder MENU to open the PHOTOS menu FAVORITE to add or remove a photo from the favorite photo list A heart appears on a photo that has been added to the favorite photo list Press EXIT to close the control bar When a photo is displayed full screen a control bar appears at the bottom of the photo The file name picture resolution size and date a...

Page 63: ... 58 Viewing photos in a slideshow You can view your photos in a slideshow To view photos in a slideshow 1 Switch to USB mode See Switching to USB mode on page 58 The PHOTOS menu opens 2 If the photos you want to view are in a folder on the USB flash drive select the folder For information about selecting a folder see Browsing photos on page 58 or Viewing favorite photos on page 59 3 Press MENU The...

Page 64: ...the slideshow You can select None No transition effect Fade to Black Fades the screen to black between photos Vertical Wipe Wipes the screen from left to right between photos Horizontal Wipe Wipes the screen from top to bottom between photos Random Randomly selects a transition effect 4 Press EXIT to close the menu Maintaining Do not use your TV in areas that are too hot or too cold because the ca...

Page 65: ...em Info then press ENTER Information about the TV software version is displayed 4 Press MENU to return to the previous menu or press EXIT to close the menu Video and audio Warning Do not try to repair your TV yourself Contact authorized service personnel Problem Solution Picture does not fill the screen There are black bars around the picture Change the aspect ratio An increasing amount of digital...

Page 66: ... or use a highly directional outdoor antenna or set top antenna with a built in amplifier Problem Solution Picture quality is good on some channels and poor on others Sound is good The problem may be caused by a poor or weak signal from the broadcaster or cable TV provider If you connect to cable or satellite TV without a set top box and experience poor picture quality you may need to install a se...

Page 67: ...om the batteries Make sure that the batteries are installed correctly See Installing remote control batteries on page 34 Replace dead batteries with new batteries See Installing remote control batteries on page 34 Problem Solution Trouble programming your existing universal remote control See instructions and a table of common codes in Programming universal remote controls on page 65 Codes are sub...

Page 68: ...Button Lock option is set to Off See Locking control buttons on page 49 Unplug the power adapter wait a few seconds then plug the cord back in and turn on your TV TV keeps turning off Make sure that the sleep timer is not turned on See Setting the sleep timer on page 56 A retail banner is displayed You selected Retail Mode when you ran the TV setup wizard Reset your TV to the factory defaults then...

Page 69: ... 877 467 4289 Video No Analog audio Headphone 1 side Digital audio 1 coaxial back WiFi No Ethernet No Speakers Number 2 Watts per channel 2 8W Power consumption On 36W Standby 1W Power input AC 120V 60Hz OSD languages English French Spanish INlink No Game Mode No ENERGY STAR qualified Yes Internet connectable No TVbase screws B4type 18mm length 4pcs V Chip version 2 0 Yes Sleep timer Yes Channel l...

Page 70: ... 3 B NMB 3 B Standard Television Receiving Apparatus Appareil de réception télévision ordinaire Canada BETS 7 NTMR 7 IC Statement This device complies with Industry Canada licence exempt RSS standard s Operation is subject to the following two conditions 1 this device may not cause interference and 2 this device must accept any interference including interference that may cause undesired operation...

Page 71: ...rchase was made What does the warranty not cover This warranty does not cover Customer instruction education Installation Set up adjustments Cosmetic damage Damage due to acts of God such as power surges Accident s Misuse unintentional or intentional Abuse unintentional or intentional Negligence Commercial purposes use including but not limited to use in a place of business or in communal areas of...

Page 72: ...hasing LLC 7601 Penn Avenue South Richfield MN55423 3645USA 2013BBY Solutions Inc All rights reserved INSIGNIAis a trademark of BBY Solutions Inc Registeredin some countries All other products andbrand namesare trademarks of their respective owners V1 ENGLISH 12 1206 ...

Reviews: