background image

Infortrend Expansion Guide


Copyright ©  2019 Infortrend Technology, Inc. All rights reserved.


Page 10 / 15 

Expansion Enclosure On-line Expanding 

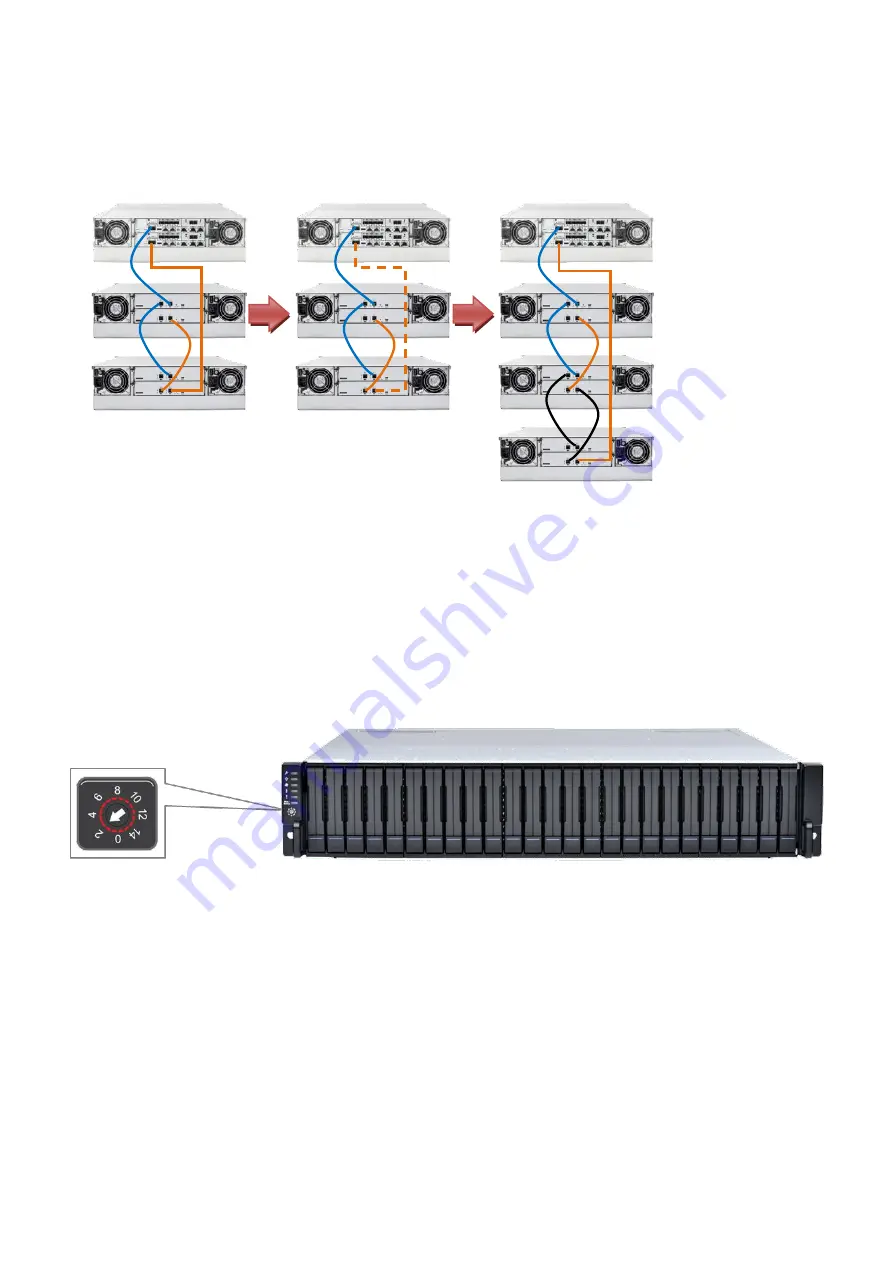
This chapter details the steps of adding expansion enclosures to an already present storage system setup. 

Figure 12: Adding an expansion enclosure 

1. Setting the expansion enclosure ID 

The expansion enclosure ID is located at the front panel of the expansion enclosure. When setting expansion IDs, always set 

them in order: Set the first expansion to 1, the second expansion ID in 2, and so on. The newly-added expansion enclosures 

must be connected after the current setup's last expansion enclosure. Do take note that the enclosure IDs must be different 

from each other. 


Figure 13: Expansion enclosure ID 

2. Installing the newly-added expansion enclosure 

Due  to  the  expansion  enclosure's  heavy  weight,  we  recommend  you  to  install  the  hard  drives  to  the  expansion  enclosure 

after the enclosure is already installed to the rack. After the ID assignment and installation of the expansion enclosures to the 

rack, you can now connect the added expansion enclosures to the current system assembly via SAS cables.   

In  connecting  the  newly-added  enclosures,  ensure  that  the  SAS  cables  are  long  enough  to  reach  between  SAS  ports.  The 

longest  cable  is  used  to  connect  the  storage  system  and  the  last  expansion  enclosure.  In  some  cases,  the  expansion 

enclosures are not directly installed on top or bottom of the storage system, so the cabling routes may vary. In most cases, at 

least one long SAS cable is required. 


Storage System 

Expansion enclosure 1 

Expansion enclosure 2 

Expansion enclosure 3 
(Newly added) 

Summary of Contents for EonServ 4012

Page 1: ...ted April 2019 Abstract This guide contains instructions and system limitations for adding expansion enclosures to Infortrend storage system without affecting its existing storage operations Expansion...

Page 2: ...del Classification Single and Redundant 9 Expansion Enclosure On line Expanding 10 1 Setting the expansion enclosure ID 10 2 Installing the newly added expansion enclosure 10 3 Reconnecting the redund...

Page 3: ...onStor GSc 2000 3000 448 within 15 mixed expansion enclosures 448 within 15 mixed expansion enclosures 896 448 448 EonStor GS 5000 EonStor GSc 5000 N A N A 896 within 15 mixed expansion enclosures x 2...

Page 4: ...rview of Maximum Drives Systems that support hybrid expansion enclosures EonStor DS GS GSe family 12 Gb s SAS drive side models EonStor GSc family EonStor GSe Pro 3000 series Systems that do not suppo...

Page 5: ...d Expansion Enclosures Figure 3 Hybrid Expansion Enclosures of EonStor GS GSc 5000 Expansion Board 896 Drives within 15 Expansion Enclosures 896 Drives within 15 Expansion Enclosures On board SAS Expa...

Page 6: ...stem Onboard Expansion Port For any type of expansion enclosure connect a SAS cable blue from the primary controller s SAS expansion port of the storage system to the primary controller s OUT SAS port...

Page 7: ...Infortrend Technology Inc All rights reserved Page 7 15 Figure 7 Connecting single controller expansions using the onboard SAS 12Gb s expansion ports Figure 8 Connecting dual controller expansions usi...

Page 8: ...cond controller s SAS expansion port of the storage system to the second controller s IN SAS port of the last expansion enclosure Basic connection rule when connecting systems in this connection type...

Page 9: ...n refer to the table below High Availability Models Single Model Redundant Model Upgradable EonStor DS 1000 2000 G Model R Model No EonStor DS 3000 DS 3024 3024B S Model R Model Yes DS 3012 3016 G Mod...

Page 10: ...13 Expansion enclosure ID 2 Installing the newly added expansion enclosure Due to the expansion enclosure s heavy weight we recommend you to install the hard drives to the expansion enclosure after th...

Page 11: ...sures in SANWatch 4 Connecting new SAS cable Connect new SAS cables see black connection from the current last expansion to the newly added expansion enclosure Ensure to follow the SAS connection s IN...

Page 12: ...s status in the storage management GUI Once the drives appeared on the GUI you can already use them in storage provisioning For more details refer to the software manual IMPORTANT If SANWatch or Embed...

Page 13: ...6Gb s DS3024 SAS 6Gb s 14 x JB 2016 JB 3016 5 x JB 2048 5 x JB 2060 L JB 3060 L DS1024B SAS 6Gb s DS2024B SAS 6Gb s DS3024B SAS 6Gb s 14 x JB 2024B JB 3024B 5 x JB 2048 5 x JB 2060 L JB 3060 L DS1036...

Page 14: ...S16E R2152 6 S16S R2250 8 x ESDS S16S J2000 R JB 2016R 3U 6 x ESDS B24S J2000 R 2U 4 x ESDS S48S J2000 R 4U 5 x ESDS S16S J2000 R JB 2016R 3 x ESDS S48S J2000 R 2 x ESDS S16S J2000 R JB 2016R 4 x ESDS...

Page 15: ...E R2142 6 B24S R2242 4 B24S R2240 5 x ESDS B24S J2000 R 2U 5 x ESDS S12S J2000 R JB 2012R 2U 5 x ESDS S16S J2000 R JB 2016R S12F S2840N 6 x ESDS S12S J2000 SN 2U S12F R2840N 6 x ESDS S12S J2000 RN 2U...

Reviews: