background image

September 4, 2012 

INFODRAW                                         PMRS-100 User Manual v5.1                                                                        


68 


2-3-3   Device Config Application: 

1)


After the MRS USB driver installation is complete, open the 

Device Configurator


application. This program allows you to configure the unit through the USB cable. 
 

2)


Turn the PMRS unit off and then back on. 
 

3)


Once the unit reconnects to the PC, it will automatically load the unit’s configuration 
parameters on the Device Configurator application. 


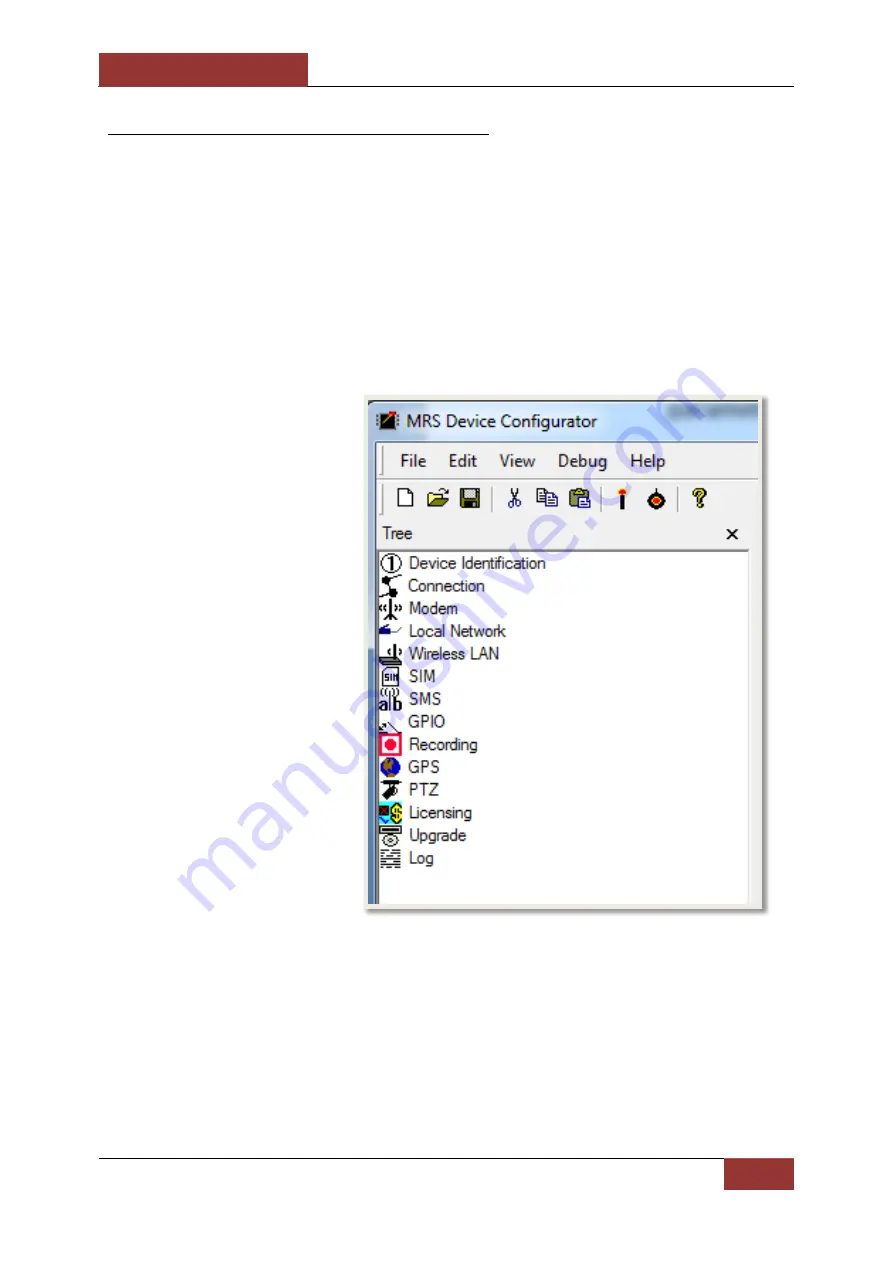
This application communicates 
with the unit and has a menu 
with the following options

Summary of Contents for PMRS-100

Page 1: ...PMRS 100 User Manual Version 5 1 September 2012...

Page 2: ...appearance from the actual software depending on the software version in use The stability and performance of the PMRS 100 unit s wireless data streaming may vary in different countries due to bandwid...

Page 3: ...ilt in lithium battery is damaged or leaking Avoid exposing the PMRS 100 device to very hot or very cold temperatures Extreme temperatures may cause deformation of the device and reduce the charging c...

Page 4: ...in this manual Make sure you understand the functions of each dip switch prior to using the unit When installing the unit in a vehicle Only use Infodraw Chargers to charge the PMRS 100 Unit Non Infod...

Page 5: ...0 1 6 5 Antennas Option 1 External GSM and GPS 21 1 6 6 Antennas Option 2 Internal GSM and External GPS 22 1 6 7 SIM Card Slot 23 1 6 8 Alarm Button 23 1 6 9 USB Client Mini USB Input 24 1 6 10 Micro...

Page 6: ...Recording Menu 78 2 3 3 10 GPS Menu 79 2 3 3 11 PTZ Menu 80 2 3 3 12 Licensing Menu 81 2 3 3 13 Upgrade Menu 82 2 3 3 14 Log Menu 83 Chapter 3 MRS Software Components 86 3 1 MRS Monitor Server Applic...

Page 7: ...3 9 10 1 Playing Recorded Files 139 3 9 10 2 Verifying Digital Signatures 141 3 9 10 3 Decrypting Recorded Files 142 3 9 11 Recording History in Graphic Format 143 3 10 VMD 144 3 11 Alarm Button 147 3...

Page 8: ...6 Use PMRS Device as 3G Router 193 Chapter 4 Technical Specifications 194 4 1 PMRS Unit Specifications 194 4 2 MRS Software Specifications 197 4 3 MRS Server Technical Requirements 198 Chapter 5 Suppo...

Page 9: ...September 4 2012 INFODRAW PMRS 100 User Manual v5 1 9 Box Contents Video Power Adapter Cable Audio In Out Adapter Cable GPS Antenna GSM Antenna Optional 5V Power Charger Option 1 PMRS Unit Option 2...

Page 10: ...September 4 2012 INFODRAW PMRS 100 User Manual v5 1 10 USB Cable For Setup 12V 5V Car Adapter Charger GPIO PTZ Cable Ethernet Cable...

Page 11: ...The supported frequency bands are listed in the Technical Specifications section of this manual Any analogue PAL NTSC camera with a RCA connector for video output can be connected to the PMRS unit Th...

Page 12: ...r to monitor and control MRS PMRS units MRS Device Configurator Application This application is used for configuring the MRS PMRS device s parameters prior to operating the unit and for upgrading the...

Page 13: ...low the PMRS unit to connect to the Device Configurator Program using the USB cable MRS ActiveX Control Software Used for integrating the MRS system with other control software MRS AV Player Applicati...

Page 14: ...owing options Open the folder of each software application and download all files inside to the same location folder on your PC MRS AV Player Application Download MRS Device Configurator Download PMRS...

Page 15: ...sion Control Protocol UDP User Datagram Protocol GPS Global Positioning System GSM Global System for Mobile Communications 3G 3rd Generation Mobile Telecommunications HSPA High Speed Packet Access EDG...

Page 16: ...3G HSPA EDGE GPRS or LAN and can be monitored and controlled from any location upon alarm request The media streaming is done using PMRS units which can be carried handheld or located either on mobil...

Page 17: ...nnected to the server only and have viewing and control capabilities P2P Peer to Peer Architecture In this configuration the server coordinates a signal from the unit directly to the client without st...

Page 18: ...September 4 2012 INFODRAW PMRS 100 User Manual v5 1 18 1 5 2 P2P Peer to Peer Architecture...

Page 19: ...input and 5V power output to the camera from the unit The input is labelled A V IN on the PMRS Unit 1 6 2 Video 5V Power Adapter Cable The unit comes with a 2 5mm TRRS Male Jack splitter cable which h...

Page 20: ...put Headphones can be connected here directly 1 6 4 Audio In Out Adapter Cable The unit comes with a 2 5mm TRRS Male Jack splitter cable which has a 2 5mm TRRS Female connector for Audio In Pink Conne...

Page 21: ...GSM Antenna on to the GSM Antenna Base 2 Connect the GSM and GPS Antennas to their appropriate antenna connectors shown above WARNING Before turning the unit ON please make sure that the GSM Antenna...

Page 22: ...Internal GSM and External GPS With this antenna setup the PMRS unit has an Internal Antenna for GSM and an External SMA Antenna connector for GPS located on the top side of the unit GPS Antenna GPS A...

Page 23: ...ingernails to insert the SIM card Once the SIM card is inserted properly close the notch by carefully pushing it all the way into the unit 1 6 8 Alarm Button The PMRS unit has a built in alarm button...

Page 24: ...Device Configurator application Connect the USB cable between the Mini USB Input shown here and a PC when configuring the unit 1 6 10 Micro SD Slot The Micro SD Slot is located on the side of the PMRS...

Page 25: ...N position until it clicks and the LED lights turn on To turn the unit OFF carefully move the switch back to the OFF position until it clicks and the LED lights turn off After switching the unit off t...

Page 26: ...ower Charger Connect the AC Charger to a wall power outlet Connect the DC tip to the PMRS Unit s 5V Power Input shown above The unit s battery takes about 10 12 hours to charge from flat to full charg...

Page 27: ...tch are described below in order from left to right 1 USB HOST CLIENT AND CELLULAR OPERATION i Up Position USB client setup through PC ii Down Position Normal cellular operation 2 USB IN OUT i Up Posi...

Page 28: ...wer is connected 2 Red LED Software status blinks when software is running 3 Blue LED on Modem is on 4 Blue LED flashing every second Modem is connected to cellular provider CAUTION After turning the...

Page 29: ...oses such as PTZ and GPIO The definitions of the wires are listed below HDMI COLOR FUNCTION 1 BLUE GPIO IN 1 2 BLUE WHITE GPIO IN 2 3 ORANGE GPIO IN 3 4 ORANGE WHITE GPIO IN 4 5 GREEN GPIO OUT 1 6 GRE...

Page 30: ...IO PTZ cable to its correct input shown above Make sure it is firmly connected WARNING When disconnecting the cable from the PMRS unit do not just pull the cable Press and hold the Lock Lever shown he...

Page 31: ...unit next to the GPIO PTZ Cable Input Connect the Ethernet Interface cable to its correct input on the PMRS unit shown above Make sure it is firmly connected WARNING When disconnecting the cable from...

Page 32: ...dress assigned in the router 4 In the routers port forwarding settings you need to open the above two ports and then port forward them to your local PC s fixed local Static IP Address 5 After opening...

Page 33: ...o are streaming However the MRS Monitor program gives full access to the server only from the computer itself and most of its features cannot be reached from the outside CAUTION If you are connecting...

Page 34: ...th MRS Service setup files Setup_MRS_Service msi and setup exe are placed in the same directory on your server machine 2 Run the setup exe file Locate the installed MRS Server folder and run the MRS_S...

Page 35: ...the user to backup and restore the server s settings Internet Protocol Displays network information Logging Menu Latest Messages Displays the server s latest log messages use for debugging Configure...

Page 36: ...e connected to the server File Uploads Lists the files which are being uploaded from the server Recordings Menu Configure Configures the server s recording attributes List Lists the devices with video...

Page 37: ...ssword where it says New password and retype the new password where it says Retype new password Then click on Set This will take you back to the main menu page Files and Folders Page The Data Folder i...

Page 38: ...the XML file Latest Log Messages Page This page will let you view the server s latest log messages It displays the time and date the message and its parameters Click on Refresh to refresh this page C...

Page 39: ...eo Audio settings Erasing recording Disabling Video Audio channel Default Access Page Here you can determine the default situation for all unlisted devices and users connecting to the server This page...

Page 40: ...Details page will appear Fill in the user name and password Retype the new password and click Apply All added User Names will appear in the list on the Users Page Click on Edit to change a password of...

Page 41: ...level for a certain entry in the list Click on Delete to delete a specific entry from the list User Device Access Page The User Device Access Page allows you to assign specific users to specific devic...

Page 42: ...us passing media such as video directly between them bypassing the server Traffic Summary Page This page displays a summary of the general data that passes through the server It gives information abou...

Page 43: ...ers Page This page lists the connected users Their IP address as seen from the server their name and current data rate File Uploads Page This page lists the active file uploads Downloading client s IP...

Page 44: ...automatically delete old server recordings after the free space on the storage device drops below 10 Sign media files Check this option to automatically generate a signature file for every recorded m...

Page 45: ...evice is disconnected from the server Software Updates List Page This page lists the update files to be sent to devices in order to upgrade their firmware The software updates can generally be enabled...

Page 46: ...ad a new software update file to the server The two types of supported files are Click Browse to select the file on your local PC Click Upload to start uploading the file to the server File Type Descr...

Page 47: ...ent devices For more than 5 devices a license is required The license depends on the hard disk volume serial number as displayed in this page After you receive the license copy the license text into t...

Page 48: ...ough MRS Monitor Application The MRS Monitor Server can be set up on any PC using Windows XP or later To setup the MRS Monitor Server application follow these instructions 1 Run the Setup_MRS_PC_Appli...

Page 49: ...cture Setup Once the MRS Monitor Server Application is installed and opened to setup the PC to act as a server using Server Based Architecture follow these instructions 1 Open the session menu on the...

Page 50: ...ecture is now activated Units and Clients can now communicate with the server This architecture is recommended for multi unit to multi client communication 4 Once the server is running the status bar...

Page 51: ...ture Setup Once the MRS Monitor application is installed and opened to setup the PC to act as a server using P2P architecture follow these instructions 1 Open the session menu on the top left hand sid...

Page 52: ...ded as a Device and as a User in the Permissions menu Follow these instructions to do so Once you have completed these instructions clients trying to connect to the server will require a username and...

Page 53: ...n the Default Device Access Level List Box select Forbidden 3 Un tick Allow Unlisted Devices and Allow Unlisted Users 4 Open the Users menu and select Add Fill in a User Name and Password Then press O...

Page 54: ...vel List box select Administrative Then press OK 9 Your new User Name Device ID and Access Level should now be listed This now means that user has administrative access to that device only Once finish...

Page 55: ...Monitor Client The MRS Monitor Client can be set up on any PC Laptop using Windows XP or later To setup the MRS Monitor Client Application follow these instructions 1 Run the Setup_MRS_Client msi fil...

Page 56: ...application is installed and opened to setup the PC Laptop to act as a client follow these instructions 1 Open the session menu on the top left hand side 2 Open the Connection screen 3 Select Remote...

Page 57: ...Client is now connected and can communicate with the server The client has viewing and control capabilities as defined on the server 4 Once the client is connected to the server the status bar on the...

Page 58: ...cellular provider in use In particular the cellular provider s APN Access Point Name must be provided The unit is configured using the Device Configurator software by connecting a USB cable between th...

Page 59: ...September 4 2012 INFODRAW PMRS 100 User Manual v5 1 59 3 If you have an Anti Virus program installed on your PC and this window appears Click Run this program Anyway 3 Click Next...

Page 60: ...s sys If you are downloading the files from www infodraw com dlds sometimes the file idmrs inf can only be downloaded by right clicking the link and pressing the save link as option Once the above two...

Page 61: ...aw MRS Driver and install 8 If the driver setup doesn t automatically open follow these instructions to install the drivers manually a Right click my computer b Click properties c Enter the Hardware t...

Page 62: ...click Next Click the Install from a list or specific location Advanced option and then click Next a Click the Search for the best driver in these locations option b Tick the Include this location in t...

Page 63: ...s located in the same folder on your PC a dseo13b exe b idmrs64 inf c idmrs64 sys If you are downloading the files from www infodraw com dlds sometimes the file idmrs64 inf can only be downloaded by r...

Page 64: ...Test Mode option b Press Next and exit the program c Restart your computer Once your computer restarts you should see the Test mode writing on the bottom right hand side of your desktop screen Open th...

Page 65: ...out 1 minute 6 After a few seconds the system will show 7 After another few seconds the system will detect new hardware 8 For the first time connecting the unit to a PC the PC will detect new hardware...

Page 66: ...If the driver setup doesn t automatically open follow these instructions to install the drivers manually a On your desktop right click on Computer Select the Properties option b In the System window s...

Page 67: ...draw Multimedia folder b Right click on the Infodraw MRS Device file c Choose the Update Driver Software option The Update Driver Software window will appear Select the Browse my Computer for driver s...

Page 68: ...nfigurator application This program allows you to configure the unit through the USB cable 2 Turn the PMRS unit off and then back on 3 Once the unit reconnects to the PC it will automatically load the...

Page 69: ...o the same server has a Unique ID Number Device Client Password If a PMRS device ID has been assigned a password in the permissions feature of the server the password will need to be inserted here oth...

Page 70: ...so act as a server by selecting the Local server option However for this configuration the unit will require a SIM card with a fixed public IP address which must be obtained from your cellular provide...

Page 71: ...Manage button to open the Multiple Connections Window In the Multiple Connections Window press on the Add button to insert another server to which the PMRS device will connect to The Local Server opti...

Page 72: ...red in this box User Name Here you can enter your User Name for your cellular provider if required usually is not required Password Here you can enter your Password for your cellular provider if requi...

Page 73: ...section of this user manual Manual Manual Configuration This option also allows you to create your own local network which comes in handy when trying to connect to an external hard drive or use the P...

Page 74: ...September 4 2012 INFODRAW PMRS 100 User Manual v5 1 74 2 3 3 5 Wireless LAN Menu Wireless LAN Parameters Descriptions The PMRS 100 Unit does not support Wireless LAN Wi Fi...

Page 75: ...SIM cards require a PIN number but most don t The PIN number is obtained from your cellular provider PUK Here you can update the PUK numbers for the SIM card in use A PUK number will only be required...

Page 76: ...it will send an SMS to this phone number containing the new IP address Send Service Type This is a parameter defining the technology used for sending SMS messages It depends on the cellular service p...

Page 77: ...Active This option will disable the selected port Normally Close This option changes the selected input port to Active High Normally Open This option changes the selected input port to Active Low Asso...

Page 78: ...the integrity of that recording For more information please view the Recorded Files Digital Signature section of this user manual Record Locations This option allows you to choose whether the unit rec...

Page 79: ...3 10 GPS Menu GPS Parameters Descriptions Activate GPS This option allows you to enable disable the GPS capability Reset GPS This option if enabled resets the GPS every time the system shuts down thu...

Page 80: ...era ID As the PMRS unit only has one video channel set the Video Channel and Camera ID both to 1 Baud Rate This list box allows you to set the PTZ control Baud Rate The unit supports the following Bau...

Page 81: ...he server clients To add a license click on the Add License button The License Text window will appear Insert the license code that you have received Then press OK If the Encryption License code is co...

Page 82: ...programming click Restart Device Once the device reconnects to the Device Configurator it should now be upgraded to the new version Download button Click the Download button to automatically download...

Page 83: ...September 4 2012 INFODRAW PMRS 100 User Manual v5 1 83 2 3 3 14 Log Menu Log Parameters Descriptions Log Menu Here you can log information while running...

Page 84: ...p click the Manual option a Enter the APN Access Point Name of your Cellular Provider b A User Name and Password for your Cellular Provider may also be required mostly for VPN users SIM Menu a A PIN n...

Page 85: ...Turn the PMRS device off 3 Change back the left 2 dip switches numbers 1 2 to down position as shown This will allow normal cellular operation After the parameters are saved open the File menu and se...

Page 86: ...ts Alarm Configure trigger actions for the Alarm button and GPIO event alarms Permissions Set permissions and access levels for connecting units and clients Online Devices Will display all online MRS...

Page 87: ...cts Alarm Configure trigger actions for the Alarm button and GPIO event alarms Online Devices Will display all online MRS PMRS devices Offline Devices Will display all devices that have disconnected f...

Page 88: ...rent languages Follow these instructions to change the language of the application 1 Open the Session menu at the top left hand corner of the screen 2 Select Language 3 The Select Language window will...

Page 89: ...itor Client on another PC Laptop and connect to the server 5 If your server is running through the MRS Monitor Server Application you can either connect to it using the MRS Monitor client on another P...

Page 90: ...Sensors Switches View the status and control Output Switches Location a View the GPS location of that specific device only b Set location event alarms SMS Allows you to add mobile phone numbers for S...

Page 91: ...w to open it for live video streaming Alternatively double click on a video channel to open it for live streaming Before viewing the video channel it must be enabled In order to enable a specific chan...

Page 92: ...ds the size to full screen Double clicking again returns it to the previous setting If the video looks like it is not centred correctly right click on the video channel and select Restart Media or pre...

Page 93: ...0 User Manual v5 1 93 The viewing area can be split into 1 4 6 9 12 16 or 20 viewing channels To change the number of channels viewed on the screen open the View menu at the top of the window and sele...

Page 94: ...ideo Properties Right clicking on an open video stream opens a small menu Select Properties Selecting a specific video channel on the left hand side of the screen and pressing F3 brings up the same Vi...

Page 95: ...dium bandwidth and QCIF is the format more suitable to low bandwidth Frame Rate This allows you to adjust the Frame Rate of the video channel The Frame Rate can be set to any number from 1 to 25 fps f...

Page 96: ...When purchasing mobile data SIM card packages from your cellular provider please consider the amount of data the unit will consume The table below provides an example of a PMRS 100 unit s mobile data...

Page 97: ...of the video channel By default the same encoder is used for viewing and recording the video channel Different video encoders can be applied for viewing the video channel and recording the video chann...

Page 98: ...September 4 2012 INFODRAW PMRS 100 User Manual v5 1 98 3 Enter in the desired Image Size Frame Rate and Bit rate 4 In the Destination list box select Recording...

Page 99: ...ng the video channel and when recording the video channel 5 Enter in the desired Image Size Frame Rate and Bit rate Once you have finished press OK To switch back to a single video encoder for both vi...

Page 100: ...Motion Detection Status will be displayed on the upper left side of the video channel Shown Below To activate the video frame text tick the Frame Text option located at the bottom right hand side of t...

Page 101: ...pplication This option restarts the video controller Set Packet Data Size Default is 1000 recommended not to change this parameter Set Time Select this option to set the time on the PMRS device to the...

Page 102: ...g without clear sky it will struggle to find its location It will take about 3 minutes for the unit to give up and continue with the rest of the system connecting to GSM Therefore it is better to disa...

Page 103: ...103 3 7 1 System Level Map To view the system level map double click on Locations under My Monitor You will now be able to see all devices on one full screen map as moving icons If there are multiple...

Page 104: ...ouble click on Location under a specific PMRS device tree You can also open this Location tree to see the GPS Co ordinates You will now be able to see the location of the specific device in a small ma...

Page 105: ...nual v5 1 105 3 7 3 Map Views The GPS map can be viewed in 4 ways To change the view of the map select one out of the four options on the top right hand corner of the map window Map View Terrain View...

Page 106: ...ser Manual v5 1 106 3 7 4 Video Over Map To view a video channel over the map click on a floating icon A menu will appear with a list of all that device s video channels Click on the desired channel t...

Page 107: ...d monitor The location history is stored per day and per device You can view the GPS location history by opening the view menu and selecting Locations History The Locations History Viewer window will...

Page 108: ...e following actions on the MRS monitor Beep Display device location View default video channel Make a Pop up Window appear Play a custom sound The unit can also send a SMS to any number of phones as a...

Page 109: ...e desired maximum number of meters that the PMRS device can move from its current position before the alarm is triggered Then press OK Once the Location event alarm is activated you will see Distance...

Page 110: ...The speed of each connected PMRS unit can be viewed over the GPS map in km h The speed will only be displayed if the unit is moving When using Google Maps simply hover your cursor over the floating i...

Page 111: ...September 4 2012 INFODRAW PMRS 100 User Manual v5 1 111 When using Open Street Maps open the full screen map and click on the floating icon on to bring up the device speed...

Page 112: ...e using the MRS Monitor application Speakers Here you can a Enable Disable your computer s speakers by ticking or un ticking the box b Select from the Device list box which connected speaker unit you...

Page 113: ...low the detected noise level When detecting noise you must not speak and allow the monitor to calculate the maximal noise received by the microphone Announcement Disable If you enable this option It m...

Page 114: ...er cable included with the PMRS unit Ensure that you have a speakers connected to the PC Audio Out Double clicking on the Audio Out 1 channel opens the audio stream of the Microphone and speakers on t...

Page 115: ...s audio parameters Name Allows you to rename the audio channel Sample Rate Allows you to change the sample rate of the audio channel The higher the sample rate the better the quality of sound but it r...

Page 116: ...Follow these instructions to do so Right click on either the Audio In 1 channel or the Audio Out 1 channel of the PMRS unit Then select the Controls option The following windows will appear Here you c...

Page 117: ...them one by one Recordings can be viewed using either the MRS Monitor Player MRS AV Player Application or by using VLC player 3 9 1 Local Recorder Settings The recordings can be saved in any folder o...

Page 118: ...w file Delete old files to free space If you tick Delete old files to free space then the oldest recorded files in the folder will be overwritten when the total folder storage capacity goes under 10 S...

Page 119: ...Select the channel that you want to record by clicking on the channel name under the PMRS device on the left hand side 2 Open the Action Menu and enable the recording by clicking on Record on Monitor...

Page 120: ...name Double click on the file to play it in the MRS Monitor player Alternatively to play recordings locate and open the recordings folder on your PC laptop The files are arranged by date Select the d...

Page 121: ...uctions 1 Select the channel that you want to record by clicking on the channel name under the PMRS device on the left hand side 2 Open the Action Menu and enable the recording by clicking on Record o...

Page 122: ...it into a PC Copy the files onto your PC to view them 2 Download the device recordings from the Micro SD card to your PC remotely over the cellular network To download the files remotely follow these...

Page 123: ...RS 100 User Manual v5 1 123 Right click on the desired recording and select Download The recorded file will download to your PC laptop over the cellular network Once the file has downloaded successful...

Page 124: ...ck on it to play it in the MRS Monitor Player The device recorded file will also be saved in your recordings folder on your PC laptop Alternatively to play recordings locate and open the recordings fo...

Page 125: ...lication Follow these instructions to do so 1 Select the channel that you want to record by clicking on the channel name of a PMRS device that is connected to the server 2 Open the Action Menu and ena...

Page 126: ...ctions to do so After you enable the recording action the corresponding message will appear at the top of the video channel S This message means that Server recording has commenced successfully 1 In t...

Page 127: ...September 4 2012 INFODRAW PMRS 100 User Manual v5 1 127...

Page 128: ...sh the recording View the audio recordings the same way as video recordings are viewed 1 Select the audio channel for recording by clicking on the Audio In 1 channel name of the PMRS device on the lef...

Page 129: ...r Manual v5 1 129 3 9 6 Synchronized Video and Audio Recording To record video and audio together follow these instructions 1 Select the PMRS device on the left hand side of the screen 2 Open the Acti...

Page 130: ...e you record that video channel the recorded file will have synchronised audio in it 4 Select the Audio channel from the Audio Channel list box Then Press OK 3 The Attach Channels menu window will ope...

Page 131: ...storage drives can be purchased from your local IT store In order to communicate with the external network storage device a Local Area Network needs to be created in the PMRS unit Follow these instru...

Page 132: ...er the address of the folder on your external network storage device that you want the recordings saved to c Enter the User Name for your storage device in the User Name box d Enter the Password for y...

Page 133: ...e SIM card into the PMRS unit 7 Ensure the GSM GPS Antennas are connected to the unit Once you activate the PMRS unit you will be able to record on the External Network Storage Device the same way as...

Page 134: ...1 The Device Configurator Application for Device Recordings 2 The MRS Monitor server client Application for Local Monitor Recordings As a result of enabling the Digital Signature there will be an extr...

Page 135: ...t Properties b The Local Recorder Settings will appear c Enable the option Sign Files d Press OK After you enable this option in either the Device Configurator or the MRS Monitor and record a video fi...

Page 136: ...onfigurator Application for Device Recordings 2 The MRS Monitor server client Application for Local Monitor Recordings For Device Recordings Encryption a In the Device Configurator go to the Recording...

Page 137: ...ble your encryption code in either the Device Configurator or the MRS Monitor and record a video audio file you will have to fill in the defined key in the MRS AV Player Application in order to view t...

Page 138: ...layer Application The MRS AV Player Application is used for viewing recorded video audio files verifying digital signatures on recorded files and decrypting recorded files 1 Run the Setup_MRS_AV_Playe...

Page 139: ...udio AAC Synchronized Video and Audio FLV Once the MRS AV Player is installed and opened follow these instructions to play recorded files 1 Open the File menu and select Open 2 Browse your PC for the...

Page 140: ...ose from x2 x3 x4 x6 x8 and x10 Slower Enable this option to slow the recording playback down In the list box select how slow you want the recording to slow down Choose from 2 3 4 6 8 and 10 After you...

Page 141: ...ed file it can be verified in the MRS AV Player Application Follow these instructions Once the recorded file is opened in the MRS AV Player open the Misc menu and select Verify Signature This will res...

Page 142: ...ed in the MRS AV Player before you can view it Follow these instructions to do so Once the recorded file is opened in the MRS AV Player open the Misc menu and select Decryption The Decryption window w...

Page 143: ...y per day and per device in the Historic Activity window of the MRS Monitor Application Open the View menu and select Historic Activity Recorded events triggered from GPIO alarms VMD location alarms o...

Page 144: ...ion to cause that video channel to automatically start recording once motion is detected Popup Window Enable this option to cause a popup window to appear on the MRS Monitor Application once motion is...

Page 145: ...channel follow these instructions Right click on an open channel s video stream and select properties In the Video Properties window select Detect Motion Then press OK Under the video channel s name t...

Page 146: ...Detected If you applied recording in the VMD settings menu the video channel will start recording for 1 minute once motion is detected The following message s will appear at the top of the open video...

Page 147: ...S to any number of phones as a result of an Alarm Button trigger refer to the SMS Alerts from Device section of this user manual The Alarm Button trigger actions are set in the Alarm Settings window o...

Page 148: ...tion to cause the video channel to automatically start recording once the alarm button is pressed Record Default Audio Channel Enable this option to cause the audio channel of the PMRS unit to automat...

Page 149: ...e Alarm button is pressed the Sensor 1 signal on the left hand side will light up The preset trigger actions will also commence accordingly If you selected recording as a trigger action the message s...

Page 150: ...ng video audio recording GPS tracking etc These features are set on the MRS monitor The unit can also send a SMS to any number of phones as a result of a GPIO trigger refer to the SMS Alerts from Devi...

Page 151: ...is activated Record Default Video Channel Enable this option to cause the video channel to automatically start recording once a GPIO alarm is activated Record Default Audio Channel Enable this option...

Page 152: ...lication Follow these instructions to do so 1 Open the Device Configurator Application 2 Turn the PMRS unit off 3 Ensure the 2 left dip switches on the PMRS unit numbers 1 2 are in up position 4 Ensur...

Page 153: ...t sensors will be at TTL Active high or Active Low as defined in the Device Configurator After inputting the above settings the configuration must be saved into the unit This is done by opening the Fi...

Page 154: ...ire and GND wire Once an Input Sensor is triggered the Sensor number signal on the left hand side will light up The preset trigger actions will also commence accordingly If you selected recording as a...

Page 155: ...ut Switch Ports on the PMRS unit you must close a connection between the following wires on the GPIO PTZ cable Port 1 Output 1 wire and GND wire Port 2 Output 2 wire and GND wire Port 3 Output 3 wire...

Page 156: ...0 User Manual v5 1 156 Once you activate an Output Switch the preset trigger actions will commence accordingly If you selected recording as a trigger action the message s M D will appear at the top ri...

Page 157: ...written in any language The contact details must be supplied in the SMS settings window located on the left hand side of the screen Follow these instructions to activate SMS alerts Open the SMS Settin...

Page 158: ...select the desired triggers from which an SMS will be sent Contact Alarm GPIO events Motion Detection VMD events Location Events GPS events In the Common Message box write a message that you would lik...

Page 159: ...tom of the window If you own a Smartphone enable the Send Image option to attach a still picture of the video stream to the SMS Once the details are inserted press the Add button to add the mobile to...

Page 160: ...urator c Open the SMS tab menu d In the Authentication Code box write down a code You will need to put this code at the start of each SMS to the PMRS device As was said above there are three options t...

Page 161: ...TZ tab menu 7 Click the Add button to add the Video Channel and Camera ID As the PMRS unit only has one video channel set the Video Channel and Camera ID both to 1 8 Set the PTZ Baud Rate from the Bau...

Page 162: ...are 2 RS 485 wires T and T built into the PMRS unit through the GPIO PTZ Cable Refer to GPIO PTZ Cable section for colour definitions These wires must be connected to the PTZ camera Once you have conn...

Page 163: ...he yellow ball Enter in a name for that position in the Name box Then press Save To view the preset camera position choose the preset name from the Move to list box The camera will then automatically...

Page 164: ...recordings folder You can access and view the images the same way video recordings are viewed Follow these instructions Right click on an open video stream and select Save Image Open the Recordings t...

Page 165: ...e PMRS 1 Open the Device Configurator Application 2 Turn the PMRS OFF 3 Ensure the 2 left dip switches on the PMRS unit numbers 1 2 are in up position 4 Ensure the SIM card is NOT inserted into the un...

Page 166: ...em Configuration menu select None If you are using the unit inside a building without clear sky disable the GPS in the GPS menu on the left hand side After inputting the above settings the configurati...

Page 167: ...rn the PMRS device off 11 Change back the left 2 dip switches numbers 1 2 to down position 12 Connect the Ethernet cable to the PMRS unit You can now connect the Ethernet cable to any local network ro...

Page 168: ...s which are permitted to each of those levels Level of Permission Actions Permitted Forbidden Aware Passive Active Administrator Can view online devices Nodes Viewing Video Audio Viewing GPS Recording...

Page 169: ...nd users If you wish to assign all devices to specific users then in the Default Device Access Level list box select Forbidden Also un tick Allow Unlisted Devices and Allow Unlisted Users Users Menu E...

Page 170: ...will appear in the Device ID list This password will need to be entered in the Device Client password box in the Device Identification menu of the Device Configurator in order for the unit to be able...

Page 171: ...ting highlight the user and select the Delete button Default Device Access Menu The default device access screen defines the access level of each device which is not specified in User Device Access To...

Page 172: ...en channels and channel parameters A session can be saved to a file and reloaded at anytime To do so open the Session menu and select Save As Users can enable the Automatic button in the Session menu...

Page 173: ...d clients under the Neighbourhood tree The details include IP addresses Software Versions and Tolerance CT In the MRS Monitor Client Application In the MRS Monitor Client Application the user can view...

Page 174: ...ptember 4 2012 INFODRAW PMRS 100 User Manual v5 1 174 3 21 Communication The communication node allows users to see their available connections Bluetooth Local area wireless and its loopback computer...

Page 175: ...ne iPod Touch open the application and follow these instructions Once you have inserted all the details press the OK button to connect to the server Upon opening the application the login menu will ap...

Page 176: ...will automatically open for live streaming Press the Login button to return to the Login screen Tap the Speaker icon to listen to the unit s audio stream Tap the Microphone icon to speak to the unit...

Page 177: ...le Maps Tap the OSM button to view the GPS map with Open Street Maps Tap the Standard button to view the map in standard view Tap the Hybrid button to view the map in Hybrid view Tap this button to ce...

Page 178: ...recordings folder where your recordings are saved The Playback screen will open Tap the Select button at the bottom right hand side of the screen Your iPhone recordings will then appear in the list Th...

Page 179: ...Manual v5 1 179 Once you have located your desired recording tap on it to play it Tap on the X to delete the recording The recording file will then play Tap Select to view other recordings Tap Back to...

Page 180: ...rted all the details press the OK button to connect to the server Upon opening the application the login menu will appear Enter in the IP address of your server in the Server box and a username and pa...

Page 181: ...p the Source button to open the previous screen where you can select which connected unit and channel you would like to view If you select the Map button the GPS map will appear full screen as shown h...

Page 182: ...indows Mobile 5 0 or Windows mobile 6 0 operating systems To install the client follow these instructions 1 Copy the Windows Mobile installer files onto the PDA and install the software Run the cab fi...

Page 183: ...er ip 12654 videostreams html This will let you view the video GPS streams of any connected device using flash Select the desired video GPS channel to open it for live streaming If video and voice is...

Page 184: ...4 PARAM NAME DeviceID VALUE 473 PARAM NAME VideoChannelIndex VALUE 0 PARAM NAME AudioChannelIndex VALUE 1 PARAM NAME UserName VALUE PARAM NAME Password VALUE OBJECT BODY HTML The following parameters...

Page 185: ...w 3 24 1 Application Upgrading The four main applications MRS Monitor Server MRS Monitor Client MRS Device Config and MRS AV Player can be upgraded in each application To do so follow these instructio...

Page 186: ...PMRS 100 User Manual v5 1 186 2 A newer version if available of the application will automatically download 3 You will then be prompted to install the new software Follow the installation instruction...

Page 187: ...tor Application 2 Turn the PMRS unit OFF 3 Ensure the 2 left dip switches on the PMRS unit numbers 1 2 are in up position 4 Ensure the SIM card is NOT inserted into the unit 5 Connect the PMRS unit to...

Page 188: ...you to commence programming Click OK 5 The firmware programming will commence DO NOT interrupt the programming Ensure that the unit is being charged when upgrading the firmware Once completed the unit...

Page 189: ...dware Identifier number of your unit Speak to your local Infodraw dealer about obtaining Encryption License codes To activate the encryption follow these instructions 1 Open the Device Configurator Ap...

Page 190: ...orrectly entered the IPSEC encryption will be listed as Active 11 Once the license in Active go to the Connection menu tab of the Device Configurator 12 You will now be able to tick the Secure box Tic...

Page 191: ...are connected to the unit After inputting the above settings the configuration must be saved into the unit This is done by opening the File menu and clicking Write To Device The candle icon After pre...

Page 192: ...0 User Manual v5 1 192 18 When connecting to the server from the MRS Monitor Client Application In the connection window tick the Secure box before you connect This will encrypt all the data between t...

Page 193: ...bnet Mask 255 0 0 0 or 255 255 0 0 Leave the rest of the settings blank 5 Tick the Enable DHCP Server option 6 Select File Write to Device 7 Select File Shutdown Device 8 Disconnect the device and tur...

Page 194: ...al Frequency SMA Connector 850 900 1800 1900 2100 MHz Bandwidth control Automatic Video Video Input 1x Video Input RCA Male Connector through video power splitter cable Supported Cameras Any Analogue...

Page 195: ...iple Trigger Actions Input Sensor Streaming Recording SMS Noise GPS Tracking Memory Micro SD Slot Up to 32GB Micro SDHC Max bit rate based on micro SD write speed GPIO Input 4x Input Sensor Ports Logi...

Page 196: ...ture Input 10 60 C Physical Dimension 5 x 10 x 2 8 cm Weight 130 g Other Interfaces USB Client Built in Mini USB Input For Setup Configuration Through USB Cable and PC video power cable Splitter cable...

Page 197: ...2011 MRS Monitor Client Windows Application Monitoring Program Windows XP Vista 7 MRS Device Configurator Windows Application Setup Configuration Program Windows XP Vista 7 MRS AV Player Windows Appli...

Page 198: ...more units clients connected to the server the more RAM will be required in the server machine Operating System Windows XP or higher Server software compatible with Windows XP Vista 7 Windows Server 2...

Page 199: ...the wireless cellular modem 202 5 The MRS Monitor program does not recognize my device When connecting with a LAN connection 203 6 My MRS device is online but I can t see the video feed from the camer...

Page 200: ...er option 4 Open TCP port 12654 and UDP port 12655 in the firewall to allow access to the server 5 If you have an anti virus program installed on your PC make sure it is not blocking the inbound outbo...

Page 201: ...nfigurator program Open the Connection tab Enable the Remote Server option configure your IP address so that it would match your server address Check that your server is operational 5 Open the MRS Dev...

Page 202: ...eption of some PMRS devices which only have one antenna slot for GPS c DIP switches 1 2 should be in down position when using the wireless cellular modem 2 Software a In order to configure your device...

Page 203: ...camera my device is connected to A Check the following 1 Open your device folder by pressing on the sign and drag the camera icon to one of the video channels 2 Make sure that your device is connecte...

Page 204: ...hat next to it the name of your device is written 3 Make sure that DIP switch number 3 is in down position 4 Open your device tree and right click the audio in icon click on the properties option in t...

Page 205: ...ce Configurator Make sure that the Tolerance level is set to High in the Connection menu of the Device Configurator c Put the SIM card in a mobile phone and check how strong the signal is on the phone...

Page 206: ...layback from your Server Close other programs that may require large amounts of memory usage You can download the file to your computer by right clicking on the playback file and choosing the download...

Page 207: ...io in it 13 Q I am connected with the cellular modem and my device is constantly restarting A Check the following 1 Constant restarting usually indicates a weak connection to the server a Open the MRS...

Page 208: ...ion Try to stop the recording again as explained in the first answer 15 Q I can t get my PMRS device to send SMS messages A Check the following 1 Make sure that the SMS feature under your device tree...

Page 209: ...nnels on the screen 211 11 How do I magnify one video channel to full screen 211 12 How do I activate the internal microphone in the MRS device 211 13 How do I hear an external microphone from my PC o...

Page 210: ...icon with your device name on it appears on the left side of your screen under the Online Devices tree If so you are connected It may take up to 3 minutes after activating the PMRS device for it to ap...

Page 211: ...ord video A1 Right click on the video channel you want to record A menu will appear At the bottom of the menu you will have 3 options Record on monitor server device Choose one or more of them and the...

Page 212: ...unit When it reloads onto the Device Configurator it will be upgraded to the newest version 15 Q How do I turn my PMRS device into a cellular router A Connect the PMRS unit to the Device Configurator...

Page 213: ...Baud Rate settings must be set on the PTZ camera itself Connect the PTZ camera to the unit through the video input and RS 485 wires A3 Open the MRS monitor program Click on the relevant video channel...

Page 214: ...MRS A Enter the Apple App Store and download the iMRS application The iMRS application is Free to download 23 Q I have an android phone How do I download update the MRS Program A Go to the Google Play...

Page 215: ...September 4 2012 INFODRAW PMRS 100 User Manual v5 1 215 Contact Us Infodraw Israel R D LTD Global Headquarters 14 Aba Hillel St Ramat Gan Israel Tel 972 3 6127434 www infodraw com...

Reviews: