


Accessing the Appliance
26
Infoblox Installation Guide
Infoblox CLI
The Infoblox CLI allows you to configure and monitor the appliance using a small set of Infoblox commands. There
are some tasks, such as resetting the appliance, that you can only do through the CLI. You can access the Infoblox
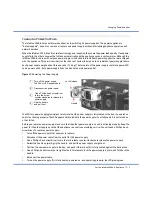
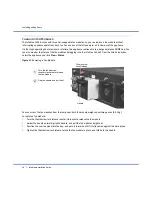
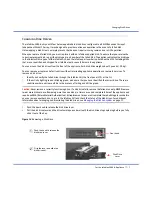
CLI through a direct console connection from your management system to the Infoblox appliance. (For more
information, see
on page 22.) You can also enable remote console access—that is, SSHv2 (Secure Shell
version 2) access—through the Infoblox GUI or CLI, and then access the CLI from a remote location using an SSHv2
client. (For more information, refer to the
NIOS Administrator Guide
.)
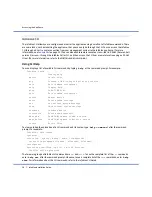
Using CLI Help
You can display a list of available CLI commands by typing
help
at the command prompt. For example:
Infoblox > help
? Display help
delete Delete files
dig Perform a DNS lookup and print the results
exit Exit command interpreter
help Display help
ping Send ICMP ECHO
quit Exit command interpreter
reboot Reboot device
reset Reset system settings
set Set current system settings
show Show current system settings
shutdown Shutdown device
traceroute Route path diagnostic
ddns_add Send DDNS update to add a record
ddns_delete Send DDNS update to delete a record
rotate Rotate files
To view an in-depth explanation of a CLI command and its syntax, type
help c o m m a n d
after the command
prompt. For example:
Infoblox > help rotate
Synopsis:
rotate log [ syslog | debug | audit | ifmapserver ]
rotate file groupname filename [ filename2, filename3, ...]
Description:
Rotates the specified log file, up to 10 previous.
logfiles will be preserved
The two main groups of Infoblox CLI commands are
set
and
show
. To see the complete list of the
set
commands,
enter
help set
after the command prompt. Likewise, to see a complete list of the
show
commands, enter
help
show
. For information about the CLI commands, refer to the
Infoblox CLI Guide
.


