


3x1 Wallplate Transmitter Switcher Kit
INFOBIT AV
www.infobitav.com
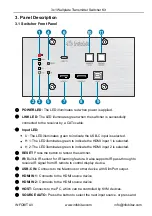
6. Button Control
6.1
Signal Switching
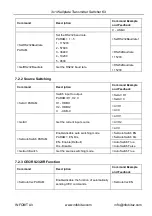
1)
Press the
SOURCE AUTO
button to switch to next source device, and then the
corresponding input LED will turn green.
2)
Press and hold the
SOURCE AUTO
button at least 3 seconds to enable auto
switching mode, and it abides by the following principles:
The switcher will switch to the first available active input starting at HDMI IN 1>
HDMI IN 2 > USB-C. If there is no device input and the display supports CEC,
the display will automatically shut down in 10 minutes.
New input: Once a new input signal detected, the switcher will automatically
switch to this new signal.
Source removed: When an active source is removed, the switcher will switch to
the first available active input starting at HDMI IN 1.
Reboot: The switcher can save the last configuration before losing power. If the
last switching mode is auto switching, the switcher will automatically enter auto
switching mode once rebooted, then detect all inputs and memorize their
connection status for future rebooting using. If the last selected input source is
still available, the switcher will switch to this input. Otherwise, it will switch to the
first available active input source starting at HDMI IN 1.
Exit auto switching mode: Press and hold the SOURCE AUTO button for 3
seconds again to exit the auto mode, and the input source will not be changed.
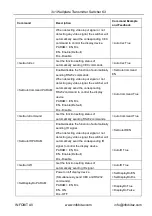
6.2
Display Control
1)
Press the blue-backlight
DISPLAY ON/OFF
button to turn on/off the display by
automatically sending CEC and RS232 command (Programming required). When
sending the ON command, the button will turn blue; when sending the OFF
command, and the button will be off.
2)
The
DISPLAY ON/OFF
button can be programmed by IR learning feature or RS232
command for compatibility with various display devices. For more details, please
refer to the


