Infinity iW-1941 RDM V1
Highlite International B.V. – Vestastraat 2 – 6468 EX – Kerkrade – the Netherlands
Ordercode: 41529
MANUAL
ENGLISH
Page 1: ...Infinity iW 1941 RDM V1 Highlite International B V Vestastraat 2 6468 EX Kerkrade the Netherlands Ordercode 41529 MANUAL ENGLISH...
Page 2: ...14 Connecting to a Network 15 ArtNet Settings 15 How to Make a Data Cable 16 Software for controlling 16 Fixture Linking 17 Data Cabling 17 Control Panel 18 Control Mode 18 DMX Addressing 18 Menu Ove...
Page 3: ...2 Ordercode 41529 Infinity iW 1941 RDM Troubleshooting 49 No Light 49 No Response to DMX 49 Product Specifications 51 Dimensions 52 Notes 53...
Page 4: ...ED Expected Lifespan LEDs gradually decline in brightness over time HEAT is the dominant factor that leads to the acceleration of this decline Packaged in clusters LEDs exhibit higher operating temper...
Page 5: ...put close to flammable liquids or gases Always keep case closed while operating Always allow free air space of at least 50 cm around the unit for ventilation Always disconnect power from the mains wh...
Page 6: ...dangers like short circuit burns electric shock crash etc You endanger your own safety and the safety of others Rigging Please follow the European and national guidelines concerning rigging trussing...
Page 7: ...property Connection with the mains Connect the device to the mains with the power plug Always pay attention that the right color cable is connected to the right place International EU Cable UK Cable U...
Page 8: ...phone number 04 A brief description of the symptoms Claims The client has the obligation to check the delivered goods immediately upon delivery for any short comings and or visible defects or perform...
Page 9: ...color display including gravity sensor Color balance Separate RGBW adjustment Color mode RGBW CMY Control Protocol DMX Artnet RDM Pan Tilt movement blackout User selectable Pan Tilt ranges 540 360 180...
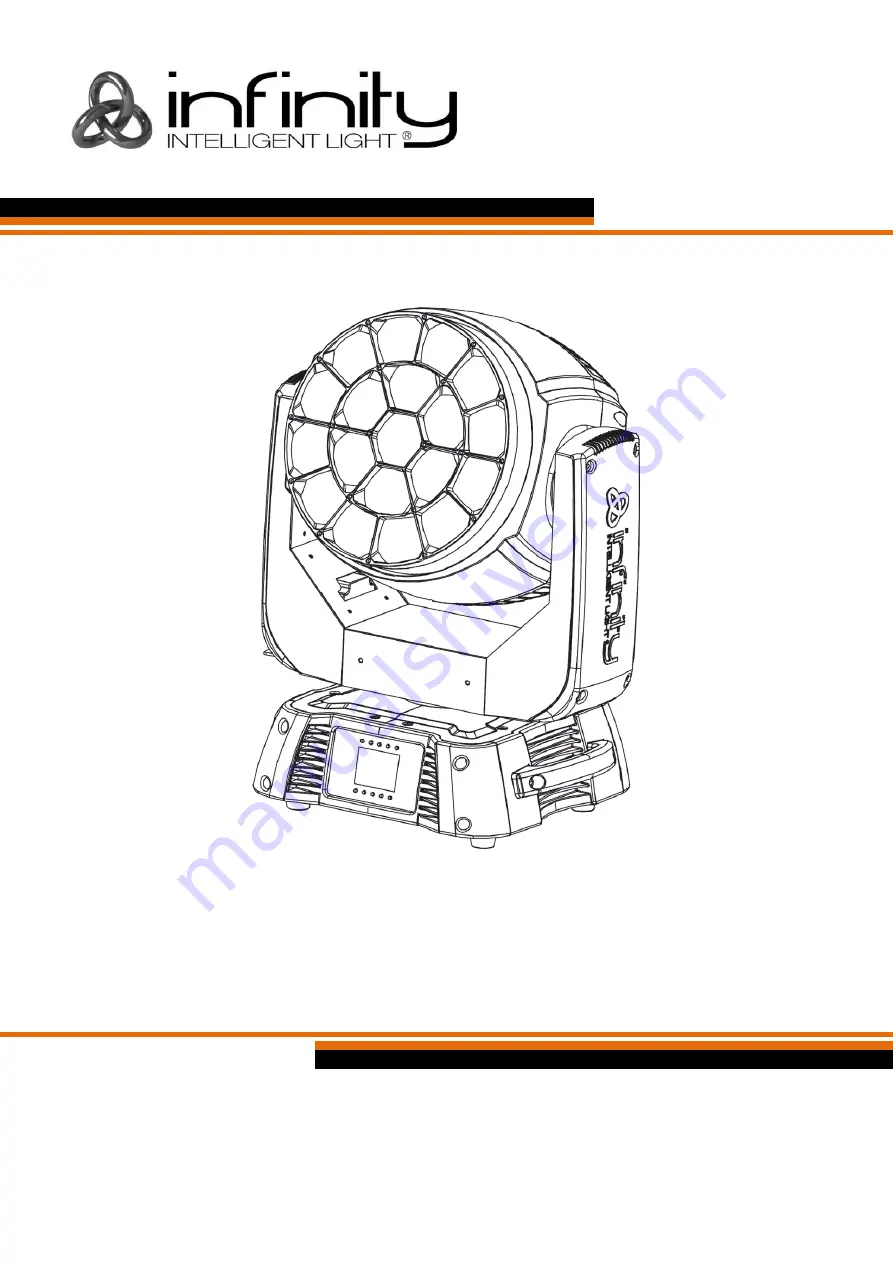
Page 10: ...9 Ordercode 41529 Infinity iW 1941 RDM Overview Fig 01 01 19x 40W RGBW 4 in 1 Osram 02 Control buttons LCD display Beam angle 3 6 Electronic adjustment Beam angle 60 Electronic adjustment Fig 02...
Page 11: ...gnal connector IN 04 3 pin DMX signal connector OUT 05 Fuse T5AL 250V 06 Ground earth connection 07 5 pin DMX signal connector OUT 08 RJ45 ArtNet connector 09 RJ45 ArtNet connector 10 Neutrik PowerCON...
Page 12: ...ranty Lock Unlock the Moving Head You can lock the moving head by sliding the lock pin to the left horizontally for Pan or upwards vertically for Tilt Red arrows You can unlock the moving head by slid...
Page 13: ...r Slave control 01 Fasten the effect light onto firm trussing Leave at least 1 meter on all sides for air circulation 02 Always use a safety cable ordercode 70140 70141 03 Plug the end of the electric...
Page 14: ...evices 05 Link the units as shown in fig 06 Connect a DMX signal cable from the first unit s DMX out socket to the second unit s in socket Repeat this process to link the second third and fourth units...
Page 15: ...et 05 Link the units as shown in fig 06 Connect the first unit s RJ45 out socket with the second unit s in socket using a CAT 5 CAT 6 cable Repeat this process to link the second third and fourth unit...
Page 16: ...s 02 Make sure that the subnet mask on each device is set to 255 0 0 0 03 Set the universe of the first Infinity to 1 04 Set the first Infinity s DMX address to 001 05 Please note that you can connect...
Page 17: ...e an extra net cable Take a standard net cable CAT 5 5E 6 and connect it to the RJ45 connector as shown in the picture below fig 07 The wires should now be colored as follows Fig 07 Software for contr...
Page 18: ...obtain data cables You can purchase DAP Audio certified DMX cables directly from a dealer distributor or construct your own cable If you choose to create your own cable please use data grade cables th...
Page 19: ...178 178 the DMX address of the third Infinity should be 178 177 355 355 etc Please be sure that you do not have any overlapping channels in order to control each Infinity correctly If two or more Infi...
Page 20: ...19 Ordercode 41529 Infinity iW 1941 RDM Menu Overview...
Page 21: ...OK Enter Address Setting Left Previous screen Infinity Logo Right 1 DMX Address With this menu you can set the DMX address 01 Press the button 02 Press the button to confirm You can choose 512 differ...
Page 22: ...g mode 01 Press the button and select 02 Press the button to confirm You can choose between 5 submenus 03 Press the buttons to select the desired DMX channels 04 Press the button to confirm 05 Once yo...
Page 23: ...4 Once you have selected the desired mode press the button to proceed to edition 05 Press the buttons to change the value from NO to YES 06 Some of the available menus have different options to the re...
Page 24: ...ounters 01 Press the buttons to select Life Time and press the button to open the menu 02 Press the buttons to choose one of the 3 reset options Time Counter the time counter will be reset Total Life...
Page 25: ...d IP address to the device Universe the device s universe 0 255 ArtNet IP ArtNet submask 04 If you have chosen the desired option press the button to proceed to edition mode 05 Press the buttons to ad...
Page 26: ...You can choose 10 different built in programs 03 Press the Up Down buttons to select the required program 04 Once you have selected the desired built in program press the buttons to change the value...
Page 27: ...cally start its auto test program 06 If you have chosen MANUAL TEST you will enter a submenu You can choose between 19 test options Pan Tilt P T Speed Red Green Blue White CTC Color Pattern LED Macro...
Page 28: ...27 Ordercode 41529 Infinity iW 1941 RDM 6 Information Menu With this menu you can see several device settings 01 Press the button and select 02 Press the button to confirm 03 You can view 7 parameters...
Page 29: ...55 and CH23 between 20 255 0 255 Fine dimmer intensity from dark to brightest Channel 8 Green Dimmer intensity CH21 must be set between 1 255 and CH23 between 20 255 0 255 Gradual adjustment Green fro...
Page 30: ...0 87 Green R 0 G 255 B 0 W 0 88 124 R G 255 B 0 W 0 125 Yellow R 255 G 255 B 0 W 0 126 162 R 255 G B 0 W 0 163 Red R 255 G 0 B 0 W 0 164 200 R 255 G 0 B W 0 201 Magenta R 255 G 0 B 255 W 0 202 238 R G...
Page 31: ...n 106 main 232 LED built in 199 main 233 LED built in 200 main 234 LED built in 201 main 235 LED built in 202 main 236 LED built in 203 main 237 255 LED built in 204 main Channel 18 LED Built in Speed...
Page 32: ...etween 20 255 0 255 Dimmer intensity from dark to brightest Channel 23 Shutter Strobe CH6 CH8 CH8 CH10 CH14 CH15 CH16 and CH21 must be set between 1 255 0 19 Shutter closed 20 24 Shutter open 25 64 St...
Page 33: ...in Delay On after 3 seconds 40 44 Reserved 45 49 Reserved 50 54 Pan reset after 3 seconds 55 59 Tilt reset after 3 seconds 60 64 Zoom reset after 3 seconds 65 69 Reserved 70 74 All reset after 3 secon...
Page 34: ...ntensity CH93 must be set between 1 255 and CH94 between 20 255 0 255 Gradual adjustment Red from 0 100 Channel 7 Green Dimmer intensity CH93 must be set between 1 255 and CH94 between 20 255 0 255 Gr...
Page 35: ...ment White from 0 100 Channel 86 CTC correction CH6 CH7 CH8 CH9 CH11 CH17 must be set between 1 255 CH18 between 20 255 0 No function 1 255 Color temperature correction from 19000K to 2700K Channel 87...
Page 36: ...st be set between 1 255 and CH18 between 20 255 0 15 No function 16 LED built in 1 17 LED built in 2 18 LED built in 3 19 LED built in 4 20 LED built in 5 112 LED built in 1 113 LED built in 98 114 LE...
Page 37: ...255 G 0 B W 0 201 Magenta R 255 G 0 B 255 W 0 202 238 R G 0 B 255 W 0 239 Blue R 0 G 0 B 255 W 0 240 247 Color fade with decreasing speed 248 255 Color jump with decreasing speed Channel 92 Background...
Page 38: ...elay Off after 3 seconds 35 39 LED built in Delay On after 3 seconds 40 44 Reserved 45 49 Reserved 50 54 Pan reset after 3 seconds 55 59 Tilt reset after 3 seconds 60 64 Zoom reset after 3 seconds 65...
Page 39: ...55 Shutter open Channel 95 Zoom 0 255 Gradual zoom adjustment from small to big 3 6 60 Channel 96 Channel Functions Desired function starts after 5 seconds setting DMX value 0 9 No Function 10 14 Pan...
Page 40: ...justment Red from 0 100 Channel 7 Red Main Dimmer 16Bit CH173 must be set between 1 255 and CH175 between 20 255 0 255 Fine dimmer intensity from dark to brightest Channel 8 Green Dimmer intensity CH1...
Page 41: ...LED 1 intensity CH173 must be set between 1 255 and CH175 between 20 255 0 255 Gradual adjustment Blue from 0 100 Channel 19 Blue Dimmer LED 1 16Bit CH173 must be set between 1 255 and CH175 between...
Page 42: ...t CH173 must be set between 1 255 and CH175 between 20 255 0 255 Fine dimmer intensity from dark to brightest Channel 166 CTC correction CH6 CH7 CH8 CH9 CH11 CH17 must be set between 1 255 CH18 betwee...
Page 43: ...ust be set between 1 255 and CH18 between 20 255 0 15 No function 16 LED built in 1 17 LED built in 2 18 LED built in 3 19 LED built in 4 20 LED built in 5 112 LED built in 1 113 LED built in 98 114 L...
Page 44: ...255 G 0 B 0 W 0 164 200 R 255 G 0 B W 0 201 Magenta R 255 G 0 B 255 W 0 202 238 R G 0 B 255 W 0 239 Blue R 0 G 0 B 255 W 0 240 247 Color fade with decreasing speed 248 255 Color jump with decreasing...
Page 45: ...60 Channel 177 Channel Functions Desired function starts after 5 seconds setting DMX value 0 9 No Function 10 14 Pan Tilt black activated after 3 seconds 15 19 reserved 20 24 RGBW color mixing after 3...
Page 46: ...0 Channel 4 White Dimmer LED 1 intensity CH93 must be set between 1 255 and CH94 between 20 255 0 255 Gradual adjustment White from 0 100 Channel 73 Red Dimmer LED 1 intensity CH93 must be set between...
Page 47: ...y CH10 must be set between 1 255 and CH11 between 20 255 0 255 Gradual adjustment Blue from 0 100 Channel 9 White Dimmer intensity CH10 must be set between 1 255 and CH11 between 20 255 0 255 Gradual...
Page 48: ...ixing after 3 seconds 30 34 LED built in Delay Off after 3 seconds 35 39 LED built in Delay On after 3 seconds 40 44 Reserved 45 49 Reserved 50 54 Pan reset after 3 seconds 55 59 Tilt reset after 3 se...
Page 49: ...ith glass cleaner and a soft cloth Do not use alcohol or solvents The front glass panel will require weekly cleaning as smoke fluid tends to build up residues reducing the light output very quickly Do...
Page 50: ...tec dealer 03 The fuse Replace the fuse See page 48 for replacing the fuse 04 If all of the above appears to be O K plug the unit in again 05 If you are unable to determine the cause of the problem do...
Page 51: ...pect connections and cables Correct poor connections Repair or replace damaged cables Data link not terminated with 120 Ohm termination plug Insert termination plug in output jack of the last fixture...
Page 52: ...th Fast Strobe 0 20Hz Pan 540 Tilt 270 Pan Tilt resolution 16 bit Dimming Curves Linear Square Inv Square S curve Housing Metal Flame retardant plastic IP rating IP20 DMX control via standard DMX RDM...
Page 53: ...52 Ordercode 41529 Infinity iW 1941 RDM Dimensions...
Page 54: ...53 Ordercode 41529 Infinity iW 1941 RDM Notes...
Page 55: ...54 Ordercode 41529 Infinity iW 1941 RDM...
Page 56: ...2019 Infinity...