background image

22

2-1

INS

TALLER

US

ER

MAINTEN

AN

CE TECHNI

CI

AN

2

  INSTRUCTIONS FOR USE 

AND MAINTENANCE.

2.1  CLEANING AND MAINTENANCE.

Important:

 the heating systems must undergo 

periodical maintenance (regarding this, see 

the section dedicated to the technician, relative 

to “yearly control and maintenance of the 

appliance”) and regular checks of energy 

efficiency in compliance with national, regional 

or local provisions in force.

This ensures that the optimal safety, performance 

and operation characteristics of the boiler remain 

unchanged over time.

We recommend stipulating a yearly cleaning and 

maintenance contract with your zone technician.

2.2  GENERAL WARNINGS

Never expose the wall-mounted boiler to direct 

vapours from a cooking surface.

Use of the boiler by unskilled persons or children 

is strictly prohibited.

For safety purposes, check that the concentric 

air intake/flue exhaust terminal (if fitted), is 

not blocked.

If temporary shutdown of the boiler is required, 

proceed as follows:

a) drain the heating system if anti-freeze is not 

used;

b) shut-off all electrical, water and gas supplies.
In the case of work or maintenance to structures 

located in the vicinity of ducting or devices 

for flue extraction and relative accessories, 

switch off the appliance and on completion of 

operations ensure that a qualified technician 

checks efficiency of the ducting or other devices.

Never clean the appliance or connected parts 

with easily flammable substances.

Never leave containers or flammable substances 

in the same environment as the appliance.
• 

Important:

 the use of components involving 

use of electrical power requires some 

fundamental rules to be observed:

  - do not touch the appliance with wet or 

moist parts of the body; do not touch when 

barefoot;

  - never pull electrical cables or leave the 

appliance exposed to atmospheric agents 

(rain, sunlight, etc.);

  - the appliance power cable must not be 

replaced by the user;

  - in the event of damage to the cable, switch 

off the appliance and contact exclusively 

qualified staff for replacement;

  -  if the appliance is not to be used for a certain 

period, disconnect the main power switch.

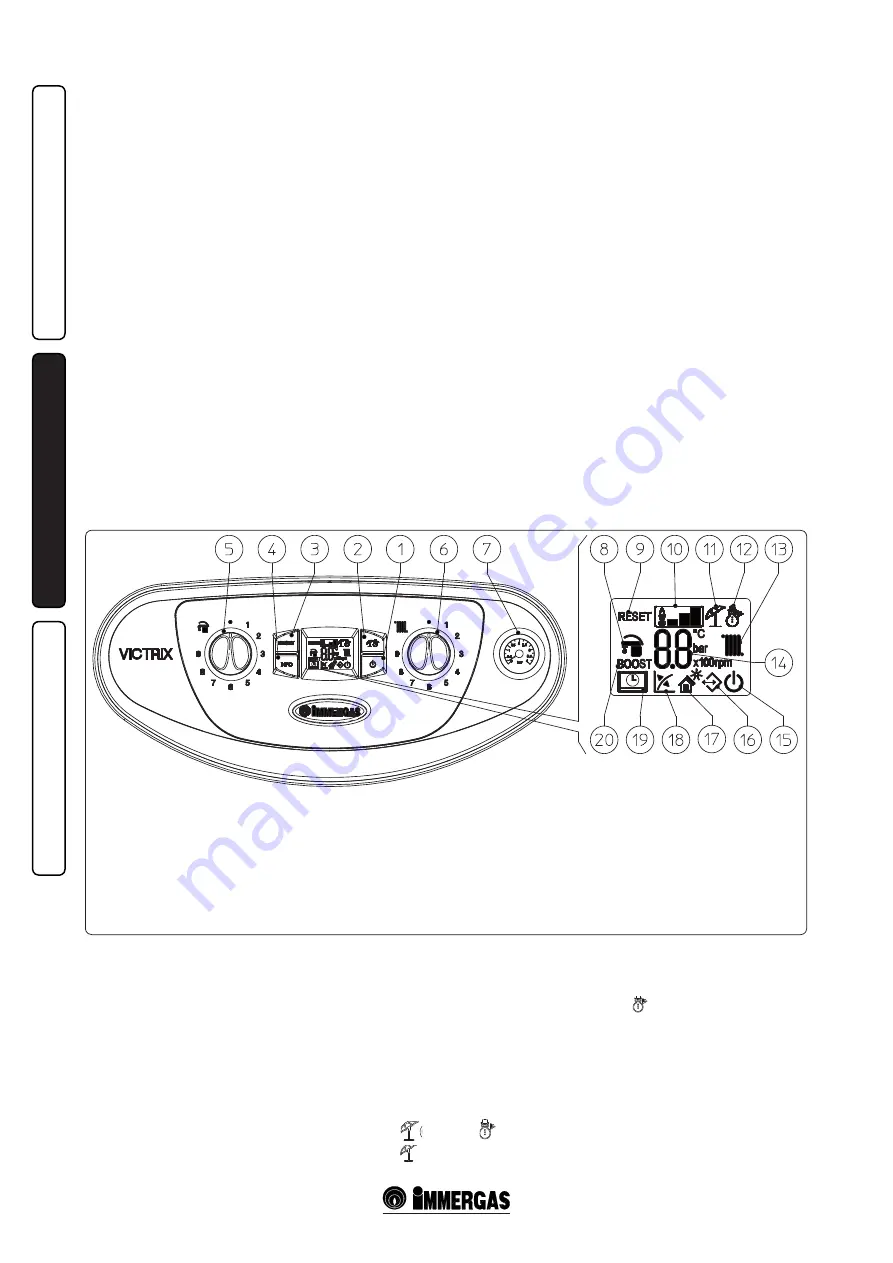
2.3  CONTROL PANEL.

Key:

  1  -  Off/Stand-by/On Button

  2  -  Summer/Winter Button

  3  -  Reset button

  4  -  Information buttons

  5  -  Domestic hot water temperature 

selector switch

  6  -  Central heating water temperature 

selector switch

  7  -  Boiler manometer

  8  -  DHW production phase functioning 

active

  9  -  Boiler in block does not require release 

via “RESET” button

  10  -  Flame presence symbol and relative 

power scale

  11  -  Functioning in summer mode

  12  -  Functioning in winter mode

  13  -  Room central heating active phase 

functioning

  14  -  Temperature indicator, boiler info and 

error codes

  15  -  Boiler in Stand-by mode

  16  -  Presence of external connected devices

  17  -  Solar function active

  18  -  Functioning with external temperature 

probe active (optional)

  19  -  Boiler connected to remote control 

V2


(optional)

  20  -  Not used on this model

2.4  USING THE BOILER.

Important:

the Victrix X 12-24 2I boiler has been designed 

to operate as an appliance for room central 

heating only or, coupled to a specific optional 

kit, for central heating and the production of 

DHW. For this reason the boiler control panel 

has a knob to adjust the temperature of DHW, 

but its operation is only activated by the optional 

kits that also enable the production of DHW. 

Without the coupling to these specific kits, 

the functioning of this knob and all functions 

referring to DHW are inhibited, apart from the 

gas valve calibration phase.

Before ignition make sure the heating system 

is filled with water and that the manometer (7) 

indicates a pressure of 1 ÷ 1.2 bar.

- Open the gas cock upstream from the boiler.
- Press the button (1) until the display switches 

on. At this point, the boiler goes to the state 

previous to switch-off.

-  If the boiler is in stand-by, press the button (1) 

again to activate it. If this is not the case, go to 

the next point.

-  Press button (2) in sequence and take the boiler 

to summer (

) or winter (

) position.

• 

Summer 

(

)

:

 in this mode the boiler 

functions only to produce the DHW, the 

temperature is set via the selector (5) and the 

relative temperature is shown on the display 

via the indicator (14).

• Winter 

(

)

:

 in this mode the boiler functions 

both for producing domestic hot water and 

heating the environment. The temperature of 

the DHW is always regulated via the selector 

(5), the heating temperature is regulated via 

selector (6) and the relative temperature is 

shown on the display via the indicator (14).

From this moment the boiler functions 

automatically. With no demand for heat (heating 

or domestic hot water production) the boiler 

goes to “standby” function, equivalent to the 

boiler being powered without presence of flame. 

Summary of Contents for VICTRIX X12-242I

Page 1: ...VICTRIX X 12 24 2 I IE Instruction and Warning book 1 036643ENG...

Page 2: ......

Page 3: ...user also in the case of transfer or succession of ownership It must be stored with care and consulted carefully as all of the warnings provide important safety indications for installation use and m...

Page 4: ...ation pump 19 1 25 Kits available on request 20 1 26 Boiler components 21 2 Instructions for use and maintenance 22 2 1 Cleaning and maintenance 22 2 2 General warnings 22 2 3 Control panel 22 2 4 Usi...

Page 5: ...pliance off immediately and contact a qualified technician e g the Immergas Technical Assistance centre which has specifically trained staff and original spare parts Do not attempt to modify or repair...

Page 6: ...by introducing a top quality anti freeze liquid into this circuit which is not noxious to health The instructions of the manufacturer of this liquid must be followed scrupulously regarding the percent...

Page 7: ...ional way using the couplings on the boiler template The boiler safety valve outlet must be connected toadrainingfunnel Otherwise themanufacturer declines any responsibility in case of flooding if the...

Page 8: ...i e it must be set to On Off mode CARV2 or chrono thermostat On Off electric connection Optional The operations described below must be performed after having removed the voltage from the appliance T...

Page 9: ...l Kit This information allows calculations to be made to verify the possibility of setting up various flue configurations Positioning of the gaskets black for green range flue extraction systems Posit...

Page 10: ...Intake and Exhaust 16 3 m 2 5 Intake m 18 7 Exhaust m 4 9 m 7 7 Exhaust m 13 6 Concentric vertical intake exhaust terminal 60 100 Intake and Exhaust 9 m 1 4 Intake m 10 3 Exhaust m 2 7 m 4 3 Exhaust...

Page 11: ...of the straps present in the kit making sure to block the 4 gasket flaps Fit the male side smooth of the exhaust terminal into the the female side of the bend 90 80 making sure that the relevant wall...

Page 12: ...o the external atmosphere The technical regulations in force must be respected Max length of exhaust duct The flue pipe vertical or horizontal can be extended to a max length of 30 straight metres Spa...

Page 13: ...al intake exhaust kit 80 125 Kit assembly Fig 1 18 for the installation of kit 80 125 the flanged adapter kit must be used to be able to install the flue system 80 125 Install the flanged adapter 2 on...

Page 14: ...l 6 and insert the intake exhaust pipe 5 Fit the 60 100 3 concentric terminal pipe with the male end 5 smooth into the flange 2 up to the stop making sure that the wall sealing plate has been fitted 3...

Page 15: ...sent in the lateral hole with respect to the central one according to needs and replace it with the flange 3 positioning the gasket 2 already present in the boiler and tighten using the supplied self...

Page 16: ...emoval of possible condensate forming in the exhaust pipe tilt the pipes towards the boiler with a min slope of 1 5 Assemble the lid A complete with adapter 1 and wall plugs 6 and assemble the flue to...

Page 17: ...e inside the flue technical slot The max possible length of the 60 flexible ducting vertical section is equal to 30 m This length is obtained considering the complete 80 exhaust terminal 1m of 80 pipe...

Page 18: ...nt the circulation pump by loosening the front cap and keeping the motor running Re tighten the cap after the operation 1 21 FILLING THE CONDENSATE TRAP On first lighting of the boiler combustion prod...

Page 19: ...24 CIRCULATION PUMP The Victrix X 12 24 2I series boilers are supplied with a built in circulation pump with 3 position electric speed control The boiler does not operate correctly with the circulatio...

Page 20: ...rmation of lime scale and preserves the original heat exchange and domestic hot water production conditions The boiler is prepared for application of the polyphosphate dispenser kit Relay board on req...

Page 21: ...ondensation module 11 Flue probe 12 Heat exchanger safety thermofuse 13 Manual air vent valve 14 Sample points air A flue gases F 15 Negative signal pressure point 16 Positive signal pressure point 17...

Page 22: ...ic hot water temperature selector switch 6 Central heating water temperature selector switch 7 Boiler manometer 8 DHW production phase functioning active 9 Boiler in block does not require release via...

Page 23: ...ite flame block 20 Return probe anomaly 23 Push button control panel anomaly 24 Block due to flue gas temperature gradient intervention 25 Insufficient circulation 27 Flue probe anomaly 29 Loss of rem...

Page 24: ...signal loss error occurs 6 times consecutively in 8 5 minutes 38 To eliminate the block the Reset button 3 must be pressed If this phenomenon occurs frequently contact a qualified technician for assis...

Page 25: ...TI FREEZE PROTECTION The boiler has an anti freeze function that switches on automatically when the temperature fallsbelow 4 C standardprotectiontominimum temperature of 5 C All information relative t...

Page 26: ...the gas flow rate regulation devices if settings are modified checktheproductionofDHW whentheboiler is connected to an external cylinder unit ensure sealing efficiency of water circuits check ventilat...

Page 27: ...ed for software updating operations 3 3 TROUBLESHOOTING N B maintenance interventions must be carried out by a qualified technician e g Immergas After Sales Technical Assistance Service Smell of gas C...

Page 28: ...eating output ignition power 3 6 ADJUSTMENT OF THE AIR GAS RATIO Important theverificationoperationsoftheCO2 must be carried out with the casing mounted while the gas valve calibration operations must...

Page 29: ...heating demand of the house Therefore the boiler works normally in a variable gas pressure field between minimum and maximum power depending on the system heat load setting fan speed in rpm hundreds...

Page 30: ...ich can be configured 0 Off 1 General alarm 2 CH phase active 3 External gas valve power supply 4 Secondary zone control from TA on relay board contact 5 Heat pump 0 5 0 P5 Relay 3 optional The boiler...

Page 31: ...every new power supply of the boiler by pressing buttons at the same time 2 and 4 Fig 2 1 for 5 seconds with boiler in stand by N B if the boiler is connected to the CARV2 the stand by function is onl...

Page 32: ...osen the two screws 4 present in the lower part of the casing front 3 unhook the central fixing 6 exerting slight pressure in the median zone of the side 5 pull the front casing slightly in the lower...

Page 33: ...sure of 1013 mbar Burner pressure values refer to use of gas at 15 C Victrix X 12 2 I Victrix X 24 2 I METHANE G20 BUTANE G30 PROPANE G31 HEAT OUTPUT HEAT OUTPUT BURNER GAS FLOW RATE BURNER NOZZLES PR...

Page 34: ...at Nom Q Min mg kWh 48 13 185 20 85 25 Flue temperature at nominal output C 56 63 57 Flue temperature at minimum output C 58 64 59 Victrix X 24 2 I Gas nozzle diameter 8205 gas valve mm 5 80 4 10 4 1...

Page 35: ...Nom Min 106 9 102 4 106 7 103 0 Efficiency 40 30 Nom Min 107 0 106 8 108 1 107 1 Heat loss at casing with burner On Off 80 60 C 0 89 0 30 0 41 0 50 Heat loss at flue with burner On Off 80 60 C 0 02 2...

Page 36: ...erial Number CHK Check Cod PIN PIN code Type Type of installation ref CEN TR 1749 Qnw min Minimum heating capacity domestic Qn min Minimum heating capacity heating Qnw max Maximum heating capacity dom...

Page 37: ......

Page 38: ......

Page 39: ......

Page 40: ...mergas com Immergas S p A 42041 Brescello RE Italy T 39 0522 689011 F 39 0522 680617 This instruction booklet is made of ecological paper Cod 1 036643ENG rev ST 000346 000 02 2014 Inglese per IRLANDA...

Reviews: