Selenio
TM
VMG-14+ Hardware Setup Guide
64
Shelf Control Manager Servicing
Gen2 Release 1.4.0
Shelf
Control
Manager
Servicing
For a front panel view of the SCM, see
SCM
Removal
1.
Unscrew the thumb screws at the opposite ends of the SCM.
2.
Open the extraction levers slowly and simultaneously until the
Hot Swap
(blue) LED begins
blinking.
3.
Wait until the
Hot Swap
LED stops blinking, and becomes solid blue.
4.
Extend the levers completely, continue holding them, and pull the SCM out of the slot.
SCM
Replacement
1.
Extend the ejector levers fully by releasing the thumbscrew.
2.
Carefully align the edge of the SCM with the slot in the chassis and gently slide it in.
3.
Press the module into the backplane and lock the ejector levers in place, making sure that the
retaining hooks are properly engaged.
4.
Tighten the thumb screws at both ends of the module faceplate.
5.
Check the LEDs to ensure that the module is functioning as expected.
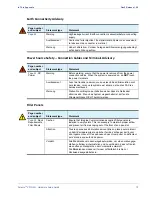
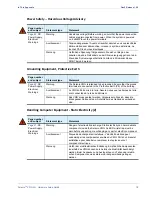
Warning!
Some shelf managers can contain a lithium battery. There is a risk of explosion if the battery
is replaced with an incorrect type. Dispose of used batteries according to the instructions.
Fan
Tray
Servicing
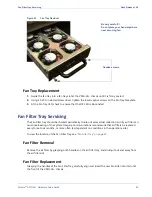
You can remove either of the two fan trays without disruption to service or degradation to system
cooling. It is not advisable to remove more than one from the system at any time.
VMG chassis fans within the chassis fan trays are not individually serviceable: do not attempt to remove
or service a fan within the fan tray. Refer to
for Fan Tray component information.
Fan
Tray
Removal
1.
Determine which of the Fan Trays has failed by looking at the LED on the Fan Tray faceplate.
If the LED is red, the Fan Tray is not operating properly.
2.
Using a 0.250-in slotted screw driver, loosen the lower captive screws on the Fan Tray faceplate.
3.
Grasp the Fan Tray handle and slowly guide the fan tray out and away from the chassis.


