background image

5

Thank you for selecting the new IMAGE

®

17.5 S tread-

mill. The 17.5 S treadmill combines advanced technol-
ogy with innovative design to help you get the most from
your exercise in the convenience of your home. And
when you’re not exercising, the 17.5 S treadmill can be
folded up, requiring less than half the floor space of
other treadmills. 

For your benefit, read this manual carefully before
using the treadmill

. If you have questions after read-

ing this manual, please see the front cover of this man-
ual. To help us assist you, note the product model

number and serial number before calling. The model
number of the treadmill is IMTL49606.0. The serial
number can be found on a decal attached to the tread-
mill (see the front cover of this manual for the location). 

To avoid a registration fee for any service needed
under warranty, you must register the treadmill at
www.iconservice.com/registration.

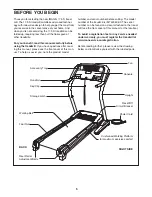
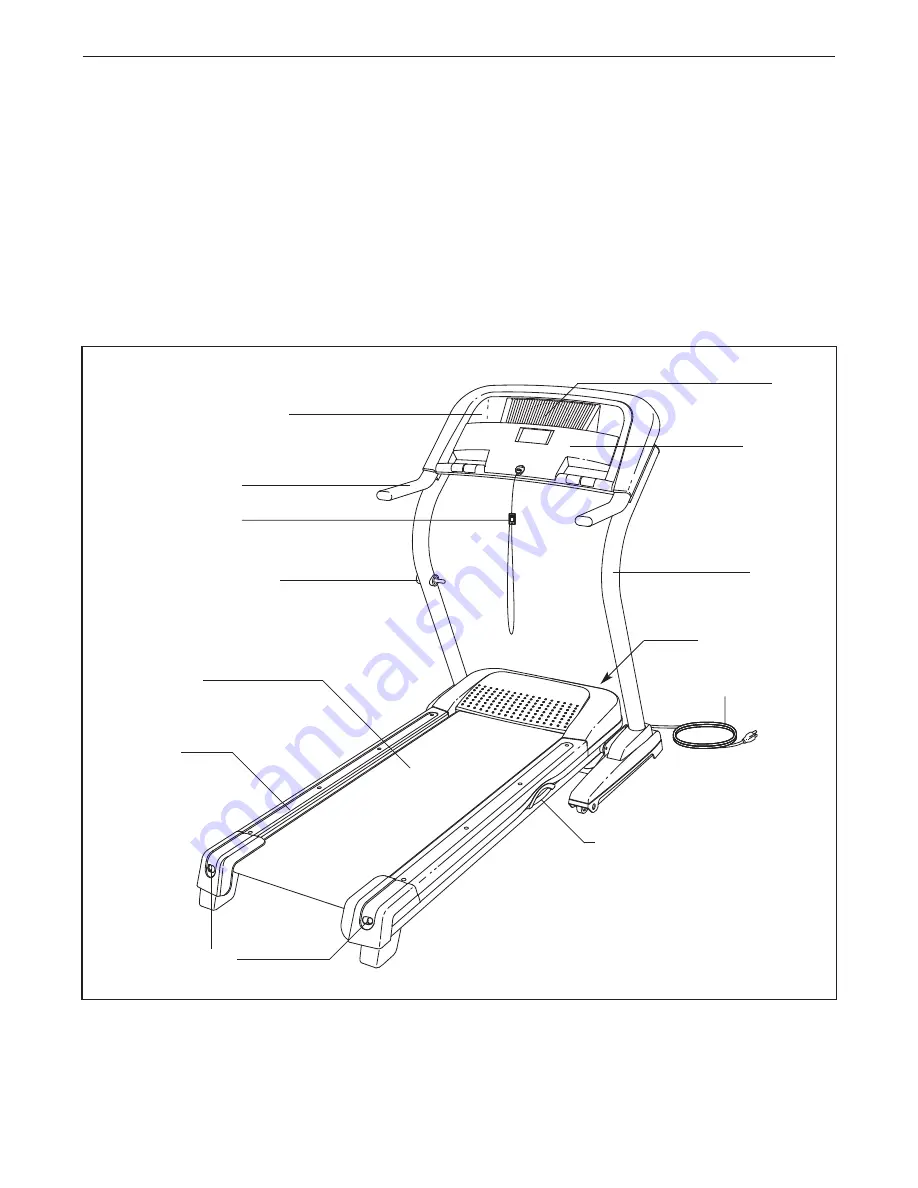
Before reading further, please review the drawing
below and familiarize yourself with the labeled parts.

BEFORE YOU BEGIN

Handrail

Upright

Storage Latch

Key/Clip

Reset/Off 

Circuit Breaker

Walking Belt

Cushioned Walking Platform

for maximum exercise comfort

Foot Rail

Power Cord

RIGHT SIDE

Rear Roller  
Adjustment Bolts

Console

Fan

Accessory Tray 

BACK

Summary of Contents for 17.5 S IMTL49606.0

Page 1: ...EE 1 800 753 4645 Mon Fri 6 a m 6 p m MST Sat 8 a m 5 p m MST ON THE WEB www iconservice com Visit our website at www weslo com new products prizes fitness tips and much more Visit our website at www...

Page 2: ...ENT 12 HOW TO FOLD AND MOVE THE TREADMILL 20 TROUBLESHOOTING 21 CONDITIONING GUIDELINES 23 HOW TO ORDER REPLACEMENT PARTS Back Cover LIMITED WARRANTY Back Cover Note An EXPLODED DRAWING and a PART LIS...

Page 3: ...described on page 12 To purchase a surge suppressor see your local IMAGE dealer or call the toll free telephone number on the front cover of this manual and order part number 146148 or see your local...

Page 4: ...representative Servicing other than the procedures in this manual should be performed by an authorized ser vice representative only 25 This treadmill is intended for in home use only Do not use this...

Page 5: ...you note the product model number and serial number before calling The model number of the treadmill is IMTL49606 0 The serial number can be found on a decal attached to the tread mill see the front c...

Page 6: ...The number in parentheses below each drawing is the key number of the part from the PART LIST in the center of the manual The number following the parentheses is the quantity used in assembly To avoi...

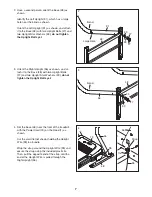
Page 7: ...it to the Base 48 with two Upright Bolts 27 and two Upright Star Washers 39 do not tighten the Upright Bolts yet 48 27 27 39 39 31 Bend Large Hole Bend 2 4 Set the Base 48 near the front of the tread...

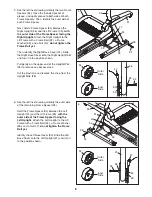
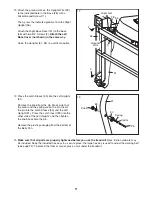
Page 8: ...it to the position shown Pull gently on the upper end of the Upright Wire 28 to remove any excess slack Cut the plastic tie and remove the strap from the Upright Wire 28 5 36 91 32 32 34 34 33 47 47...

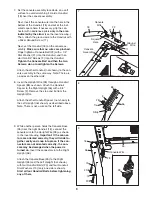
Page 9: ...rail 18 and out of the indi cated square hole If necessary grip the con nector with needlenose pliers only in the area indicated by the arrow see the inset drawing Then attach the ground wire to the H...

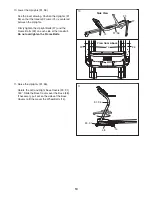
Page 10: ...27 and the Frame Bolts 32 on each side of the treadmill Do not overtighten the Frame Bolts 36 31 36 32 74 74 31 View from Above Side View 10 27 11 Raise the Uprights 31 36 Rotate the Left and Right B...

Page 11: ...n into the Latch Sleeve 30 and the Left Upright 31 Press the Latch Insert 89 into the other side of the Left Upright and then tighten the knob back onto the pin Remove the plastic packaging from the b...

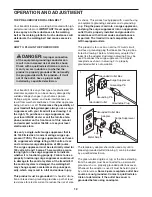
Page 12: ...alfunc tion or break down grounding provides a path of least resistance for electric current to reduce the risk of elec tric shock This product is equipped with a cord having an equipment grounding co...

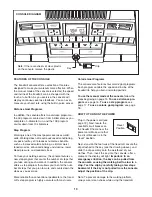
Page 13: ...exercise More reliable than conventional pedometers the tread mill s step program is highly accurate with most users Calorie Goal Programs The console also features four calorie goal programs Each pro...

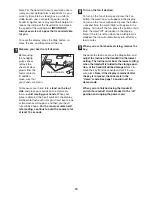
Page 14: ...to flash in the display To restart the walking belt press the Start button the Speed increase button or one of the numbered speed buttons Note The first time you use the treadmill periodi cally inspec...

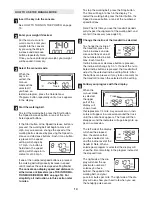
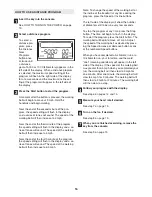
Page 15: ...r the most accurate heart rate reading continue to hold the contacts for at least 15 seconds Turn on the fan if desired To turn on the fan at low speed press the Fan button the word Low will appear in...

Page 16: ...ones will sound The speed of the walking belt will then increase to 6 5 mph Note To change the speed of the walking belt or the incline of the treadmill at any time during the program press the Speed...

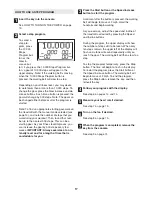
Page 17: ...ps every few weeks IMPORTANT Always exercise at an in tensity level and for a length of time that is comfortable for you Press the Start button or the Speed increase button to start the program A mome...

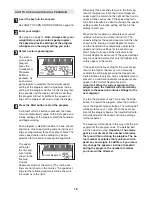
Page 18: ...d and or in cline of the treadmill is about to change the speed setting and or the incline setting will flash in the display to alert you When the first segment is completed all speed settings will mo...

Page 19: ...hours that the treadmill has been operated The lower right corner of the display will show the total number of miles or kilo meters that the walking belt has moved In addition an E for English miles...

Page 20: ...not leave the treadmill in the storage position in temperatures above 85 Fahrenheit HOW TO MOVE THE TREADMILL Before moving the treadmill convert it to the storage position as described above Make su...

Page 21: ...a Check the circuit breaker located on the treadmill frame near the power cord see the drawing above If the circuit breaker has tripped wait for five minutes and then press the switch back in b Make s...

Page 22: ...clockwise 1 2 of a turn if the walking belt has shifted to the right turn the left bolt counterclockwise 1 2 of a turn Be careful not to overtighten the walking belt Then plug in the power cord inser...

Page 23: ...ctivity that requires large amounts of oxygen for prolonged periods of time This increases the demand on the heart to pump blood to the muscles and on the lungs to oxygenate the blood For aerobic exer...

Page 24: ...ine Motor Nut Top 47 4 Nut 48 1 Base 49 3 Plastic Tie 50 1 Belly Pan 51 1 Controller 52 2 Upright Endcap 53 2 Lift Frame Bolt 54 6 3 8 Nut 55 1 Lift Motor 56 1 Stop Bracket 57 1 Incline Motor Bolt Top...

Page 25: ...8 38 38 56 47 54 46 55 60 54 54 11 62 61 54 66 24 64 65 66 72 73 4 4 3 71 68 4 4 78 78 38 76 83 38 81 82 85 84 11 82 81 79 80 38 76 4 4 74 75 4 68 4 63 24 53 33 12 12 71 76 76 67 43 69 69 40 41 2 2 2...

Page 26: ...ial damages arising out of or in con nection with the use or performance of the product or damages with respect to any economic loss loss of property loss of revenues or profits loss of enjoyment or u...

Reviews: