background image


Quick programming using Avelour 

Installation guide   

K0J00121


IJINUS - 25 ZA de Kervidanou 3, 29300 MELLAC - France -  – Customer Service: +33 2 98 09 03 32 / 

[email protected]


20 

5


Revision of the document 


Date 

Revision 

Writer(s) 

Modifications 

03/07/2019 

2A03 

D. MAHE 

A. TRIBALLIER 

Creation of the document 


Summary of Contents for LOG03V3-3G

Page 1: ...Installation guide LOG03V3 3G Wireless 3G data logger 2x analog inputs 4 20mA 2x digital inputs 1 or 0 1x voltage input 7Vcc 30V 1x open collector output 1x voltage output 7Vcc 30V...

Page 2: ...oftware Avelour 3 3 1 Necessary equipment 4 3 2 Run Avelour and connect to the sensor to configure 5 3 3 General information and name of the logger 6 3 4 Application 4 20 mA measure 7 3 5 Data sending...

Page 3: ...i protocol to the logger to configure it and to retrieve locally the data Depending on the data logger model it can have a modem allowing to automatically send data remotely to the web platform ijitra...

Page 4: ...s 1 2 3 4 5 6 7 8 Signal Vin GND Vout Input Input Input Input Output Open drain 2A 30V Type 7V 30Vdc Ground 7 30Vdc Current 1 Current 2 Digital 1 Digital 2 Grounding contact Feature Power in Switch 4...

Page 5: ...activate anything else on the device Locate the sensor s serial number SN on the sensor label ex IJA0101 0000 3559 and on the connection screen and click OK On the first connection with the sensor on...

Page 6: ...can last a moment On site prefer the best radio connection so not if the metal cover of a manhole is closed When the logger has finished these checks Avelour will look bellow figure 3 3 General inform...

Page 7: ...le with the LOG03V3 using 4 20 mA and or Modbus input and or open drain output This chapter describes the configuration of the sensor First select in the Add menu the application 4 20mA measure The co...

Page 8: ...ture C angle or quantify without unit For each of the five units four parameters could be set 1 Value at 4mA the minimum value in most cases 0 of the sensor connected to the logger 2 Value at 20mA the...

Page 9: ...able should be created by clicking in the Edit table button to have the possibility to create the table by clicking on the Edit table button With the flowrate two calculation of the volume accumulatio...

Page 10: ...France Customer Service 33 2 98 09 03 32 sav ijinus com 10 Advanced parameters The View advanced parameters button allows more functionalities Displaying the configuration summary Once the configurat...

Page 11: ...Customer Service 33 2 98 09 03 32 sav ijinus com 11 Saving the configuration You must save the configuration by clicking on the Program the device button to send it to the logger s memory After few s...

Page 12: ...icult through a metal cover in the manhole Second Insert in the logger sim holder a regular size data sim card with at least 5Mbytes data month on your plan While buying the Sim card please ask the AP...

Page 13: ...he data to our server as we propose a web platform ijitrack com with different services to manage them So if this option is selected no change is needed in the FTP Username Before forcing a data sendi...

Page 14: ...SSI 90 dBm Very good RSSI between 90 up to 105 dBm Acceptable RSSI 105 dB No network While testing the network some special values could appear 1 or 0 meaning no network available for communication Ad...

Page 15: ...View broadcast measures Main menu Windows View broadcast measures View broadcast measures this option opens a window showing the measures received by radio from Ijinus sensors and loggers nearby If y...

Page 16: ...vidanou 3 29300 MELLAC France Customer Service 33 2 98 09 03 32 sav ijinus com 16 3 7 Data export From the graph and or list of data you find the tab Export the measures with the choice of different f...

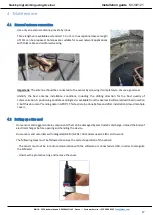
Page 17: ...ding the drilling direction for the best quality of communication A positioning and data sending test is available from the Avelour 6 software described in section 3 6 of this document sending data in...

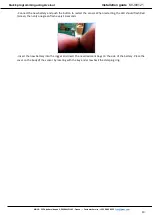
Page 18: ...oo long max 2 min to avoid that the desiccant bags absorb too much moisture Insert the Sim card beveled edge facing up To close the cover place the cover on the body of the sensor by locating with the...

Page 19: ...19 Connect the new battery and push the button to restart the sensor When restarting the LED should flash Red Green then only one green flash every 10 seconds Insert the new battery into the logger an...

Page 20: ...n guide K0J00121 IJINUS 25 ZA de Kervidanou 3 29300 MELLAC France Customer Service 33 2 98 09 03 32 sav ijinus com 20 5 Revision of the document Date Revision Writer s Modifications 03 07 2019 2A03 D...

Reviews: