IGLU COLD SYSTEMS PTY LTD © 2015
TEL. (02) 9119 2515 FAX. (02) 9913 8667
EMAIL. [email protected]
WEB. www.iglucoldsystems.com.au
Illustrated (Basic) HTWL Controller Functions – non-service type
1.
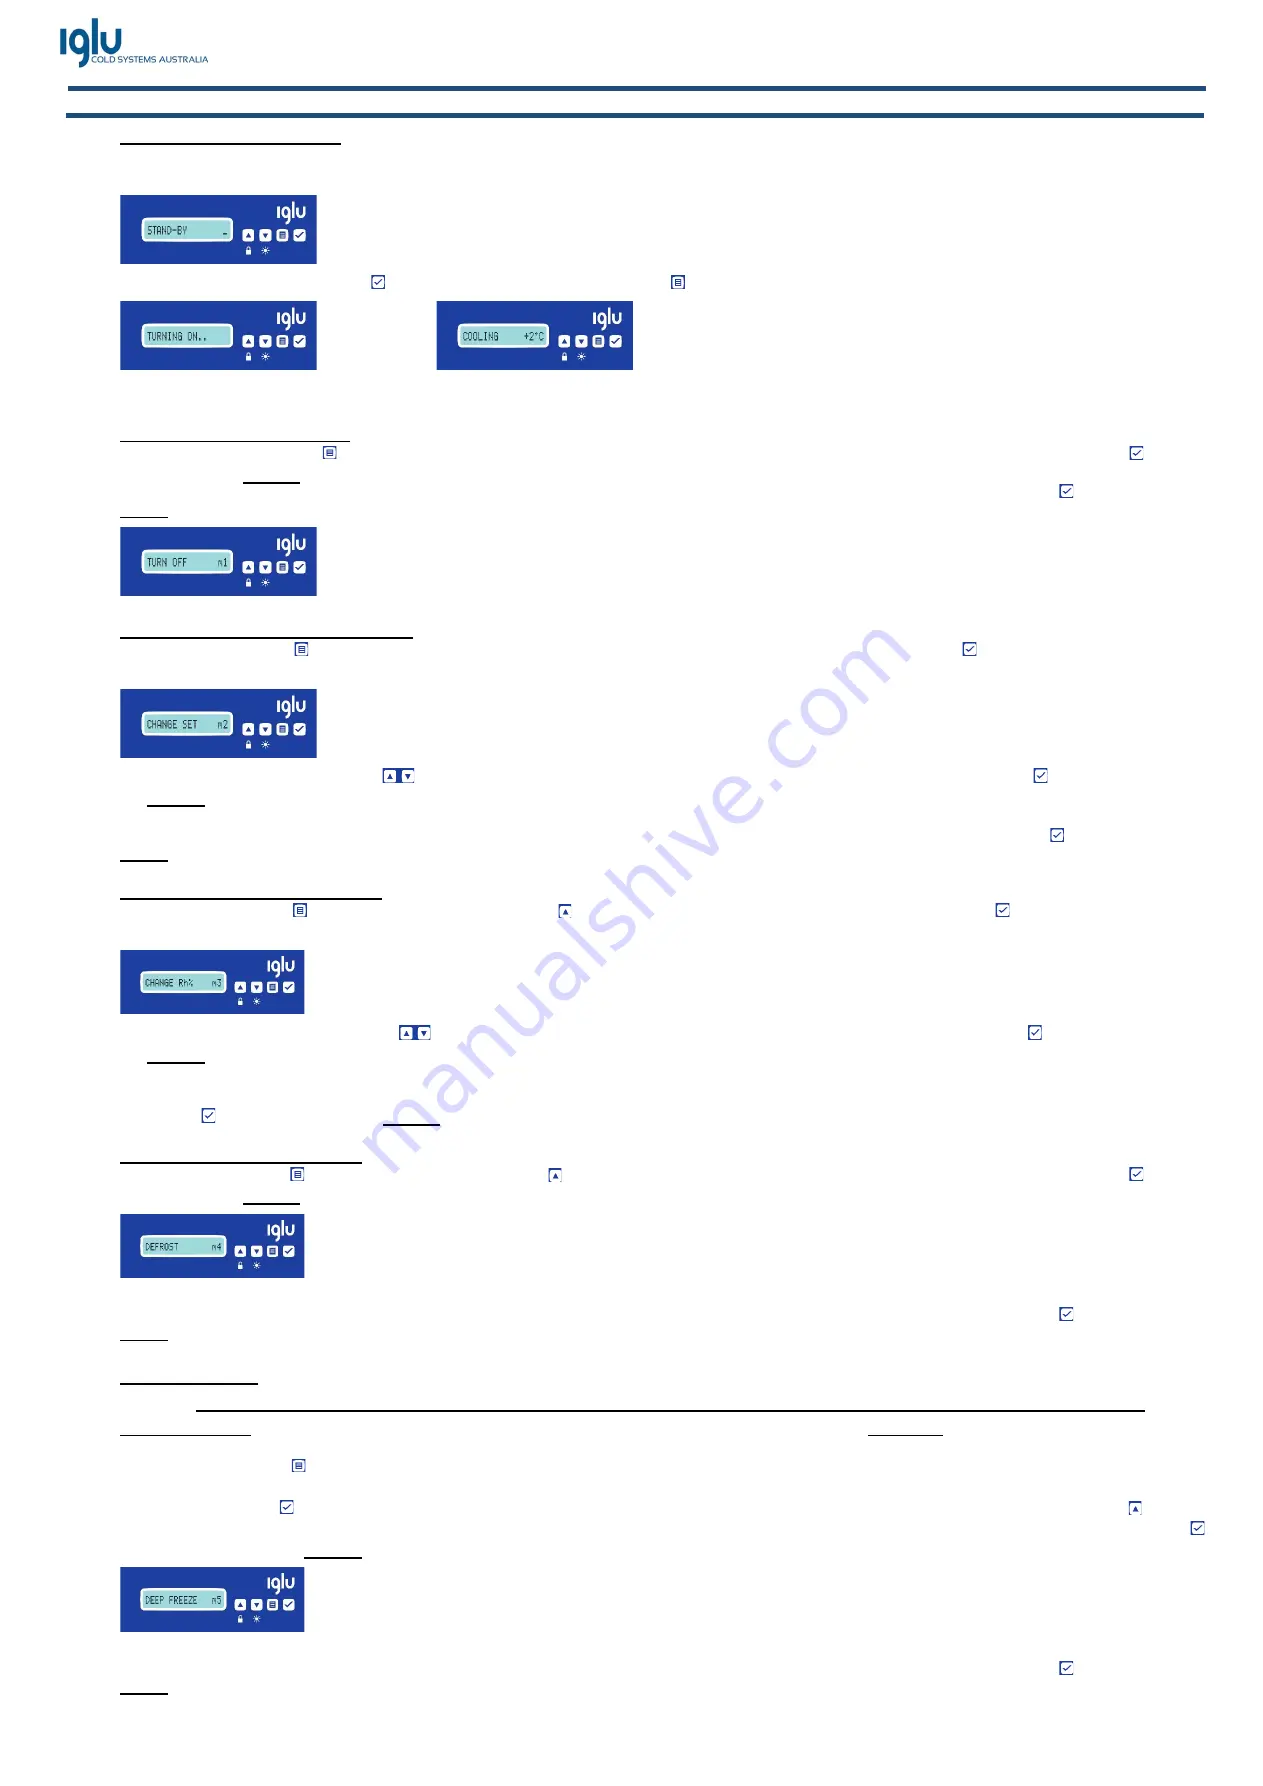
TURNING ‘ON’ Equipment
-
Plug 3 pin plug into a standard General Purpose Outlet (GPO): 230V – 240V / 50Hz / 1Phase
1.1
Once plugged into the wall socket turn ‘ON’ the power switch on the GPO, the controller will ‘beep’ turn On, then turn Off and idle in
standby mode;
1.2
Press and hold in the ‘Tick’ ( ) or
‘OK’
symbol, or the ‘Menu’ key ( ) for 3-4 seconds or until the controller beeps and turns on.
(Display will display ‘COOLING’ after an initial systems/firmware check, and display the equipment ambient temperature)
2.
TURNING ‘OFF’ Equipment
-
Do not ‘Turn Off’ the equipment by switching off the power at the wall or unplugging the power;
2.1
Press the ‘Menu’ key ( ) and the display will automatically display
‘TURN OFF m1’
as the first menu option, Press the ‘Tick’ ( ) symbol
or
‘OK’
key
TWICE
to confirm;
(NOTE: if >>CONFIRMED<< does not display the defrost has not commenced, ensure >>CONFIRMED<< is displayed by pressing the
‘Tick’ ( ) symbol or
‘OK’
key
TWICE)
3.
CHANGING ‘SET TEMPERATURE’
3.1
Press the ‘Menu’ ( ) key and using the arrow up symbol select
‘CHANGE SET m2’
Press the ‘Tick’ ( ) symbol or
‘OK’
key and the
Menu will display
SETPOINT -
02˚C
(Refrigerated) or
SETPOINT -
18˚C
(Freezers);
3.2
Using the arrow Up or Down (
) symbols select the desired temperature set point, to confirm Press the ‘Tick’ ( ) symbol or
‘OK’
key
TWICE
to confirm;
3.3
The controller will display
>>CONFIRMED<<
(NOTE: if >>CONFIRMED<< does not display the defrost has not commenced, ensure >>CONFIRMED<< is displayed by pressing the
‘Tick’ ( ) symbol or
‘OK’
key
TWICE)
4.
CHANGING ‘HUMIDITY’ LEVEL
4.1
Press the ‘Menu’ ( ) key and using the arrow ‘Up’ ( ) symbol select
‘CHANGE rh% m3’
Press the ‘Tick’ ( ) symbol or
‘OK’
key and
the Menu will display
SET Rh% 90%
(Refrigerated only);
4.2
Using the arrow ‘Up or Down’ (
) symbols select the desired level of humidity, to confirm Press the ‘Tick’ ( ) symbol or
‘OK’
key
TWICE
to confirm;
4.3
The controller will display
>>CONFIRMED<<
(NOTE: if >>CONFIRMED<< does not display the humidity level has not been changed, ensure >>CONFIRMED<< is displayed by pressing
the
‘Tick’ ( ) symbol or
‘OK’
key
TWICE)
5.
MANUAL DEFROST OPTION
5.1
Press the ‘Menu’ ( ) key and using the arrow ‘Up’ ( ) symbol select
‘DEFROST m4’
to start a defrost cycle: Press the ‘Tick’ ( ) symbol
or
‘OK’
key
TWICE
to confirm;
5.2
The controller will display
>>CONFIRMED<<
(NOTE: if >>CONFIRMED<< does not display the defrost has not commenced, ensure >>CONFIRMED<< is displayed by pressing the
‘Tick’ ( ) symbol or
‘OK’
key
TWICE)
6.
DEEP FREEZER - (for continuous fast chill cycle or fast freeze cycle operation below the set point temperature value) –
*** ATTENTION DO NOT USE AS A SUBSTITUTE FOR A PERMANENT FREEZER OR BLAST CHILLING & FREEZING ***
Important Notice: The inbuilt ‘Deep Freezer’ feature is not intended to be used for more than a Maximum period of 6hrs. This feature is only
recommended for use in order to bring down the temperature of goods stored within the counter quickly, or as a short-term ‘freezer’ solution.
6.1
Press the ‘Menu’ ( ) key and using the arrow up symbol select
‘DEEP FREEZE m5’
to convert a ‘refrigeration’ cycle to ‘Deep Freezer’
cycle:
6.2
Press the ‘Tick’ ( ) symbol and the controller will display ‘
COOLING h00:00’
, select the period of time using the arrow ‘Up’ ( ) symbol
increasing the ‘Deep Freezer’ cycle in 15min increments (min period of 15mins, up to maximum period 06:00hrs): Press the ‘Tick’ ( )
symbol or
‘OK’
key
TWICE
to confirm;
6.3
The controller will display
>>CONFIRMED<<
(NOTE: if >>CONFIRMED<< does not display the defrost has not commenced, ensure >>CONFIRMED<< is displayed by pressing the
‘Tick’ ( ) symbol or
‘OK’
key
TWICE)


