background image

MSD-54 SERIES User

’s Guide


240


8.17.3  Key lock [KEY LOCK] 

You can enable or disable key lock for when MSD is turned on. 


AUTO    [Default] 

UNLOCK 

LOCK 


If you select 

“AUTO” and turn on the MSD, the previous mode (when you turned off the MSD last time) will be 

applied. To fix the key lock state, 

select “UNLOCK” or “LOCK”. 


[Table 8.36] Key lock mode when MSD is powered on 

Setting 

Previous key lock mode 

Key lock mode that will be 

applied when turning ON 

AUTO (Default) 

UNLOCK 

UNLOCK 

LOCK 

LOCK 

UNLOCK 


UNLOCK 

LOCK 


LOCK 


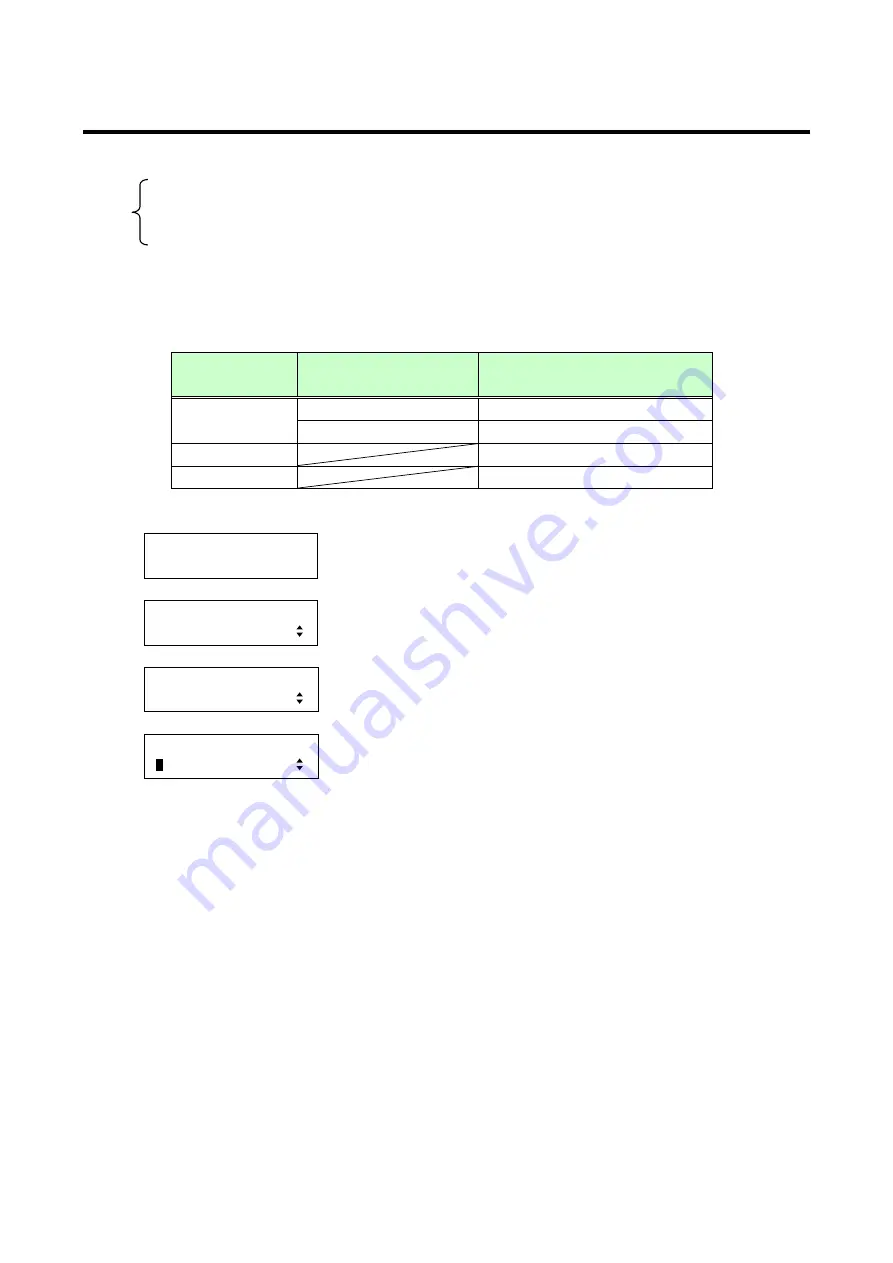
1. To set key lock mode using menu: 

MSD-5404


Top 


  SET key 

[FUNCTION SELECT]
POWER ON SETTING


▲▼

keys: Select “POWER ON SETTING”. 


  SET key 

[POWER ON SETTING]
KEY LOCK


▲▼

keys: Select “KEY LOCK”. 


  SET key 

[KEY LOCK]

A

UTO


▲▼

keys: Select the desired key look mode (AUTO, UNLOCK, LOCK). 


  ESC key: Returns to the previous screen. 


2. To set key lock mode using commands: 

None 


Summary of Contents for MSD-5401

Page 1: ...IN7 IN8 IN9 OFF POWER DISPLAY 1 2 3 4 IN2 MENU SET ESC COMMAND E COMMAND COMMAND COMMAND COMMAND A B C D V A VIDEO AUDIO SWITCHING MODE PRESET LOAD COMMAND Thank you for choosing our presentation swit...

Page 2: ...ies PJLink is a trademark in Japan the United States and other countries regions Microsoft Windows Internet Explorer are either registered trademarks or trademarks of the Microsoft Corporation in the...

Page 3: ...uant to part 15 of the FCC Rules These limits are designed to provide reasonable protection against harmful interference when the equipment is operated in a commercial environment This equipment gener...

Page 4: ...ury if the warning is ignored or the equipment is handled incorrectly Indicates the presence of a hazard that may cause minor personal injury or property damage if the caution is ignored or the equipm...

Page 5: ...power plug in a convenient place to unplug easily You can easily unplug in case of any extraordinary failure or abnormal situation and it also helps for unplugging when you do not use it for a long pe...

Page 6: ...ty place If the product is placed near humidifiers or dusty area it may cause fire or electric shock Do not block the vent holes If ventilation slots are blocked it may cause fire or failure due to in...

Page 7: ...Operation Keys 25 7 3 Turning ON OFF Display Devices 26 7 4 Executing Control Commands 27 7 5 Loading Cross Point 28 7 6 Locking Unlocking Front keys 28 7 7 WEB Browser Control by 29 7 8 Remote Contro...

Page 8: ...ed HDCP INPUT ENABLE 85 8 5 3 Input equalizer INPUT EQUALIZER 87 8 5 4 Signal type of analog input ANALOG INPUT TYPE 88 8 5 5 Automatic detection of input video interruption INPUT OFF CHECK 89 8 6 Inp...

Page 9: ...0 8 9 6 Speaker configuration SPEAKER 142 8 9 7 EDID Copy MONITOR EDID COPY 144 8 10 Serial COM Port Settings 145 8 10 1 Communication setting PARAMETERS 145 8 10 2 Operation mode FUNCTION 146 8 11 LA...

Page 10: ...6 8 16 4 Aspect ratio ASPECT 227 8 16 5 Position POSITION 229 8 16 6 Input bitmap channel assignment CHANNEL ASSIGN 230 8 16 7 Bitmap output at startup POWER ON BITMAP 231 8 16 8 Dividing memory area...

Page 11: ...11 11 Trouble shooting 261 12 Fuse 270...

Page 12: ...main unit One 1 RS 232C cable 1 8 meters approximately 5 91 feet One 1 power cable 1 8 meters approximately 5 91 feet Two 2 rack mounting brackets Cable clamps Six 6 for MSD 5401 and MSD 5401SL Seven...

Page 13: ...connectors and you can also execute them when operating the input switching keys and turning on the MSD Video Matrix Switch HDMI DVI Input 5 ch Scan Converter 1 Digital I O supports HDMI signals and D...

Page 14: ...d by JBMIA Japan Business Machine and Information System Industries Association Power control of display devices using CEC 3 Others Connection Reset 4 EDID emulation for all inputs 1 For models MSD 54...

Page 15: ...nal Control Controlling peripheral devices RS 232C LAN and Parallel are available By registering external control commands peripheral devices can be controlled via RS 232C LAN Tally output or CEC PJLi...

Page 16: ...key Selects a switching mode V A VIDEO AUDIO if an input is selected 4 Input channel selection keys IN1 to IN9 OFF Selects video and audio outputs 5 Control command execution Cross point loading keys...

Page 17: ...LEL input port PARALLEL For external control by contacts 9 Tally output port TALLY For external control by contacts 10 Maintenance port UPDATE Not used Keep this port free 11 AC power connector AC 100...

Page 18: ...I AUDIO AUDIO AUDIO AUDIO L R L R L R L R AUDIO AUDIO AUDIO AUDIO L R L R AUDIO AUDIO AUDIO AUDIO AUDIO L R L R L R L R L R L R L R RS 232C CH2 LAN UPDATE RS 232C CH1 TALLY PARALLEL IN 7 IN 9 IN 8 IN...

Page 19: ...19 For input and output of HDMI use HDMI Type A male cables The HDMI cable does not have lock mechanism but the provided cable clamp prevents the cable from falling off Figure 6 2 Cable clamp...

Page 20: ...gnments N C No Connection The type of input video signals is recognized automatically but if video is not output correctly select the signal type manually using the menu shown in section 8 5 4 Signal...

Page 21: ...ble 6 3 Spec of serial communication Compliance standard RS 232C Baud rate 4800 9600 19200 38400 bps Data bits 8 7 bit Parity check None even odd Stop bit 1 2 bit X parameter Invalid Flow control None...

Page 22: ...ICMP Transport layer TCP Port used for command control 23 1100 6000 to 6999 Port used for WEB browser control HTTP 80 5000 to 5999 Application layer HTTP TELNET RX Received Data NC Not connected TX Tr...

Page 23: ...CP IP connection 1 port is occupied 7 ports free Sending command xxx Sending reply command xxx TCP IP close 1 port is released 8 ports are free Figure 6 6 Increasing connections Note If any command is...

Page 24: ...y video AUDIO only audio The LED of the selected mode illuminates Figure 7 1 SWITCHING MODE selection key 2 Press the desired input channel selection key IN1 to IN9 OFF to set a channel to output vide...

Page 25: ...scapes from the menu Keys Switches menus and sets values keys Moves the cursor and selects the item to be set VFD screen Displays menus and settings See 8 1 Menu List if necessary If no operation is a...

Page 26: ...12 3 Command link If you press the keys accidentally the display device may be turned off This can be avoided by pressing and holding the DISPLAY POWER keys for the registered number of seconds set in...

Page 27: ...stered in 8 12 3 Command link Command control Controlling command execution EXC To execute commands associated with Control Command execution keys COMMANDs A to E Procedure 1 Select the desired comman...

Page 28: ...ngs Procedure 1 Select PRESET LOAD using the Operation Mode selection key 2 Press the cross point command keys to load the cross point settings Commands A to E correspond to cross points 1 to 5 POWER...

Page 29: ...We tested the MSD using Microsoft Internet Explorer 6 0 7 0 and 8 0 for Windows The MSD may possibly operate incorrectly on other versions and or browsers If the port number of the browser control po...

Page 30: ...A to I No command is registered by factory as default To execute control commands register them to COMMAND A to I in advance by following instructions in section 8 12 3 Command link Buttons in which...

Page 31: ...ntrol window OUT1 to 4 are set by default 3 Control command name Enter the desired input names which will be displayed in COMMAND EXECUTE on Figure 7 6 A to I are set by default 4 SEND Saves the names...

Page 32: ...ory default 1 5 1 Set for each output 2 Set for each input port input signal 3 Set for each input 4 Set for each output bitmap Function Factory default Set for each I O bmp INPUT CHANNEL Channel selec...

Page 33: ...ls are detected it is set automatically 2 AUTO START POS ON 2 UNKNOWN TIMING ON Device data registered by user All 99 data is not registered 2 TRACKING 0 when signals are input it is set automatically...

Page 34: ...ULTI AUDIO DOWN MIX 1 TEST TONE Test tone OFF Speaker ALL 1 EDID DATA INTERNAL EDID 3 PC RESOLUTION For IN 1 to IN 5 1080p 1920x1080 For IN 6 to IN 9 UXGA 1600x1200 3 AV RESOLUTION AUTO 3 DEEP COLOR I...

Page 35: ...ion key OFF does not blink For display device power switch EXECUTION blinks while control command is executed CROSS POINT MEMORY All nine are not controlled channel PRESET MEMORY All eight are not reg...

Page 36: ...p with settings which were set on the MSD before the last power down KEY LOCK AUTO Starts up with settings which were set on the MSD before the last power down COMMAND Tally OFF KEY LOCK MODE Disabled...

Page 37: ...AUTO SIZING IN1 AUTO SIZING SURE NO OUTPUT TIMING OUTPUT POSITION OUT1 POSITION H 0 V 0 OUTPUT TIMING OUTPUT SIZE OUT1SIZ H 1920 1920 LINK ON V 1080 1080 SET ESC SET ESC SET ESC SET OUTPUT TIMING OUTP...

Page 38: ...T LINK ON R 100 G 100 B 100 IMAGE EFFECT OUT DEFAULT COLOR OUT1 DEFAULT COLOR SURE NO SET SET ESC SET ESC SET ESC FUNCTION SELECT INPUT SETTING INPUT SETTING ANALOG INPUT TYPE IN6 ANALOG TYPE AUTO INP...

Page 39: ...ING LOAD IN6 LOAD No 1 INPUT TIMING TRACKING IN6 TRACKING 0 SET ESC INPUT TIMING AUTO SETUP IN6 AUTO SETUP PUSH SET NORMAL MODE SET ESC INPUT TIMING UNKNOWN TIMING UNKNOWN TIMING AUTO SETUP ON SET ESC...

Page 40: ...SET ESC OUTPUT SETTING HDCP OUTPUT MODE OUT1 HDCP MODE ALWAYS SET ESC OUTPUT SETTING DEEP COLOR OUTPUT OUT1 DEEP COLOR 24 BIT COLOR SET ESC OUTPUT SETTING SWITCHING SPEED OUT1 SPEED 350ms SET ESC OUTP...

Page 41: ...TO NUMBER 2 SET ESC EDID MONITOR EDID COPY MONITOR EDID COPY OUT1 No 1 COPY DATA1 SET ESC EDID DEEP COLOR INPUT IN1 DEEP COLOR 24 BIT COLOR SET ESC EDID AV RESOLUTION IN1 AV FORMAT AUTO SET ESC AUDIO...

Page 42: ...COMMAND LINK COMMAND A PRESET COMMAND INVALID TIME SET ESC PRESET COMMAND INITIALIZE PRESET INITIALIZE CMD 1 SET ESC PRESET COMMAND COMMAND TALLY FRONT A LINK ON REGISTERED SET ESC PRESET COMMAND FLA...

Page 43: ...C SET ESC SET ESC SET SET ESC FUNCTION SELECT PRESET MEMORY PRESET MEMORY LOAD CROSS POINT LOAD CROSS POINT No 1 PRESET MEMORY SAVE CROSS POINT SAVE CROSS POINT No 1 PRESET MEMORY STARTUP STARTUP LAST...

Page 44: ...OUT1 POWER ON ON SET ESC SET ESC SET SET ESC FUNCTION SELECT TALLY TALLY FUNCTION ASSIGN TALLY PIN 2 OUT1 IN1 TALLY INITIALIZE TALLY INITIALIZE FACTORY DEFAULT BITMAP DIVIDE MEMORY ESC SET DIVIDE MEMO...

Page 45: ...0MHz Figure 8 9 Menu list 9 9 Some menus can be set separately as follows and those setting units are shown on the top right of each section in this manual You can set the menu for each output separat...

Page 46: ...ea for 50 devices per channel When new signals are input the oldest data will be overwritten IN9 720p UXGA Figure 8 11 Memory table per channel The data of the following settings are stored for each i...

Page 47: ...changed Position and size are not changed Video size is reduced in the output side and black bars are displayed at top bottom right left Settings set in the output side are applied to output video Vi...

Page 48: ...3 15 Test pattern 2 Set the display position by following 8 3 10 Output position to match the upper left of the display device and test pattern 3 Reduce the test pattern by following 8 3 11 Output si...

Page 49: ...resolution AUTO Default WXGA 60 1440x900 720p 50 1280x720 VGA 60 640x480 WXGA 60 1600x900 720p 59 94 1280x720 SVGA 60 800x600 UXGA 60 1600x1200 720p 60 1280x720 XGA 60 1024x768 WSXGA 60 1680x1050 1080...

Page 50: ...ING SET key OUTPUT TIMING RESOLUTION keys Select RESOLUTION SET key RESOLUTION AUTO 1080p59 94 keys Select the desired resolution keys Select the desired output OUT1 to OUT4 ESC key Returns to the pre...

Page 51: ...0 480 4 3 WXGA 1280 800 16 10 WXGA 1600 900 16 9 576i p 720 576 4 3 Quad VGA 1280 960 4 3 UXGA 1600 1200 4 3 720p 1280 720 16 9 SXGA 1280 1024 5 4 WSXGA 1680 1050 16 10 1080i p 1920 1080 16 9 If aspec...

Page 52: ...have letter box signal video which may not be displayed within the screen In such case set the aspect to AUTO 2 to display the whole video Input signal 4 3 video signal 16 9 video signal 14 9 video si...

Page 53: ...2 BC top bottom BC right left BC right left BC right left Selecting LETTER BOX SIDE PANEL for aspect ratio restoration processing Figure 8 15 Aspect ratio control 1 2 2 The aspect ratio selected for t...

Page 54: ...ignals NTSC PAL S Video signals NTSC PAL and analog YPbPr signals SDTV HDTV are restored based on ID 1 signals and WSS signals while aspect ratio of HDMI signals is restored based on packets called In...

Page 55: ...zontally long 16 10 long Vertically long Horizontally long Aspect ratio of destination display device 16 9 letter box 14 9 letter box Vertically long Vertically long Horizontally long Horizontally lon...

Page 56: ...NG keys Select OUTPUT TIMING SET key OUTPUT TIMING INPUT ASPECT keys Select INPUT ASPECT SET key IN1 ASPECT AUTO 1 keys Select the desired aspect ratio keys Select the desired input IN1 to IN9 ESC key...

Page 57: ...6 9 input video is output to a 4 3 display device L BOX S PANEL Letter box S CUT TB CUT Side panel Output signal 4 3 input video is output to a 16 9 display device Side cut Top bottom cut Figure 8 19...

Page 58: ...called Overscan HDTV and VESA are displayed on the full effective display area Some HDTV signals include areas which display black bars on the edges depending on sources 1 To set the overscan using m...

Page 59: ...will be the standard Horizontal position Vertical position Figure 8 20 Input position The setting range depends on 8 3 1 Output resolutions and 8 3 7 Input size and the minimum settable values of the...

Page 60: ...s Guide 60 IN1 POSITION H 0 V 0 keys Set the vertical position of IN1 ESC key Returns to the previous screen 2 To set the input video position pixel position using commands SNP Set input position GNP...

Page 61: ...izontal output resolution Vertical size Scaled in a unit of line Default Vertical output resolution Note If the resolutions of each output are not the same the resolution of OUT1 will be the standard...

Page 62: ...e input video You can set the masking amount for each input by using this menu or for each output by following 8 3 12 Output masking Normally set the masking of each input in settings of each input If...

Page 63: ...T 0 B 1080 keys Set the left side masking of IN1 keys IN1 MASKING L 0 R 1920 T 0 B 1080 keys Set the right side masking of IN1 keys IN1 MASKING L 0 R 1920 T 0 B 1080 keys Set the top side masking of I...

Page 64: ...pending on some settings 1 To set the input automatic sizing using menu MSD 5404 Top SET key FUNCTION SELECT OUTPUT TIMING keys Select OUTPUT TIMING SET key OUTPUT TIMING INPUT AUTO SIZING keys Select...

Page 65: ...ends on settings of 8 3 1 Output resolution and 8 3 11 Output size Values can be set unless video disappears from the top bottom and right left of the screen If the display position exceeds the settab...

Page 66: ...e Figure 8 24 Output size The setting range and default vary depending on settings of 8 3 1 Output resolutions and the range is quarter to quadruple of output resolution Default is the same as the res...

Page 67: ...aspect ratio is kept and vertical size is also set If either horizontal or vertical size reaches the limit you cannot set the larger values 2 Only if you set LINK to OFF you can set the vertical size...

Page 68: ...pixel Default Horizontal output resolution Top side masking Masked in a unit of line Default 0 Bottom side masking Masked in a unit of line Default Vertical output resolution 0 0 Horizontal size Vert...

Page 69: ...0 B 1080 keys Set the left side masking of OUT1 keys OUT1 MASKING L 0 R 1920 T 0 B 1080 keys Set the right side masking of OUT1 keys OUT1 MASKING L 0 R 1920 T 0 B 1080 keys Set the top side masking o...

Page 70: ...ng using menu MSD 5404 Top SET key FUNCTION SELECT OUTPUT TIMING keys Select OUTPUT TIMING SET key OUTPUT TIMING OUTPUT AUTO SIZING keys Select OUTPUT AUTO SIZING SET key ESC key Returns to the previo...

Page 71: ...B 100 keys Set the background color Red for OUT1 0 to 255 keys OUT1 COLOR LINK OFF R 100 G 100 B 100 keys Set the background color Green for OUT1 0 to 255 2 keys OUT1 COLOR LINK OFF R 100 G 100 B 100...

Page 72: ...100 WHITE RASTER CROSS HATCH OUTPUT FRAME VERTICAL STRIPE HORIZONTAL STRIPE VERTICAL ZEBRA H COLOR BAR H GRAY SCALE HORIZONTAL LAMP HORIZONTAL ZEBRA Figure 8 26 Test patterns Scroll OFF Default 3 pix...

Page 73: ...OFF keys Select the desired test pattern for OUT1 keys OUT1 SCROLL OFF keys Select the desired scroll speed for OUT1 keys ESC key Returns to the previous screen You can select SCROLL only if selecting...

Page 74: ...quality settings 8 4 1 Input brightness INPUT BRIGHTNESS Brightness 80 to 120 Default 100 If you increase the value the whole level will be increased as well if you reduce the value the whole level w...

Page 75: ...IN1 CONT LINK ON R 100 G 100 B 100 keys Set the contrast of Red for IN1 0 to 200 keys IN1 CONT LINK OFF R 100 G 100 B 100 keys Set the contrast of Green for IN1 0 to 200 2 keys IN1 CONT LINK OFF R 100...

Page 76: ...SD 5404 Top SET key FUNCTION SELECT IMAGE EFFECT keys Select IMAGE EFFECT SET keys IMAGE EFFECT INPUT HUE keys Select INPUT HUE SET key IN1 HUE 0 keys Set the hue 0 to 359 keys Select the desired inpu...

Page 77: ...mes more vivid 1 To set the saturation using menu MSD 5404 Top SET key FUNCTION SELECT IMAGE EFFECT keys Select IMAGE EFFECT SET key IMAGE EFFECT INPUT SATURATION keys Select INPUT SATURATION SET key...

Page 78: ...direction Even if you change the black level the white level is not changed 1 To set the setup level using menu MSD 5404 Top SET key FUNCTION SELECT IMAGE EFFECT keys Select IMAGE EFFECT SET key IMAG...

Page 79: ...ect IMAGE EFFECT SET key IMAGE EFFECT IN DEFAULT COLOR keys Select IN DEFAULT COLOR SET key ESC key Returns to menu without changing settings IN1 DEFAULT COLOR SURE NO keys Select YES or NO keys Selec...

Page 80: ...duced 1 To set the output brightness using menu MSD 5404 Top SET key FUNCTION SELECT IMAGE EFFECT keys Select IMAGE EFFECT SET key IMAGE EFFECT OUTPUT BRIGHTNESS keys Select OUTPUT BRIGHTNESS SET key...

Page 81: ...ON R 100 G 100 B 100 keys Set the contrast of Red for OUT1 0 to 200 keys OUT1 CONT LINK OFF R 100 G 100 B 100 keys Set the contrast of Green for OUT1 0 to 200 2 keys OUT1 CONT LINK OFF R 100 G 100 B 1...

Page 82: ...SET key IMAGE EFFECT OUT DEFAULT COLOR keys Select OUT DEFAULT COLOR SET key ESC key Return to previous screen without changing settings OUT1 DEFAULT COLOR SURE NO keys Select YES or NO keys Select t...

Page 83: ...etting repeatedly Figure 8 29 Repeating reset Note 2 If you use this input monitoring function and the power saving function of the PC s monitor simultaneously the PC may output video again only after...

Page 84: ...T SET key IN1 VIDEO DETECT 10000ms keys Set the monitoring time OFF 2000 to 15000 keys Select the desired input IN1 to IN5 ESC key Returns to the previous screen 2 To set the No signal input monitorin...

Page 85: ...DISPLAY 1 2 3 4 IN2 MENU SET ESC COMMAND E COMMAND COMMAND COMMAND COMMAND A B C D V A VIDEO AUDIO SWITCHING MODE PRESET LOAD COMMAND DIGITAL MSD 5404 MULTI SWITCHER OUT1 OUT2 OUT3 OUT4 IN1 IN3 IN4 IN...

Page 86: ...MSD 54 SERIES User s Guide 86 2 To enable disable the HDCP input using commands SHE Set HDCP input enabled disabled GHE Get HDCP input enabled disabled...

Page 87: ...nd signals cannot be corrected appropriately In such a case set this menu to OFF Enable input equalizer ON Default Disable input equalizer OFF 1 To enable Disable the input equalizer using menu MSD 54...

Page 88: ...AUTO if only S Video is input select Y C Note For video of a monochrome camera or VHS tape with a bad recording condition or the like automatic detection may fail In these cases select VIDEO AUTO VIDE...

Page 89: ...ll be ON OFF repeatedly due to distorted synchronous idles In this case set this menu to OFF Note 2 Even if you set this item to ON distorted video cannot be corrected completely when input video sign...

Page 90: ...put or if part of the output video is cut off by using the standard table registered in the MSD set the input timing manually You can check if the input signals are registered in the MSD in 8 18 7 Inp...

Page 91: ...splay the set value for input analog video signals or digital input signals and you cannot change the setting If no signal is input you cannot set the function and the message is displayed IN6 H TOTAL...

Page 92: ...sition and the set value of the horizontal start position exceeds the limit value by changing the total number of horizontal dots or horizontal display period set the horizontal start position to the...

Page 93: ...zontal display period using menu Top SET key keys Select INPUT TIMING SET key keys Select H DISPLAY SET key keys Set the horizontal display period keys Select the desired input IN1 to IN9 ESC key Retu...

Page 94: ...tart position and the set value of vertical start position exceeds the limit value by changing the vertical display period the vertical start position is set to the limit value automatically 1 To set...

Page 95: ...IN1 to IN9 ESC key Returns to the previous screen Note You can set the vertical display period only if there is an input signal If no signal is input you cannot set the period and the message shown ri...

Page 96: ...If you input very black or extremely dark video the measurement fails and a message MEASUREMENT ERROR is displayed 1 To set the automatic measurement using menu Top SET key keys Select INPUT TIMING SE...

Page 97: ...e aspect ratio does not match or video is displayed on the position far from the correct position set the input timing in 8 6 1 The total number of horizontal dots 8 6 2 Horizontal start position 8 6...

Page 98: ...nput If analog video signals are input no signal is input or video input is set to a channel other than IN6 to IN9 you cannot execute the measurement and the message shown right is displayed IN 1 IN 2...

Page 99: ...n select ALL OFF Note 2 Only the start position is set by automatic measurement of this menu If 8 6 1 The total number of horizontal dots 8 6 3 Horizontal display period and 8 6 5 Vertical display per...

Page 100: ...key INPUT TIMING AUTO START POS keys Select AUTO START POS SET key IN6 AUTO START ON keys Select the desired mode ALL OFF OFF ON keys Select the desired input IN6 to IN9 ESC key Returns to the previo...

Page 101: ...ng in the following menus 8 6 1 The total number of horizontal dots 8 6 2 Horizontal start position 8 6 3 Horizontal display period 8 6 4 Vertical start position or 8 6 5 Vertical display period Note...

Page 102: ...ING AUTO SETUP ON keys Select the desired mode AUTO SETUP OFF or AUTO SETUP ON ESC key Returns to the previous screen 2 To set the input timing using commands SSM Set automatic setting of input timing...

Page 103: ...T TIMING SET key INPUT TIMING LOAD keys Select LOAD SET key ESC key Returns to the previous screen without loading the setting For digital input IN1 LOAD 1920x1080 keys Select the desired input IN1 to...

Page 104: ...device data corresponding to the input signal is registered IN 1 IN 2 IN 3 IN 4 IN 5 IN 6 IN 7 IN 8 IN 9 I I I I I D D D D I Can be executed only if there is an input signal D Can be executed only if...

Page 105: ...next character Select the desired input IN6 to IN9 SET key Displays the confirmation screen before saving settings ESC key TIMING TABLE 1 SAVE NO keys Select YES or NO To apply the setting Select YES...

Page 106: ...key IN6 TRACKING 0 keys Set the tracking 0 to 63 keys Select the desired input IN6 to IN9 ESC key Returns to the previous screen Note Tracking works only if analog RGB or analog YPbPr signals are inp...

Page 107: ...distorted Table 8 3 Amount of corrections Setting of output equalizer Amount of corrections OFF 0 0 dB LOW 1 5 dB MIDDLE 3 5 dB HIGH 6 0 dB 1 To set the output equalizer using menu MSD 5404 Top SET ke...

Page 108: ...output YCbCr MODE used only for TV output resolutions 480i 576i 720p 1080i 1080p HDMI RGB MODE and DVI MODE used for PC resolutions Table 8 4 Output mode priority Signals supported by display device...

Page 109: ...fault 1 To enable disable the synchronous output using menu MSD 5404 Top SET key FUNCTION SELECT OUTPUT SETTING keys Select OUTPUT SETTING SET key OUTPUT SETTING SYNC OUTPUT keys Select SYNC OUTPUT SE...

Page 110: ...d no video is output to the display device 1 To set the video when no video is input using menu MSD 5404 Top SET key FUNCTION SELECT OUTPUT SETTING keys Select OUTPUT SETTING SET key OUTPUT SETTING VI...

Page 111: ...gnals FADE OUT IN and WIPE OUT IN cannot be performed regardless of the setting of this menu You can set the switching speed of FADE OUT IN and WIPE OUT IN by following 8 7 6 CUT FADE OUT IN FREEZE FA...

Page 112: ...PUT SETTING SET key OUTPUT SETTING VIDEO SWITCHING keys Select VIDEO SWITCHING SET key OUT1 SWITCHING FREEZE FADE OUT IN keys Set the desired effect keys Select the desired output OUT1 to OUT4 ESC key...

Page 113: ...ideo before switching Vertical synchronous signal Cross fade starts Cross fade finishes d Waiting time before the next video becomes stable e Speed of switching video input channel e For MSD 5401SL MS...

Page 114: ...T SETTING SET key OUTPUT SETTING SWITCHING SPEED keys Select SWITCHING SPEED SET key OUT1 FADE SPEED 350ms keys Set the switching speed 100 ms to 2000 ms keys Select the desired output OUT1 to OUT4 ES...

Page 115: ...WIPE LINK ON R 0 G 0 B 0 keys Set the wipe color Red for OUT1 0 to 255 keys OUT1 WIPE LINK OFF R 0 G 0 B 0 keys Set the wipe color Green for OUT1 0 to 255 2 keys OUT1 WIPE LINK OFF R 0 G 0 B 0 keys S...

Page 116: ...gnals are with HDCP HDCP INPUT ONLY HDCP is output at all times ALWAYS Default HDCP is not authorized DISABLE Note Normally select ALWAYS If you connect a distribution amplifier supporting HDCP for ou...

Page 117: ...ult Not retry 0 Retry for the set number of retry times 1 to 100 1 To set the number of HDCP retries using menu MSD 5404 Top SET key FUNCTION SELECT OUTPUT SETTING keys Select OUTPUT SETTING SET key O...

Page 118: ...or long cable is connected In those cases the noise may be removed by selecting 24 BIT COLOR 24 BIT COLOR Default 30 BIT COLOR 1 To set the Deep Color of HDMI outputs using menu MSD 5404 Top SET key F...

Page 119: ...cted for its first time EDID may possibly be changed Therefore before operation connect a display device under the same CEC connection status to make the MSD recognize the address of the display devic...

Page 120: ...To set the CEC using menu MSD 5404 Top SET key FUNCTION SELECT OUTPUT SETTING keys Select OUTPUT SETTING SET key OUTPUT SETTING CEC CONNECTION keys Select CEC CONNECTION SET key OUT1 CEC NOT CONNECTED...

Page 121: ...eys Select OUTPUT SETTING SET key OUTPUT SETTING HDCP AUTHORIZATION keys Select HDCP AUTHENTICATION SET key OUT1 AUTHORIZATION SURE NO keys Select YES or NO keys Select the desired output OUT1 to OUT4...

Page 122: ...ormat Description 2 channel linear PCM 2ch 32 kHz to 192 kHz 16 20 24bit Multi channel linear PCM 8ch 32 to 192kHz 16 20 24bit AC 3 Dolby Digital DTS Bit stream Dolby Digital DTS HD Dolby TrueHD Bit s...

Page 123: ...VOLUME you can set the audio output level on the top screen 1 To set the audio output level using menu MSD 5404 Top SET key FUNCTION SELECT AUDIO keys Select AUDIO SET key AUDIO OUTPUT LEVEL keys Sele...

Page 124: ...1 To set the audio output mute using menu MSD 5404 Top SET key FUNCTION SELECT AUDIO keys Select AUDIO SET key AUDIO OUTPUT MUTE keys Select OUTPUT MUTE SET key OUT1 MUTE OFF keys Select OFF or ON key...

Page 125: ...utput device is changed the analog audio is output If you do not want to output analog audio in these conditions set the audio input manually 1 To select the digital or analog audio input using menu M...

Page 126: ...MSD 5404 Top SET key FUNCTION SELECT AUDIO keys Select AUDIO SET key AUDIO INPUT OFFSET keys Select INPUT OFFSET SET key IN1 AUDIO OFFSET 0dB keys Set the audio input level 60 to 0 keys Select the des...

Page 127: ...es the maximum number of delayed frames is limited to eight frames If sampling frequency of the audio signals sampling frequency of input signals or digital input the set value of 8 8 7 Sampling frequ...

Page 128: ...et the lip sync frames individually for each input Lip sync 0 to 8 frames Default 0 frame 1 To set the input lip sync using menu MSD 5404 Top SET key FUNCTION SELECT AUDIO keys Select AUDIO SET key AU...

Page 129: ...ast used sampling frequency and displays an following the sampling frequency that is actually output OUT1 FREQUENCY AUTO 48kHz OUT1 FREQUENCY AUTO 48kHz EDID can be loaded EDID cannot be loaded AUTO D...

Page 130: ...nnector regardless of the setting of this menu 1 To set the audio output connector using menu MSD 5404 Top SET key FUNCTION SELECT AUDIO keys Select AUDIO SET key AUDIO OUTPUT CONNECTOR keys Select OU...

Page 131: ...H8 STEREO CH5 CH6 MONO CH3 CH4 STEREO CH1 CH2 MONO CH7 CH8 MONO CH5 CH6 STEREO CH3 CH4 MONO DOWN MIX Default 1 To set the multi channel audio output using menu MSD 5404 Top SET key FUNCTION SELECT AUD...

Page 132: ...C RRC RR FRONT FLH FLW FL FLC FC FCH FRC FRH FR FRW LFE TC RL RLC RC RRC RR Front Left High Front Left Wide Front Left Front Left Center Front Center Front Center High Front Right Center Front Right H...

Page 133: ...133 Only if you set the test tone to 1 kHz or 400 Hz you can set a speaker 2 To set the test tone using commands SAT Set test tone GAT Get test tone...

Page 134: ...ing EDID DATA You can set the EDID to be sent to the connected source device If you select INTERNAL EDID the EDID that is set in the following menus is sent 8 9 2 PC resolutions 8 9 3 8 9 4 Deep Color...

Page 135: ...ay device is connected or loading EDID fails OUTPUT MONITOR UNCONNECTED OUTPUT MONITOR EDID READ ERROR If EDID cannot be updated pressing the SET key the same message is displayed for a second as well...

Page 136: ...are also supported Select the resolution responding to the resolution that is output from the connected PC Table 8 6 Supported resolution Y Supported N Not supported Supported resolution Input Resolut...

Page 137: ...on for the PC keys Select the desired input IN1 to IN9 SET key Applies settings PC RESOLUTION NOW UPDATE The message is displayed for one second and then previous screen is displayed automatically EDI...

Page 138: ...AV resolution from 480p 720p 1080i and 1080p in this menu However some PCs and AV devices may choose the higher resolution of the resolutions set in 8 9 2 PC resolutions or set in this menu If you se...

Page 139: ...cause noise if a cable with a bad quality or a long cable is connected In such a case the noise may be removed by setting the color to 24 BIT COLOR 24 BIT COLOR Default 30 BIT COLOR 1 To set the Deep...

Page 140: ...6 4 192 96 Default values are enclosed in parentheses 1 To set the audio format using menu MSD 5404 Top SET key FUNCTION SELECT EDID keys Select EDID SET key EDID AUDIO FORMAT keys Select AUDIO FORMAT...

Page 141: ...141 2 To set the audio format using commands SAF Set audio format GAF Get audio format...

Page 142: ...The number of speakers FR FL LFE FC RL RR RC FLC FRC RLC RRC FLW FRW FLH FRH TC FCH 1 OFF OFF ON OFF OFF OFF OFF OFF OFF OFF OFF 2 ON OFF OFF OFF OFF OFF OFF OFF OFF OFF OFF 3 ON ON OFF OFF OFF OFF OF...

Page 143: ...tings SPEAKER NOW UPDATE The message is displayed for one second and then previous screen is displayed automatically EDID SPEAKER The cursor can be moved only if you select MANUAL The number of speake...

Page 144: ...connector OUT1 to OUT4 keys MONITOR EDID COPY OUT1 NO 1 COPY DATA1 keys Select the desired EDID number 1 to 8 keys MONITOR EDID COPY OUT1 NO 1 COPY DATA1 keys Set the EDID name 20 to 7D of 9 ASCII co...

Page 145: ...ETERS keys Select PARAMETERS SET key ESC key Cancels the setting and returns to the previous screen CH1 PARAMETERS 9600 8 NONE 1 keys Set the communication of RS 232C CH1 keys CH2 PARAMETERS 9600 8 NO...

Page 146: ...xternally 1 To set the COM operation mode using menu MSD 5404 Top SET key FUNCTION SELECT COM PORT keys Select COM PORT SET key COM PORT FUNCTION keys Select FUNCTION SET key ESC key Cancels the setti...

Page 147: ...SD 5404 Top SET key FUNCTION SELECT LAN keys Select LAN SET key LAN IP ADDRESS keys Select IP ADDRESS SET key ESC key Cancels the setting and returns to the previous screen IP ADDRESS 192 168 1 199 ke...

Page 148: ...setting and returns to the previous screen SUBNET MASK 255 255 255 0 keys Set the subnet mask 0 0 0 0 to 255 255 255 254 SET key Applies settings SUBNET MASK NOW UPDATE The message is displayed for on...

Page 149: ...the previous screen GATEWAY ADDRESS 192 168 1 200 keys Set the gateway address 0 to 255 keys Moves the cursor SET key Applies settings GATEWAY ADDRESS NOW UPDATE The message is displayed for one seco...

Page 150: ...CEIVER mode in 8 11 5 TCP port number 1 to 65535 Default 1100 Make sure the port number is correct because reserved port number that is only for specific purpose can also be selected technically PASSW...

Page 151: ...t No 80 Connection 7 Connection 8 MSD 5404 Port No 1100 Connection 1 Connection 2 IP address 192 168 1 199 Port No 23 Connection 4 Connection 5 Port No 80 Connection 7 Connection 8 Communication comma...

Page 152: ...NECT2 PASSWORD 1 keys Set the password of CONNECTION 2 30 to 39 41 to 5A 61 to 7A from 9 ASCII codes 1 2 3 keys Moves the cursor to the next character Up to 32 characters SET key Applies settings LAN...

Page 153: ...Set connections for communication command control to any of 23 1100 and 6000 to 6999 Set connections for browser control to any of 80 and 5000 to 5999 1 To set the TCP port number using menu MSD 5404...

Page 154: ...address using menu MSD 5404 Top SET key FUNCTION SELECT LAN keys Select LAN SET key LAN MAC ADDRESS keys Select MAC ADDRESS SET key MAC ADDRESS 00 08 E5 55 00 00 The MAC address is displayed ESC key R...

Page 155: ...rol commands Execution condition 1st 2nd 3rd 4th 5th 6th 7th 8th 9th 10th COMMAND A COMMAND B COMMAND C 1 2 3 4 5 30 31 32 Control commands Execution order Associating commands COMMAND 1 COMMAND 3 COM...

Page 156: ...Example 2 SCREEN OK is registered as the MEMO Example 3 PROJECTOR LAMP is registered as the MEMO and 1LAMP 1000 1 is received Example 4 If the reply command to the sent command cannot be received it...

Page 157: ...he set time passes Received data is displayed NO CHECK is selected for receive command 2 NO YES Received data is matched with reply command 2 NO YES RETRY is set for when reply command 2 is received Y...

Page 158: ...eived even after the time set in TIME OUT passes it causes timeout and retries the operation 10 If any reply command is not received the send command data is resent for the number of replies set in RE...

Page 159: ...to multiple communication ports at the same time RS1 RS 232C CH1 6 RS2 RS 232C CH2 6 LOOP BACK Internal loop back LAN1 to LAN8 LAN connections 1 to 8 7 OFF Default ON COM SIZE 1 Set the number of byte...

Page 160: ...put back after controlling contact points with Tally output NONE Eternal Default 100 ms to 9990 ms by 10 ms HDMI CEC control 9 Set the CEC control for the display devices connected to HDMI connectors...

Page 161: ...T CMD 1 keys Select the desired control command CMD 1 to CMD 32 MEMO is displayed on the right of the command number SET key ESC key Cancels the setting and returns to the previous screen PORT COM SIZ...

Page 162: ...ort keys LAN5 OFF LAN6 OFF LAN7 OFF LAN8 OFF keys Select LAN the ports 5 to 8 to send commands OFF ON keys Moves the cursorto the next communication port keys COMMAND INPUT MODE ASCII keys Select the...

Page 163: ...Set the command data 11th to 15th bytes upper row 16th to 20th bytes lower row 0 to F in Hex 2 keys Moves the cursor to the next number keys DATA 20 20 20 20 20 21 20 20 20 20 20 keys Set the command...

Page 164: ...ed at the right of the command number keys RCV 2 NOT CHECK keys Set whether to check reply command 2 NOT CHECK CHECK Memo is displayed at the right of the command number keys RCV32 NG NOT CHECK keys S...

Page 165: ...l command is not changed Make sure to press the SET key Setting loop back If the MSD sends a communication command back to the MSD itself using the loop back function the MSD replies OK if processed n...

Page 166: ...PJLink commands class1 The MSD supports the following PJLink commands Table 8 15 PJLink commands class1 ASCII codes No Command Description 1 1 P O W R SP 0 CR Power off Standby 2 1 P O W R SP 1 CR Pow...

Page 167: ...hown in Table 8 17 In addition to these five commands there are other reply commands listed in Table 8 18 are defined for setting acquisition commands Table 8 17 Reply commands to PJLink command class...

Page 168: ...above 8 Other errors Numbers and meanings are the same as those of the fan error status above 9 Accumulated time of lamp which is any of 0 to 99999 For projectors that do not count the accumulated ti...

Page 169: ...ursor to the next character Up to 14 characters SET key Applies settings PRESET COMMAND 1 NOW UPDATE The message is displayed for one second and then previous screen is displayed automatically COMMAND...

Page 170: ...OMMAND 1 NOW UPDATE The message is displayed for one second and then previous screen is displayed automatically COMMAND EDIT CMD 1 Note If you do not press the SET key the control command is not chang...

Page 171: ...onsisting of only 0A 0D 20 to 7D text HEX For data including other codes ASCII Default HEX DATA Set the command to be compared with the received data from the first byte to the byte count set in SIZE...

Page 172: ...All FF MEMO All space OK NG All space All space All space All space All space Figure 8 52 Defaults of reply commands 1 To edit the reply command using menu MSD 5404 Top SET key FUNCTION SELECT PRESET...

Page 173: ...sk data for 1 to 5 on the lower row 0 to F in hex 2 keys Moves the cursor to the next number keys DATA6 00 00 00 00 00 MASK6 FF FF FF FF FF keys Set the reply command data for 6 to 10 bytes on the upp...

Page 174: ...mmand to ASCII it is automatically set to FF For example if 0 of ASCII codes 30 in hex is replied Binary Binary Hexadecimal Received data 00110000 MASK 11111111 30 Reply command data 00110000 30 match...

Page 175: ...dard protocol to control projectors If you set PJLink to ON the PJLink command can be selected at the time of inputting the reply command data You can select PJLink command by pressing keys when the c...

Page 176: ...R ON Controlling display device power of OUT2 DISPLAY2 POWER OFF AUDIO OUT2 OFF DISPLAY3 POWER ON Controlling display device power of OUT3 VIDEO OUT3 IN1 to VIDEO OUT3 IN9 Selecting video input channe...

Page 177: ...NE B separately You can select which command will be executed at start up of the MSD from AUTO PLANE A or PLANE B If you select AUTO the opposite plane of the plane executed immediately before turning...

Page 178: ...ON keys COMMAND A 1st OFF keys Set the 1 st command OFF COMMAND 1 to COMMAND 32 If you set TOGGLE to OFF this screen is for PLANE A keys COMMAND A 2nd OFF keys Set the 2 nd command OFF COMMAND 1 to C...

Page 179: ...eration SUP Set execution plane at starting up GUP Get execution plane at starting up 8 12 4 Command execution COMMAND EXECUTION Although you can execute only COMMANDs A to E using the control command...

Page 180: ...formed For example if you execute a control command from the front panel you cannot perform all operations from the front panel until the control command execution time or time set in this menu passes...

Page 181: ...s Select PRESET COMMAND SET key PRESET COMMAND INITIALIZE keys Select INITIALIZE SET key ESC key Cancels initializing and returns to the previous screen PRESET INITIALIZE CMD 1 keys Select the command...

Page 182: ...OUT2 VIDEO OUT3 IN1 Selecting video input channel of OUT3 DISPLAY2 POWER OFF to DISPLAY3 POWER ON Controlling display device power of OUT3 VIDEO OUT3 IN9 DISPLAY3 POWER OFF VIDEO OUT3 OFF DISPLAY4 POW...

Page 183: ...Lights while a control command is executed Lights if PLANE A will be executed at the next press turned off if PLANE B will be executed at the next press 2 If execution time is 500 ms or shorter it li...

Page 184: ...been completed even after the set time passes it continues to blink until the execution is completed 1 To set the flash time of command keys and display power keys using menu MSD 5404 Top SET key FUN...

Page 185: ...Cancels loading and returns to the previous screen LOAD CROSS POINT No 1 keys Select the desired memory number 1 to 9 Memory name is displayed on the right of the memory number SET key Loads settings...

Page 186: ...method CONTINUE DELETE SET key Saves settings CROSS POINT 1 NOW SAVING Displays the message for 1 second before automatically returning to the previous screen PRESET MEMORY SAVE CROSS POINT If you sel...

Page 187: ...point memory SCV Overwrite video channel setting in cross point memory SCA Overwrite audio channel setting in cross point memory SEM Save video and audio channel setting in cross point memory SEV Sav...

Page 188: ...o 9 or OFF keys CROSS POINT 1 OUT 1 V A keys Select the desired audio input channel 1 to 9 or OFF keys CROSS POINT 1 NAME keys Set the memory name 20 to 7D of 9 ASCII codes keys Moves the cursor to th...

Page 189: ...el 1 OUT 4 Input channel 4 Input channel settings after loading cross point memory Not changed Figure 8 58 Loading edited cross point memory 2 To edit the cross point using commands ECM Edit video and...

Page 190: ...RESET MEMORY LOAD ALL SETTING keys Select LOAD ALL SETTING SET key ESC key Cancels loading and returns to the previous screen LOAD ALL SETTING No 1 keys Select the desired memory number 1 to 8 Memory...

Page 191: ...ber of horizontal dots 8 6 2 Horizontal start position 8 6 3 Horizontal display period 8 6 4 Vertical start position 8 6 5 Vertical display period 8 6 7 Automatic measurement of start position 8 6 8 A...

Page 192: ...NG No 1 keys Enter the memory name 20 to 7D of 9 ASCII codes keys Moves the cursor to the next character up to10 characters SET key Displays the confirmation screen ESC key PRESET MEMORY 1 SAVE NO key...

Page 193: ...ry For settings that are not saved in the preset memory it starts up with the settings of the last MSD power off For settings that can be saved in the preset memory see 8 13 5 Saving all settings 1 To...

Page 194: ...panel switching mode 3 Sending control commands 4 Locking releasing parallel inputs 5 Turning on off display devices 6 Operating menu 7 Locking releasing front panel 8 Loading cross point preset memor...

Page 195: ...function for input pin 2 keys PARALLEL PIN 49 NOT USE keys Select the desired function for input pin 49 SET key Applies settings PARALLEL FUNCTION NOW UPDATE Displays the message for 1 second before...

Page 196: ...OT USE 20 COMMAND F 45 NOT USE 21 COMMAND G 46 NOT USE 22 COMMAND H 47 NOT USE 23 COMMAND I 48 NOT USE 24 AUDIO OUT1 UP Phase A Audio output level of OUT1 4 49 NOT USE 25 GND 50 GND 1 Channels video a...

Page 197: ...AUDIO OUT2 MUTE 17 OUT2 IN6 2 42 DISPLAY1 POWER ON OFF Controlling display device power of OUT 1 5 18 OUT2 IN7 2 43 DISPLAY2 POWER ON OFF Controlling display device power of OUT 2 5 19 OUT2 IN8 2 44 P...

Page 198: ...udio output level you can select PUSH SWITCH or ROTARY ENCODER in 8 14 2 Audio level 5 Toggle operation from the current state If it is now OFF it turns to be ON and vice versa 6 All parallel inputs a...

Page 199: ...3 IN1 2 Selecting input channel of OUT 3 1 47 DISPLAY2 POWER ON OFF Controlling power of OUT 2 4 23 OUT3 IN2 2 48 DISPLAY3 POWER ON OFF Controlling power of OUT 2 4 24 OUT3 IN3 2 49 PARALLEL LOCK Lock...

Page 200: ...tching mode 3 20 OUT2 IN9 2 45 SWITCHING VIDEO 21 OUT2 OFF 46 SWITCHING AUDIO 22 OUT3 IN1 2 Selecting input channel of OUT3 1 47 PARALLEL LOCK Lock parallel input 4 23 OUT3 IN2 2 48 NOT USE No assignm...

Page 201: ...ON OFF Controlling power of display 8 OUT4 OFF to SWITCHING V A Selecting channel switching mode 3 DISPLAY4 POWER ON OFF SWITCHING VIDEO V A OUT1 IN1 2 Selecting video and audio input channels of OUT...

Page 202: ...itch the selected channel and turn OFF alternately set 8 14 6 Toggle to ON If you want to perform automatic measurement of input timing setting Ref 8 6 6 Analog input auto set 8 14 9 Analog input meas...

Page 203: ...SD 4403 A We recommend the use of a similar rotary encoder Manufacturer Model number ALPS ELECTRIC CO LTD EC11E1530401 1 To set the audio level switch using menu MSD 5404 Top SET key FUNCTION SELECT P...

Page 204: ...ry encoder clicks using menu MSD 5404 Top SET key FUNCTION SELECT PARALLEL keys Select PARALLEL SET key PARALLEL ROTARY ENCODER keys Select ROTARY ENCODER SET key ROTARY ENCODER 5CLICK keys Set the nu...

Page 205: ...ited 1 To set the parallel lock using menu MSD 5404 Top SET key FUNCTION SELECT PARALLEL keys Select PARALLEL SET key PARALLEL LOCK SETTING keys Select LOCK SETTING SET key PARALLEL LOCK UNLOCK keys S...

Page 206: ...udio only AUDIO 1 To set the parallel switching mode using menu MSD 5404 Top SET key FUNCTION SELECT PARALLEL keys Select PARALLEL SET key PARALLEL SWITCHING MODE keys Select SWITCHING MODE SET key SW...

Page 207: ...utton for inputs on the console OFF Default ON 1 To set the toggle operation using menu MSD 5404 Top SET key FUNCTION SELECT PARALLEL keys Select PARALLEL SET key PARALLEL CHANNEL TOGGLE keys Select C...

Page 208: ...and then signals are turned on and off repeatedly 1 To set the chattering reduction time using menu MSD 5404 Top SET key FUNCTION SELECT PARALLEL keys Select PARALLEL SET key PARALLEL CHATTERING FILTE...

Page 209: ...ent AUTO SETUP You can select whether or not to perform an automatic measurement of input timing when one of the analog input keys for the parallel inputs IN6 to IN9 is pressed for 2 seconds or longer...

Page 210: ...FUNCTION SELECT PARALLEL keys Select PARALLEL SET key PARALLEL INITIALIZE keys Select INITIALIZE SET key ESC key Cancels initialization and returns to the menu PARALLEL INIT FACTORY DEFAULT keys Selec...

Page 211: ...s of 8 12 Control Command Settings Amphenol full pitch 50 pin female MSD 5404 rear side 50 26 25 1 25 50 GND 27 to 49 Pin number Function 1 26 2 to 24 5 V 4 5 V to 5 5 V Functions can be assigned Figu...

Page 212: ...pin 2 keys TALLY PIN 49 NOT USE keys Select the desired function for input pin 49 SET key Applies settings TALLY FUNCTION NOW UPDATE Displays the message for 1 second before automatically returning to...

Page 213: ...target of video and audio depends on channel switching mode If video and audio channels are not the same and V A is selected for channel switching mode the video channel is output 2 Pins for the switc...

Page 214: ...LLEL LOCK Lock parallel input 6 20 OUT2 IN9 45 NOT USE Not assigned 21 OUT2 OFF 46 NOT USE 22 SWITCHING V A Selecting channel switching mode 2 47 NOT USE 23 SWITCHING VIDEO 48 NOT USE 24 SWITCHING AUD...

Page 215: ...alternately blinks when control commands are executed according to the setting of 8 12 8 Flash time Command keys and DISPLAY POWER keys 4 The following pins are pulled to ground Pins of MAX if maximum...

Page 216: ...of OUT 2 5 25 GND 50 GND 1 Pins for the currently selected channels are pulled to ground allowing current to flow through them Output target of video and audio depends on channel switching mode If vi...

Page 217: ...OUT4 IN7 16 OUT2 IN5 41 OUT4 IN8 17 OUT2 IN6 42 OUT4 IN9 18 OUT2 IN7 43 OUT4 OFF 19 OUT2 IN8 44 SWITCHING V A Selecting channel switching mode 2 20 OUT2 IN9 45 SWITCHING VIDEO 21 OUT2 OFF 46 SWITCHIN...

Page 218: ...LOCK Locking front panel 8 OUT4 IN9 DISPLAY1 POWER ON Controlling display power 10 OUT4 OFF to SWITCHING VIDEO DISPLAY4 POWER ON SWITCHING AUDIO V A OUT1 IN1 Selecting video and audio input channels o...

Page 219: ...channel switching mode If video and audio channels are not the same and V A is selected for channel switching mode the video channel is output 2 Pins for the switching mode channels currently selected...

Page 220: ...n are pulled to ground allowing current to flow through them Channels of video and audio to be output are independent from the channel switching modes If video and audio channels are not the same when...

Page 221: ...SET key FUNCTION SELECT TALLY keys Select Tally SET key TALLY INITIALIZE keys Select INITIALIZE SET key ESC key Cancels initialization and returns to the previous screen TALLY INITIALIZE FACTORY DEFA...

Page 222: ...ndows BITMAPV4HEADER or BITMAPV5HEADER are not supported The number of colors One of the following 2 colors monochrome 1 bit 16 colors 4 bits 256 colors 8 bits 16 77 million colors TRUE COLOR 24 bits...

Page 223: ...en a number other than 80 5000 to 5999 is set for port number of browser control port For example the port number is 5000 http 192 168 1 199 5000 bitmap html 1 Memory Number is displayed only if the b...

Page 224: ...llocated You may solve this error by rebooting the MSD and sending the bitmap file again Figure 8 67 Bitmap send error Note The MSD has an approximately 900 000 byte memory to save data temporarily af...

Page 225: ...eys Select BITMAP SET key BITMAP BITMAP OUTPUT keys Select BITMAP OUTPUT SET key OUT1 BITMAP OUTPUT OFF keys Select OFF or ON keys Select the desired output OUT1 to OUT4 ESC key Returns to the previou...

Page 226: ...e background color Red for OUT1 0 to 255 keys OUT1 COLOR LINK OFF 1 R 255 G 255 B 255 keys Set the background color Green for OUT1 0 to 255 3 keys OUT1 COLOR LINK OFF 1 R 255 G 255 B 255 keys Set the...

Page 227: ...x1080 Output screen 1920x1080 Aspect ratio is not kept and the image is displayed on the whole screen Bitmap 1024x768 Figure 8 68 Setting aspect ratio Note Bitmaps can be enlarged but cannot be reduce...

Page 228: ...ys Select ASPECT SET key OUT1 ASPECT No 1 AUTO keys Select the desired bitmap number 1 to 4 keys OUT1 ASPECT No 1 AUTO keys Select the desired aspect ratio for OUT1 AUTO FULL THROUGH If several bitmap...

Page 229: ...SITION SET key OUT1 POSITION No 1 CENTER keys Select the desired bitmap number 1 to 4 keys OUT1 POSITION No 1 CENTER keys Set the desired display position for OUT1 CENTER TOP LEFT BOTTOM LEFT TOP RIGH...

Page 230: ...e the bitmap is being written 1 To assign bitmap channel using menu MSD 5404 Top SET key FUNCTION SELECT BITMAP keys Select BITMAP SET key BITMAP CHANNEL ASSIGN keys Select CHANNEL ASSIGN SET key OUT1...

Page 231: ...T key FUNCTION SELECT BITMAP keys Select BITMAP SET key BITMAP POWER ON BITMAP keys Select POWER ON BITMAP SET key OUT1 POWER ON OFF keys Select OFF or ON keys Select the desired output OUT 1 to OUT 4...

Page 232: ...sections Into four sections Into four sections Into four sections Into four sections Into two sections After divide After divide After divide After divide After divide After divide After divide After...

Page 233: ...enu without divide Select NO and press the SET key DIVIDE MEMORY NOW UPDATE Displays the message for 1 second before automatically returning to the previous screen BITMAP DIVIDE MEMORY If you select B...

Page 234: ...is deleted because of changing start position of memory area an S is displayed In case bitmap will be deleted because of changing end position of the memory area an E is displayed BITMAP1 BLOCK 0 63...

Page 235: ...re input video using menu MSD 5404 Top SET key FUNCTION SELECT BITMAP keys Select BITMAP SET key BITMAP VIDEO CAPTURE keys Select VIDEO CAPTURE SET key VIDEO CAPTURE OUT1 No 1 keys Select the desired...

Page 236: ...the window for capturing images 80 is set for port number of browser control port 80 normal case http 192 168 1 199 capture html To set a number 5000 to 5999 other than 80 for port number of browser...

Page 237: ...capture fails one of the following error messages is displayed NOT AVAILABLE NOW Cannot be captured because the input video is not displayed MEMORY SIZE ERROR Cannot be saved because the input video i...

Page 238: ...ther to turn on display device using menu MSD 5404 Top SET key FUNCTION SELECT POWER ON SETTING keys Select POWER ON SETTING SET key POWER ON SETTING DISPLAY POWER keys Select DISPLAY POWER SET key DI...

Page 239: ...eys Setting Previous operation mode Operation mode that will be applied when turning ON AUTO Default COMMAND COMMAND PRESET LOAD PRESET LOAD LOCK LOCK COMMAND COMMAND PRESET LOAD PRESET LOAD LOCK LOCK...

Page 240: ...Key lock mode when MSD is powered on Setting Previous key lock mode Key lock mode that will be applied when turning ON AUTO Default UNLOCK UNLOCK LOCK LOCK UNLOCK UNLOCK LOCK LOCK 1 To set key lock m...

Page 241: ...ate Setting Previous Tally output Tally output that will be applied when turning ON AUTO OFF OFF ON ON OFF Default OFF ON ON Even if you set it to AUTO or ON OFF is output for approximately two second...

Page 242: ...3 4 IN2 MENU SET ESC COMMAND E COMMAND COMMAND COMMAND COMMAND A B C D V A VIDEO AUDIO SWITCHING MODE PRESET LOAD COMMAND DISPLAY POWER keys Input channel selection keys Control command execution Cro...

Page 243: ...keys Select UNLOCK or LOCK for SWITCHING MODE keys ESC key Returns to the previous screen 2 To set key lock mode using commands SLM Set key lock target for front panel GLM Get key lock target for fron...

Page 244: ...l input If you select ON and no operation of menu control keys is performed for 30 seconds the display brightness will be reduced to approximately 25 When you operate any key operation the luminance w...

Page 245: ...5000 ms 5 seconds by 10 ms Default 0 ms 1 To set time for pressing power switch using menu MSD 5404 Top SET key FUNCTION SELECT OTHERS keys Select OTHERS SET key OTHERS POWER SWITCH ON keys Select PO...

Page 246: ...Audio adjustment channel IN2 1 IN3 is selected for video input channel of OUT1 IN3 is selected for video adjustment channel automatically 2 IN2 is selected for audio input channel of OUT1 IN2 is sele...

Page 247: ...INPUT CHANNEL LINK SET key INPUT CHANNEL LINK VIDEO OFF keys Select the automatic selection of video adjustment channel OFF OUT1 OUT2 OUT3 OUT4 keys INPUT CHANNEL LINK AUDIO OFF keys Select the automa...

Page 248: ...8 7 Input signal status In 8 18 8 Display device status you can check display device status connected to video output connector If you select MONITOR STATUS in this menu the display device status is d...

Page 249: ...L Displays video input status of IN2 keys IN9 FORMAT 1080i 59 94Hz Y Displays video input status of IN9 ESC key Returns to the previous screen For the status of all input connectors channel numbers ar...

Page 250: ...displayed at the lower right see the descriptions of inputs Only if HDMI signals are input the color depth is displayed at the upper right 24 HDMI signals of 24 BIT COLOR are input 30 HDMI signals of...

Page 251: ...he lower row with one of the following alphabet characters B To output each connector HDCP authentication state is displayed on the lower row with one of the following character strings A B Descriptio...

Page 252: ...1 4 Displayed only for IN1 to IN5 Video or audio output of source device is in a Mute status 5 Displayed only for IN1 to IN5 Signals with HDCP are input but the display device does not support HDCP Th...

Page 253: ...UT1 ESC key Returns to the previous screen EDID information is displayed into five screen pages at a maximum 1 st screen page Monitor name is displayed on the upper row Resolution is displayed on the...

Page 254: ...dio bit length such as 16BIT and 16 20 24BIT is displayed on the upper row and the number of the supported audio channels such as 2CHANNEL and 8CHANNEL is displayed on the lower left If the compressed...

Page 255: ...u MSD 5404 Top SET key FUNCTION SELECT OTHERS keys Select OTHERS SET key OTHERS VERSION keys Select VERSION SET key VERSION MSD 5404 1 00 Displays the firmware version ESC key Returns to the previous...

Page 256: ...BS 08 28 H 48 h 68 HT 09 29 I 49 i 69 LF 0A 2A J 4A j 6A VT 0B 2B K 4B k 6B FF 0C 2C L 4C l 6C CR 0D 2D M 4D m 6D SO 0E 2E N 4E n 6E SI 0F 2F O 4F o 6F DLE 10 0 30 P 50 p 70 DC1 11 1 31 Q 51 q 71 DC2...

Page 257: ...rtical Tabulation FF 0C Form Feed CR 0D Carriage Return SO 0E Shift Out SI 0F Shift In DLE 10 Data Link Escape DC1 11 Device Control 1 DC2 12 Device Control 2 DC3 13 Device Control 3 DC4 14 Device Con...

Page 258: ...TTL level CS TTL level Sync on Green Analog YPbPr 1 0 V p p Y 0 7 V p p Pb Pr 75 EDID emulation Connector Female high density D Sub 15 pin NTSC PAL VESA PC SDTV HDTV Supported formats NTSC PAL VESA PC...

Page 259: ...1 output MSD 5402 2 outputs MSD 5403 3 outputs MSD 5404 4 outputs MSD 5401SL 1 output MSD 5402SL 2 outputs Unbalanced stereo L R Output impedance 75 Reference level 10 dBu Output level up to 10 dBu No...

Page 260: ...or MSD 5404 1 30 bit pixel 10 bit component Deep Color is supported xvYCC Lip Sync 3D ARC and HEC are not supported Lip Sync manually adjustable 2 For MSD 5402SL resolution cannot be set for each outp...

Page 261: ...tput connector that does not output video Error code 2 Check if the source device is connected and turned on Error code 3 Signals are not input Check 1 to 6 on the next page Error code 4 A problem may...

Page 262: ...ed by the input side If it occurs for all inputs or only when a test pattern is displayed the problem was caused by the output side Change the resolution to a lower level and or disable Deep color You...

Page 263: ...nals and output resolution do not match video may be cut off or a black bar s may be displayed at edge s automatically depending on settings If the video is displayed on the full screen by setting the...

Page 264: ...cannot be set or the setting is canceled If the monitoring function for no signal input works the dual monitor function may not operate correctly In this case turn the monitoring function OFF 83 It ta...

Page 265: ...ignals are not input Check 14 15 17 and 18 Error code 4 There may be problems in the source device side or HDCP authentication Check 14 Error code 5 If the display device or AV amplifier does not supp...

Page 266: ...d so on is input analog audio is not output You can check the input audio type in 8 18 7 Input signal status 122 140 Audio is output from analog output connectors but not from digital output connector...

Page 267: ...146 150 ERR 6 is returned If control command is executed by communication commands communication command controls are disabled until execution of control commands finishes or INVALID TIME passes 180...

Page 268: ...d is executed from parallel input operations from the parallel input are disabled until execution of control commands finishes or INVALID TIME passes 180 Immediately after starting up operations from...

Page 269: ...n contact us 1 Does the same problem occur at all channels Yes No 2 Does the problem occur even if you directly connect the source and display devices using the genuine cable without using the MSD in...

Page 270: ...the procedure below 1 Turn off the MSD and unplug the power supply plug 2 Remove the power connector from the AC inlet 3 Remove the fuse holder by pulling out the depressed portion of the connection a...

Page 271: ...4 TEL 1 203 204 2445 Email info idkav com URL http www idkav com Europe IDK Europe GmbH Lise Meitner Str 6 D 40878 Ratingen Email info idkav eu URL http www idkav eu Product information Support Arvani...

Reviews: