background image

Part 1 - Remote Setup

12

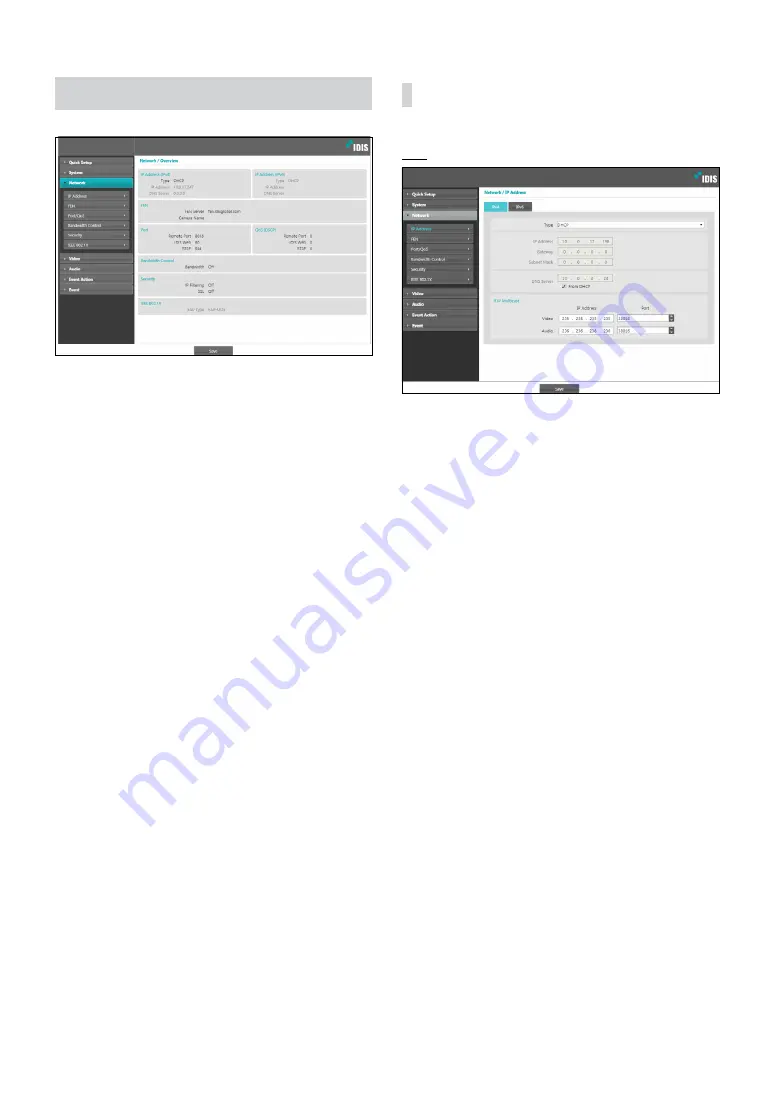
Network

Change the network settings, enable FEN and security 
features, and control network bandwidth use.

IP Address

IPv4

 •

Type

: Select the type of network you are using. If this 

option has been changed,


click 

Save

 to apply the 

current settings, and then restart Remote Setup. If you 
do not restart Remote Setup, the changes afterwards 
will not be applied.

 -

Manual

: Select if using a static IP. You will then be 

able to configure the related settings manually.

 -

DHCP

: Select if connected to the network using 

DHCP. Click 

Save

 to retrieve IP address and other 

network settings automatically from the DHCP 
server.

 •

DNS Server

: Enter the DNS server’s IP address. By 

using the DNS server, you will be able to use domain 
names instead of IP addresses when configuring the 
FEN, time, or SMTP server. If the camera is connected 
to the network via DHCP, select the 

From DHCP


option to retrieve the DNS server’s IP address from the 
DHCP server automatically. The updated address will 
be displayed upon the subsequent connection.

 •

RTP Multicast

: Set up the IP address and the Port for 

the RTP multicast.

Summary of Contents for DC-Y8C13RX

Page 1: ...Powered by Network Camera Operation Manual DC Y3C14WRX DC Y8C13WRX DC Y8C13RX ...

Page 2: ...h explanation about some functions may not be incorporated The manufacturer is not responsible for any problems resulting from the use thereof The information contained herein is subject to change without notice Revisions or new editions to this publication may be issued to incorporate such changes It is recommended that first time users of this network camera and individuals who are not familiar ...

Page 3: ...ble system This will prevent damage to the equipment due to lightning and power line surges If thunder or lightning is common where the equipment is installed use a surge protection device 10 Overloading Do not overload wall outlets and extension cords as this can result in the risk of fire or electric shock 11 Objects and Liquids Never push objects of any kind through openings of this equipment a...

Page 4: ... or human health from uncontrolled waste disposal please separate this from other types of wastes and recycle it responsibly to promote the sustainable reuse of material resources Household users should contact either the retailer where they purchased this product or their local government office for details of where and how they can take this item for environmentally safe recycling Business users...

Page 5: ...etup 9 System 9 General 9 Date Time 10 User Group 11 Network 12 IP Address 12 FEN 13 Port QoS 14 Bandwidth Control 16 Security 16 IEEE 802 1X 17 Video 17 Camera 18 Streaming 21 Webcasting 23 MAT 23 Privacy Masking 24 Audio 24 In Out 25 Event Action 25 Alarm out 26 Email 26 Remote Callback 27 Audio Alarm 27 ...

Page 6: ...ord 29 Event 31 Heatmap 31 Alarm In 32 Motion Detection 32 Trip Zone 33 Audio Detection 34 Tampering 35 System Event 36 Part 2 IDIS Web 38 Web Live Mode 40 Web Search Mode 44 Part 3 Appendix 47 Setup Menu Tree Remote Setup 47 Index 48 2 3 ...

Page 7: ...nual IDIS protocol Control the camera over the network from software installed on a computer or a separate NVR Ideal for using the camera over the network from a remote location Switching Protocols 1 Launch the IDIS Discovery program and from the list select a camera whose protocol you wish to change 2 Click on the Setup icon and then select Setup Protocol Setup Alternatively you can right click o...

Page 8: ...on 10 or later Google Chrome Mozilla Firefox or Apple Safari It may not work properly with Microsoft Internet Explorer version 9 0 or earlier It is recommended that you update the web browser to the latest version When you launch Remote Setup on a Microsoft Internet Explorer version 10 or later supporting HTML5 and the Remote Setup screen does not appear check if the web browser s document mode is...

Page 9: ...us ONVIF Protocol Select to enable ONVIF protocol use However ONVIF Protocol is available only to users belonging to the standard user groups Administrator Operator and User and when video compression is set to H 264 or JPEG under Video Streaming menu When you have connected to the camera by using the ONVIF protocol only the currently enabled streams or events are supported and you cannot change i...

Page 10: ...nnection with the other camera If IP Address Port and or SSL settings have been changed click Save to apply the current settings and then restart Remote Setup If you do not restart Remote Setup the changes afterwards will not be applied Date Time Date Time Change the camera s date time settings and display formats and configure the time zone and daylight saving time settings Click Save to apply th...

Page 11: ... For more information on webcasting refer to the Webcasting on page 23 User Group settings can only be configured by users belonging to the Administrator group There is no default password for the Administrator group s admin user Standard groups Administrator Operator and User cannot be edited or deleted Authorities assigned here apply identically to ONVIF protocol user groups Group authorities th...

Page 12: ...e related settings manually DHCP Select if connected to the network using DHCP Click Save to retrieve IP address and other network settings automatically from the DHCP server DNS Server Enter the DNS server s IP address By using the DNS server you will be able to use domain names instead of IP addresses when configuring the FEN time or SMTP server If the camera is connected to the network via DHCP...

Page 13: ...he DNS server s IP address If the camera is connected to the network via DHCP select the From DHCP option to retrieve the DNS server s IP address from the DHCP server or the router automatically If it can not be received automatically it will be created automatically from the camera The updated address will be displayed upon the subsequent connection Contact your network administrator for more inf...

Page 14: ... an error message if you do not enter a FEN name or enter a name already registered to the FEN Server If the FEN name contains special characters the connection may not be made when the WebGuard or remote setting is accessed by FEN name through the Web browser If you can not access special characters you can access by changing the encoding The FEN Server operated by IDIS is a service to its client...

Page 15: ...vironment Each port number must be unique It is not allowed to use the same port number for more than one function You can connect to the camera using a media player that supports RTSP service and monitor its video feed If the camera is connected to the network via an IP router or NAT or is behind a firewall you must open the ports All ports if using UDP protocol and RTSP ports if using TCP protoc...

Page 16: ...ve All Remove individual or all IP addresses from Allow List or Deny List SSL Select this option to enable SSL Secure Sockets Layer Enabling this option applies SSL protocol protection on data transmitted out However programs and systems that do not support SSL will not be able to connect to the camera If this option has been changed click Save to apply the current settings and then restart Remote...

Page 17: ...Type Choose a network connection authentication method Selected method must be identical to the authentication method used on the authentication server EAPOL Version Choose EAP authentication s version EAP Identity EAP Password Enter authentication ID and password The authentication server and AP must support IEEE 802 1X authentication in order for the IEEE 802 1X network connection authentication...

Page 18: ...ally Hold Hold the current white balance INCANDESCENT FLUORESCENT COLD Select a lighting type to apply the appropriate white balance If the Preset is Hold and the WDR mode is changed a reset is required Manual Adjust the white balance manually Adjust Red and Blue gain values Greater the value greater the intensity of the corresponding color If the white balance does not work properly under the fol...

Page 19: ...ht Compensation OFF does not work ON When images are too bright overall due to backlight objects are exposed brighter under backlight circumstances HSBLC High Suppress Backlight Compensation When a certain area of images is too bright due to backlight under low lighting conditions and it causes the other area to be too dark this function provides the other area of images brightly and clearly by bl...

Page 20: ...lter Auto Allow the system to enable disable IR Cut Filter automatically Schedule Sets up the IR cut filter schedule The IR cut filter is disabled during the date and time scheduled as Nighttime and enabled during the rest Set up or release Nighttime by selecting On or Off in the bottom and clicking or dragging the date and time area in the table Selecting On or Off and clicking the Select All Cle...

Page 21: ...he IR LED The higher the value is set the brighter it is Streaming Mount Type Choose a position that the camera is mounted The available Screen Type changes depending on this setting Display Type Choose a screen type Full Screen Resolution Choose total resolution The system assigns resolution to each pane ...

Page 22: ...ality Choose a quality setting for video streaming Target Bitrate Kbps Set the target bitrate When Quality is set to Manual you can configure the value of the target bitrate If not the set value of the target bitrate for each Quality appears Bitrate Control Choose a bitrate control mode for video compression CBR Fixed Bitrate Maintains the current bitrate regardless of motion change in the video V...

Page 23: ...detected for the duration of time specified video is transmitted and recorded using the frame rate designated below until movement is detected again Frame Rate Designate the frame rate to be used between the end of the Inactivity Period and the next motion detection When the slow shutter mode is enabled under Video Camera menu the fame rate may change Video is transmitted and recorded at the desig...

Page 24: ...et up on Original View video Thus if video is dewarped privacy masks are also dewarped Draw Erase Set or remove a privacy mask Click on the button and drag drop using the mouse to set up a privacy mask No Name Displays a list of active privacy masks The numbers indicate privacy mask numbers Select the empty space next to a number to assign a name to the corresponding privacy mask Click Delete to r...

Page 25: ...ou turn on the noise filter the sound may be distorted somewhat We recommend that you do not use this function in a place with a lot of songs because it may degrade performance Output Select an option and then adjust the volume Cameras do not feature built in audio amplifier units and therefore require the user to purchase a speaker system with a built in amplifier separately Event Action Designat...

Page 26: ...d out emails SMTP Server Port Enter the SMTP server s IP address or domain name and port number you received from the network administrator If a DNS server has been set up during network configuration you can enter a domain name instead of an IP address Use SSL STARTTLS If using an SMTP server requiring an SSL or STARTTLS connection select SSL or STARTTLS option Authentication Enter a user ID and ...

Page 27: ...hat will receive the messages Retry Designate how many reattempts to make if message delivery fails Audio Alarm Select Audio Alarm to generate audio List Displays a list of audio files to playback Click Add or Remove to add remove audio files Select an audio file from the list and then click Play to listen to the file The total audio file upload capacity is 10MB Please upload a file that a support...

Page 28: ...he settings below when an event is detected Upload Frequency Activated only when Upload Type has been set to Always Designate the upload speed The specified number of images will be uploaded to the FTP server during the specified period of time Image per Activated only when Upload Type has been set to Event Designate the upload speed Select Upload for and specify a duration Images will be uploaded...

Page 29: ... inserted Type Select the record type Normal Mode SD recording is performed according to schedule and setting Smart Failover Used for recording failover in NVR VMS interlock For more information refer to the NVR VMS manual Total Capacity Indicates the SD memory card s total capacity if it has been inserted properly Format SD card Click on this button to format the inserted SD memory card Formattin...

Page 30: ...can record up to 60MB of video Using high resolution quality and frame rate settings can cause the recording to exceed the 60MB limit and stop before the end of the specified recording duration Post Event Select the post event recording duration Settings Select the Settings tab and configure recording settings Recording Stream Choose a stream to use for recording It s possible to designate differe...

Page 31: ... the SD memory card will be formatted Cool down Indicate on the screen the heatmap information recorded during the selected time Record duration Set the recording interval to save the Heatmap data in the SD memory card Use Ignoring Time Define the event ignoring time Motion detection and event logs are not recorded during the defined time range Event Action Select a heatmap event alert action Reco...

Page 32: ... file FTP Upload Select this option if you wish to upload images to the FTP server Record Select this option to record video Event Action settings must be configured correctly in order to perform event actions Motion Detection Select Motion Detection to configure motion detection event settings With motion detection event enabled motion detections within the designated area will be assumed as events...

Page 33: ...e FTP server Record Select this option to record video Event Action settings must be configured correctly in order to perform event actions Trip Zone Select Trip Zone to configure trip zone event settings With trip zone event enabled motion detected inside outside the selected area will be assumed as an event Sensitivity Select daytime and nighttime motion detection sensitivity levels Higher value...

Page 34: ... option to record video Event Action settings must be configured correctly in order to perform event actions Audio Detection Select Audio Detection to configure audio detection event settings With audio detection enabled an audio detection taking place during the specified activation period will be assumed as an event Sensitivity Define the audio detection sensitivity Higher values will result in ...

Page 35: ...ord Select this option to record video Event Action settings must be configured correctly in order to perform event actions Tampering Select Tampering to configure tampering detection event settings With tampering detection event enabled a sudden change in the video such as due to movement of the camera or covering up of the lens will be assumed as an event Sensitivity Define the tampering detecti...

Page 36: ...With system event enabled system status alarm in status and disk status will be checked periodically and corresponding alerts will be generated System Alive Select to check the system status and then set up a schedule Send Email Select to send out an email when the system comes on line Remote Callback Select this option to send a message to a remote system when the system comes on line and then se...

Page 37: ...llback settings under Event Action must be configured correctly in order to send out emails and messages Remote Callback is not supported on IDIS Web The camera must be registered to the remote system in order to use the Remote Callback feature ...

Page 38: ... Or http web idisglobal com it is required to enter the camera IP address when logging in If the camera uses the FEN feature you can enter the FEN name registered to the FEN server instead of the camera IP address after selecting the USE FEN option If the Use HTTPS option has been selected during IDIS Web port number setup enter https instead of http If prompted with a security certificate warning...

Page 39: ...ge Internet Options so that the address bar or the status bar is hidden Tools Internet Options Security Custom level Allow websites to open windows without address or status bars Enable Launching a new version of IDIS Web for the first time can cause Internet Explorer to load information from the previous version In this case navigate to Tools Internet Options General delete temporary Internet fil...

Page 40: ...n Press the ESC key on the keyboard to return to the previous screen 5 Click TYPE 1 to print the current video screen using a printer connected to the computer 6 Click TYPE 1 to save the current video screen as an image file 7 Click TYPE 1 to configure rendering mode and OSD settings Select rendering mode to adjust the video output rate or select which OSD elements to display on the screen from th...

Page 41: ...d to adjust live video quality Click TYPE 1 TYPE 1 to control the alarm out device connected to the camera Event status window at the bottom of the screen displays a list of events detected at remote locales Enable Disable Alarm In Tampering Motion Detection Audio Detection Trip zone ...

Page 42: ...stem If no name is entered for the camera the name used at the remote locale is shown on the screen Enable Audio Enables audio transmission with remote locales Select to display buttons Enables transmission of audio to the remote locale via microphone Enables playback of audio from the remote locale on speakers Enables two way audio communication with the remote locale Disables audio transmission ...

Page 43: ...ra easy setup Select from presets or custom setup for the video mode according to daytime nighttime Preset Select from Natural Vivid or De Noise User Custom Manually configure the values of each setting Sharpness Contrast Colors and Brightness ...

Page 44: ...terminate IDIS Web 2 Place the mouse pointer on the logo to check IDIS Web s version 3 Displays time information of the video recording from the remote locale 4 Click TYPE 1 to view the video in full screen Press the ESC key on the keyboard to return to the previous screen 5 Click TYPE 1 to print the current video screen using a printer connected to the computer 6 Click TYPE 1 to save the video re...

Page 45: ...earched by selecting specific dates on the calendar Time information of video recordings found on the selected dates is shown on the time table at the bottom of the screen Select a point in time to display video from that moment If multiple recordings are available for the selected point in time you can select the desired segment Select TYPE 1 to enable event search mode and search for events matc...

Page 46: ...o select the area easily in the main view screen ePTZ Controls Pan Tilt and Zoom function Dragging the mouse the size of dragging indicates the speed of PTZ The left button drag controls Left Right Pan and Up Down Tilt The right button drag controls Zoom Display Source Image Cancels the adjustment and reloads the original image Change Camera Title Used to change the camera s name Renaming the came...

Page 47: ...load System Event Record Alarm In Heatmap Alarm Out Camera IP Address General System In Out Motion Detection Email Streaming FEN Date Time User Group Network Trip zone Remote Callback Webcasting Port QoS Video Audio MAT Bandwidth Control Privacy Masking Security IEEE 802 1X Part 3 Appendix Setup Menu Tree Remote Setup ...

Page 48: ...Time 10 DSCP 14 F FEN Name 13 FEN Server 13 Frame Rate 22 I IDIS Web port 14 IPFiltering 16 M MAT 23 N Network Bandwidth Limit 16 O ONVIF Protocol 9 Q Quality 22 R Remote Port 14 Resolution 22 RTSP Port 14 S SSL 16 T Time Sync 10 U Use FEN 13 Use HTTPS 14 User Group 11 Use UPnP 15 V2 0 ...

Page 49: ...IDIS Co Ltd For more information please visit at www idisglobal com ...

Reviews: