background image

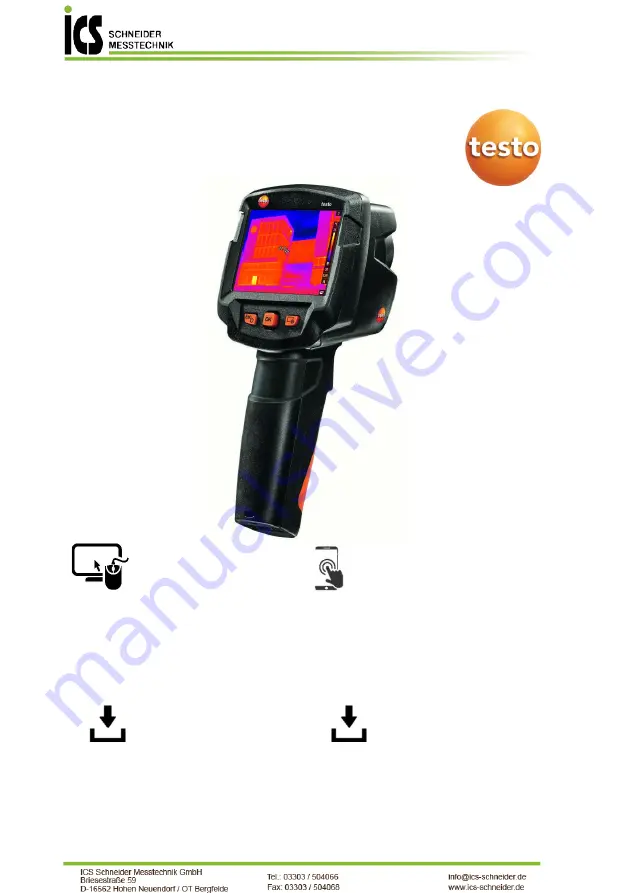
testo 865s thermal imager 

Instruction manual 

Analysis software 

testo IRSoft 

testo Thermography App 

Use the testo IRSoft software to 

analyze your thermal images 

extensively and in detail, and to 

create professional reports. You can 

download the software free of charge 

and licence-free via the following link: 

Use the testo Thermography App to 

transfer thermal images live to your 

smartphone/tablet and create quick 

analyses and simple reports directly 

on site. 

Download the app free of charge for 

Android or iOS from the app store: 

www.testo.com/irsoft 

testo Thermography 

App 

Summary of Contents for testo 865s

Page 1: ...l and to create professional reports You can download the software free of charge and licence free via the following link Use the testo Thermography App to transfer thermal images live to your smartphone tablet and create quick analyses and simple reports directly on site Download the app free of charge for Android or iOS from the app store www testo com irsoft testo Thermography App ...

Page 2: ......

Page 3: ...the menu 13 4 4 Quick select button 14 5 Performing the measurement 16 5 1 Setting measuring functions 16 5 1 1 Activating disabling Pixel mark 17 5 1 2 Activating the differential temperature 17 5 2 Saving an image 18 5 3 Image gallery 19 5 4 Setting the scale 21 5 5 Setting emissivity and reflected temperature 23 5 5 1 Selecting the emissivity 25 5 5 2 Customizing the emissivity 25 5 5 3 Setting...

Page 4: ...3 Cleaning the instrument 32 6 4 Firmware update 32 6 4 1 Performing an update using IRSoft 33 6 4 1 1 Preparing the camera 33 6 4 1 2 Performing an update 33 6 4 2 Performing an update with the camera 34 6 4 2 1 Preparing the camera 34 6 4 2 2 Performing an update 34 7 Tips and assistance 35 7 1 Questions and answers 35 7 2 Accessories and spare parts 35 8 Authorisations and certification 36 ...

Page 5: ...there are signs of damage on the housing mains unit or connected cables Dangers may also arise from objects to be measured or the measuring environment Always comply with the locally valid safety regulations when carrying out measurements Do not store the product together with solvents Do not use any desiccants Only perform maintenance and repair work on this instrument that is described in this d...

Page 6: ...time Take the rechargeable battery out of the instrument immediately if it is not functioning properly or if it shows signs of superheating Rechargeable battery may be hot When not in use for a long period of time take the rechargeable battery out of the instrument to prevent exhaustive discharge Warnings Always pay attention to any information denoted by the following warnings Implement the preca...

Page 7: ...ectral range 7 5 14 µm Image presentation Feature Values Display 8 9 cm 3 5 TFT QVGA 320 x 240 pixels Display options Infrared image Colour palettes 4 options Grey Cold hot Iron Rainbow HC Measurement Feature Values Measuring range 20 to 280 C Accuracy 30 to 20 C 3 C otherwise 2 C 2 of measured value Emissivity reflected temperature adjustment 0 01 to 1 manual Analysis functions Center spot Hot co...

Page 8: ...ature Values Battery type Li Ion rechargeable battery 2600 mAh 3 63 V Operating time 4 0 h 20 C Mains operation Yes Charging option In instrument in charging station optional Charging time in the instrument Approx 3 h with 2A mains unit supplied Charging time in charging station Approx 5 h via mains unit USB interface 5V 1 8 A Direct current Ambient conditions Feature Values Operating temperature ...

Page 9: ...IP54 protection but is not suitable for permanent outdoor use Standards tests Feature Values EMC 2014 30 EU RED 2014 53 EU You can find the EU declaration of conformity on the Testo website www testo com under the product specific downloads ...

Page 10: ...d display of surface temperature distribution Areas of application Building inspection Energy efficiency rating of buildings heating ventilation air conditioning trade building engineers engineering firms experts Production monitoring quality assurance monitoring of production processes Preventive maintenance servicing Electrical and mechanical inspection of systems and machines ...

Page 11: ...h camera on and off Cancel action 4 OK key Joystick Open menu select function confirm setting Navigate within the menu highlight function select colour palette 5 Quick select button Opens the function assigned to the quick select button the icon for the selected function is displayed bottom right 6 Infrared camera lens protective cap Takes infrared images protects the lens 7 Trigger Saves the disp...

Page 12: ...operation capacity 10 25 Battery operation capacity 0 10 Mains operation battery is charging 3 Image display IR image display 4 C or F Unit set for reading and scale displays 5 Scale Temperature unit temperature margin of the image displayed showing the minimum maximum reading with automatic scale adjustment or the selected minimum maximum display value with manual scale adjustment 6 E Emissivity ...

Page 13: ...ower is supplied automatically via the mains unit and the rechargeable battery is charged only at ambient temperatures from 0 to 40 C Operation is possible with the mains unit connected It is also possible to charge the battery using a charging station accessory The instrument is equipped with a buffer battery to maintain the system data during an interruption in the power supply e g when the batt...

Page 14: ...ss The camera starts The start screen appears on the display To ensure measuring accuracy the camera performs automatic zeroing approx every 60 s A click is heard when this happens The image freezes briefly when this occurs Zeroing is carried out more frequently during the camera warm up period takes approx 90 seconds During the warm up period no measuring accuracy is guaranteed The image can alre...

Page 15: ...s and hold down until the progress bar is complete The display goes off The camera is switched off 4 3 Getting to know the menu 1 Press OK to open the Menu 2 Move the joystick to highlight a function orange border 3 Press OK to select the function ...

Page 16: ...le if the Image type is set to infrared Set scale limits Emissivity This function is only available if the Image type is set to infrared Set emissivity E and reflected temperature RTC Palette Toggles the palette selection Adjustment This function is only available if the Image type is set to infrared Carries out manual zeroing Changing assignment of quick select button 1 Move the joystick to the r...

Page 17: ...quick select button is assigned to the selected menu item The icon for the selected function is displayed bottom right Using the quick select button 1 Press The function assigned to the quick select button is carried out ...

Page 18: ...s activated the colour scale is continuously adjusted to the min max values of the current measurement image This means that the colour assigned to a specific temperature is changing constantly To be able to compare multiple images based on the assigned colour scaling must be set manually to fixed values or must be subsequently adjusted to uniform values using the PC software 5 1 Setting measuring...

Page 19: ... temperature Differential temperature enables the temperatures between two measuring points to be calculated 1 Open Menu 2 Select Measurement settings The Measurement settings menu opens 3 Select Differential temperature and press OK 4 Select Active and press OK 5 Select which differential temperature is to be calculated P A vs P B P A vs Probe P A vs Value P A vs RTC 5 1 P A vs P B selection o Mo...

Page 20: ...nually 5 4 P A vs RTC selection o Move the joystick to the right select measuring point 1 press OK move the measuring point to the live image using the joystick press OK o Move the joystick to the right set the RTC value in the Emissivity menu see the section Setting RTC The differential temperature is shown in the top centre of the display 6 End measurement Select Active and press OK no check mar...

Page 21: ...e PC e g in Windows Explorer Displaying a saved image Saved images can be viewed and analyzed in the image gallery When SuperResolution is enabled 2 images are saved in the image gallery an IR image and an SR image The high resolution SuperResolution image is saved in the background In the status bar the number of SuperResolution images to be saved is displayed for example SR 1 A maximum 5 SuperRe...

Page 22: ...ge gallery contains an IR image and a high resolution image SR The images show the same image section They can be displayed and analyzed in the image gallery The measurement functions Center spot Hotspot Coldspot and Differential temperature can be used to analyze saved images In saved images the crosshairs which mark the measuring point can be moved using the joystick For a description of the ind...

Page 23: ...ting the scale Manual scaling can be activated instead of automatic scaling continuous automatic adjustment to the current min max values The scale limits can be set within the measurement range The activated mode is displayed bottom right A automatic scaling M manual scaling and S OptiScale ScaleAssist Auto scaling continuously adjusts the scale to the readings presented and the colour assigned t...

Page 24: ...ture range upper and lower limit value simultaneously and the upper limit value can be set 1 Select the Scale function 2 Press OK 3 In the mode menu move the joystick up down until Manual is selected 4 Move the joystick to the right select Min Temp lower limit value Move the joystick up down to set the values 5 Move the joystick to the right select Max Temp upper limit value Move the joystick up d...

Page 25: ...et emissivity The reflected temperature RTC can be set individually Other materials can be imported into the instrument from an existing list using the PC software Emissivity information The emissivity describes the capability of a body to emit electromagnetic radiation This is material specific and must be adapted for correct measurement results Non metals paper ceramic gypsum wood paints and coa...

Page 26: ...92 Black paint matt 80 C 0 97 Steel heat treated surface 200 C 0 52 Steel oxidised 200 C 0 79 Clay burnt 70 C 0 91 Transformer paint 70 C 0 94 Brick mortar plaster 20 C 0 93 Reflected temperature information Using this offset factor the reflection is calculated out based on the low emissivity and the accuracy of the temperature measurement with infrared measuring instruments is improved In most ca...

Page 27: ...the joystick to the right until E is selected Manually set value 3 Select and press OK 5 5 3 Setting RTC 1 Select the Emissivity function 2 Move the joystick to the right until RTC is selected Manually set value 3 Select and press OK 5 6 Selecting the colour palette This function is only available if the Image type is set to infrared image 1 Select the Palette function 2 Move the joystick up down ...

Page 28: ...rature unit 2 Move the joystick up down to select the required unit and then press OK Power save options The illumination intensity of the display can be set A lower intensity increases the battery life The time until automatic switch off can be set 1 Select Configuration Settings Power save options 2 Move the joystick up down to select the required intensity level and then press OK 5 7 2 SuperRes...

Page 29: ...t using the IRSoft PC software 1 Select Menu Configuration Save JPEG 2 Press OK 3 Move the joystick up down until On Off is selected 4 Add a date time stamp to a JPEG file if required Turn function on or off for this 5 Select and press OK 5 7 4 Configure key 1 Select Menu Configuration Configure key 2 See the section Quick select button 5 7 5 Ambient conditions Measurement deviations arising due t...

Page 30: ... 7 7 Certificates 1 Select Menu Configuration Certificates Displays the radio certificates for the instrument 5 7 8 Fullscreen mode The scale and the quick select button function indicator can be hidden 1 Select Menu Configuration Fullscreen mode When Fullscreen Mode is activated the scale and icon for the quick select button are hidden When a key is pressed these elements are displayed briefly 5 ...

Page 31: ... image counter are not reset 1 Menu Configuration Reset options 2 Select the Factory settings function Apply factory settings is displayed 3 Select and press OK to reset to factory settings 3 1 Press Esc or select X and press OK to cancel the process Formatting The image memory can be formatted When formatting all data saved in the memory is lost Back up all saved images before formatting to preve...

Page 32: ...s starts If the battery has been completely drained the charging time is approx 5 hours Whether the battery is full or charging is indicated 6 2 Changing the rechargeable battery WARNING Serious risk of injury to the user and or destruction of the instrument There is a risk of explosion if the battery is replaced with one that is the wrong type Dispose of spent faulty batteries in accordance with ...

Page 33: ...6 Maintenance 31 1 Switch the instrument off 2 Open battery compartment 3 Release the battery and remove ...

Page 34: ... is closed The battery compartment is closed 1 Rub down the surface of the instrument with a damp cloth Use mild household cleaning agents or soapy water for this Cleaning the lens and display 1 If the lens is dirty clean it with a cotton bud 2 If the display is dirty clean it with a cleaning cloth e g microfibre cloth 6 4 Firmware update The current firmware version is available at www testo com ...

Page 35: ...ly charged or the camera is connected to the mains adapter 1 Connect the computer to the camera with the USB cable 2 Switch on the camera 6 4 1 2 Performing an update IRSoft is activated 1 Select Camera Configuration 2 Click on Configure thermal imager The Camera settings window opens 3 Select Instrument settings Firmware Update OK FW_T87x_Vx xx bin is displayed 4 Select Open Firmware update is pe...

Page 36: ...onnected to the mains adapter 1 Switch on the camera 2 Open the cover of the interface 3 Connect the computer to the camera with the USB cable The camera is displayed as MTP Device testo_8xx in Window Explorer 6 4 2 2 Performing an update 1 Copy the FW_T87x_Vx xx bin file to the camera directory using drag drop 2 Wait until the firmware has been copied Firmware update is performed 3 Observe the pr...

Page 37: ...age freeze is carried out very frequently Camera is still in its warm up period takes approx 90 seconds Wait until the warm up period has passed If we have not been able to answer your question please contact your dealer or Testo Customer Service You will find contact details on the back of this document or on the website www testo com service contact 7 2 Accessories and spare parts Description Or...

Page 38: ...8 Authorisations and certification 36 8 Authorisations and certification Please refer to the commissioning instructions supplied for testo 865s 868s 871s 872s 0973 8723 ...

Page 39: ......

Page 40: ......

Reviews: