


7
CONNECTION PORT SETTINgS
7-9
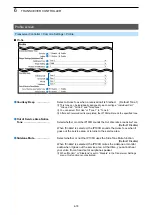
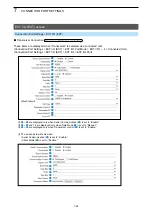
Digital Transceiver (D-TRX) screen
Connection Port Settings > Digital Transceiver (D-TRX)
■
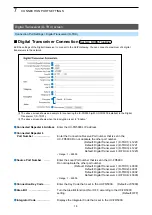
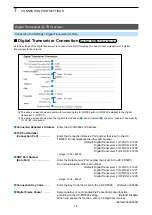
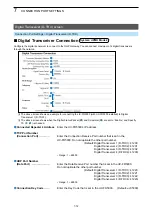
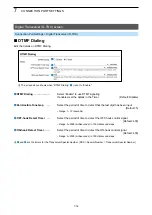
Digital Transceiver Connection
System: NXDN-Conventional
Edit the settings of the digital transceiver to connect to the RoIP gateway. You can connect a maximum of 4 digital
transceivers to the network.
1
2
3
4
5
6
7
1
Connected Repeater’s Address
Enter the UC-FR5000’s IP address.
2
TCP Port Number
(Connection Port)
Enter the Connection Receive Port number that is set in the UC-
FR5000. Do not duplicate the other port number.
(Default: Digital Transceiver 1 (D-TRX1): 41200
Digital Transceiver 2 (D-TRX2): 41201
Digital Transceiver 3 (D-TRX3): 41202
Digital Transceiver 4 (D-TRX4): 41203)
• Range: 1024 ~ 65535
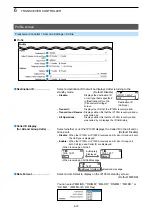
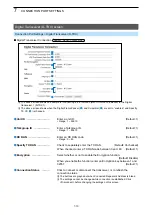
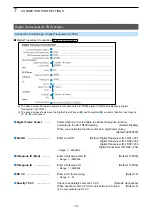
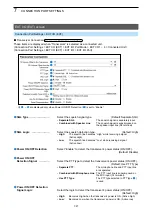
3
UDP Port Number
(Data Port)
Enter the Data Receive Port number that is set in the UC-FR5000.
Do not duplicate the other port number.
(Default: Digital Transceiver 1 (D-TRX1): 41220
Digital Transceiver 2 (D-TRX2): 41221
Digital Transceiver 3 (D-TRX3): 41222
Digital Transceiver 4 (D-TRX4): 41223)
• Range: 1024 ~ 65535
4
Connection Key Code
Enter the Key Code that is set in the UC-FR5000. (Default: ucfr5000)
5
Digital Frame Packet
Select whether or not to enable the Packet Encryption function,
according to the UC-FR5000 setting.
(Default: Disable)
When you enable the function, enter an 8 digit Common key.
(Default: 00000000)
8
9
10
11
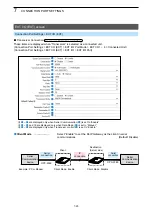
L
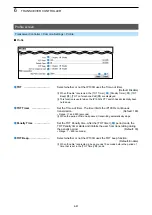
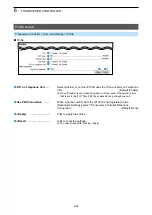
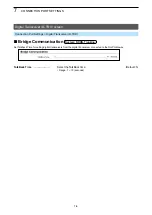
The above screen shows an example for connecting the IC-FR5000 (with UC-FR5000 installed) to the Digital
transceiver 1 (D-TRX1).
L
The above screen shows when the Digital Frame Packet (
5
) and Scrambler (
11
) are set to “enabled,” and Specify
TX CC (
10
) is checked.