12
OTHER FUNCTIONS
12-15
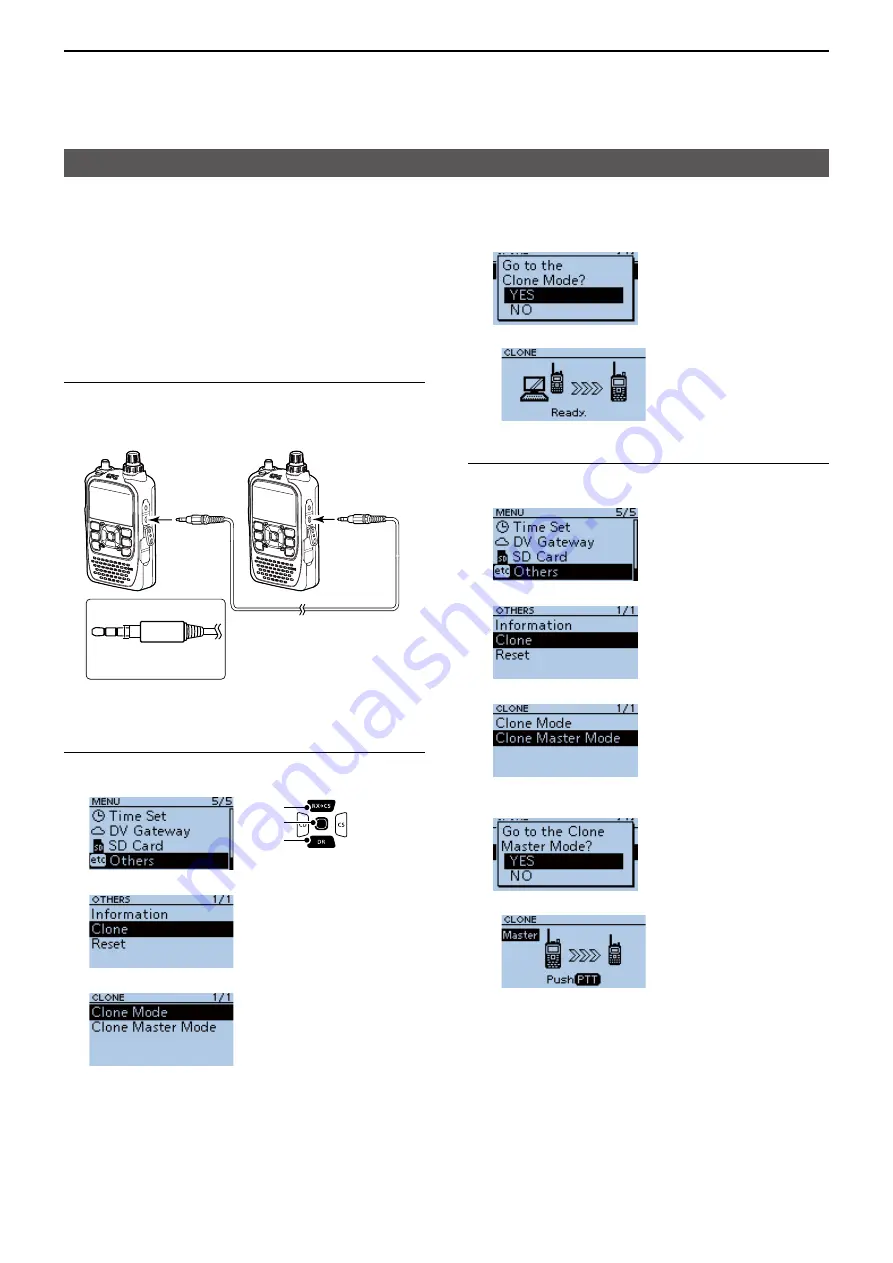
Cloning function
5� Select <YES>�
•
The following screen is displayed�
Step 3. Setting the master transceiver.
1� Push [MENU] on the master transceiver�
2� Select “Others�”
3� Select “Clone�”
4� Select “Clone Master Mode�”
• A confi rmation dialog is displayed.
5� Select <YES>�
•
The following screen is displayed�
6� Push [PTT] of the master transceiver�
•
Starts the cloning�
•
On the sub transceiver, “CLONE-IN” is displayed� On
the master transceiver, “CLONE-OUT” is displayed�
•
When cloning is completed, the master transceiver
returns to the Clone Master Mode screen and the sub
transceiver displays “CLONE End�”
L
If you have another transceiver to clone, connect it
and then push [PTT] on the master transceiver�
7� Restart the sub transceiver to use it with the
cloned setting data�
D
Transceiver-to-Transceiver cloning using a cable
Step 1. Connecting transceivers.
1� Turn OFF both master and sub transceivers�
2� Connect a stereo audio cable between the
transceivers�
3� Turn ON both transceivers�
Step 2. Setting the sub transceiver.
1� Push [MENU] on the sub transceiver�
2� Select “Others�”
3� Select “Clone�”
4� Select “Clone Mode�”
• A confi rmation dialog is displayed.
You can clone transceivers using a cable� Connect 2
transceivers (master and sub transceiver)
using a user supplied stereo audio cable (3�5 (d) mm,
1⁄8″).
L
Depending on the stereo audio cable, it may not be
used for cloning�
[ENT]
[Down]
[Up]
( 3�5 (d) mm,
1⁄8″)
Stereo audio
cable
( 3�5 (d) mm,
1⁄8″)
Stereo audio
cable
To the
[SP] jack
Less than
4.5 mm, 0.17″
To the
[SP] jack


