8
D-STAR OPERATION <BASIC>
8-11
D
Using the Repeater Search function
The transceiver searches for the nearest repeater by
using your own and the repeater’s position.
The nearest repeater in your transceiver’s repeater list
is displayed as the available choices.
To receive your own position, connect an external
NMEA format compatible receiver to the transceiver
according to the instructions.
( See page 10-2 for connecting the third party GPS re-
ceiver)
If you set your position into the “Manual” item of the
“GPS Set” Set mode, and if you use the transceiver as
a base station, you can use the Repeater Search func-
tion without needing to receive any other position data.
(See page 10-2 for Manual position entry)
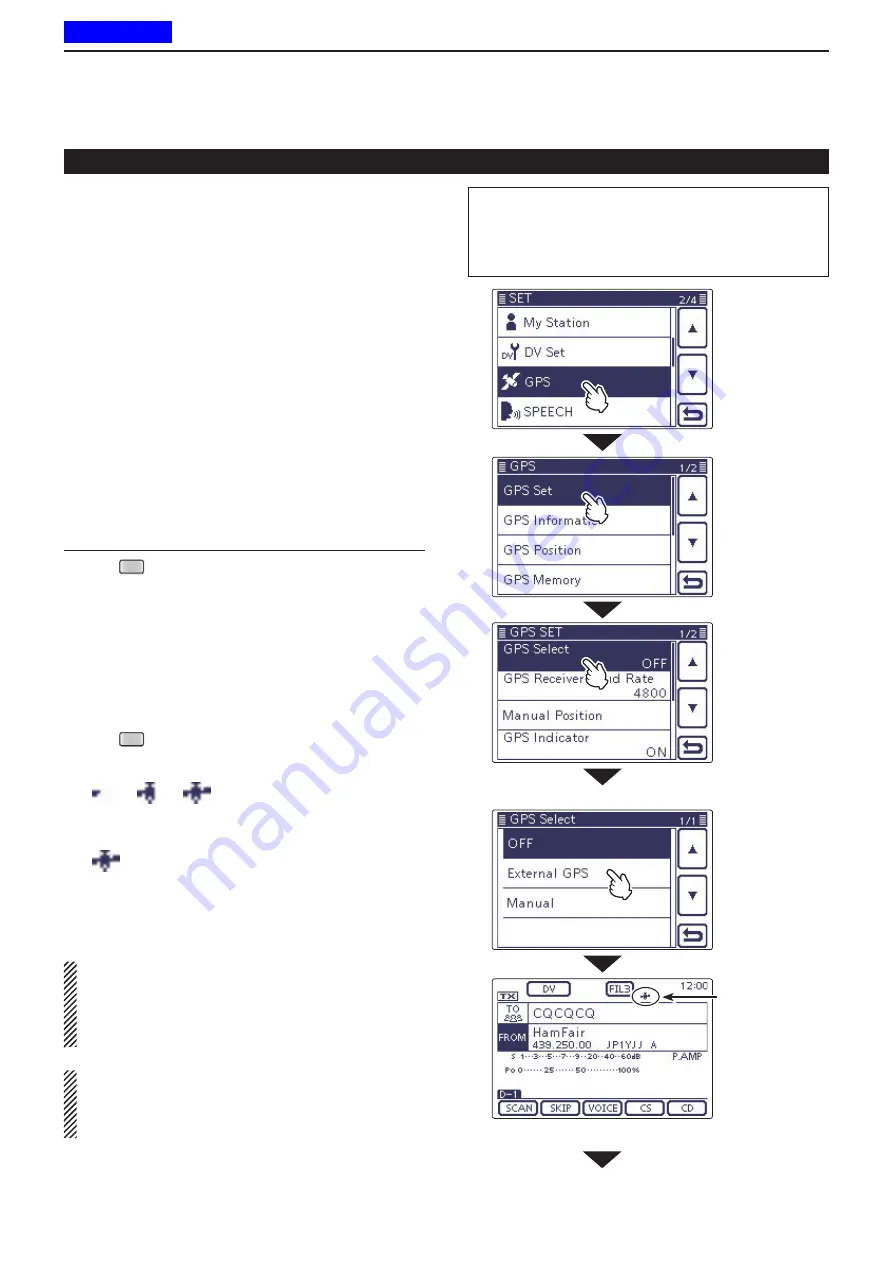
Receiving your own position from the GPS re-
1.
ceiver
Push
q
SET
(
C
) to select the Set mode.
Touch the “GPS Select” item of the “GPS Set” Set
w
mode.
GPS > GPS Set >
GPS Select
• If the specified item is not displayed, touch [
∫
] or [
√
](
D
)
one or more times to select the page.
Touch “External GPS.”
e
• When you know your position and operate as a base sta
-
tion, the Repeater Search function can be used if “Manu-
al” is selected.
Push
r
SET
(
C
) to save, and exit the Set mode.
• The GPS icon blinks when receiving data.
- If “Manual” was selected, the icon does not appear.
➪
➪
➪
(Disappears)
• The GPS icon stops blinking when valid data is re
-
ceived.
• It may take only a few seconds to receive. But depend
-
ing on the environment, it may take a few minutes. If you
have difficulties receiving, we recommend that you try a
different location.
If the “DATA 1” item in the “Connectors” Set mode is
set to other than “GPS” (default), set to “GPS.” (p. 17-
25)
Connectors > USB2/DATA1 Function >
DATA1 Function
Set the “GPS Receiver Baud rate” item in the “GPS”
Set mode, according to your GPS receiver. (Default:
4800)
GPS > GPS Set >
GPS Receiver Baud rate
“FROM” (Access repeater) setting (Continued)
Appears when
valid data is
received.
In the DR mode
“GPS Select” screen
Continued on the next page.
☞
The
L
,
R
,
C
or
D
in the instructions indicate the
part of the controller.
L
: Left side,
R
: Right side,
C
: Center bottom
D
: Display (Touch screen)
Previous view


