background image


14 

SI-323-N User Manual 


2.4  Setting the Jumpers 

Set up and configure your SI-323-N by using jumpers for various settings and 
features according to your needs and applications. Contact your supplier if you 
have doubts about the best configuration for your use. 
 

2.4.1 

How to Set Jumpers 

Jumpers are short-length conductors consisting of several metal pins with a 
non-conductive base mounted on the circuit board. Jumper caps are used to 
have the functions and features enabled or disabled. If a jumper has 3 pins, 
you can connect either PIN1 to PIN2 or PIN2 to PIN3 by shorting. 


A 3-pin jumper 

A jumper cap 

 
Refer to the illustration below to set jumpers.   
 

Pin 

Jumper 

Illustration 

Open 


1-2 

Closed 


2-3 

Closed 


When two pins of a jumper are encased in a jumper cap, this jumper is 

closed

i.e. turned 

On

 
When a jumper cap is removed from two jumper pins, this jumper is 

open

, i.e. 

turned 

Off


Pin#

1

2

3

1 2 3

1 2 3

1 2 3
Summary of Contents for SI-323-N

Page 1: ...SI 323 N Mid Range Digital Signage Player User s Manual Version 1 0 Jan 2020 ...

Page 2: ... to the products described in this document without prior notice Every effort has been made to ensure the information in the document is correct however IBASE does not guarantee this document is error free IBASE assumes no liability for incidental or consequential damages arising from misapplication or inability to use the product or the information contained herein nor for any infringements of ri...

Page 3: ...urer s instructions may cause harmful interference to radio communications WEEE This product must not be disposed of as normal household waste in accordance with the EU directive of for waste electrical and electronic equipment WEEE 2012 19 EU Instead it should be disposed of by returning it to a municipal recycling collection point Check local regulations for disposal of electronic products Green...

Page 4: ...al current may still flow Use neutral cleaning agents or diluted alcohol to clean the device chassis with a cloth Then wipe the chassis with a dry cloth Vacuum the dust with a computer vacuum cleaner to prevent the air vent or slots from being clogged WARNING Attention during use Do not use this product near water Do not spill water or any other liquids on your device Do not place heavy objects on...

Page 5: ...y from the date of shipment If the date of shipment cannot be ascertained the product serial numbers can be used to determine the approximate shipping date 3rd party parts 12 month 1 year warranty from delivery for the 3rd party parts that are not manufactured by IBASE such as CPU CPU cooler memory storage devices power adapter panel and touchscreen PRODUCTS HOWEVER THAT FAIL DUE TO MISUSE ACCIDEN...

Page 6: ...Chapter 2 Hardware Installation Motherboard Information 8 2 1 Installation Replacement 9 2 1 1 Memory 11 2 1 2 Mini PCIe M 2 Cards 12 2 1 3 WiFi 3G 4G Antenna Installation 12 2 2 Pin Assignment for DC Power Input Connector 13 2 3 Pin Assignment for COM1 RS 232 Port 13 2 4 Setting the Jumpers 14 2 5 Jumper Connector Locations on Motherboard 15 2 6 Jumpers Connectors Quick Reference 16 2 6 1 COM1 RS...

Page 7: ...PU Configuration 30 4 4 7 AMI Graphic Output Protocol Policy 30 4 4 8 Network Stack Configuration 31 4 4 9 CSM Configuration 31 4 4 10 USB Configuration 32 4 5 Chipset Settings 33 4 6 Security Settings 35 4 7 Boot Settings 37 4 8 Save Exit Settings 38 Appendix 39 A SDR and HDR Resolution Support 40 A 1 Maximum SDR Resolution Clone Extended mode 40 A 2 Maximum HDR Resolution Clone Extended mode 40 ...

Page 8: ......

Page 9: ...1 Chapter 1 General Information The information provided in this chapter includes Features Packing List Accessories Specifications Overview Dimensions ...

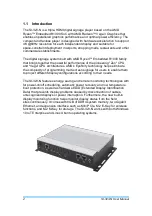
Page 10: ...technology helps eliminate the complexity of programming multi screen signage for users to enable them to project different display configurations according to their needs The SI 323 N features energy saving and remote monitoring technologies with for power on off scheduling automatic power recovery and low temperature boot protection as well as hardware EDID Extended Display Identification Data t...

Page 11: ...or your dealer if you need any VESA Mounting Bracket HDMI Capture Card 1 2 Features Segregated flow ventilation design intelligent energy saving Observer remote monitoring technologies AMD Ryzen Embedded R1000 series Vega GPU with up to 11 Compute Units 3 x HDMI 2 0 with independent audio output support Built in hardware EDID emulation function with the software setting mode 2 x DDR4 2400 SO DIMM ...

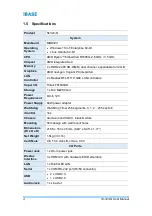
Page 12: ...I O Fintek F81846AD Storage 1 x M 2 M2280 slot Power Requirement DC In 12V Power Supply 84W power adapter Watchdog Watchdog Timer 256 segments 0 1 2 255 sec min iControl Yes Chassis Aluminum and SGCC black white Mounting Slim design with wall mount holes Dimensions W x H x D 215 8 x 164 x 45 mm 8 49 x 6 45 x 1 77 Net Weight 1 5kg 3 31 lb Certificate CE FCC class B cULus CCC I O Ports Power Jack 1 ...

Page 13: ...176 F Relative Humidity 10 90 at 45 C non condensing Vibration Protection Random operation 5grms 5 500 Hz All specifications are subject to change without prior notice Note The product performance relies on the system functioning as a whole The level of CPU APU GPU processor the interaction among the processor and the memory and storage bandwidth or the functionality of the digital signage applica...

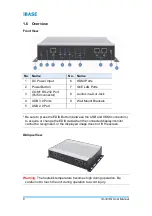
Page 14: ...Ports 9 Wall Mount Brackets 5 USB 2 0 Port Be sure to press the EDID Button between the USB and HDMI connectors to acquire or change the EDID data when the connected display monitor cannot be recognized or the displayed image does not fit the screen Oblique View Warning The heatsink temperature becomes high during operation Be careful not to touch the unit during operation to avoid injury ...

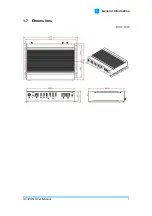
Page 15: ...General Information SI 323 N User Manual 7 1 1 7 Dimensions Unit mm ...

Page 16: ...8 Chapter 2 Hardware Installation Motherboard Information The information provided in this chapter includes Installation of memory M 2 and capture card Information and locations of connectors ...

Page 17: ...Remove the 6 screws as indicated below to remove the bottom chassis cover in order to install or replace the 1st memory module M 2 M2280 E2230 cards and HDMI capture card If you need to remove the motherboard install or replace the 2nd memory module move the jumper caps or replace the lithium battery you need to remove the 8 screws indicated below ...

Page 18: ...ndicated One memory slot can be seen at the right side The M 2 M2280 J13 E2230 J12 card sockets are on the left side To remove the motherboard or to install replace the 2nd memory the 10 screws indicated below need to be removed Indicated below is the optional HDMI capture card with its connector ...

Page 19: ...y slot down and outwards with your fingertips 1 Hold the memory module and align the key of the module with that on the memory slot 2 Gently push the module in an upright position unitl the ejector tabs of the memory slot close to hold the module in place when the module touches the bottom of the slot To remove the module press the ejector tabs outwards with your fintertips to eject the module ...

Page 20: ...work card with an M3 screw Mini PCIe M 2 2 1 3 WiFi 3G 4G Antenna Installation Thread the WiFi 3G 4G antenna extension cable through an antenna hole of the front I O cover and fasten the antenna as shown below Then apply adhesive to the edge of the hex nut behind the front I O cover to prevent the extension cable from falling if the cable becomes loose 1 Thread and fasten the hex nut and the washe...

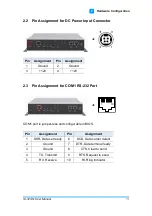
Page 21: ...round 2 Ground 3 12V 4 12V 2 3 Pin Assignment for COM1 RS 232 Port COM1 port is jumper less and configurable in BIOS Pin Assignment Pin Assignment 1 DSR Data set ready 6 DCD Data carrier detect 2 Ground 7 DTR Data terminal ready 3 Ground 8 CTS Clear to send 4 TX Transmit 9 RTS Request to send 5 RX Receive 10 RI Ring Indicator 10 1 ...

Page 22: ...ns with a non conductive base mounted on the circuit board Jumper caps are used to have the functions and features enabled or disabled If a jumper has 3 pins you can connect either PIN1 to PIN2 or PIN2 to PIN3 by shorting A 3 pin jumper A jumper cap Refer to the illustration below to set jumpers Pin Jumper Illustration Open 1 2 Closed 2 3 Closed When two pins of a jumper are encased in a jumper ca...

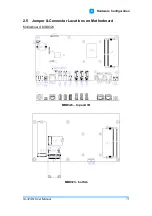
Page 23: ...Hardware Configuration SI 323 N User Manual 15 2 2 5 Jumper Connector Locations on Motherboard Motherboard MBD323 MBD323 top and I O MBD323 bottom ...

Page 24: ... Audio Line Out jack CN10 DC power input connector 1 CN11 COM1 RS 232 port 2 COM1 Power button SW1 Clearing EDID button SW2 Full Size Mini PCIe slot J7 SIM card socket J10 DDR4 memory slot J4 J11 M 2 E3042 slot J12 M 2 M2280 slot J13 Factory use only J1 J5 J14 J30 J31 1 Refer to 2 2 Pin Assignment for DC Power Input Connector 2 Refer to 2 3 Pin Assignment for COM1 RS 232 Port Be sure to press the ...

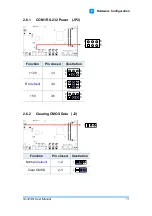
Page 25: ...r Manual 17 2 2 6 1 COM1 RS 232 Power JP2 Function Pin closed Illustration 12V 1 3 RI default 3 4 5V 3 5 2 6 2 Clearing CMOS Data J2 Function Pin closed Illustration Normal default 1 2 Clear CMOS 2 3 6 5 2 1 6 5 2 1 6 5 2 1 6 5 2 1 1 1 1 ...

Page 26: ...18 SI 323 N User Manual 2 6 3 System Fan Power Connector J8 Pin Signal Name 1 Ground 2 12V 3 Rotation detection 2 6 4 CPU Fan Power Connector J9 Pin Signal Name 1 Ground 2 12V 3 Rotation detection 1 1 ...

Page 27: ...19 Chapter 3 Driver Installation The information provided in this chapter includes AMD Radeon Graphics Driver Installation HD Audio Driver Installation LAN Driver Installation ...

Page 28: ...w ibase com tw Register as a member of our website to download all the necessary drivers and extract for installation 3 2 AMD Radeon Graphics Driver Installation 1 Run the Setup exe file 2 Accept the license agreement to continue 3 Choose either Express Install or Custom Install 4 When the driver is completely installed restart the computer for changes to take effect ...

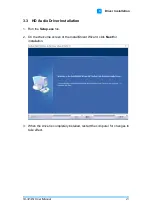
Page 29: ...nual 21 3 3 3 HD Audio Driver Installation 1 Run the Setup exe file 2 On the Welcome screen of the InstallShield Wizard click Next for installation 3 When the driver is completely installed restart the computer for changes to take effect ...

Page 30: ...allation 1 Run the Setup exe file 2 On the Welcome screen of the InstallShield Wizard click Next 3 Accept the license agreement and click Next to continue 4 When the driver is completely installed restart the computer for changes to take effect ...

Page 31: ...hapter describes the different settings available in the AMI BIOS that comes with the board The topics covered in this chapter are as follows Main Settings Advanced Settings Chipset Settings Security Settings Boot Settings Save Exit ...

Page 32: ...will continue with its test routines thus preventing you from invoking the Setup If you still need to enter Setup restart the system by pressing the Reset button or simultaneously pressing the Ctrl Alt and Delete keys You can also restart by turning the system Off and back On again The following message will appear on the screen Press DEL to Enter Setup In general press the arrow keys to highlight...

Page 33: ...ets the date Use the Tab key to switch between the data elements System Time Set the time Use the Tab key to switch between the data elements 4 4 Advanced Settings This section allows you to configure improve your system and allows you to set up some system features according to your preference ...

Page 34: ...sables BIOS ACPI auto configuation Enable Hibernation Enables Disables system ability to hibernate OS S4 Sleep State This option may not be effective with some operating systems ACPI Sleep State Selects the highest ACPI sleep state the system will enter when the SUSPEND button is pressed 4 4 2 IDE Configuration ...

Page 35: ...on resume delay Temperature Guardian Enables Disables the temperature guardian Schedule Slot 1 2 Sets up the hour minute for system powe on Important If you would like to set up a schedule between adjacent days configure two schedule slots For example if setting up a schedule from Wednesday 5 p m to Thursday 2 a m configure two schedule slots But if setting up a schedule from 3 p m to 5 p m on Wed...

Page 36: ... Manual 4 4 4 F81846 Super IO Configuration BIOS Setting Description Serial Ports Configuration Sets parameters of Serial Port COM Enables Disables the serial port and select an optimal setting for the Super IO device ...

Page 37: ...art Fan Control Disable or set fan control for CPU_FAN2 at 50 C 60 C 70 C or 80 C Temperatures Voltages These fields are the parameters of the hardware monitoring function feature of the motherboard The values are read only values as monitored by the system and show the PC health status CPU Shutdown Temperature Disables or sets system shutdown temperature to 50 C 60 C 70 C or 80 C ...

Page 38: ... 4 6 CPU Configuration BIOS Setting Description Node 0 Information Displays the memory information related to Node 0 4 4 7 AMI Graphic Output Protocol Policy BIOS Setting Description Output Selection Selects an output interface ...

Page 39: ...ration BIOS Setting Description Network Stack Enables Disables UEFI Network Stack 4 4 9 CSM Configuration BIOS Setting Description CSM Support Enables Disables CSM support Network Controls the execution of UEFI and Legacy PXE OpROM Options Do not launch UEFI Legacy ...

Page 40: ...ip change should be claimed by XHCI driver USB Mass Storage Driver Support Enables Disables the support for USB mass storage driver USB Transfer time out The time out value for Control Bulk and Interrupt transfers Device reset time out Seconds of delaying execution of start unit command to USB mass storage device Device power up delay The maximum time the device will take before it properly report...

Page 41: ...BIOS Setup SI 323 N User Manual 33 4 4 5 Chipset Settings BIOS Setting Description Sourth Bridge South Bridge parameters SB USB Configuration Options for SB USB configuration ...

Page 42: ...34 SI 323 N User Manual 4 5 1 SB USB Configuration BIOS Setting Description XHCI0 XHCI1 Ports Enables Disables XHCI0 XHCI1 ports ...

Page 43: ... User Manual 35 4 4 6 Security Settings BIOS Setting Description Administrator Password Sets an administrator password for the setup utility User Password Sets a user password Secure Boot Custimizable secure boot settings ...

Page 44: ...vated when it is enabled when the Platform Key PK is enrolled the System mode is user deployed and CSM is disabled Secure Boot Customization Customizable Secure Boot mode In Custom mode Secure Boot policy variables can be configured by a physically present user without full authentication Options Standard Custom ...

Page 45: ...535 0xFFFF means indefinite waiting Bootup NumLock State Selects the keyboard NumLock state Quiet Boot Enables Disables Quiet Boot option Boot Mode Select Select boot mode as Legacy or UEFI Boot Option Priorities Sets the system boot order UEFI Hard Disk Drive BBS Priorities Specifies the Boot device priority sequence from available UEFI hard disk drives ...

Page 46: ...fter saving the changes Discard Changes and Reset Resets system setup without saving any changes Save Changes Saves changes done so far to any of the setup options Discard Changes Discards changes done so far to any of the setup options Restore Defaults Restores Loads defaults values for all the setup options Save as User Defaults Saves the changes done so far as user defaults Restore User Default...

Page 47: ...the mapping addresses of peripheral devices and the sample code of watchdog timer configuration SDR and HDR Resolution Support AMD Eyefinity Multiple Displays I O Port Address Map Interrupt Request Lines IRQ Watchdog Timer Configuration ...

Page 48: ...p30 3 displays 2160p60 Single Channel 1 display 2880p60 4320p30 2 displays 2160p60 3 displays 1440p60 2160p30 A 2 Maximum HDR Resolution Clone Extended mode Dual Channel 2 displays 2160p60 4 displays 1440p60 Single Channel 1 display 2160p60 2 displays 1440p60 4 displays 1080p60 Note This is about the supported display resolution not related to the multimedia streams ...

Page 49: ...D Eyefinity Using Quick Setup B 1 1 AMD Eyefinity Quick Setup with All Displays This section describes how to set up AMD Eyefinity with the Quick Setup option where all the connected displays will be part of the AMD Eyefinity Display Group created As AMD Eyefinity Quick Setup creates an Eyefinity Display Group based on the current default display configuration ensure that the displays are arranged...

Page 50: ...ay configuration Note At the time of writing Advanced Setup for configuring Eyefinity is available However this feature is not supported Do not confuse with Try Advanced Setup see below picture which becomes available after Eyefinity Quick Setup is complete The Try Advanced Setup option is used to customize the Eyefinity Display Group created after Eyefinity Quick Setup is complete ...

Page 51: ...ange Displays Arrange the position of each display in the AMD Eyefinity Display Group Refer to the next section Arrange Displays after Eyefinity Quick Setup for details Try Advanced Setup Additional settings to customize the AMD Eyefinity Display Group Refer to B 2 Customizing AMD Eyefinity Using Try Advanced Setup for details Arrange Displays after Eyefinity Quick Setup To arrange displays in des...

Page 52: ...guring Eyefinity with only a portion of the connected displays is not allowed For example setting up 3 x 1 Eyefinity with 4 connected displays is not possible with Eyefinity Quick Setup The following example which sets up 3 x 1 Eyefinity Quick Setup with a total of 4 x 4k connected displays demonstrates the method to work around the limitation 1 Physically connect the displays to be used for the E...

Page 53: ...inity Using Try Advanced Setup Try Advanced Setup becomes available after Eyefinity Quick Setup is complete see above picture It offers customization for the Eyefinity Display Group created with options such as Position Windows Taskbar Arrange Eyefinity Display Group Resize Desktop Disable Eyefinity Display Group Adjust Bezel Compensation Customize Eyefinity Desktop Resolution B 2 1 Position Windo...

Page 54: ...once Radeon Additional Settings launches 3 Check the Position the Windows taskbar on a single display option and click Continue 4 To move the Taskbar simply drag and drop it to the desired display Ensure that the Taskbar setting is not set to locked 5 To have the Taskbar running across multiple displays again uncheck the Position the Windows taskbar on a single display option and click Continue ...

Page 55: ... Displays after Eyefinity Quick Setup Step 2 to 4 to complete re arranging the displays in an Eyefinity Display Group B 2 3 Resize Desktop When displays in an AMD Eyefinity Display Group are configured to use different resolutions rotations or alignments the desktop image may appear stretched or cropped In an AMD Eyefinity Group consisting of displays with mixed dimensions different sizes resoluti...

Page 56: ...displays in the group to the original display configuration To disable the Eyefinity Display Group 1 Click Try Advanced Setup under Eyefinity tab in AMD Radeon Settings after Eyefinity Quick Setup is complete 2 Click Disable Eyefinity Display Group once Radeon Additional Settings launches B 2 5 Adjust Bezel Compensation In an AMD Eyefinity Display Group the edges bezels of the displays may cause t...

Page 57: ...p size of an AMD Eyefinity Display Group to be changed to any resolution that is listed in the Custom Resolution drop down menu Once the desired Custom Resolution is chosen in Customize Eyefinity Desktop Resolution this particular resolution becomes available in the Operating System s display settings menu for selection To customize Eyefinity desktop resolution 1 Click Try Advanced Setup under Eye...

Page 58: ...ur displays and cannot be changed Use the Custom Resolution drop down menu to select from a list of supported resolutions 4 Select the preferred resolution from the Custom Resolution drop down menu and click Apply to save the setting 5 Open the Operating System s display settings menu to change the resolution to the Custom Resolution selected in Step 4 ...

Page 59: ... 0x000000A0 0x000000A1 Programmable interrupt controller 0x00000000 0x000003AF PCI Express Root Complex 0x00000000 0x000003AF Direct memory access controller 0x000003E0 0x00000CF7 PCI Express Root Complex 0x000003B0 0x000003DF PCI Express Root Complex 0x00000D00 0x0000FFFF PCI Express Root Complex 0x0000F000 0x0000F0FF Realtek PCIe GBE Family Controller 2 0x0000F000 0x0000F0FF PCI Express Root Por...

Page 60: ...00C6C 0x00000C6C Motherboard resources 0x00000C6F 0x00000C6F Motherboard resources 0x00000CD0 0x00000CD1 Motherboard resources 0x00000CD2 0x00000CD3 Motherboard resources 0x00000CD4 0x00000CD5 Motherboard resources 0x00000CD6 0x00000CD7 Motherboard resources 0x00000CD8 0x00000CDF Motherboard resources 0x00000800 0x0000089F Motherboard resources 0x00000B00 0x00000B0F Motherboard resources 0x00000B2...

Page 61: ...troller 1 10 Microsoft IRQ 4294967279 AMD USB 3 10 eXtensible Host Controller 1 10 Microsoft IRQ 4294967278 AMD USB 3 10 eXtensible Host Controller 1 10 Microsoft IRQ 4294967277 AMD USB 3 10 eXtensible Host Controller 1 10 Microsoft IRQ 4294967276 AMD USB 3 10 eXtensible Host Controller 1 10 Microsoft IRQ 4294967275 AMD USB 3 10 eXtensible Host Controller 1 10 Microsoft IRQ 4 Communications Port C...

Page 62: ...94967274 AMD USB 3 10 eXtensible Host Controller 1 10 Microsoft IRQ 4294967273 AMD USB 3 10 eXtensible Host Controller 1 10 Microsoft IRQ 4294967272 AMD USB 3 10 eXtensible Host Controller 1 10 Microsoft IRQ 4294967271 AMD USB 3 10 eXtensible Host Controller 1 10 Microsoft IRQ 4294967270 AMD USB 3 10 eXtensible Host Controller 1 10 Microsoft IRQ 4294967269 AMD USB 3 10 eXtensible Host Controller 1...

Page 63: ...TION IS PROVIDED AS IS WITHOUT WARRANTY OF ANY KIND EITHER EXPRESSED OR IMPLIED INCLUDING BUT NOT LIMITED TO THE IMPLIED WARRANTIES OF MERCHANTABILITY AND OR FITNESS FOR A PARTICULAR PURPOSE include dos h include conio h include stdio h include stdlib h include F81846 H int main int argc char argv void EnableWDT int void DisableWDT void int main int argc char argv unsigned char bBuf unsigned char ...

Page 64: ... Set_F81846_Reg 0xF5 bBuf start counting void DisableWDT void unsigned char bBuf Set_F81846_LD 0x07 switch to logic device 7 bBuf Get_F81846_Reg 0xFA bBuf 0x01 Set_F81846_Reg 0xFA bBuf disable WDTO output bBuf Get_F81846_Reg 0xF5 bBuf 0x20 bBuf 0x40 Set_F81846_Reg 0xF5 bBuf disable WDT THIS CODE AND INFORMATION IS PROVIDED AS IS WITHOUT WARRANTY OF ANY KIND EITHER EXPRESSED OR IMPLIED INCLUDING BU...

Page 65: ...1846_UNLOCK outportb F81846_INDEX_PORT F81846_UNLOCK void Lock_F81846 void outportb F81846_INDEX_PORT F81846_LOCK void Set_F81846_LD unsigned char LD Unlock_F81846 outportb F81846_INDEX_PORT F81846_REG_LD outportb F81846_DATA_PORT LD Lock_F81846 void Set_F81846_Reg unsigned char REG unsigned char DATA Unlock_F81846 outportb F81846_INDEX_PORT REG outportb F81846_DATA_PORT DATA Lock_F81846 unsigned ...

Page 66: ...ITY AND OR FITNESS FOR A PARTICULAR PURPOSE ifndef F81846_H define F81846_H 1 defineF81846_INDEX_PORT F81846_BASE defineF81846_DATA_PORT F81846_BASE 1 defineF81846_REG_LD 0x07 define F81846_UNLOCK 0x87 defineF81846_LOCK 0xAA unsigned int Init_F81846 void void Set_F81846_LD unsigned char void Set_F81846_Reg unsigned char unsigned char unsigned char Get_F81846_Reg unsigned char endif F81846_H ...

Reviews: